Resin Art is like Ogres

It’s got layers!

One of the things that I’ve learned so far is that when things don’t go your way, the answer is usually to add more layers (and time, sigh).

We (my BFFs and I) are going to participate in a one day small village Christmas market and I’m producing merchandise for this (i.e. I have an excuse to make a lot of resin stuff). As usually i have many ideas and sometimes they even turn out as planned, especially the second time.

First, a pendant you already know plus its failed forerunner:

Resin pendants

©Giliell, all rights reserved

As you can see, in the right one the leaf has been swallowed by the blue. Here I poured a layer of clear resin, added the leaf, and then poured the blue onto the wet resin. The best description here is “interesting”.

The rest is below the fold ’cause it’s a lot of pictures.

[Read more…]

Tree Tuesday

This week’s tree come to us from rq who says that she took the pictures while waiting for a light to change. It’s a wonderful talent to be able to see the beauty in an ordinary, everyday moment and then to use that moment to create art. I think the photos are serene and contemplative and I wonder if that reflects rq’s state of mind. Perhaps the artist will tell us in the comments below. Thanks for sharing, rq.

©rq, all rights reserved

©rq, all rights reserved

Making Kitchen Knives – Part 9 – Starting Again

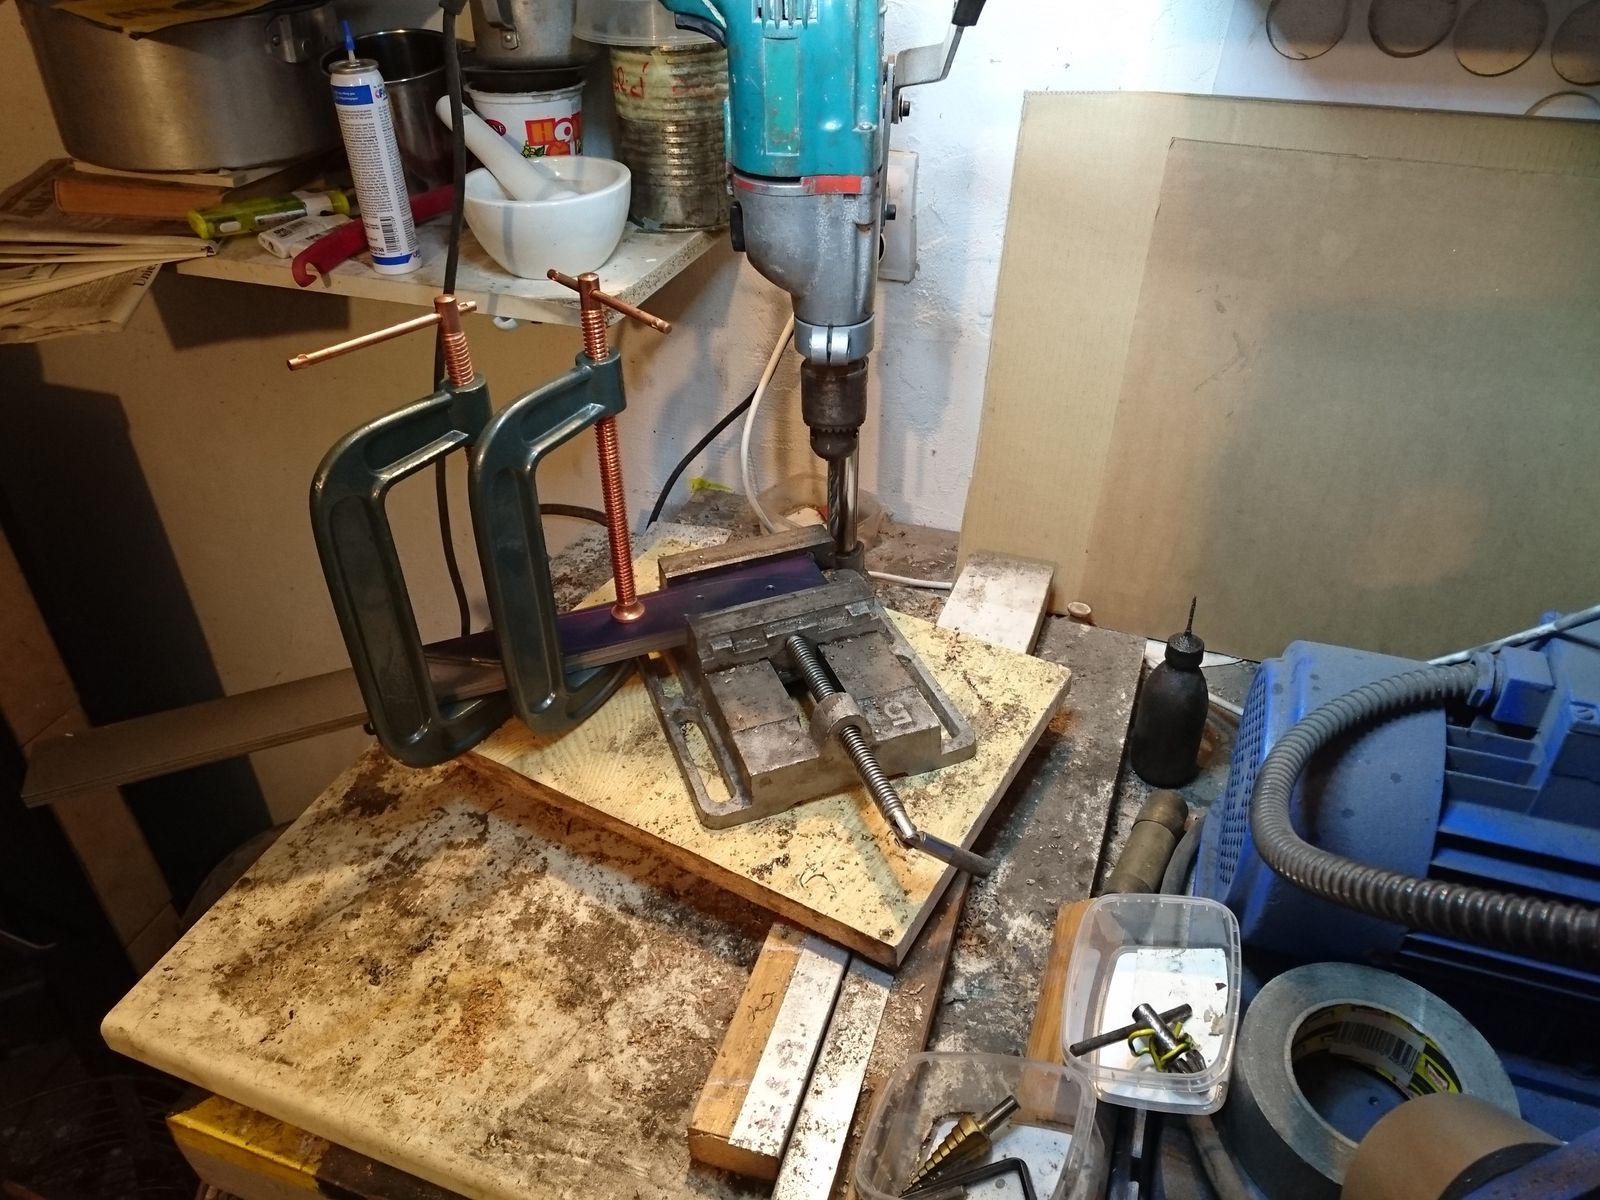
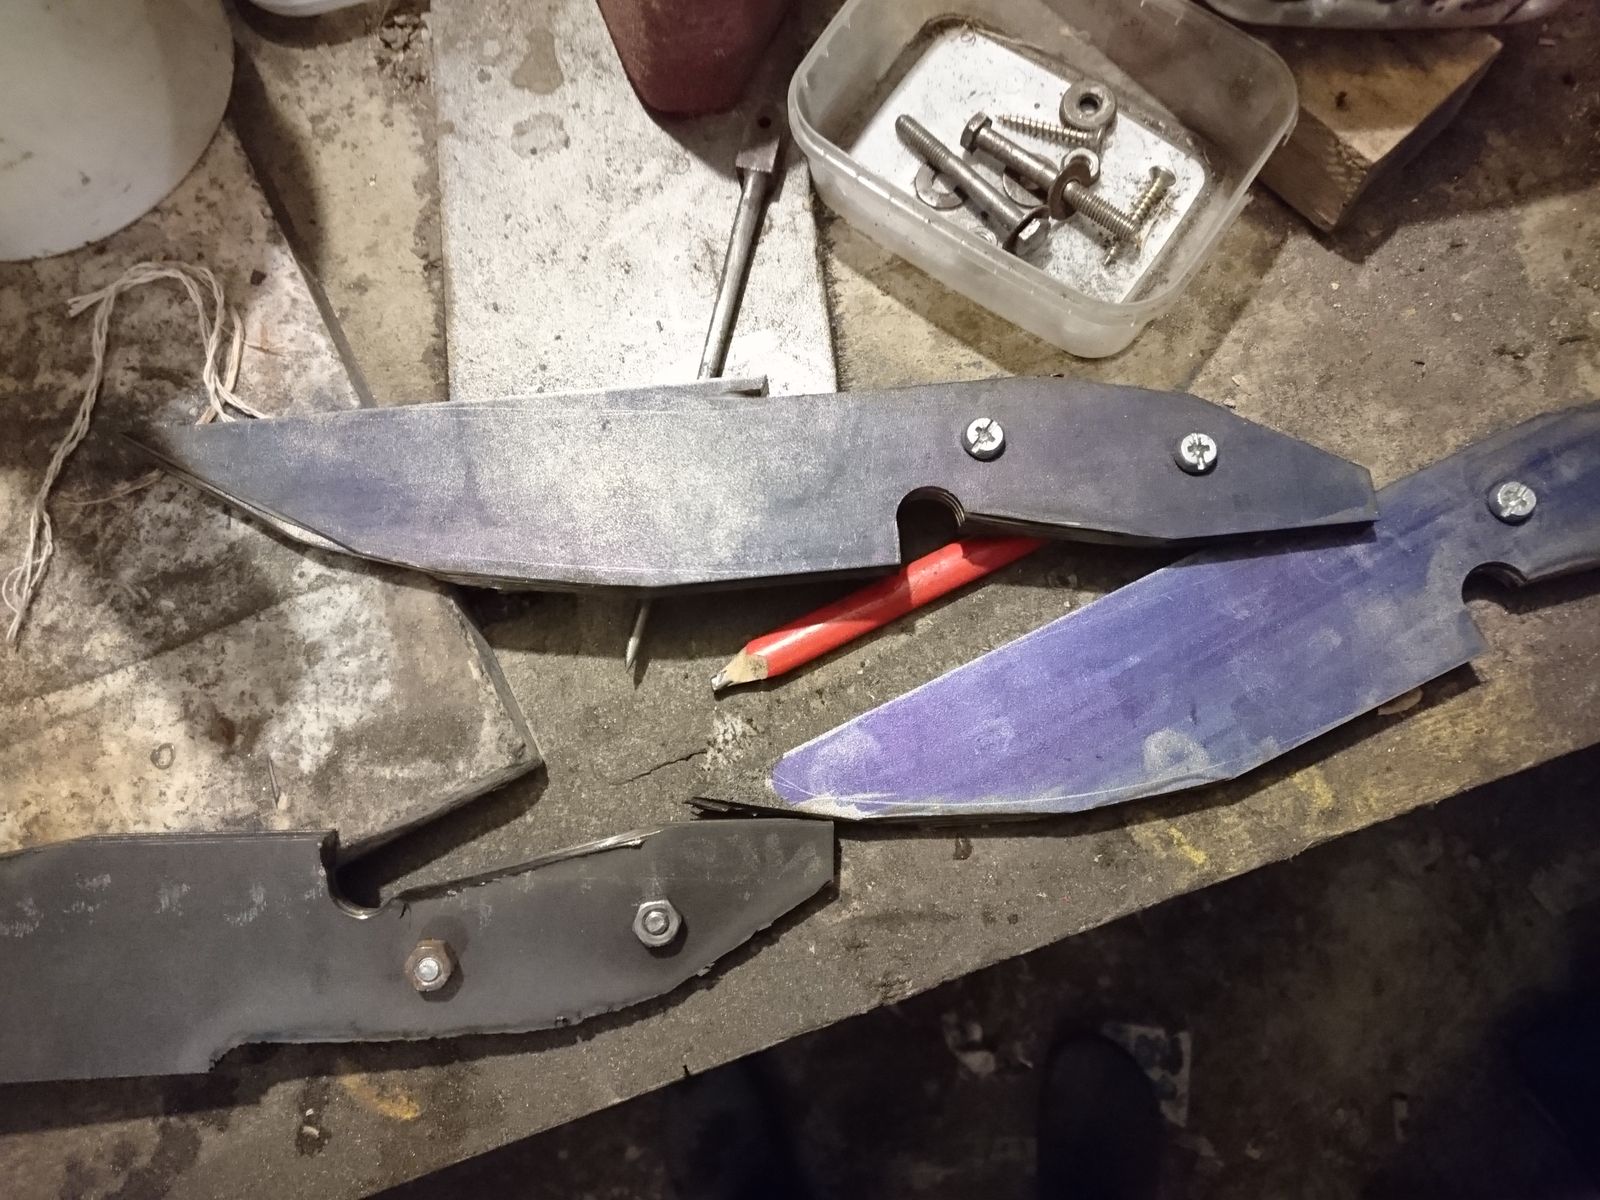
As I said last time, I am going to make multiple knives in parallel, because I think that a non-trivial amount of time can be saved just by that. I had all my steel already straightened, so I could go right away to drawing, drilling and shaping. First thing to be done was to draw and drill one blade on one half of one steel bar. That I have subsequently used as a template to drill holes in the other half and in all the other steel bars.

©Charly, all rights reserved. Click for full size.

For the drilling I clamped the template firmly with the drilled steel bars and before proceeding to the other side I inserted a steel pin in the drilled hole so the bars do not shift and slide. This has saved some time, despite it being a step with negligible time in the analysis, but my main hope here is that this work on multiple pieces in parallel brings better reproducibility regarding the hole positions and and that better reproducibility could save me some time later on when shaping the handle scales.

I have learned two lessons, one of them rather expensive. First lesson was that for this I have to take the 6 mm drill bits as de-facto consumable material, because I blunted and subsequently broke one towards the end despite using copious amounts of cutting oil. And I do not think it can be avoided.

Second lesson was that I really have to buy a new drill press, and preferably one with continuously regulated speed at that. My jury-rigged press with a very old hand drill has only two speeds and both of them are apparently too high for drilling 16 mm hole in 1,8 mm steel. Towards the end of the work the step drill bit overheated and it got irreversibly blunted on the 16 mm step. Ouch. That drill bit costs 40,-€. I think this investment is unavoidable, if I want to save time I cannot take the bit out and dunk it in water after each drilled hole, slower rotations would be better. And I cannot buy 40,-€ drill bit for each dozen of knives I make – that money be best saved for grinding belts. Hobby or not, at this rate I would spend the price of an acceptable small to middle sized drill press (300-400,-€) on the drill bits rather quickly.

Cutting the blanks in half and roughly cutting the outlines of the blades with an angle grinder did not take long at all. and working on multiple blades in parallel seemed to work comparatively well. But for the sake of precision, next time I will halve the blanks individually – two came out somehow too short and two too long. Not by much, but it is noticeable. The end result were three stacks of four roughly cut blades.

©Charly, all rights reserved. Click for full size.

Before this step took me 15 minutes per blade, now it was 10 minutes per blade (teasing out broken 6mm drill bit and fruitlessly trying to drill a hole with blunted 16mm drill bit included). So I would call it a semi-success. I learned some do’s and dont’s and I achieved my two goals – the holes in the tangs align across all 12 blades nicely and I have saved some time without even really trying to.

Bookbinding

One of our regular readers and commenters, Anne Cranky Cat Lady, makes journals by hand and she has kindly shared her latest project with us. Every journal is unique and Anne has chosen a lively and interesting range of papers so that each one is sure to please its recipient. Thanks for sharing, Anne. Your work is inspiring and I’m sure that everyone on your list will be thrilled to receive such a beautiful gift. I’ll let Anne introduce them.

This year’s crop of gift journals are finshed. Done, done, cleaned up after, done! 

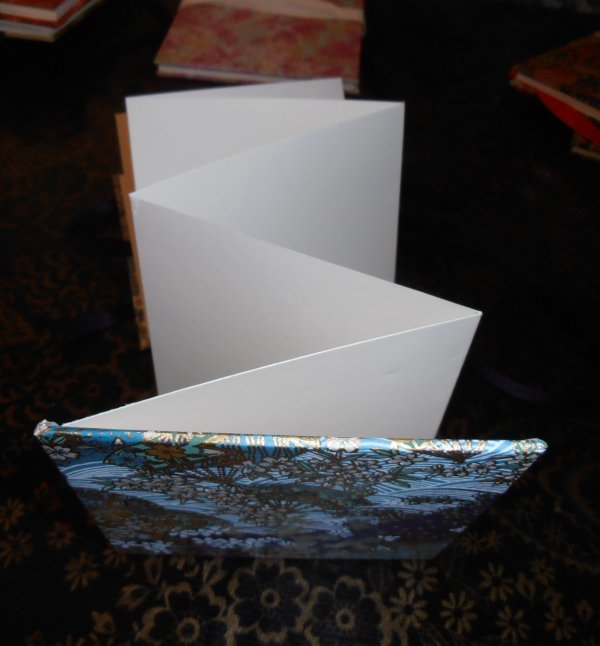
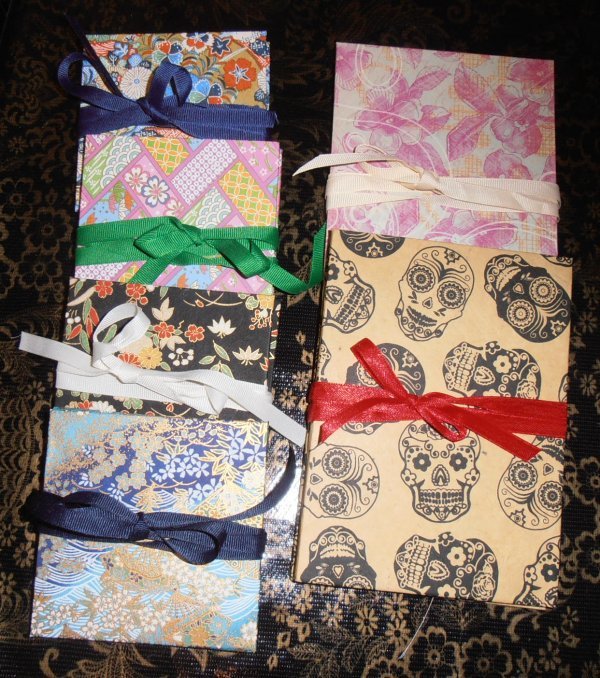
All but three which I made a few years ago were put together either last Friday or today. So you can see that they’re pretty quick. They’re made with Books by Hand kits or refill sets of boards and page blocks, assorted papers and ribbons, and, of course, lots of glue. The dimensions are small 4×4″, medium 5×7″, and large 4×8¼”.
The wood-grain one is going to Paul for our anniversary, the rest will be Christmas gifts or get stashed for later giving.


Small journal, open to show accordion page structure, ©Anne, Cranky Cat Lady, all rights reserved


Group 1 Small and Medium, ©Anne, Cranky Cat Lady, all rights reserved

Group 2 Medium and Large, ©Anne, Cranky Cat Lady, all rights reserved

Youtube Video: Medieval ASSASSIN’S CROSSBOW (Balestrino) ASSEMBLED & TESTED!

I could not decide between multiple videos, as usual, and last-minute decision fell on this one. It is a nice piece of engineering and the video is reasonably short and packed with interesting information.

It might also be Halloween appropriate? I have no clue, since I originate from and live in a country with no Halloween tradition whatsoever and honestly I do not understand what Halloween is supposed to be about at all. But I read something about murderers and monsters the other day, so maybe an (alleged) assasin’s weapon might fit in.

I have a day off and I planned to do some knife-work, but I have to pass on that since I am still not well.

Jack’s Walk

They’re watching me, ©voyager, all rights reserved

Happy Halloween.

We had a trick today instead of a treat. Jack didn’t have his surgery because they found enlarged lymph nodes in his rear legs which they biopsied instead. Once we have the results back in a few days we’ll see what to do next. He had blood work done less than a month ago and everything was normal so that’s good. He’s also been happy and playful so I’ll try not to worry… too much. In the meantime these are photos from Jack’s evening walk last night. This is the best dressed house in the neighborhood. Click through to see where the eyeballs lead you.


[Read more…]

Tree Tuesday

Our tree this week is a pear tree in full fall flame from kestrel who says,

We have no idea how old this pear tree is but it’s pretty old. It does still bear fruit, but this is not a great climate for it, as there are often late frosts that kill the blossoms. Even when it does bear fruit the pears frequently drop off before they can ripen. I suppose we ought to cut it down but it’s quite lovely in the fall when the leaves change color; just recently it fired up and looks wonderful for such a very old tree. 

Old trees have a stateliness and grace and this old pear tree is putting on quite the show this year. All of the photos are bright and beautiful, but the last one of just the leaves in sunlight is gorgeous. Thanks so much for sharing, kestrel.

©kestrel, all rights reserved

[Read more…]

Yes, I’ve been having fun

This resin stuff is great for messing around. What follows are a few things that went well, some that didn’t go that wll and some that are still work in progress.

First of all, the globes


Resin globes

©Giliell, all rights reserved

On the left you have a light globe with a small string of embedded fairy lights. Although the blue resin all rose to the top, I quite like it. This one’s so big that it released a lot of heat while curing. On the right there is the next attempt at a snowglobe. I like the results a lot. Glueing the ornaments to the wood and then inserting them was a good idea. I still hate the moulds. They are way too thin and easily separate. More on that later.

That was the rest of the resin Marcus sent, btw.

[Read more…]

Jack’s Walk

It has been raining here for days and even Jack is getting fed up. He doesn’t like the drops hitting his snout and he stops often to wipe his face on my pants. How special. The water does make some things look pretty, though. So here are some leaves on a pond.

©voyager, all rights reserved

©voyager, all rights reserved

Making Kitchen Knives – Part 8 – First Evaluation

First thing first – today I tested the very nearly finished knife when I was cooking shrimp for lunch.

©Charly, all rights reserved. Click for full size.

It handles well and cuts OK, but I really suspect it won’t hold an edge as well as it should. But the cheapo wood looks way more posh than I expected it, ammonia fuming really, really improved its looks.

And now to the boring stuff.

What I am doing here is actually a small-sized DMAIC project – an abbreviation for Define-Measure-Analyze-Improve-Control. It is a process used in industry to bring some logic and use of scientific method into improving manufacturing processes. Although as everything in today’s corporate culture it is used wrongly and heavily abused and misunderstood all over the place, because american-trained managers …. wheef, do not get me started on american-trained managers.

Aaaaanyway, in the first phase, Define, you should either define your problem or your goal or both. In my case, I have a specific goal – to get my manufacturing time of this type of knife under five hours of manual labor.

In the second phase you should acquire all measurements that you need in order to do something about it – in my case I have measured the manufacturing time of each distinct step in the process.

And now, in this post, I am performing the Analysis of said data. Total manufacturing time: 10:46, or 646 minutes.

A picture is worth a thousand words, so here is a picture.

©Charly, all rights reserved. Click for full size.

There are of course multiple approaches one might use, but in this specific case I think that this suffices ample enough – it is so-called Pareto Graph. The balks are actual times in minutes for each step, ordered from the highest to the lowest. The black line is a sum of the relative proportions of these times to the total as one progresses from left to right. As you can see, I have ten distinct manufacturing steps and from those five steps constitute 90% of manufacturing time. These are the steps where I have to concentrate on actually reducing said time, because here my efforts have the biggest payoff. That does not mean that improvements in the other five steps are not worthy pursuing at all, but they are not worth pursuing at this time.

I have done one thing that is not normally done, that is I sorted from get-go the steps into two categories – low hanging fruit, where I think I can do improvements without too much hassle and without obtaining expensive or complicated equipment, and high-hanging fruit, where I can save time only through acquiring new skill or new equipment or where I think saving time is not actually possible in a meaningful way.

Now comes the next phase, which is  to improve the process. I will try to implement some of the ideas for that I have expressed and make a batch of multiple (~10) knives with improved process. We will see how it turns out.

Macedonia 5 – Stillness

One impression that I was left with after my trip was a sense of… unfinished? The opposite of stillness. It’s hard to explain. The city of Skopje was such a mix of modern, ancient, renovated and decrepit, and through it all it was clear that Things were Happening, but… there was also a sense of organized chaos? I have a lot of question marks in my thoughts about the city, and the best I’ve been able to tell people is It was interesting. I think the one conclusion I will come away with is that there is no need for conclusions.

In any case, Skopje is full of statues – hollow statues – so many figures standing or sitting around or holding epic poses, it’s quite grand. And many of them are large! Immense! Makes you feel a bit small, to be honest. And the sort of grandiosity that puts me a bit on edge. Here’s a very, very, very tiny sample:

Alexander the Great, of course.
©rq, all rights reserved. Click for full size.

The view from under the arches of a medieval bridge… not even the oldest object around.
©rq, all rights reserved. Click for full size.

Upskirt photography at its finest.
©rq, all rights reserved. Click for full size.

The other side of the bottom of the previous statue – sitting around for ages!
©rq, all rights reserved. Click for full size.

A paeon to motherhood, I assumed – I might add that nobody was looking particularly thrilled.
©rq, all rights reserved. Click for full size.

I am frighteningly ignorant when it comes to good music from the region, though, so here’s Loreena McKennitt instead. I intend to work on my musical diversity.

Making Kitchen Knives – Interlude 1 – The Little Great Polishing Experiment

I will share with you a proper analysis of the acquired data, but I just finished a little experiment and I am too eager to share the results.

Without too big analyzing of anything, it is clear at even a casual glance that polishing is the most time-consuming part of the job. It is also the most boring part, in my opinion, because not much can be done and the opportunities for a mess-up are numerous. It is necessary to go through the laborious process for fancy knives, like Ciri’s dagger, but for a kitchen knife without any ribs or facets it is a waste of time.

For over twenty-five years, ever since I read about the technique in ABC as a kid, I wanted to try a process that goes under many names, “tumbling”  being probably the most known one. I have even mentioned the device for it in the article “The Handmade Dilemma” as a “polishing drum”. It is a technique that has been in use for thousands of years, literally – for example Bohemian Crown Jewels contain precious stones that were polished this way. And it has been tried and used for knife finishing both on commercial and hobby scale. All that it takes is having the polished things in a rotating drum where they tumble over each other, sometimes with the help of a polishing medium, sometimes without. A very simple machine, and had I lived by a stream I would build a water powered one years ago. Unfortunately I do not live near a stream and wind is too unpredictable so I am stuck with using electricity, and I have not got my hands on a motor with the right properties yet.

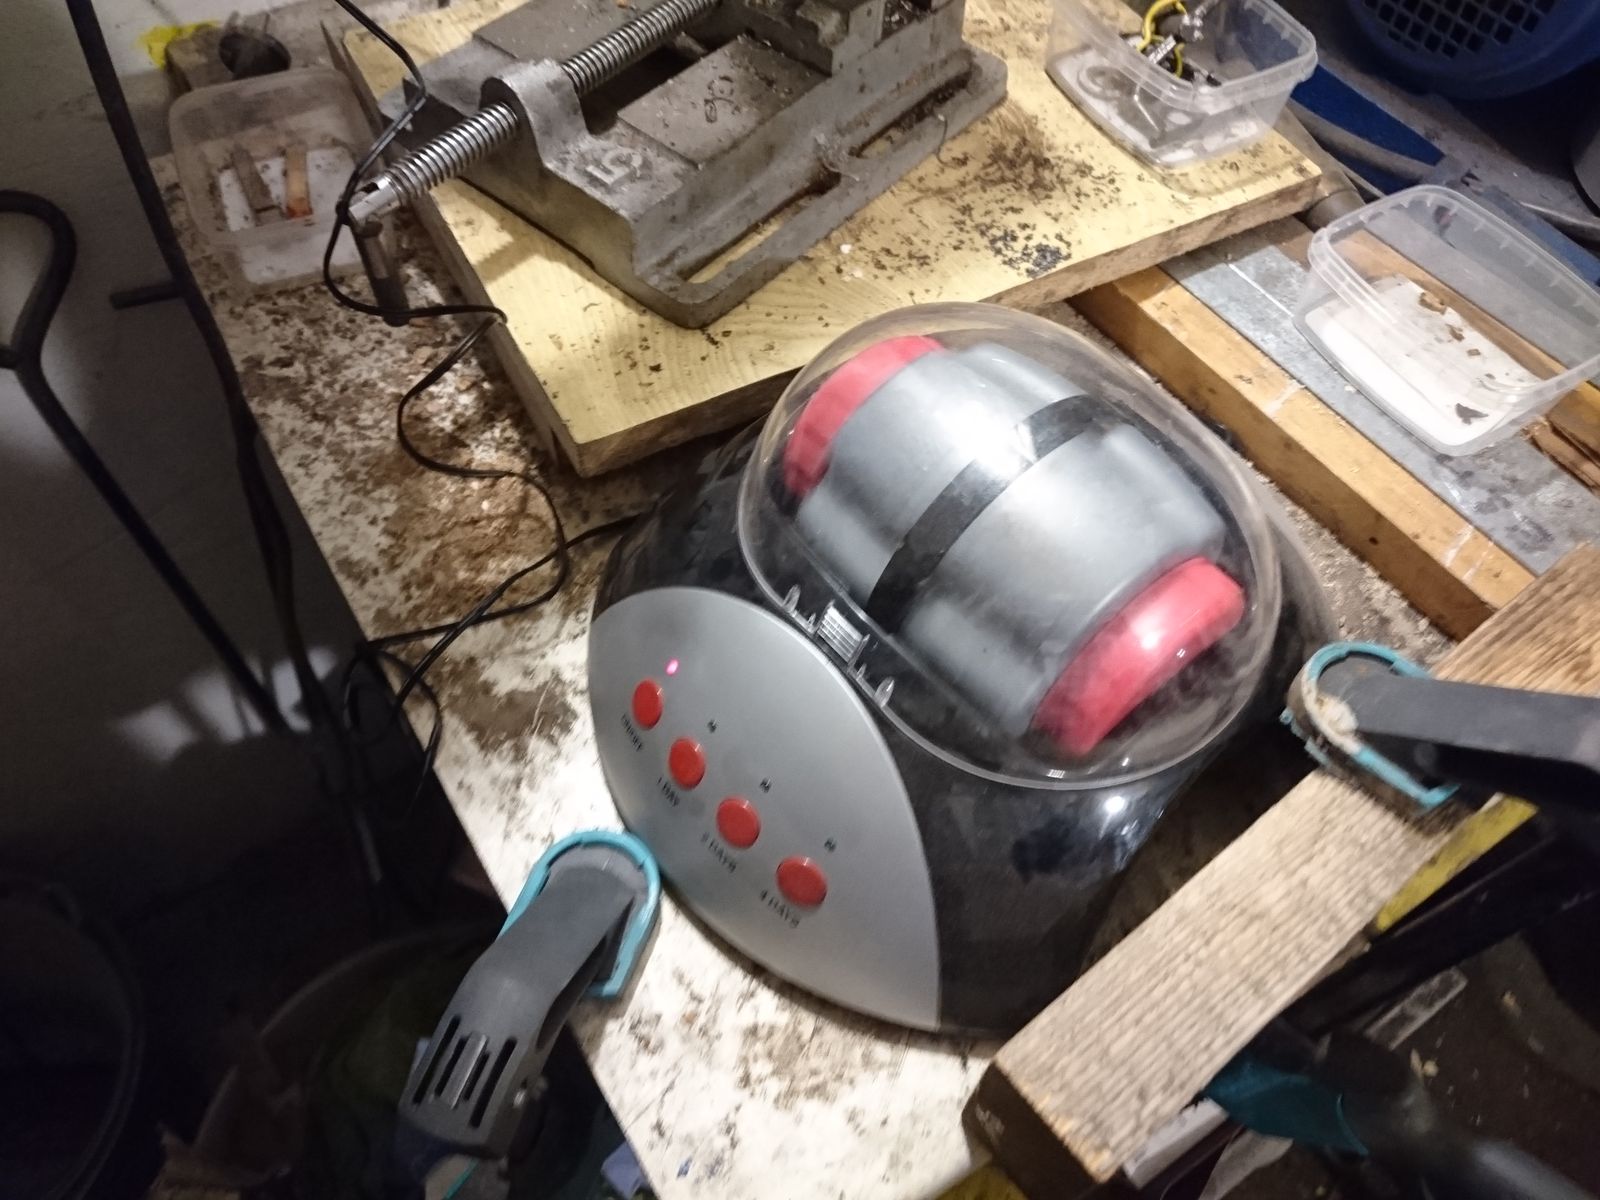
But I got lucky, my colleague has bought small toy tumbler for his son when he was little and they do not need it anymore, so he lent it to me a few months ago. As you can see, it is not big enough to hold a knife, not even a small one, so after I let it run with a few pieces of unhardened steel with very mixed and generally unsatisfactory results, it has collected dust again.

©Charly, all rights reserved. Click for full size.

But here was the second stroke of luck – I have bought a slab of high-carbon tool steel and I started to make myself a set of better hardness measuring gauges than the impromptu ones I have made from an old saw blade. I have already ground and hardened these little chisels to HRc 62,  and I only cleaned the two big facets and sanded them up to 150 grit – that is the grit up to which the grinding and polishing is relatively quick and the blade does not heat up too much. I was not intending to high-polish these, since that would be silly. But I remembered the lent tumbler and checked if they fit in – and the did!

So I chucked the blades into the polishing drum with a spoon of jeweler’s rouge and half filled it wiht crushed walnut shells, mixed it all up and let it run for one day. Bugger – it got blocked after unknown time and I only found out next day. So I started it again for one day. And the change in surface was remarkable. It was not polished, but the perpendicular sandpaper scratches were no longer visible and the surface has got a very nice satin sheen to it. But I like my blades mirror-polished, so I started it for another day. I took another chisel out and subjectively there was no change against the first day, so I assumed that this is as good as it gets (but I will let it run for one more day). But I also assumed that since there are no visible perpendicular scratches anymore, I can quickly buff it to mirror polish with the three buffing wheels that I have  – and I was correct.

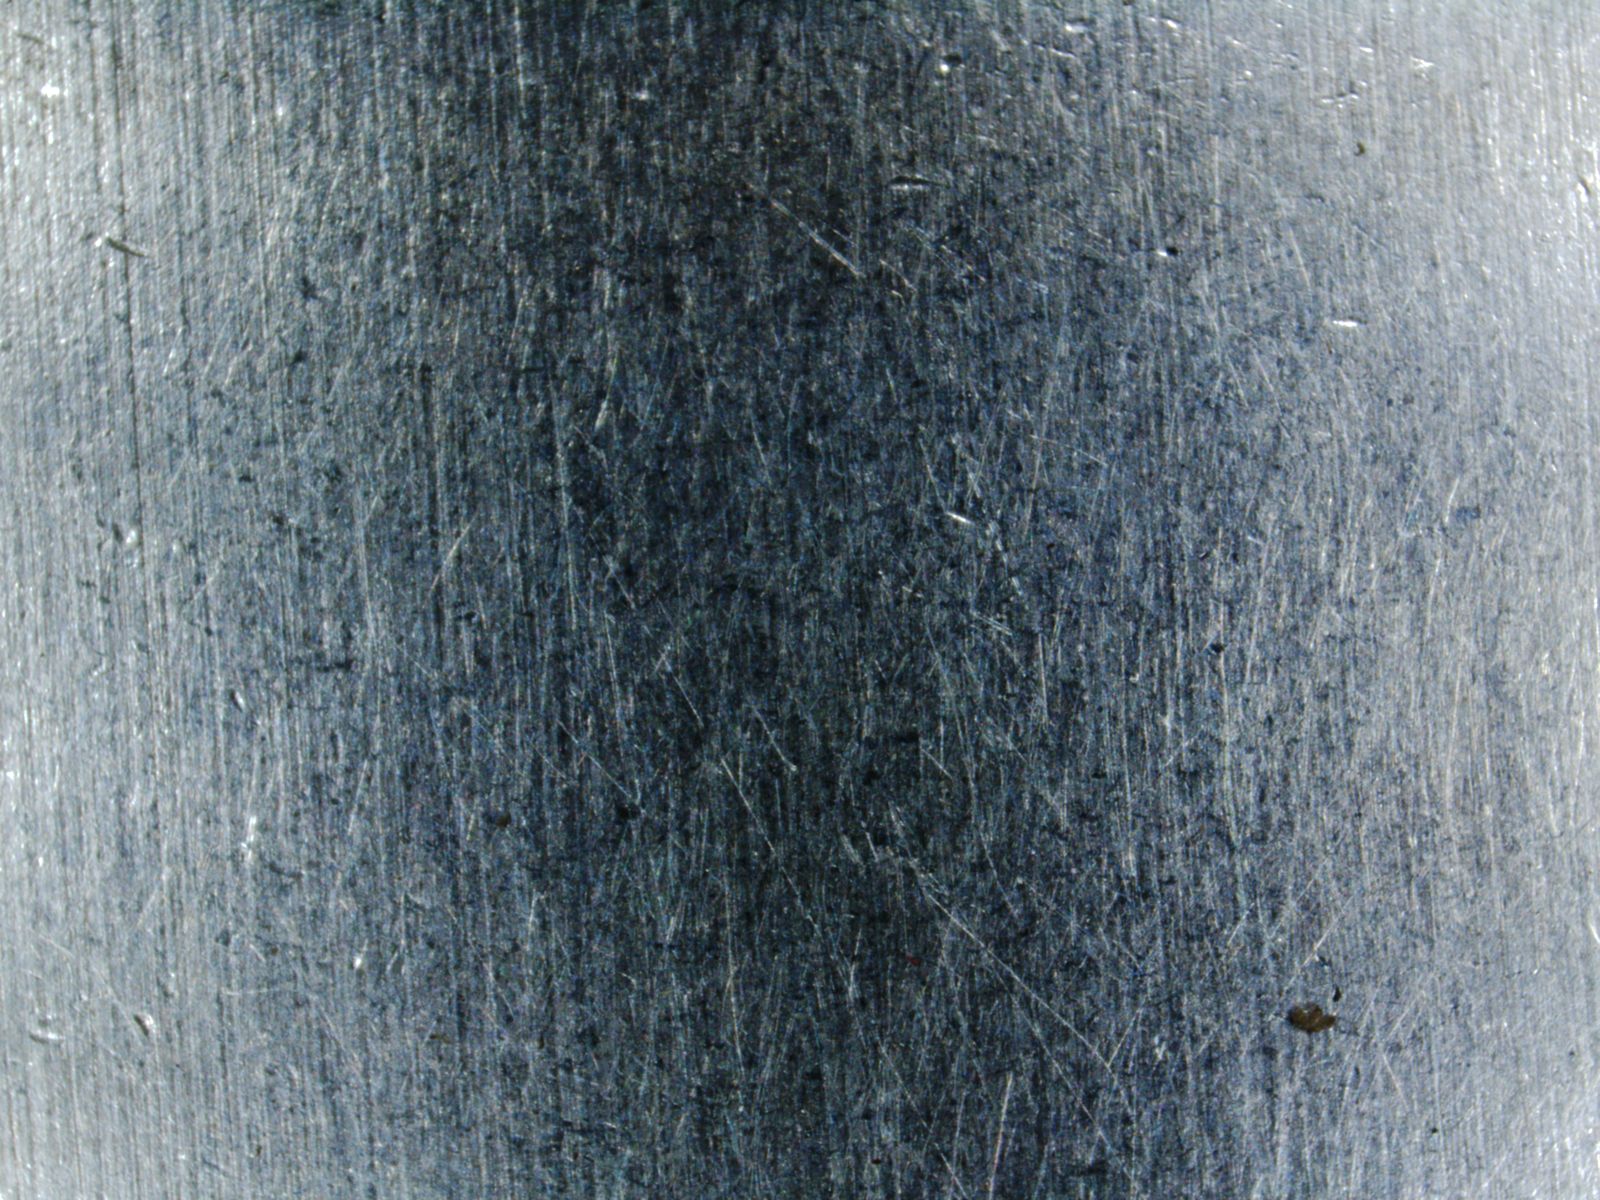
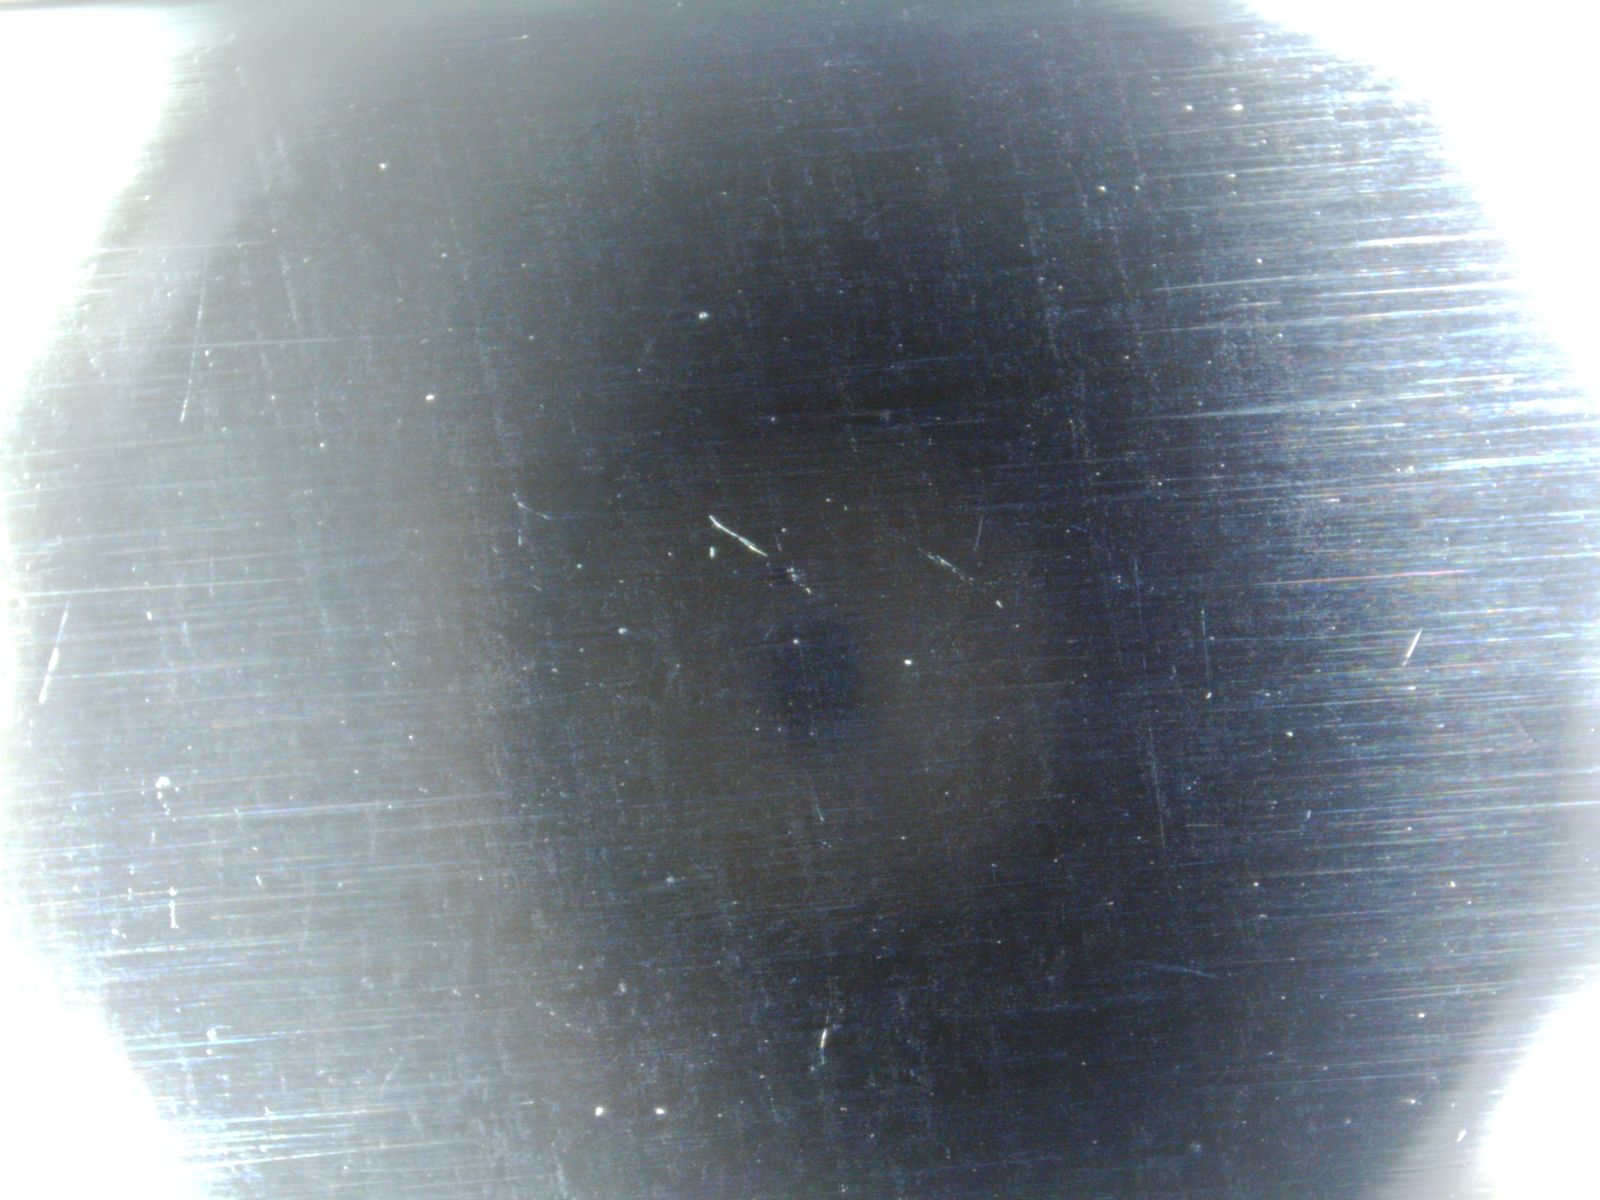
Here you can see four pictures taken with my digital microscope (courtesy of our quality department who tossed it away because they lost the installation CD – so I took it home and downloaded free software). Each picture represents a section approximately 10 mm wide in reality.

After 150 grit belt – parallel scratches perpendicular to the blade are very clearly visible.
©Charly, all rights reserved. Click for full size.


After one day, scratches from the sandpaper are no longer visible with the naked eye, but they are still visible under the microscope.
©Charly, all rights reserved. Click for full size.


After two days, the scratches from sandpaper are no longer visible even under the microscope unless you really look for them.
©Charly, all rights reserved. Click for full size.

And after just a few minutes with the set of buffing wheels the scratches are no longer visible and the surface is so polished that the microscope photographs itself.
©Charly, all rights reserved. Click for full size.