Once the blade is annealed, it’s time to haul it out and shape it, or “profile” it as some knife-makers say. Every part in the process is really important, because each permanently affects the ones following. Sometimes you can go back and correct something, but only at the cost of winding the clock forward again afterward.
What do I mean? Suppose you get something wrong in the blade profile and decide to fix it. You just get on the grinder and grind stuff away until it’s what you now want. But, when you did that, you just changed the relationship between the high part of the bevel and the edge of the blade. If you bring one piece of the edge in, you’ve created a ripple in the back-line (what the Japanese call the “shinogi”) – making a mistake like that on something the size of a katana means you wind up throwing the blade away. I have a pretty-looking tanto dagger blade on my bench but I screwed up the shinogi line so badly it’s only going to get worse if I try to correct it (and by “worse” I mean “thinner and shorter.”) I don’t know if I could illustrate this problem effectively by photographing it and, to tell the truth, it’s painful for me to even look at the thing.
All of that is to say that profiling the blade seems like it’s pretty straightfoward, but it sets the direction for the whole thing going forward, so it’s worth putting some thought into. I usually let my creative sense rule, here, looking for balance and proportion more than anything else.
You pull the blade-to-be out of the annealing tank and brush it off, clamp it into a vise, pick up an angle grinder, and clean up the outline. Pay careful attention the the edge and back, looking for hairline cracks that might indicate a bad weld. You cannot establish the edge so that it leads to a botched weld, or you’re just going to waste all of your invested time.
A couple of thing, here:
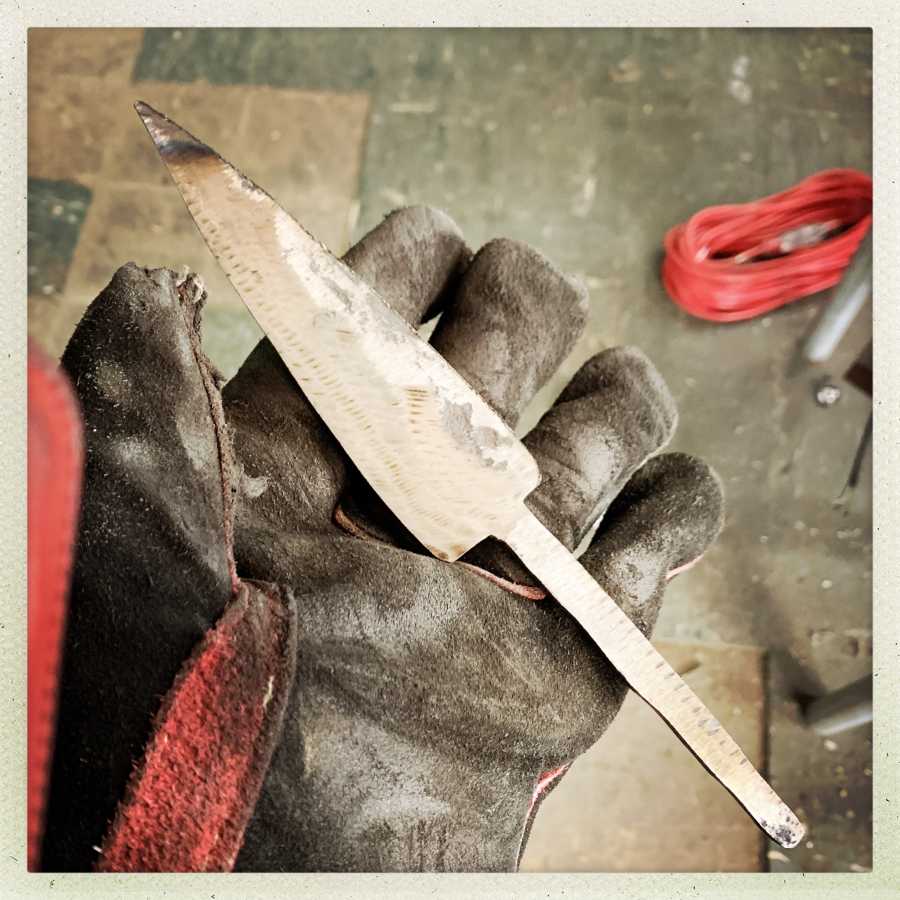
- There’s a little cut-back at the “heel” near the base of the blade. That is going to be problematic because it’s going to be impossible to sharpen that bit by the time the blade’s planes are done. There are two options: bring the whole edge in, or bring the shoulder down. Since the shoulders are nowhere close to even, at this stage in the game, I just plan to bring the shoulder down as part of evening it all up for the bolster.
- There are some big craters in the back of the blade. Those have to get ground out, which means that the whole side of the blade needs to be flattened down. At this point, you have to take a careful look and decide if there’s enough metal that you can do that. Or, you throw it away.
- The finish there is rough, since I just free-ground that using an angle grinder. The outside of the blade, at this stage, is covered with carbide (oxidized steel) and if you put it on a sanding belt, the carbide will eat the belt, not the other way around. Since a belt can cost $25 and a grinder wheel $5, it’s good to master the use of angle grinders before you go father. At this point, I can angle-grind a blade into shape almost to the point where I can go directly to quenching it without using a sanding belt except to check that large surfaces are flat. That is done by putting the large surface on the platen of the sanding belt and grinding it a bit to see whether it’s contacting the belt evenly at all points. The belt sander is you #1 flattening tool.

Some of these photographs are tricky and even stupidly dangerous. I did that with the blade held with one hand, against the sander, and my iPhone in my other hand. For one thing, that means my iPhone was being pelted with little bits of ceramic and carbide that were breaking off the belt. That will wreck the glass on an iPhone like nobody’s business. Also, since I wear glasses, I always wear a full face-shield when I am grinding. Sure, it protects my eyes but it also keeps my polycarbonate bifocal lenses, which cost a lot of money, from getting blasted into opaqueness with carbide. Always put a UV.0 filter over the lens of any camera you plan to take into a machine-shop – a chip of steel coming off a lathe will ruin a camera in a fraction of an instant. I’m not exaggerating – chips will sand-blast the aluminum housing of a phone, or a camera, too. Skin is remarkably resilient, you realize, once you notice that unlike all your other gear, it heals itself.
Heck, take a look at the thumb on the right hand glove in the picture above. That’s a heavy-duty welder’s glove that has brushed against the sanding belt, just slightly, a couple of times. It saved my finger from that treatment, which means it was worth it.

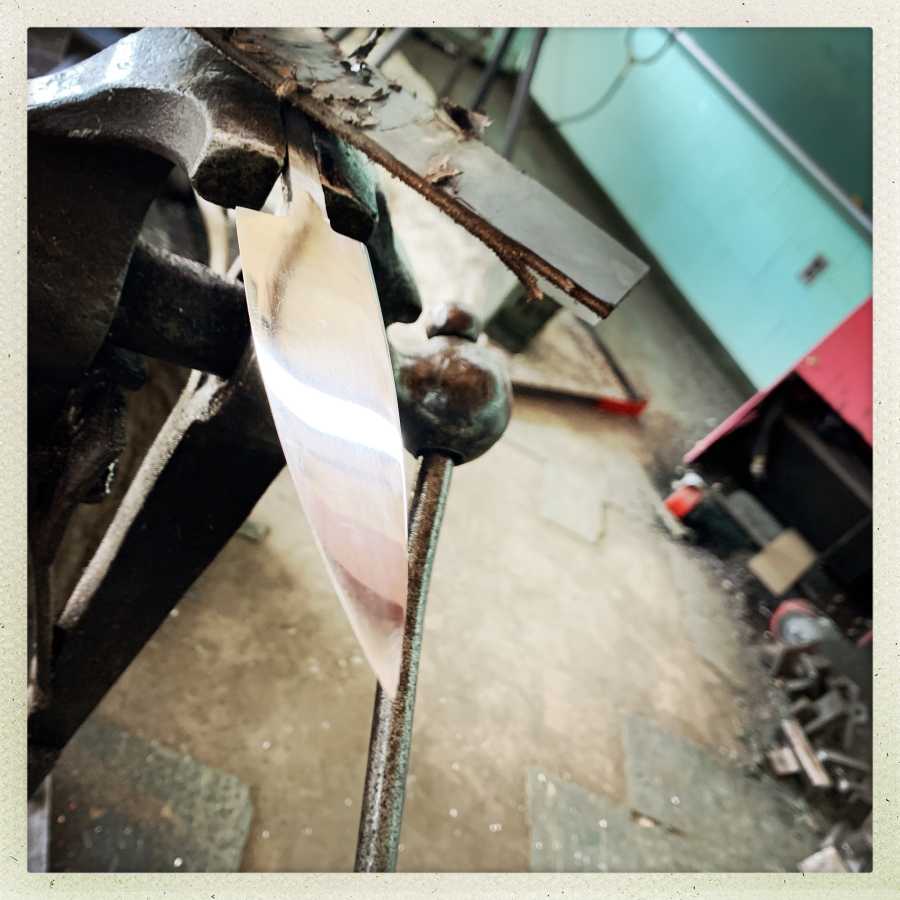
Flat profiled, you can really see what I meant about that problem-zone down near the heel. I put the surface flat on the platen and ground a few thousandths off and it didn’t even touch down there. I make a note to keep an eye on it, but mostly it’ll be OK so long as I grind the bevels so that they meet behind where that little declivity is. Since the blade is about 3/8″ (5mm) thick, there’s plenty of material to work with so it’ll be fine as long as I avoid screwing something else up.
Profiling a blade like that is quick work if you’re a good hand with an angle grinder. I think that you’re probably looking at about 1/2 hour of work there. (again, look at the left thumb on that welder’s glove!) The next steps are to thin the edge down and start the bevel, so that it’s thin enough to quench without there being too much hardened material to have to grind away. Since I’ve got a pretty hefty belt grinder, I don’t worry too much about that – I’d rather not deal with the agonizing and frustrating issues you get when you try to quench a blade that’s too thin. Especially with damascus that has different metals in it – the different heat/cooling expansion of the metals means that a twist damascus blade like this is trying to untwist itself when you quench it. Not much, but every bit counts. The trade-off is: the thicker you leave it, the less it bends, but the more you get to grind glass-hard steel. Hard steel is a whole different animal to grind than nice soft annealed steel. Normally, I’d differentially quench the blade, like the Japanese do, by insulating the back with clay at the quench, so it doesn’t harden, but that forms a temper-line (“hamon” in Japanese) which wouldn’t look right on this knife – the temper-line would interfere with the twist pattern and its coloration.
There’s one more step before proceeding to start setting the bevel, and that’s to see if there are cracks in it. A super easy way to check for cracks is to put the blade in etching solution (which also lets you check the pattern) and rinse it and wipe it down. If there are cracks, etching solution will remain in the cracks and in 2 days you’ll have little rusty lines on the blade. Then, you throw it away and start over. Have you noticed that there are a lot of nodes on the knife-maker’s flow chart labelled, “throw it away, GOTO 10”?

Two days later, there are no rusty lines. You’ll notice that, at some point, I straightened the shoulders of the blade but left a ramp there to keep it from forming a stress zone.
Next it’s time to start thinning the edge and establishing a bevel. This is a pretty simple straight grind: you just remove the steel until it’s evenly flat along the edge.
Around about there, I looked at the grind and some pictures of old Scottish sgian dubh, and thought that the grind-line was a bit too Japanese. I’m making a light little slicy murder weapon for a highlander, not a body-dismembering battle-blade for a samurai. Having that thicker line down the middle of the blade would support the edge and tip better if this thing was going to hammered through armor but I believe it’s intended to slice woolens and linens. It’s also a lot of fraught work to fix the grind at this point. But, what you do, is you set the knife on the belt against the platen, where the contact-point is right on the ridge-line, and then you grind that sumbitch away. When that’s done, your bevel is flat, right? That’s what I mean about rolling the clock backward and forward: grinding that ridge-line away meant going back to an 80-grit belt to move the material, which meant that I had to re-do my foundation polish on both sides, since I had just ground them off.
Because I wanted to not fumble the quench, I have no pictures of that, since I didn’t want to be waving around a phone while I was managing the heat-balance in the blade. So, I quenched it and it came out nice and hard and straight, and I softened the spine and tang a bit with a propane torch while it was held in a vise (to keep it straight) Then, it was into the oven in my kitchen for 2 hours at 400 degrees. [If you drop a blade, fresh from the quench, onto a concrete floor, it’ll shatter like glass. Yes, I have done that. And no, I don’t want to talk about it.]
The next morning, it’s back to grinding, except now with attention to flatness and evenness, and running up the grits. 36 grit to 80, 80 grit to 120. 120 grit to 220, 220 grit to 400. 400 grit to 600 grit.
That’s around 400 grit:

Then it’s time for some hand sanding. 600 grit gives way to 800 grit, 1000 grit, 2000 grit, 3000 grit.
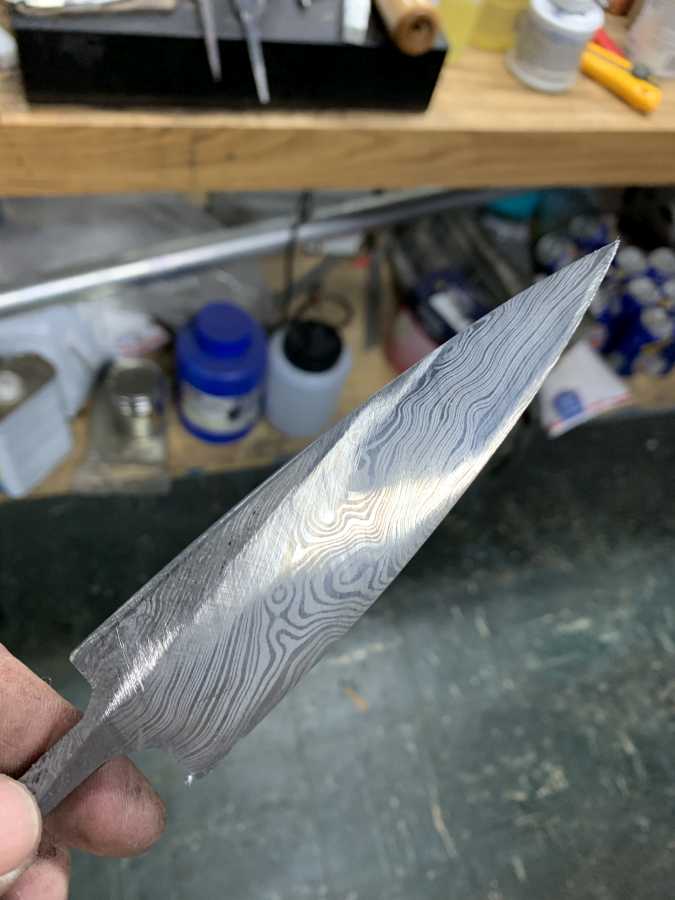
Around 3000 grit you’re entering the “near mirror polish” range. Lately I have been playing with a very fun thing. I can’t wait to do some “show and tell” with this stuff next time I go out to Dragonfly Forge; I am going to blow sensei’s mind… So, introducing polycrystalline synthetic diamond abrasive. It’s synthetic diamond dust where the grains are not single crystals, so as the grit is used, it shatters into smaller crystals, ad nauseam. You can start off with an abrasive dust that is effectively around 3000 grit and just rub away at some steel and, as you keep rubbing, the abrasive gets finer as the surface does, too. Since it’s diamond, it chews even hardened steel as if it’s butter. So when I have a blade at the point where it’s around 3000 grit and I think it’s done, I spray it with Windex, put a smidgeon of the polycrystalline diamond on it, and rub it with a piece of heavy leather glued to a polypropylene block. The results are weird: for a few seconds the blade goes all cloudy, then after about 30 seconds of rubbing, the clouds seem to rub off and then the blade looks really weird.
In this case, the blade started to look orangey brown, because it was reflecting the wood of the ceiling. It’s a sudden, remarkable, almost magical transition.

Now, I need to think about the handle.
At this point, progress ground to a halt for over a month and a half, while the blade sat on the bench.
I love reading about this, I can’t wait for the result.
A minor nitpick – the blade is not covered with carbide, but with magnetite if it is ordinary steel, and in your case probably some boron compounds to since it is damascus and you have used borax as flux. Those are hard as glass and will destroy belts for sure, but from carbon steel they can be removed by the use of a vinegar bath. I have tested this on one of the steel cable bars you have sent to me. After two days in vinegar about 90% of the oxidated layer rubbed off with a handheld steel brush easily.
A radius between the tang and the blade shoulders is great for avoiding stress concentration. A ramp following approximately the hyperbola curve is even better.
Fascinating. I’ve never much considered the geometry of my knives, but knifemaking seems very mathematical in nature. Like some weird combination of math, chemistry and art. The skillset required to master knifemaking is certainly broad!
I often wonder how humans first learned how to do this stuff.
That’s shaping up really nicely.
I love seeing the grain emerge as the polishing continues. If it were me I’d have a hard time stopping the polishing.
For taking pictures, perhaps a 35mm digital camera on a tripod with a built-in timer and a telephoto lens would be helpful. Set up your shot before you perform your next step, set the timer and then take your work position, keeping in mind the position of body and hands in relation to the camera’s line of sight. You could even use a normal (50 or 55mm) lens with a cable shutter release that you can hold while keeping both hands on your work. Don’t know if that will work for you, but it’s definitely safer.
Re polycrystaline diamond. There is a similar stuff called Yorkshire Grit (or abrasive paste) used for polishing wood on a lathe. Starts off quite abrasive but breaks down to (I think) about 1200. Lovely finish.
derferick@#6:
Recipe for yorkshire grit:
1 part diatomaceous earth
2 parts mineral oil
1/4 part beeswax
Warm in a microwave, mix, pour into container. I use hemp oil instead of mineral oil. Sometimes I add a few drops of linseed oil.
Another trick is to soak the above mix into cotton twill pads (military bandages or gun cleaning patches) then dredge them with diatomaceous earth.
The little bitty diatoms break down to dust just like the diamond crystals. I haven’t tried it on a blade because compared to hardened steel they probably don’t cut very well.
Charly@#1:
A minor nitpick – the blade is not covered with carbide, but with magnetite if it is ordinary steel, and in your case probably some boron compounds to since it is damascus and you have used borax as flux. Those are hard as glass and will destroy belts for sure, but from carbon steel they can be removed by the use of a vinegar bath. I have tested this on one of the steel cable bars you have sent to me. After two days in vinegar about 90% of the oxidated layer rubbed off with a handheld steel brush easily.
I need to try that. Leaving it in ferric chloride will also strip the oxides pretty well, too. I worry about too much vinegar or etchant attacking the thin regions of carbon in the welds. I saw some wrought iron a guy left in chloride for a week, by accident, and it looked like rotten plywood. I’ve been meaning to make up some test goobies that I can destructively experiment with.