There are traditional ways of making a blade, which have been figured out at great expense over 1000+ years.
A lot of steps were prior to this. In this case, I had a good chunk of welded wire rope that I had hot-folded three times so it’d have an interesting but not “obviously cable” grain. Then I drew and flattened it, cut it in half, ground it clean, and took a chunk of low layer twist 1095/15N20 and layered the whole thing into a 3-layer billet. That forge welded down pretty cleanly (yay!) and it wanted to be a tanto blade so I went with it. I think my original plan was to split it and make two cooking knives. The plan is that the twist would peek out from behind a curtain of cable. It ought to be pretty cool, right?

That was midway through forging it; I hammered some bevels in and cleaned it up considerably before putting it in the annealing bin to cool.
Then came about 3 hours of rough-shaping it with an angle grinder, a file, and my belt sander. It was starting to look pretty good, actually! The outer jacket of cable is still completely covering the inner cutting edge material.
To keep things from getting wobbly, I usually rough-shape the edge down to about the thickness of a penny or thereabout. But it depends on the blade. In this case, it’s got a good thick back (combat knife) so I don’t expect much deflection to happen and flat-grinding the bevels will take care of that.
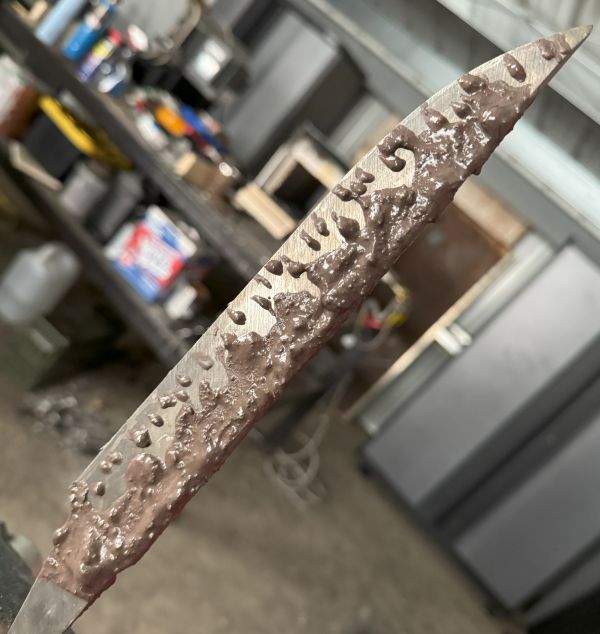
I decided to go for a dramatic temper line, even though I didn’t actually expect much of one to form or be visible, because there was already a lot of visual action going to be going on in and near the edge. That’s a mix of fire clay, refractory cement, volcanic ash, and iron oxide. I left it to dry overnight and the next morning I did the whole routine of heating the mass evenly, letting it soak in the heat a while, and then dunking it in some nice cold Parks#50 quench oil. Traditional Japanese process at this point would be to go into water but I went with the Parks because it’s less likely to cause cracks.
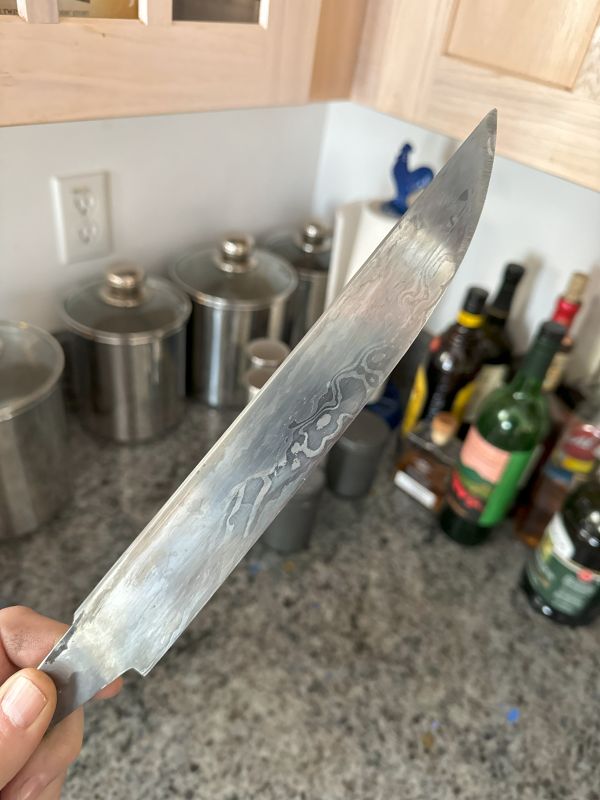
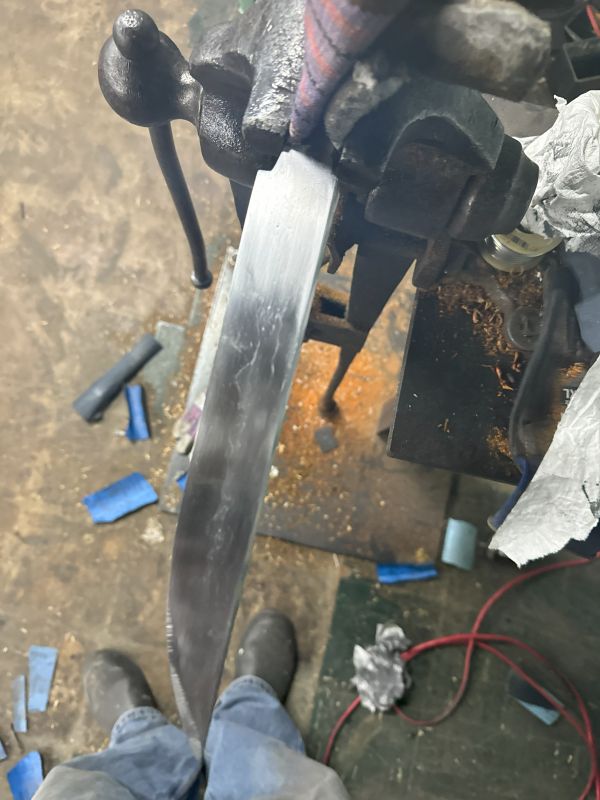
Now, the edge is glass hard and it’s time to take it back to the grinder and start to make the bevel for the edge. It’s not a completely straight bevel because, as a dagger, you want some thickness at the tip to support the stabby stabby, but it’s mostly flat on the sides. Here you can clearly see the low layer twist starting to stick out from behind the cladding of cable.
Around now I start thinking “this may be tacky, for a dagger. should have done cooking knives.” But that’s what that is, so it’s still starting to look pretty darned good.
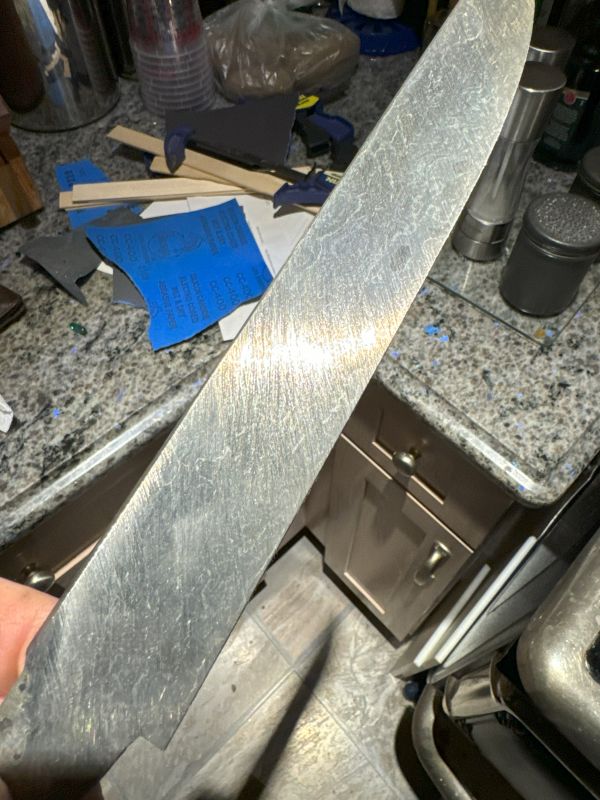
The next stage is a trick I have come to really like, which is using a woodworker’s 6×48″ belt sander with an 80 grit belt to shape down the flats. Wow, does that thing make flat flats! It’s pretty quick, too, comparatively. From this point on, we are no longer “fine shaping” and are into “finish grinding” which means worrying (a lot) about getting scratches off the surface. I use the big belt at 80, 120, then 400 grit, by which time the edge is basically “wafer theen” and nearly sharp. In the Japanese tradition you don’t “sharpen” a blade – you set the bevels up and polish them down and the meeting point will become sharp as part of the polishing process. That means you start off with a pretty thin edge already and by the time you’re moving it to around 400 grit, if it catches on the belt somehow and the blade yanks, your finger may well yank along with the blade instead of staying with you. In this process there comes a definite moment when you think “OK I think I don’t want to be using machine tools on this, any more.” Really. I know some smiths who wear kevlar gloves with nitrile/rubber fingertips starting around the “wafer theen” part of the process, but I prefer to be constantly conscious of my edge holding and where the blade will go if it catches.
I should mention around now that “catching” is extremely unlikely. The sanding belt is smooth enough that the grit won’t grab the steel, and the steel is smooth – the general sensation is more like you’re gliding it across a really big strop. But. But. What if the belt tears? Then the belt will catch the blade and wrap the whole mess into the belly of the beast and you don’t want your hand to be part of that. So, you hold it carefully and accept that if the belt tears, the blade may launch across the room and then it goes in the Fucked Box.
I don’t actually have a Fucked Box in my shop but when I get out through the snow I’m going to stop and find some kind of trunk or crate that I can label accordingly, and set up at the shop. Currently I have a Shelf of Shame and Woe, which has about a half dozen failed experiments dating back to (?) 2017 or so. But it’s not a very big shelf and I probably need to formalize my failure storage.
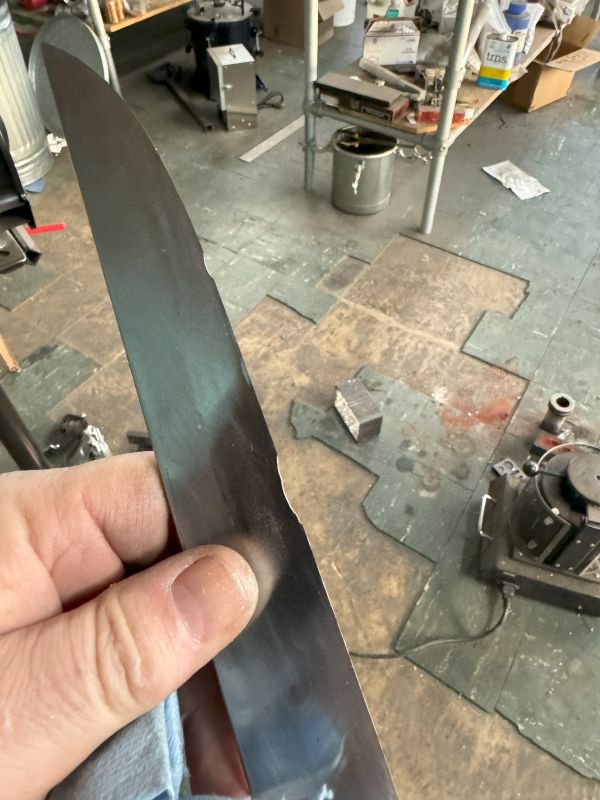
Above is the last stage of the fine shaping process. I’ve got a silicone pad on my countertop, and a Dia-sharp diamond plate with some water, and it takes about an hour to grind everything dead flat and get all the scratches from the belt sander out. By the time all that’s done, the blade is around 600 grit finish, and you could shave with it. By the way, stupid “cutting tests” are just showing off for youtube. By the time you’ve been shaping this stuff on a diamond plate, you know it’s going to cut just fine, and the geometry of the blade, which you are intimately familiar with, says it’s going to be a smooth operator.
Next, is bringing it to a mirror polish. My method is to use sandpaper to keep working down the scratches to 800 grit, 1000 grit, 2000 grit, then I finish it off with polycrystalline diamond powder on a piece of leather that has been boiled in wax. The image above is actually just a bit of buffing before I fine finished the tip (you can see big scratches on it) but I wanted to see what the metal inside looked like.
And, around then, I got the stupids. I think it’s pretty traditional to say something like “I was tired and I really do not know what the hell I was thinking!?” But, I thought I’d dress up the sides of the tang with a mill file, because there were big ugly machine-grinder marks on it, and I thought a filed surface would look better. Obviously, can’t clamp the tang in the vise and then file on it; it might pop free and then the blade would fly and the edge might get chipped. Normally what I would have done is wrapped it in a couple of kevlar gloves, sat down on my stool with a file, and hand-filed the damn thing. But my hands were getting tired. So I came up with a brilliant solution!
I took a block of polypropylene and made a lengthwise groove down the side with Mr Happy Dancing Bandsaw, then mounted the blade in my vise with the edge in one groove and the ridge-line of the rear in the other. I didn’t tighten it down much because I didn’t want the blade to get jammed into the poly or something like that. So I started to file and as soon as I put a little pressure on it, the poly block shifted in the vise and I heard a “click.” Not a loud click. But a click.
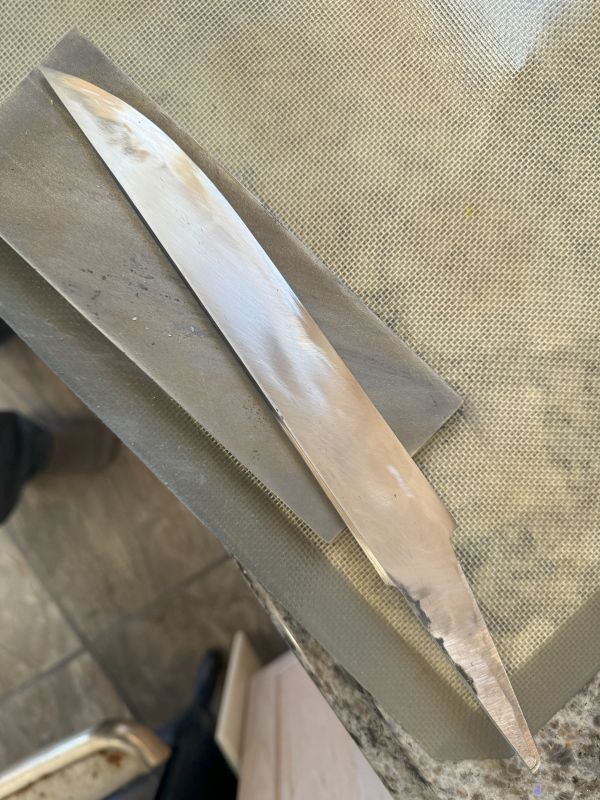
So, yeah, after all that work, I snapped the whole cutting edge right off in an instant. The edge has plenty of strength against pressure from cutting, but not so much lateral strength. That’s why samurai tried to block cuts with the back or flat of the blade, not the edge – because of the fractally complex temper line it’s unlikely the whole blade will splinter, but it’s possible to knock a chip right out. Like I did.
It’s irreparable, because if I tried to grind it back I’m shortening the tempered edge. I actually could re-grind it and re-shape the whole thing down but, seriously, I think I’m done with this one because I will always know I screwed it up and will never be able to bear to look at it again.
Ouch. I know the feeling.
Gumption trap. One to share later over a 12 year Islay malt.
Please pick up again. I had a quilt that, because I hated working on it , took 20 years to finish. Literally 5 minutes after I finished it. I put it on the kitchen chair to go to the bathroom. My oldest came back from the laundromat and put a dripping bottle of bleach on top of my quilt . I think my screams of despair should have taken the roof off the building. I washed it to get the bleach out and removed the damaged patches . I couldn’t even look at it for an entire year. After that year I replaced the damage and sewed it back together . I keep my kid well away from it 😁
Aaarrrgh! Bummer. It’s such a nice piece of steel. Maybe you can do something with it.
I’m looking for diamond plates for sharpening HSS and carbide metal lathe bits. What would you recommend among, DMT, Trend, M.Power, Ultra-Sharp, others? Thanks.
captainjack@#4:
I use the Dia-Sharp diamond plates; you can get them from woodworkers’ supply or amazon. DMT are good, too.
You could still forge something else out of it
Hey, I always wondered this – when I watch blacksmiths on YouTube, some of them will forge bevels into their cutting implements (knives, swords) before finishing them in the grind, while others get their bevels entirely by grinding them in. I’ve always believed (not sure why, I have no direct personal experience in smushing hot steel) that forging bevels takes more skill, and results in less grinding time, which is why the ones capable of doing so will opt for this method (as grinding is already a pain in the butt, and anything you can do to shorten that process is desirable). Is this the reason one might forge bevels? Or are there other advantages, or perhaps disadvantages, of going this route? Or…does it depend on the specific use case?
OMG. That was heartbreaking. But, nice to hear about metal again. That’s beautiful metal, anyway.
VolcanoMan@#7:
There’s a lot of “ifs” but lemme sketch out the basic shape of the iceberg.
some of them will forge bevels into their cutting implements (knives, swords) before finishing them in the grind, while others get their bevels entirely by grinding them in
Sometimes it has to do with whether they started off doing stock removal (taking a bar and cutting and shaping a blade out of it) or forging (taking a piece of metal and heating and upsetting it into shape) – I find that has a lot to do with it. I do both, depending on where I am going with a piece. For example, if I need to make sure that the core is in the right place – you don’t want it wavering all over – then I will forge weld to a bar then cut and shape the bar using stock removal. But, if you want the grain of the steel to reflect its history of shaping, then you hammer it.
For example, if you’re making the tip of a katana or wakizashi, you want the grain in the blade to follow the curve of the tip (boshi). If you’re doing stock removal, that doesn’t happen – the tip looks like it was punched out of a piece of steel. So, if you’re forging you cut an angle on the opposite side of the tip, then hammer the tip around to the back, then flatten and tweak the curve. That process is really nuts-looking but it works great. I don’t have any photos of doing that, offhand. But it’s not only easier to shape the tip that way, it’s the only way to shape the tip so it looks right. Assuming you define “right” as having the grain curve to follow the curve of the tip.
forging bevels takes more skill, and results in less grinding time, which is why the ones capable of doing so will opt for this method (as grinding is already a pain in the butt, and anything you can do to shorten that process is desirable). Is this the reason one might forge bevels?
It’s actually about the same. Some smiths like to hammer in a bevel, and it’s definitely easier once you know how, but hammering in a bevel can be problematic if you get the wrong number of hits on one side or the other, because then you are bending the lateral grain of the blade.
An angle grinder or a belt sander will take off a remarkable amount of metal very fast. “profiling” (rough shaping the outline of the blade and the flats) takes about 30 minutes typically, with an angle grinder. You need to hit the blade with the angle grinder in any case, just to knock the forge scale off. That stuff is TOUGH and it’ll eat your sanding belt, and you definitely do not want to try to rasp it off unless you’re Japanese and very very traditional. My teacher does the final bevel forging with water on the anvil, because the water makes the forge scale blast right off the blade. Pretty cool, but messy and dramatic. So my teacher (Michael Bell) still hits the blade with an angle grinder, briefly, just to knock the scale off and get it ready to start shaping. If the bevels have been forged in, it saves maybe a few minutes but it’s not a big deal unless you’re looking at a large or long blade like a katana.
Some Japanese cooking knife makers forge and then go right to a grinder, which gives a characteristic look because there’s still forge scale on the back of the spine and upper flats. It’s a cool look and forge scale does not rust much.
Another factor is that in Japan, steel is rare material. A lot of the reasons behind the techniques depend on the endless attempt to waste a minimum of steel.
Also, the origin of steels is interesting and the new market for fancy blades has had a certain effect. There are people on youtube who basically fake what they are doing. I am often upset and confused by this. For example:
https://www.youtube.com/watch?v=B37THlDrosw&t=594s
at 2:18 we see him shaping some steel. What we don’t see is welding up the billet. Normally, a Japanese smith would have someone welding up billets one day, then shaping blades another day, grinding them another day, putting handles on them, etc. But let’s stick with this guy. Because… at 8:15 you can see one blade has a thin line at the edge, which is NOT a temper line (hamon) it’s a different kind of steel. That’s a fairly typical pre-WWII Japanese technique. In those days the Japanese had a steel shortage, so you make the body of the blade from scrap iron and weld a thin piece of good steel onto the edge. Typically nowadays thats “aogami” (hitachi blue paper #1) a really high quality and very expensive steel. So you use a tiny bit. (a 48″ bar of 1/4″ hitachi blue is about $200, compared to about $15 for ASTM certified 1095 or 15N20)
But bear with me! At 10:34 the grinder is working on some very different-looking steel! Why? It’s mass-produced Chinese-made VG10 stainless damasteel. That stuff has to be assembled in a thermoelectric oven in an anoxic environment. So the knife the guy is grinding is not Japanese steel at all. I’ve seen a lot of those VG10 core blades show up, even in Japanese knife stores, and they carry high price tags. I won’t say they’re a ripoff but they are … sketchy, in my opinion.
At 11:46 – they look great! And they are great steel. But, yeah. Is it bullshit? I don’t know. Here’s another thing – you can clearly see its a layered architecture. There is stainless damascus cladding on both sides of a core which is also pretty darned nice looking and perfectly centered in the billet. If you’re hammering in the bevel, the core moves around a bit more and that edge is wavier. That billet was texturized with a press die to get the dimples, or was re-forged, from a billet that came from Shenzen. A Japanese smith working in the traditional model would NOT have an anoxic thermal robotic forge press for laminating stainless. Besides, those machines cost about $250,000 to make.
There’s a video on youtube that shows the real traditional Japanese method. Now I gotta find it.
Here, https://www.youtube.com/watch?v=5JHZRLer5PI
at 2:02 we see a billet that has been shaped, and the smith is forge welding a piece of aogami onto the body of the blade. He puts it on one side only because the blade is going to be chisel ground – i.e.: the back and spine are irrelevant and exist only to hold the piece of aogami. That’s pretty typical. In fact a lot of Japanese knives have this architecture and use pot steel (“suminigashi” or “oroshigane”) or iron or wrought iron as the body, and only worry about the cutting edge.
The fellow in the video above is using a pretty big chunk of aogami, but you can see why he wouldn’t want to hit that blade with an angle grinder – it could completely eat the edge right off the knife in a fraction of a second. Forging a blade in this manner results in an edge zone that is already quite thin.
At 8:26 you can see him using his Ronco(tm) edge-guide to differentially polish the bevel. That’s a typical production process that a homebrewer like me would not bother with. But it’s also a hell of a good clamp.
The popularity of fancy knives has led to a lot of corner-cutting. I am not sure what I think. The blades that result are perfectly good (perhaps even fabulous) but, yeah.
Now this is a guy whose work I love:
https://youtu.be/894YPtzJZfk?si=xJrDbdUNBJPbguPU&t=23
The chisel has a typical Japanese blade architecture: a billet of damascus someone made – either an apprentice or they source it somewhere else. My money is on apprentice. Then the billet has a piece of aogami welded to it and wrapped around.
At 0:23 we see the aogami edge welded on and wrapped. At 0:58 the welding technique is sublime. He fluxes the core billet then presses the aogami into place, carefully heats the whole thing, then shapes it down. There is plenty of opportunity there to knock the aogami askew. A western smith of the new school would let the whole thing cool then tack the aogami in place with a MIG welder, then grind the weld spot off.
I don’t know where it is but I saw one video of a very old school Japanese knife maker, who has a large roll of aogami or bandsaw blade material (15N20) and he just takes tin snips and clips a piece off the roll then welds this little sliver of steel onto a mild steel core to make a blade. Very cool.
The process of making a katana the traditional way is much more involved. You do not use a billet made by an apprentice or a factory in Shenzen. You smelt iron sands down with carbon and form a billet from that, then fold and fold and homogenize it, driving or grinding out the slag as you keep going. That is called “tamahagane” and it’s such a pain in the ass that nobody in their right mind would use tamahagane for a chisel or a cooking knife – it’s very special stuff. By the way if you want to call a blade a “nihonto” literally “Japanese sword” it must be tamahagane smelted from iron sands.
I have done “oroshigane” which is the process of smelting your own steel from wrought iron or iron into a blob of bloomery steel, which is then refined like tamahagane. The oroshigane process is a great big pain in the ass but it’s 1/10 as bad as tamahagane. Old school tamahagane furnaces (“tatara”) are great monstrous mounds of charcoal assembled by apprentices and burned for days to smelt relatively small plugs of steel. Nowadays there are Japanese smiths who do tatara that are powered with ducted fans and propane and charcoal. That is also pretty cool stuff but it’s not as crazy as the old 12th century process. (it’s older than 12th century, but it was kinda perfected around then)
One thing Marcus didn’t mention on forged vs ground bevels is that forging will distort fancy damascus patterns. If you’re doing mosaic pattern damascus you don’t want to distort it all by forging the bevels. If you look at fancy knives you can see this a lot, look for the flow of the grain around the tip like Marcus was talking about
Depending on the knife you’re making and if you’re willing to outsource stuff grinding can be significantly faster. Do a non-tapered full tang, get it cut by a 5 axis water jet out of a sheet of steel with chamfers to start the bevels and it can be delivered to your door ready for heat treatment.
seems boring, i would rather hit some hot steel with a hammer.
I like manual processes that put me and my skill with my hands into the piece. I can design something in CAD and get it machined, but that bypasses the physicality of my skill (which is why we have machining and CAD). I want the aesthetic from making it by hand
dangerousbeans@#11:
forging will distort fancy damascus patterns. If you’re doing mosaic pattern damascus you don’t want to distort it all by forging the bevels
Yeah, I forgot to mention that.
A lot of smiths do fancy tile patterns, and hammering those to stretch the steel can do all kinds of weird things to the shape. Usually a little stretching is OK but sometimes it’s ruinous.
I agree about the mass production aspect. In my mind, there isn’t much difference between having the local fabricator water jet cut some outlines, or just having 5,000 of them done at a factory in Shenzen, then slapping handles on them.
The whole thing becomes an exercise in “what does ‘I made this’ mean?” I suppose one could argue that their bladesmithing is an exercise in management and finance – i.e.: I have an idea and hire people to do all the dirty stuff, but since it was my idea I get the credit. There is also some influence I see of AI in designs. Why not? Ask midjourney to design a knife and it’ll do a good job of producing something that would suit a wielder with 15 fingers.
Thanks for the extensive answers, Marcus and dangerousbeans. That makes a lot of sense. The people I watch who do the most interesting of pattern-welded steel, often out of the weirdest of materials (thinking of shurap here, but there are others), they always seem to grind in the bevels. I guess it gives you a bit more control over what the final product looks like, makes it more uniform. I have absorbed a bunch of weird information about blade-making over the years, so I knew about the forge scale thing (i.e. using the angle grinder), and I have seen people use the water technique to remove scale, but I had my doubts about its efficacy (it definitely looks cool though, sparks shooting everywhere). And I was able to figure out the purpose of the cutting the angle on the opposite side of the sharp side, and then hammering it around. In a similar manoeuvre, for double-edged blades you sometimes see the smith cut a “v” out of the blade tip, and forge-weld the two sides together (to me, that seems pretty challenging to pull off, but my knowledge of this topic is fairly limited).
I find it fascinating how much the practice of bladesmithing has entered the public consciousness over the last decade. I suspect it’s mostly a side-effect of Forged in Fire, but maybe it would’ve happened anyway, as it gives a serious dopamine hit to anyone who is either a former (childhood) wannabe ninja (who loves the forging of weapons), or a former (or current) pyromaniac (who loves the fire, and the violence of the quench)…or both (like me). I actually have half a mind to take a course sometime, just to actually experience it for myself, but I fear that while my upper-body strength is probably adequate, my stamina is not, and I’d have to stop after a few heats. But who knows…maybe someday.
VolcanoMan, my stamina is kind of fucked from long covid and it’s possible to work around. I only work on one piece at a time, and sit down to take a break while the piece is heating. It’s not the most efficient approach, but it actually works out to be quite good exercise for me
Smaller pieces are also easier, and in the scheme of things all knives are pretty small forgings
So if you talk to whoever is running the class there are probably ways you can do it
I think the water forging to remove scale might be one of those techniques that is quite efficient if you know how to do it and you’re already forging close to the final shape.
@Marcus
I suppose the big question is really what do you want to make. I want to make a one off piece that speaks to my skill with my hands, so i need to forge it myself. There’s a knife maker I know here in aus who wants to make good knives; he does stock removal from patterns he designs because that gives him the control to get the product he wants. They’re probably better knives than anything i make, but to me they lack the character i get from embracing the less precise process
The difference between sourdough culture and commercial yeast is probably a good analogy.
However I will insist that you have to swing a hammer to call yourself a smith.
VolcanoMan@#13:
for double-edged blades you sometimes see the smith cut a “v” out of the blade tip, and forge-weld the two sides together
Known as a “fish mouth” weld. It’s tricky but not too bad – a lot of smiths keep an angle grinder with a diamond wheel in the shop so they can do the cut while the metal is hot. That way you can cut it and get some flux on it quickly so oxides don’t form. You can also do the cut cold, but … why?
Flux does a bunch of stuff but mostly acts as an oxygen barrier to reduce scale formation (oxidized steel) it also lowers the effective welding temperature by making the weld an oxygen-free contact zone, which eases the formation of crystals across the boundary.
often out of the weirdest of materials (thinking of shurap here, but there are others), they always seem to grind in the bevels
When you’re welding disparate materials, the blade may tear itself apart or bend. You can get some crazy bends, too. For example, I’ve done blades with stainless sandwiching carbon steel. One of those blew apart when I quenched it. It didn’t delaminate (it was welded) but the carbon steel crumbled. Anyhow, a lot of the time if you’re welding exotic materials, you shape the billet fairly thick and then do stock removal on it to get it to the quench while it’s fairly thick, then fine shape it from there. Shurap also has a lot of various grinders (he’s fun!) including that surface grinder that he uses to flatten his stock to dead flat. (I free grind stuff flat, which is not hard if you practice)
dangerousbeans@#14:
I suppose the big question is really what do you want to make. I want to make a one off piece that speaks to my skill with my hands, so i need to forge it myself.
I’m with you on that. I want to own my process as much as I can, within reasonable limits. I do not always smelt my own steel, nor do I dive into marshy waters in Ukraine to try to drag out thousands of years old oak trees. Actually, except for the fact that a war is raging in the Pripet marsh area where bog oak is harvested, I’d be down to try that. The bog oak collectors are going to have lots of tracked vehicles they can use to tow logs out of the water, when it’s all over.
In my previous piece I tried to dance around the effect that the demand spike in custom knives has had on the art – in some cases, it has reduced it to a craft. I used to own a set of Shenzen VG10 stainless damascus cooking knives and they were great but I gave them away when I started being able to do my own metallurgy. There are a couple of knife making outfits that have mechanized considerably and in my opinion all that does is lower the value of what they produce.
I have a friend who is in Japan right now, and went to a Japanese knife store. He sent me a picture of a really pretty looking yanagiba that was ground out of VG10 and, frankly, looked CNC cut. They wanted $500 for it, and there were some more classical laminated aogami/iron blades in the $2000 range. So, yeah, it’s economics: would you rather make 500 $500 knives or 10 $2000 knives? I’m glad I’m a retired amateur who does not have to even consider those questions.
Yeah, there’s no way I’m trying to make a living off this. The whole disability things kind of precludes it anyway
It’s nice that more people have access to knives with good metallurgy, that’s a plus out of this. VG10 seems to be pretty common and a pretty good steel (in my pro-carbon steel opinion)