The Habaki, a small copper or other metal collar that goes between the tang and handle of a Japanese blade, is an essential component for managing the force of impact so that the handle does not split when it’s used.
Consequently, it has to fit pretty much perfectly. It goes tightly around the tang and fits around the shoulder of the blade at the front. At the back, it’s larger to distribute the impact and to wedge the mounted blade into the scabbard. Making habaki is a great big pain in the ass, since it has to be fitted completely by hand, tapered by hand, polished by hand, etc. The whole process is a great deal of tapping a piece of metal with a little hammer, to wrap it around the tang, then tapping it on and off, holding this little bitty thing, and shaping it with a file.
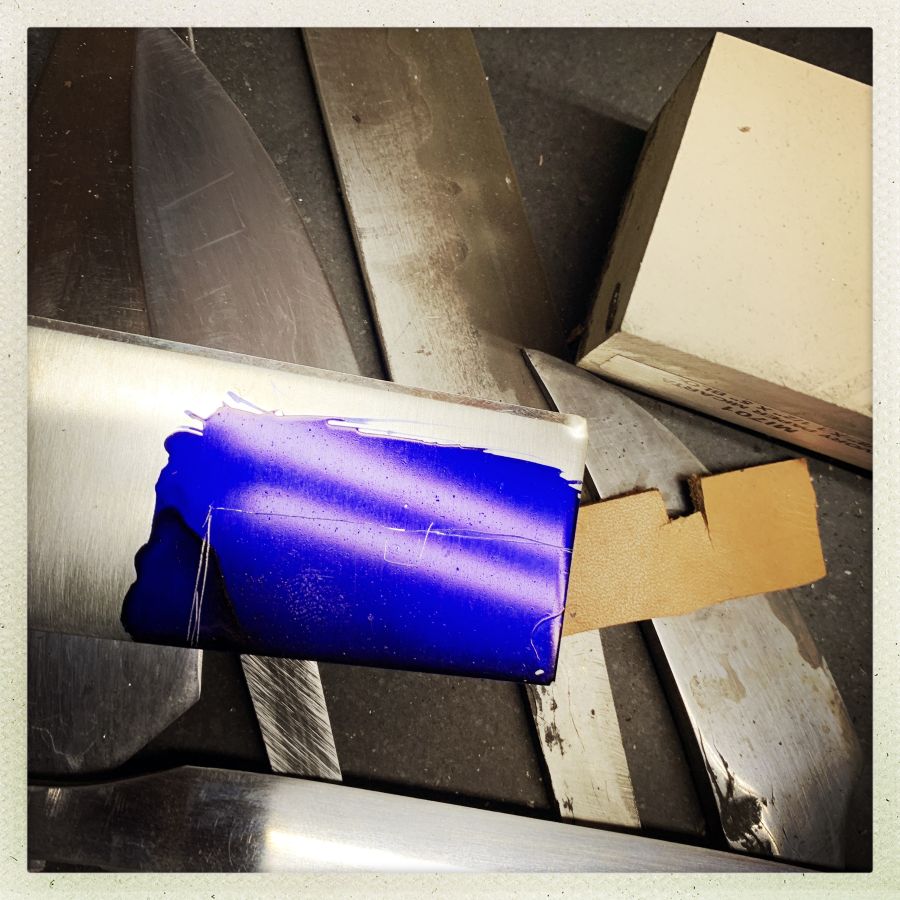
The first step is to wrap a piece of leather where the habaki will go. That’ll give a good idea of the necessary thickness and length of the piece of metal you’re going to use. In this case I’m using a piece of silver bar that I got from Rio Grande. The leather is to the right. The shape of the leather has been transferred with a scratcher in some dyechem.
I didn’t take a picture of the process of cutting out the silver shape. That was about 10 minutes with a jeweler’s saw; I keep breaking the blades. Memo to self: get coarser blades. And, now that I think of it, I’m kicking myself for not cutting the ends off a coping saw blade and using that. A fine coping saw blade would cut silver like cheese.
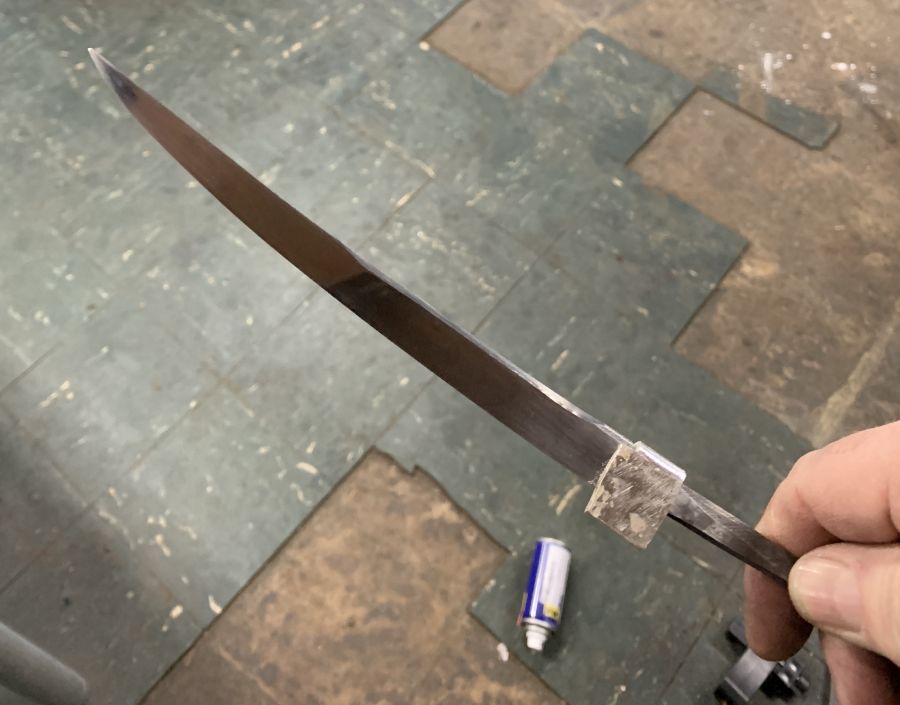
Now, we see an interesting problem. The blade I made is not really shaped like a Japanese sword. Consequently, the idea of a habaki may be wrong; it may just not work at all. The back of the blade is too square and I’m going to have to round and shape the habaki to a taper.
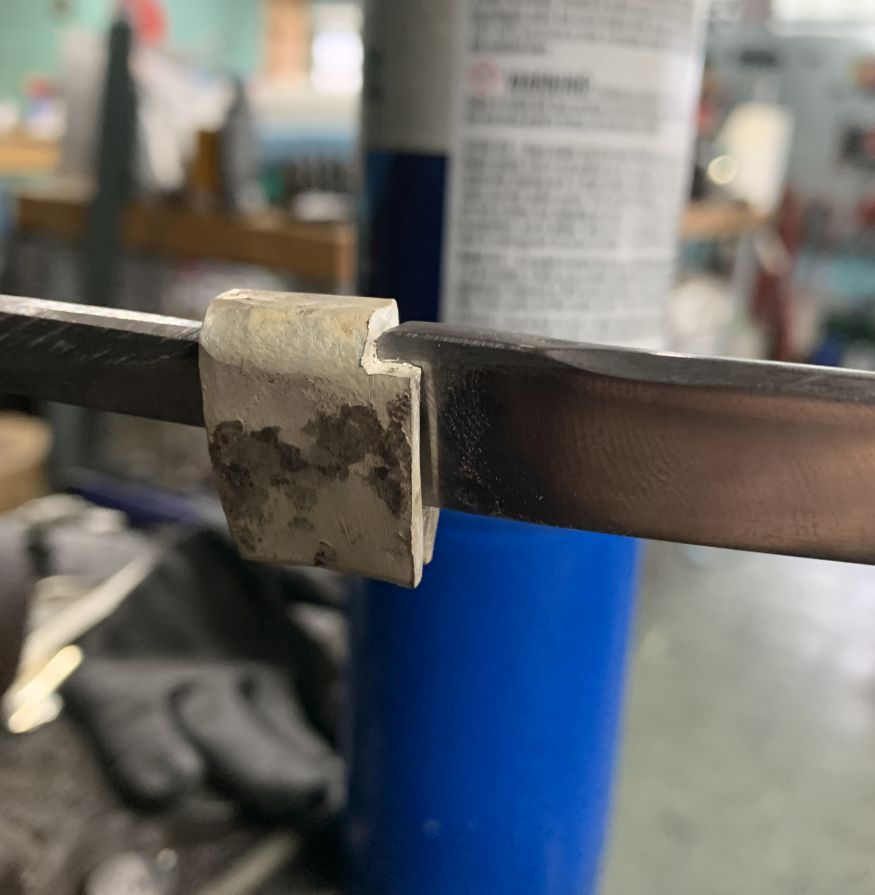
Because I didn’t have any hands free, I wasn’t able to photograph wrapping the silver. I annealed it in case it had work-hardened, then positioned it in a vise exactly where the bend-line needs to be on one side. Then I took a little hammer and tapped it over to a 90 degree bend. After that, I checked the fit on the blade (thumbs up, it was in approximately the right place) and found a piece of scrap steel the same thickness as the tang – a process requiring a bit of a trip to the grinder – and then used the vise to squeeze the metal into place. The vise exposed the top of the habaki and I was able to drive it down onto my ersatz mandrel with a couple of taps. Then, I annealed it again.
You can see that I did a little tapering at the bottom where the ends meet, before I wrapped it around the blade. That’ll be where the whole thing gets soldered together with some silver solder.
If you look at the picture above, you can stretch your imagination and visualize the forces on the blade and habaki in a cut. The blade is going to rock back from the impact, and is seated right in the notch, so it will smoothly transfer impact to the entire habaki, which will be (I will make sure it is!) perfectly flat at the back, and transfers the impact through the larger surface.
One thing I have learned in this process: it is not easy to take a Japanese technique for mounting sword-blades and just fudge it around to serve as a mounting technique for arbitrary other blades. I should have shaped the tang more like a Japanese dagger’s, in which case the habaki’s fit would be a lot easier to arrange.
As it is, I must resist the temptation to use the tang itself as a mandrel. It’s not hardened and if I start hammering on it, I can change its shape, slightly, too. Once the habaki is to where it is in the picture above, the remaining shaping is all done by hand with a file. The bottom is way too long and looks ugly as it is.
The next step, and I have no idea how long it’ll take me to work up the courage to get around to it, is to make a small wedge of silver that fits into the habaki from the handle-side, to fill up the “cheeks” where they wrap around. That’s a crucial piece for keeping the habaki from tipping under impact, which would cause it to eventually break at an inconvenient stabby-time. Shaping the silver is a matter of cutting a piece then putting an angle on it with a couple of whacks from my little hammer, then fiddling and filing and fitting. If that all works out, I can attempt to solder the pieces together, and then it’s down to hand-filing to shape everything just so. My observation is that the Japanese, at this point, do a lot of hand processes because if you use a power tool you can wreck the whole thing in an instant.
It took me about 2 hours to get it to where it is, and I’m pretty happy with it. I’ve started shaping and tapering the cheeks and the back and if I don’t screw anything up it’ll look great.
A fully traditional Japanese mounting would be for the habaki to butt up against a spacer (“seppa”) at the front of the handle and guard, to further distribute impact. But this knife won’t have a guard, so that complicates and simplifies things. A Japanese dagger would have a hole in the tang and the handle would be pinned into place with a metal or bamboo pin through the handle and the hole, at an angle, to wedge it all into place. My plan is to bed the tang in a piece of bog oak using chopped carbon fiber and epoxy.
Every time you install or remove the habaki, you look at the tang and see where the silver rubbed. Sometimes it takes a little tap from the hammer to reshape a bit of the silver; it starts to fit better and better as the process continues. There’s a method to the madness. Most people, when they first encounter Japanese blade-smithing, think “these crazy Japanese made everything much more complicated than it has to be!” but it’s the end result of centuries of evolution applied to a particularly life-critical bit of mechanical design.

I feel bad admitting I spent hours working on this, yesterday, because I have so many other things that I ought to be doing. I have a wok to pimp, a scandi-knife to make a handle for, a nakiri to design, a sgian dubh-inspired everyday carry knife, a forge to build, doors to make and paint, etc. I cannot ever seem to manage my work-load.
Fascinating. I did not know this was done on Japanese swords! This blade looks really super cool. I think it will be beautiful when it’s finished.
Blades breaking a lot is cured by more hours spent sawing. Something no one wants to hear. However, there are some good blades out there that don’t break easily. I use Laser Gold blades, usually 8s since I can’t get 9s anymore. A nice sturdy bench pin to adequately brace the work and therefore be able to move the saw blade very straight up and down also helps… any flexing of course will result in a break.
When I learned the skill I was spending about 4 hours a day pretty much every day sawing. I was often accused of using a blade until all the teeth had worn off, then swearing when it broke. I’m afraid it’s true… I still swear luridly when a blade breaks.
Sometimes it is better to do what will actually get done than the things on The List that keep getting put off for whatever reason; achieving something means you are more likely to get to the rest of the list.
The back of the blade, what is that particular shape for?
I really love these posts, so thank you!
kestrel@#1:
When I learned the skill I was spending about 4 hours a day pretty much every day sawing
Yipe. No thanks.
I was watching Ilya making a sword-guard (lotus blosson/kiku style) and the whole thing is saw-cut out of wrought iron. Just watching that made my heart hurt. I mean, it’s just time, right? You get started, put the phones on, and … eventually it’s done. But it still makes me want to scream.
PS – custom habaki fetch $400-$500, which isn’t bad for 2 days of work.
Jazzlet@#2:
The back of the blade, what is that particular shape for?
Those are questions that have embarrassing answers.
Here’s the truth: the blade was an experiment. I was working on making a letter opener blade but when I got into it, I made it longer and then when I hammered the bevel in, it started to curve. And it looked pretty good. So I started to finish it. Once it was starting to look like a “keeper” I concluded that the back lacked interest. If I was going to do it in the Japanese style, it would need to have a high angled back (“mune”) but the blade is way too narrow for that, so I did a weird kind of relief-thing to give the spine some visual interest without weakening it.
This particular blade is made from a very lovely piece of low-layer count damascus (1095/15N20) and it gives me great pleasure to see the grain (“hada”) in the mirror polish. I could etch it, but I won’t.
Eventually, I want this thing to look like a thin wand made of bog oak, with a really really nasty blade inside. I don’t think anyone’s going to mistake this thing for a cooking knife.
By the way, I saw someone spend 2 days making a habaki and then overheated it when soldering the bottom piece into place… Hmm, it should be a haiku:
Bend, hammer and file
hours spent shaping; my hands hurt
oops, its a puddle!
If life is not hard enough, you can make 2-piece habaki:
And that’s just copper and brass. I’ve seen some with an outer layer of shakudo (silver/gold alloy) that has a mon/family crest cut through the outer piece. Because, you know, may as well make it as hard as possible.
That 2-piece looks gorgeous. I love your blade as well. I don’t quite have enough information/imagination to picture what your habaki will look like at the end, but I’m looking forward to more pictures.
well then, i suppose you could make the inner bit out of pattern welded steel. There’s plenty of space there for more decoration too, although i don’t know what would be traditional for that :P.
The silver one looks like it will be cool when you’re done (or you can melt it down and cast it into something else)
There is a meditative quality to doing fine work that takes patience and time. You need to get familiar and then intimate with what you’re working on, and it creates a “flow state,” where time passes unnoticed. I think that artistic endeavours are often imperative and are seldom a waste of time because they fulfill us. Practical endeavours are seldom so engaging.