A Knife for my Brother

I did not manage to finish a knife for my brother’s 50 birthday last year, for I nearly hacked off my finger with a hatchet. So I am rectifying the issue this year.

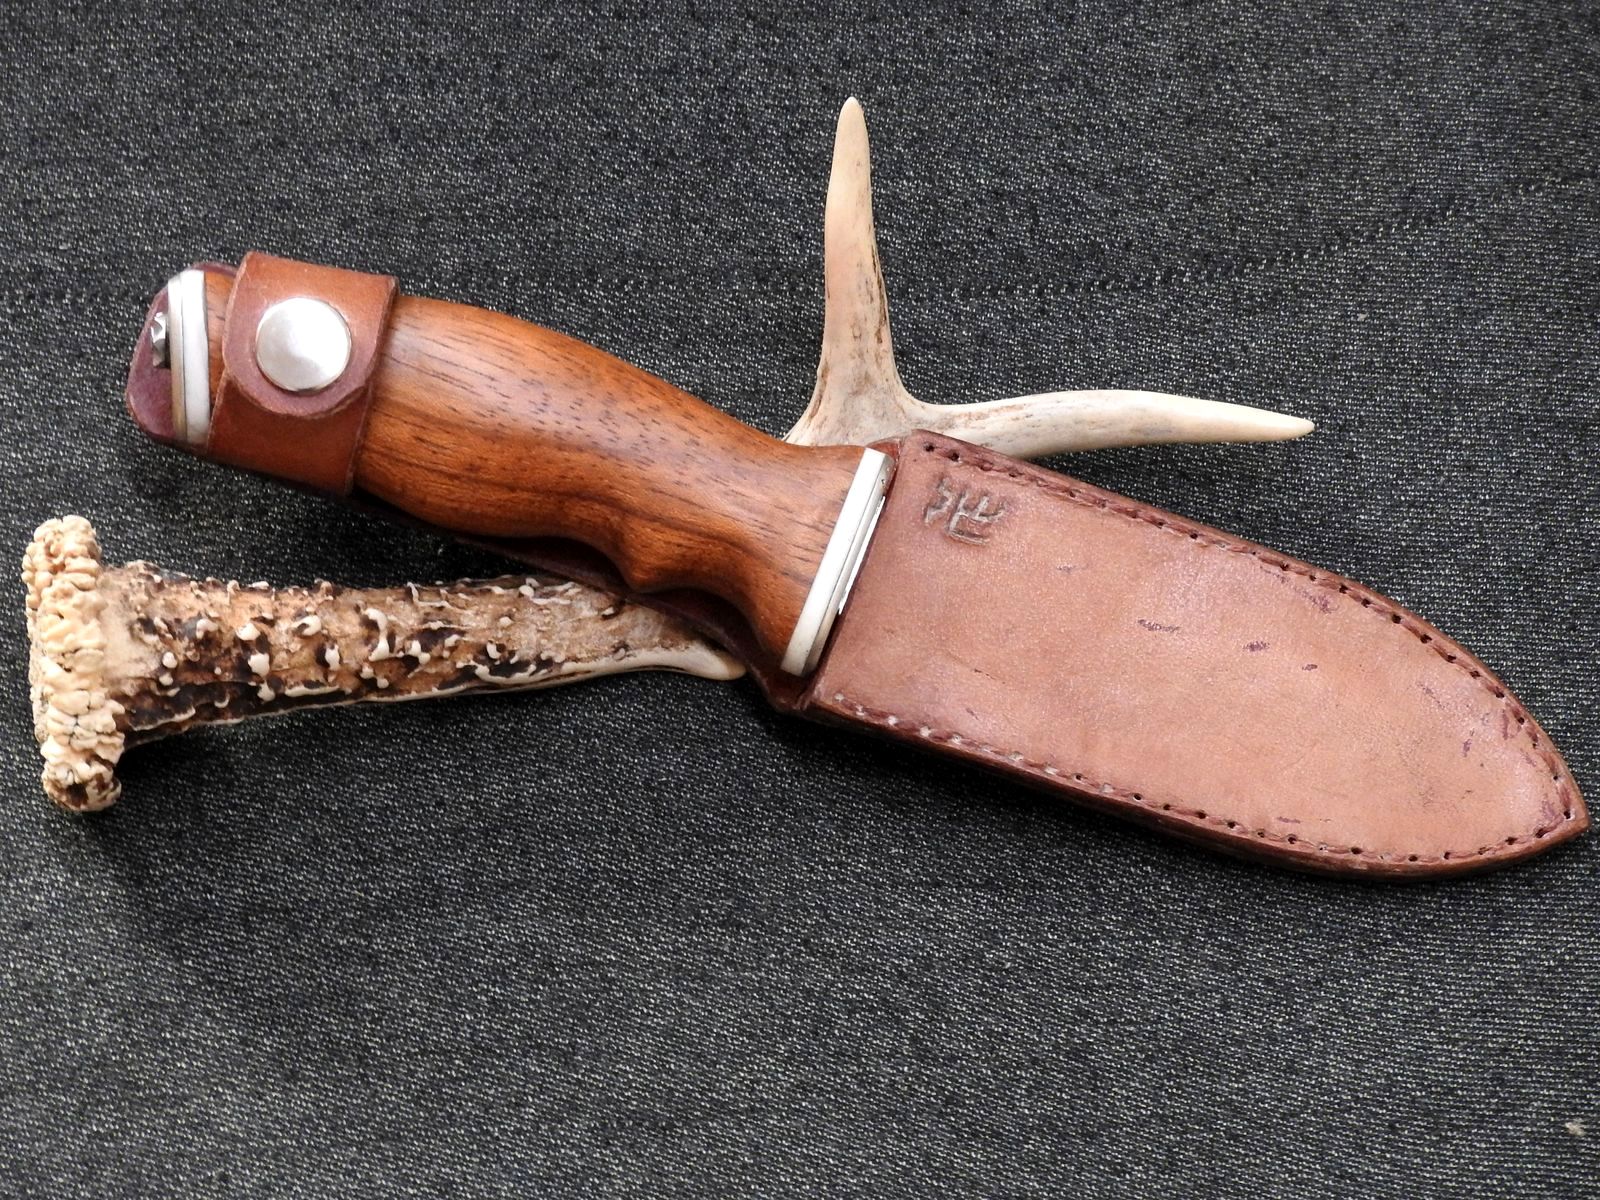
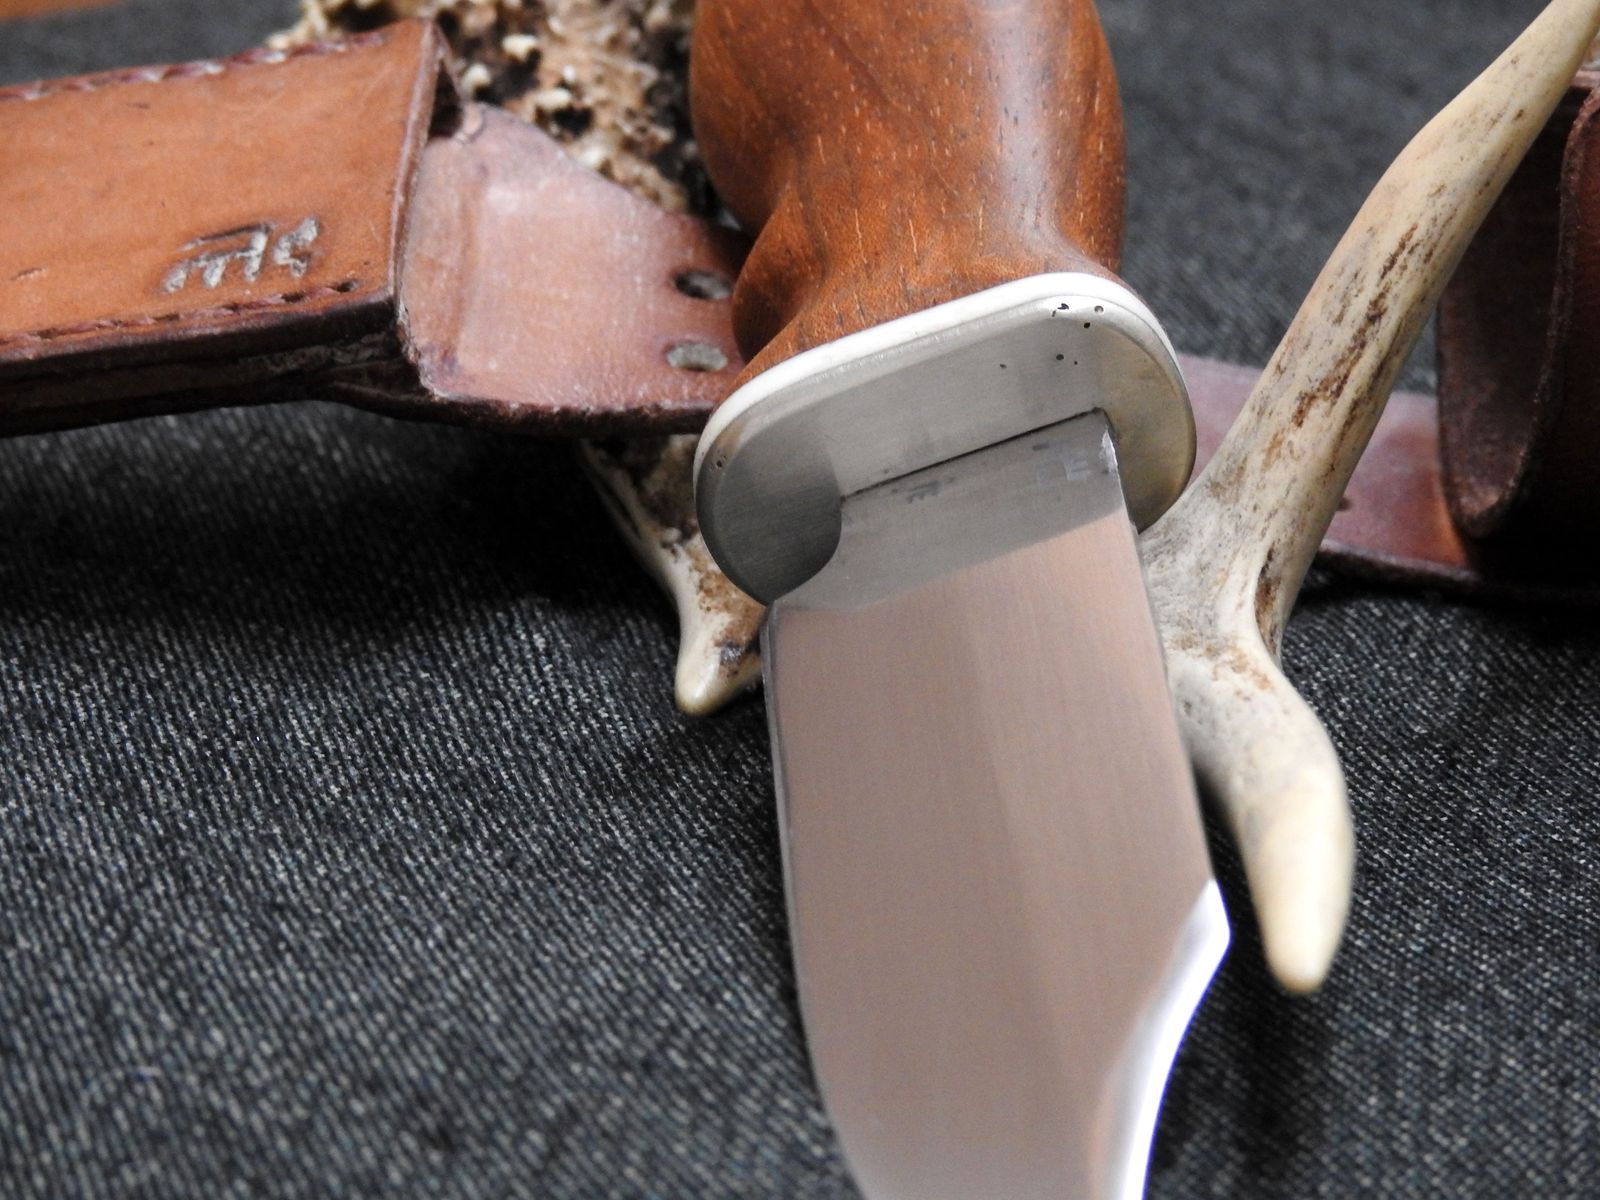
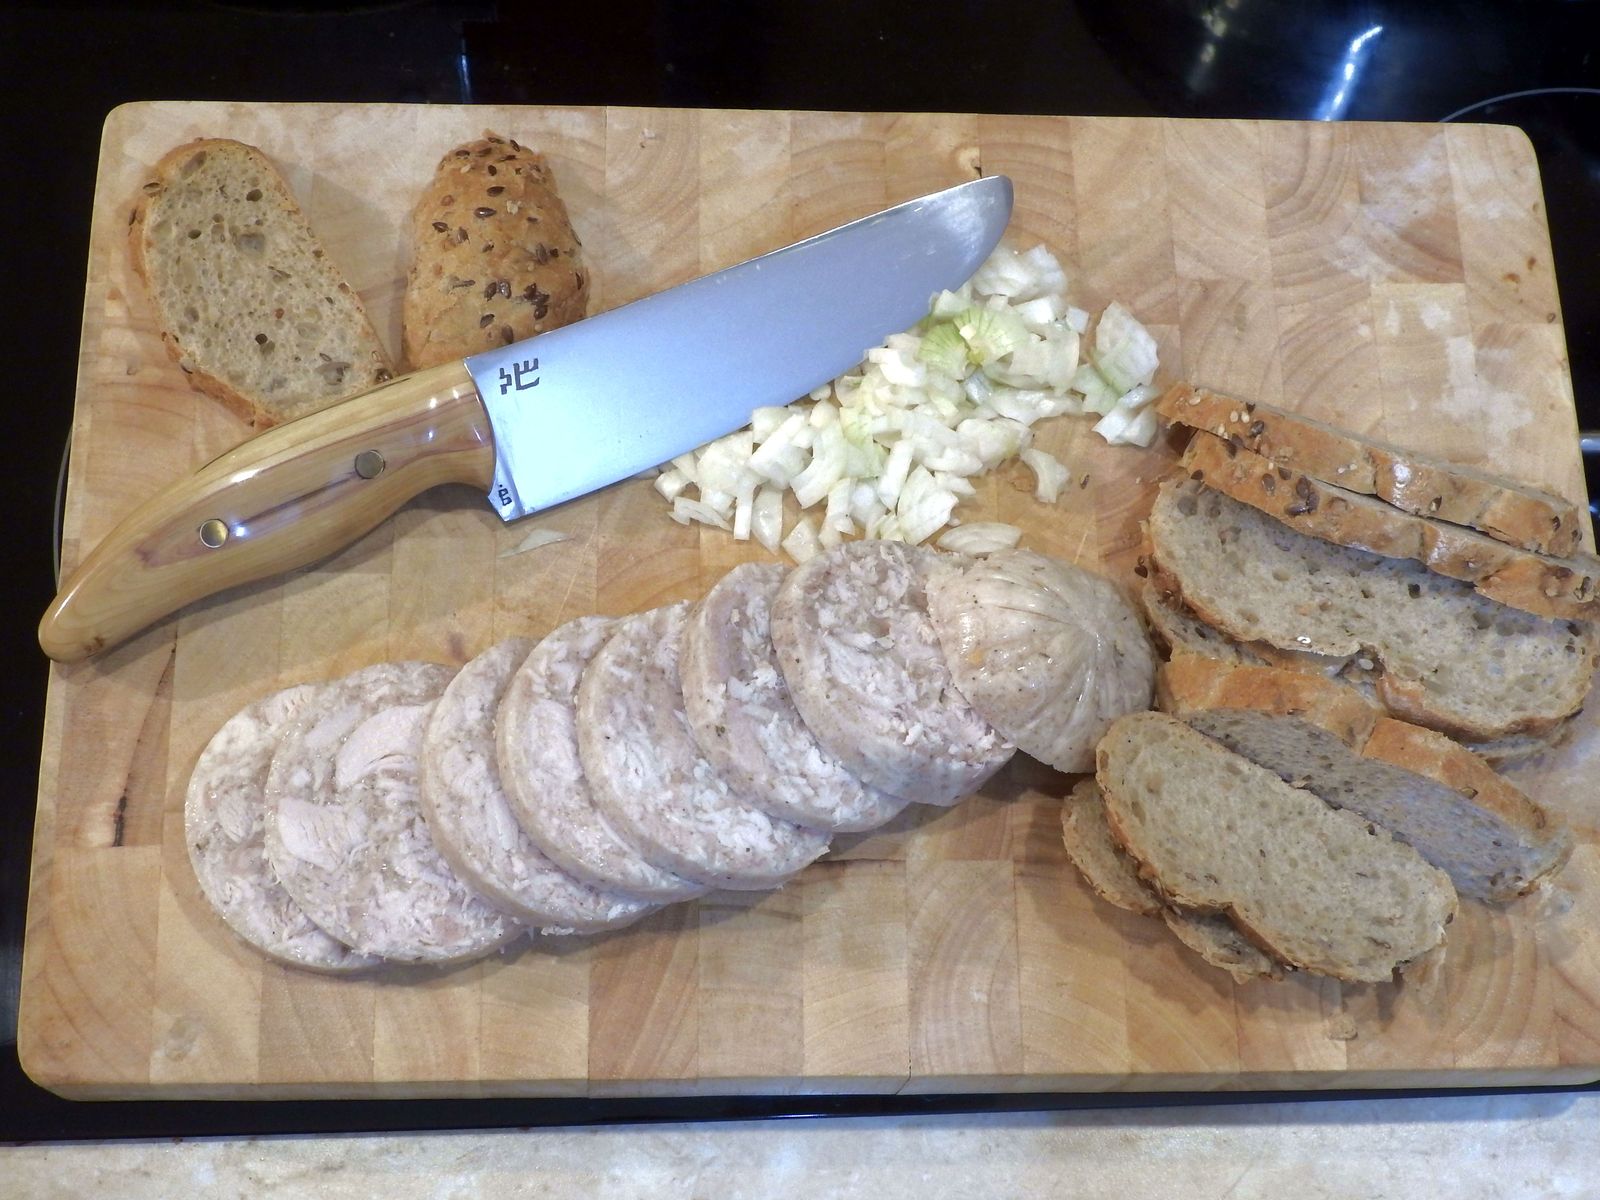
This is the blade that was hardened when I was working on the rondel dagger. It is not a perfect blade, aesthetic-vise. I messed up the polish a few times and I had to eventually stop trying to correct it otherwise the knife would turn into a small razor. It is a good universal kitchen knife, very good cutter, I am just not happy with the surface finish. But it is either this or nothing and this year I want to give my brother a knife I know he wants. He is going to appreciate it even with the flaws.

© Charly, all rights reserved. Click for full size.

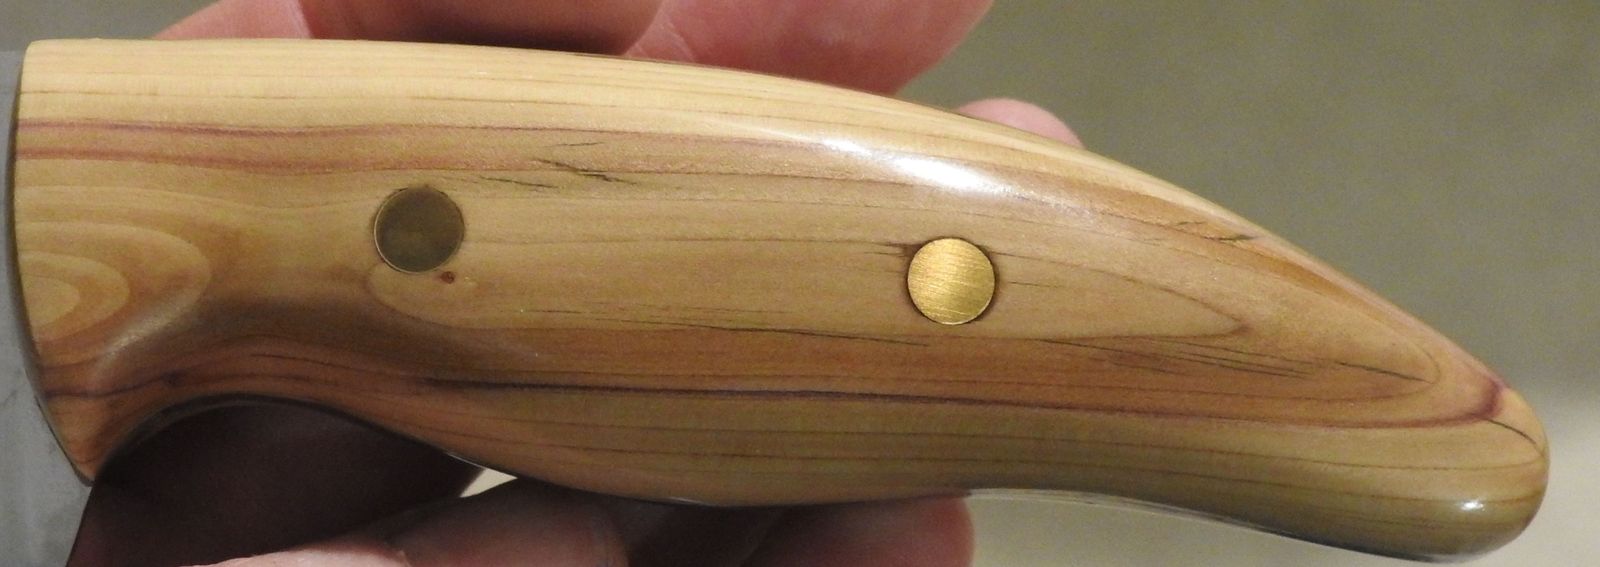
I tried to make up for the flaws with the handle, so I have used a piece of partially rotten lilac branch that I have harvested last fall. It is just stunningly beautiful wood and this is probably the prettiest knife handle I have made so far. The wood is rock-hard with tiny pores (lilac is one of those woods that can take 1000 grit polish without dirtying) and would probably hold up well even without the boat lacquer coating. But it was partially rotten, so the outlying regions were not only discolored, but also softer, so I soaked it in boat lacquer to stabilize it. With the coating, it should be near indestructible.

The lilac-colored heartwood will probably age into dark brown over the years, but it might take a really long time since the branch was already several years dead when I cut it off.

© Charly, all rights reserved. Click for full size.

© Charly, all rights reserved. Click for full size.

© Charly, all rights reserved. Click for full size.

How to Make a Soft Buffing Brush Wheel

    1. Materials: Threaded rod or long screw, two matching nuts and at least two washers. The bigger the washers the better, to spread the load more evenly over a broader area. Further, you will need some sturdy paper and very sharp scissors or a razor. And the final ingredient is a lot of soft, thin string, at best some sort of linen or cotton.

      © Charly, all rights reserved. Click for full size.

    2. Cut several (in my case it was 24) identical semi-circles out of the sturdy paper, with the radius of the desired buffing wheel.

      © Charly, all rights reserved. Click for full size.

    3. Divide the semicircles into pairs and wrap each pair evenly with the thread so that approximately 60% of the paper is covered. It is good to wrap each pair in approximately the same amount of turns.

      © Charly, all rights reserved. Click for full size.

    4. Prepare one nut and one washer on the rod a few cms from the end.
    5. Pull string between the paper of one of the semicircles and tie it around the threaded rod as close to the washer as possible. You probably won’t be able to tighten it properly yet, but it is good to have it at least somewhat secured.

      © Charly, all rights reserved. Click for full size.

    6. Cut the string at the outer rim of the semicircles, remove the paper and tighten the thread around the metal rod properly. Twist carefully the threaded rod to pull the whole thing close to the washer.

      © Charly, all rights reserved. Click for full size.

    7. Repeat steps 5-6 for the rest, try to space the thread tassels around the rod as evenly as possible.
    8. Cap it with the second washer and nut and tighten the nuts. Be careful not to over-tighten them, it might shear the threads.
    9. Trim any threads exceeding the radius.
    10. Enjoy your soft buffing brush wheel.

      © Charly, all rights reserved. Click for full size.

I did not actually need to do this, but I had some rubbish thread that I have no better use for, I cannot spend too much time in my workshop yet for I would either freeze or burn through more wood than I can afford, and this was a fun way to spend an hour. It works a treat for buffing up lacquered or oiled handles, I will probably make several more to use with various grades of buffing compounds, but I need to buy or make the big washers, since I only had these two.


A Hunting Knife – Auction for FTB Legal Defense Fund

You can still donate, the damage Richard Carrier has done with his petulance is not undone yet. I cannot afford to donate any meaningful cash right now since I have no income. But I can afford to donate a bit of time. So I am giving this knife in exchange for the highest donation. Details see further.

© Charly, all rights reserved. Click for full size.

Technically it is a hunting & fishing knife since my first customer specifically requested it for angling, but you need not be a hunter for having a use for it. I am regularly using a knife like this when collecting mushrooms or just walking in the forest when it might come handy. It would also be useful as an all-purpose knife for camping. The false edge is sharp, but not cutting sharp. The blade is signed and numbered “2” in Glagolitic script.

© Charly, all rights reserved. Click for full size.

I made a simple leather scabbard, this time symmetrical so the knife can be conveniently fastened on either left or right side since the preference of its future owner is unknown.

© Charly, all rights reserved. Click for full size.

The handguard/bolster has a few dark spots. These are inclusions in the used material (see further).

© Charly, all rights reserved. Click for full size.

The endcap is fastened over an ornate stainless steel washer into which is the end of the tang peened.


If you are interested, write your bid in comments or per e-mail to affinity (note, I might not be able to post your e-mailed bids in the comments next two days, there is a huge storm coming our way and I might experience blackout).

If you bid from outside of the European Single Market, please make sure that you are allowed to import such things and be prepared to pay for any import/customs fees, duties or other taxes as may be relevant in your region/country/state. I will pay for the postage.

The knife will be sent to you after submitting proof of the promised donation. If the highest bidder reneges on their promise, it will go to the next one in line. The start is 10$ (the cost of materials), the sky is the limit.

The auction will run for two weeks until February 23. 2019 and this post will be pinned to the top of the page until then.

More info below the fold.


[Read more…]

Making Kitchen Knives – Part 14 – Straightening Curls

Last time I was working on this project, I had some very bad results from quench. This week I have finally managed to test one idea of correcting the problem and maybe prevent it from ever happening again in the future. And I am glad to say that it did work. Not perfectly, but the new process is definitively worth to use instead of the old one.

Here is first the comparison of the three worst blades before and after. As you can see, there are still some curls in there, but they are noticeably less pronounced and one blade is almost completely straight. They will still come smaller than intended out of the polishing process, I will still have to remove some material from the edge until I get to the straight part, but I estimate it to be about 1/2-1/3 of what it was before. On the worst blade, the curls went about 10-15 mm from the edge towards the spine, whilst now it is about 3-5 mm. That is a significant improvement, and I think that had the blades been quenched from a straight form, they would never have curled in the first place.

As I alluded to previously, the process that I wanted to use for correcting the blades is called plate-quench. It cannot be used for simple carbon steels. Only so-called deep hardening steels can be thus quenched, and N690 is such steel, according to some articles I found on the internet. Nevertheless, it is better to not have the internet at all than to believe everything you can read on it – the manufacturer recommends oil quenching.

So I have tested the process first on one blade that I accidentally broke when correcting an ever so slight banana-bend. When the broken blade hardened properly – which I have confirmed not only by scratching with my gauges, but also by breaking off a tiny piece of it – I went on with the curly ones. On one of these, I confirmed the hardening too by breaking off a tiny piece of the tip, with the remaining two I was satisfied with the scratch test only.

For the plate-quench are used two flat plates from either alluminium or copper. These two metals have very high heat conductivity and thus can cool down some steels fast enough for them to turn into martensite. Luckily I got quite a few nice slabs of alluminium on hand. And because I wanted to make the process a bit faster (despite not making time-measurements this time), I have made a simple prototype quench-jig.

It consists of two identical pieces of alluminium with a small hinge, and locking pliers. The hot blade went out of the forge between the plates with the edge towards the hinge. Then it was firmly clamped by the pliers to hold it straight. When it stopped glowing near the tang – indicating a temperature well bellow 600 °C – I dunked the whole thing in a bucket of cold water just to be sure. And just as last time, because it costs nothing, I have put the blades into a freezer straightway for a few hours before tempering them. None of the three blades cracked.

Not an actual quench, staged photo – sometimes I miss having third hand greatly. © Charly, all rights reserved. Click for full

It worked reasonably well and quick. I will definitively improve it and build a proper jig when the weather is nicer and I do not freeze my nuts off in my workshop. I will add a more stable hinge(s) and maybe even screw one of the plates to the pliers.


Another advantage of this process is no burnt oil gunk on the blade, no flames and no stinking oil fumes.

Resin Art: Wood You Love Me?

When Marcus sends out boxes, they are always two things: treasure boxes and challenges. There’s all this wonderful pieces of wood and they’re asking: “What am I?” and then it’s me who has to figure it out. For some of them the question could be answered.

First two pieces of burl:

©Giliell, all rights reserved

©Giliell, all rights reserved

As you can see the wood is very thin, at the most 2mm, which made sanding quite difficult. I made them by firmly wrapping tape around the wood to create a container and then I filled it with resin. This, of course, creates a rather cylindrical resin shape which then needs to be evened out. I’m pretty happy with how both of them turned out, fire and water respectively.

The next three pieces look rather different but are all from the same piece of wood. The last parcel Marcus sent contained some bog oak with which I instantly fell in love. It pretty clearly told me that it wanted to be SOMETHING so I took the first piece and tried SOMETHING. I have some golden pearl pigment I am not completely happy with, as it is heavier than the resin and sinks to the ground, but which for the very same reason became idea for this project.

The original piece of wood was maybe 2″ by 3″, already sawed into a disc with that sharp angle on one side. I cast it in a big slab, pouring the gold pigment resin first and then filling up with mostly clear resin.

This is the “central piece”:

©Giliell, all rights reserved

I cut off all the resin around the wood and cut the top into a rhombus, matching the angle at the bottom. The gold pigment sunk into the gaps in the wood, filling it with veins of shimmer. As you can see there were still some bubbles trapped in the wood, but they’re actually more visible in the pic than in reality. I’m sooooooo happy with how that turned out because I was quite afraid to ruin the gorgeous wood.

An speaking of the precious wood, it would have been a crime to throw away the scraps:

©Giliell, all rights reserved

This used to be the top of the wood. I cut it into an oval and rounded the sided before polishing. The wire lies in a groove to keep it from slipping, but I still need to glue it to the cabochon with some resin. Same goes for the next piece.

©Giliell, all rights reserved

This one’s a bit smaller and only a tiny bit of wood remains, but the colours are so gorgeous. It’s fascinating how the same cast yielded such different shades. All that was left after that were small pieces of resin, but even they got used, but that project isn’t finished yet, so you’ll have to wait. Those five pieces represent about 15 hours of sanding and polishing and sawing between, not to mention an open wound the size of a big bean on my left palm because I’m stupid.

Always wear your protective gloves, kids.


Poor Man’s Belt Grinder – Mark 3

My belt grinder has served me well, and for a hobbyist, it would be probably good enough. But since I am inching my way towards knife making not being just a hobby, I needed some significant improvement on it. And an opportunity luckily arose.

One of the good things about my previous employer was that there was an internal process for employees to get obsolete materials and equipment either cheaply or completely cost-free. I have used this opportunity quite often and got a lot out of it – I am well stocked in graphite and alluminium, I got precise analytic scales completely for free, and one of the last things I have managed to get was a variable frequency drive.

I was not able to haggle this one down to zero, it was a bit pricey even though used, and I also had to pay a bit to a professional electrician to connect it for me. I could get a new one for a bit cheaper if I capped it at the 1,5 kW that my motor has (this one can handle 5,5 kW) and took the cheapest one there is, but it was still a good deal even if it was not exactly a bargain.

And it works like a charm, even when I am not able to use anything more than the manual mode yet. Finally, I have the ability to change the speed of the motor as I need it, I can even reverse the rotation. I have tested it already and it is exactly what I hoped for-  finally I can work wood without burning it and I can sharpen tools and have a bit more time before the edge starts overheating.

I hope it continues to work well – I have great plans for the future. Multiple grinding wheels, a polishing attachment and, maybe, even a lathe attachment. The belt grinder shall not rest!

An old Woodworking tip for Tight Bonds

Today was my first real workday since the beginning of the year – today was the first day I did not feel like crap. So I have decided to assemble handrail (or a balustrade?) around the entrance to the attic, which was on my backlog for a few years by now.

I did not make the handrail, and I did not even pay the full price for it. I am not normally a difficult customer, I do not haggle, I pay on time and I am forgiving of a miss-hap here and then. But this is one of the instances when I really lost my patience. The carpenter did not object, he knew he screwed up. And when I was assembling the handrail today, I found out the screwed up even more than I knew. Initially, I was only angry about his inability to either keep a deadline or to inform me in advance that he needs a delay (which he got three times after he failed to show up). Today I found out that he did a poor job too.

For example, two screws holding the frame together had their heads twisted off and the whole thing was all wibbly-wobbly because there were huge gaps between the parts.

A really unseemly gap. Unstable too. © Charly, all rights reserved. Click for full size.

In addition to these gaps, the frame was not even properly square – not even close! The handrail was fixed 5 mm higher on one column than on the other, which was enough to be noticeable with the naked eye. So I had to glue-up the pre-drilled holes and make new ones.

That is not something a professional carpenter should demand to be paid for. As a professional, he has a fancy workshop full of tools that I can only dream of. Surely he has some long clamps that would allow him to screw the thing together without such huge gaps. Nevermind that fancy modern clamps are not even necessary, as I am going to show you.

You need a rope, a piece of wood and… and that’s it.  You tie the rope loosely around two parts that are perpendicular to the desired force vector, as close to the joint as possible (in this case the column and the closest vertical bar in the frame). Then insert the piece of wood into the loop (in this case a hammer handle) and start twisting the rope until it tightens the joint together. For best result, the rope should be so long that you get a tight fix at just 1-2 full revolutions, less and you have poor control, more and the strands will be unevenly stressed.

When tightened to your desire, you can either hold or tie the piece of wood in position and screw the parts together.

Hammer inserted into the loop and turned around two times to tighten the rope. © Charly, all rights reserved. Click for full size.

Thus you can get a nice fit between the parts, without unseemly gaps that make the joint not only ugly but also unstable.

A proper joint without a gap. © Charly, all rights reserved. Click for full size.

To give credit where it is due, I did not invent this trick. It is a centuries-old technique used, among other things, by ottoman bow-builders for getting a very tight bond between layers in their composite bows while the glue sets.

After I have spent one hour fixing the poor work, I needed two more hours to assemble the whole thing again and fix it in place.

Mah “new” handrail finally in place. © Charly, all rights reserved. Click for full size.

Behind the Iron Curtain part 33 – McGyver in Every Household

These are my recollections of a life behind the iron curtain. I do not aim to give a perfect and objective evaluation of anything but to share my personal experiences and memories. It will explain why I just cannot get misty-eyed over some ideas on the political left and why I loathe many ideas on the right.


“Zlaté české ručičky” (Golden Czech Hands) – a self-flattering saying that Czechs like to say about themselves for fairly long time. I was not able to google-fu the origin of the phrase, but one of the speculations I believe the most is that it originated during the times of the Iron Curtain.

I have already mentioned the centrally planned economy and the many negatives it has lead to. But I did not mention one of the at least somewhat positive things – the widespread ability to get the most out of whatever little there was available.

For example one of my uncles wanted to have a gramophone, but those were hard to get by. So he scraped and scrounged parts from defunct gramophones and has built a functioning one out of them. He also has built two high-quality loudspeakers for it – and they worked and sounded good for a long time. Previously he also has built a simple radio. And a bicycle from parts.

This uncle, a Ph.D. mathematician, has emigrated to USA when I was only about six years old and he took this mindset with him. He married a Korean-American woman, whom I have met in 1999 during my only visit there. One of her complaints about her husband was that she rarely gets to buy new stuff, because whenever something breaks – be it TV, vacuum, microwave or a kitchen robot – he repairs it. And indeed all these items around the house were visibly repaired.

I have this mindset too. I wanted a nice sturdy knife to take with me on forest walks, but they were expensive and hard to get by, so I have made one. I am not as handy with electronic as my uncle is, but have repurposed parts from his old radio project and used the speakers for building myself high-quality horn-speakers. And many other things.

But around here, this was not exceptional. Every man had to be a handyman, knowing a bit about electronics, plumbing, carpentry, masonry and, if you were lucky, car repair and maintenance. Because when something broke in the household, buying replacement was often not an option and getting a professional to do the job for you was not easy or fast enough. Of course, some were better at somethings than others, and a thriving black market of skills has emerged. Indeed the only way to thrive was to have a network of skilled friends or you were screwed.

Towards the end of the regime, in 1987, there emerged a TV show dedicated to this kind of “DIY” thing, named “Receptář nejen na neděli” (Recipe book not only for Sundays), whose spinoffs and follow-ups run until today under different names. There was also a periodical of the same name as the TV show, another periodical “Udělej si sám” (Do It Yourself :-)) and even one of the periodicals for children that I have previously mentioned (ABC) had sections dedicated to small crafts.

Today there is a lot of moaning about how this aspect of our culture is slowly disappearing. The availability of cheap goods on demand did lead to a decreased need to be inventive and frugal. Some of the moaning is just that – the regular moaning about the corruption of youth and the good old times – but some of it is to my mind justified. Indeed when working in Germany, I was often able to come up with creative solutions to some problems with the things I found in a drawer, exactly because that is what I was used to doing, whilst some of my colleagues were content with listing through a catalog.

I think that being poor is not a virtue, but being frugal and inventive is. The only problem that remains is how to raise inventive and frugal people when being lazy and wasteful is easier.

Finishing a Depressing Episode in Life

Two years ago my father’s oldest brother has died. If you were reading TNET at the time, you may remember that it was very stressful before his death. His house was full of garbage. Literally full – each and every room to the breast height, some more – and literally garbage – wrappings, shopping bags, spoiled food. And mixed in that garbage were occasionally valuable things, like tools or antique furniture.

My uncle was not on good terms with the whole family, except with me. So he wanted to give his property to me, which I have refused unless he allows me to throw his garbage out. I planned then to sell the dump for the price of the land and give the money to my nephew, to compensate him a bit the shitty start of life his good-for-nothing father has caused him.

It was difficult to find a company willing to even touch that mess, and when we found one, it took over a month and cost his whole life savings (nearly 30.000,-€). Unfortunately, he died before the works were finished. So I secured the door, barred the windows and the property hung in the limbo of inheritance legalities ever since. My uncle was childless and did not write a testament, therefore his siblings were his inheritors. And, as I expected, my uncles and aunt were not exactly cooperative.

Not that they wanted money – I would be OK with that, I did not want anything in the first place, not for myself. But they knew it would be cheeky to ask for money after they multiple times said they want nothing to do with their brother when he was alive and sick and in need of help. They just were uncooperative and deliberately obtuse, so the whole legal process took almost two years. Last month it was finally over, with my father now being the sole owner of the property. We already have a buyer, for a good price, so hopefully, before the year’s end, it will be over.

During the two years, people broke into the house – door were kicked in, all windows were broken – and stripped it of nearly everything of even modicum of value that was still left there. Someone even tried and failed to steal a huge central heating oven, but it was evidently too heavy. Nevertheless, there were still some things that I want to take before we sell it all.

An old broken wooden cross.

One of those things is an old, broken massive wooden cross. My uncle was a fervent catholic and he worked as a sexton in the local church for decades. He probably scrounged this either to repair it or just as junk. But it is good, old, seasoned oak. The big beam is rotten a bit, but it can still be mostly salvaged enough for a plethora of knife handles, or for vice jaws or something.

In the cellar was a huge pile of fire bricks. I am a bit surprised that those were not stolen – they cost 2,-€ each and they are thus more valuable than the huge heating oven. And they would be less work to take. Possibly the scavengers did not recognize what they are and thought those are ordinary building bricks – I do in fact know that one such person who illegally broke into the house mistook them for ordinary bricks.

I am not sure whether I will be able to make something out of them, but I wanted to build a wood-fired ceramic kiln for a long time, and these bricks were enough for just that. But maybe they will just stay in their new place until my heirs have to clean them away.

Another thing(s) I wanted to take – of limited value to anyone but me – were the lilac and elderberry bushes that have overgrown the garden. Lilac wood is extremely hard and durable, extremely rare and extremely beautiful – the heartwood is lilac and the sapwood creamy-white. Elderberry wood is not very durable, but it too is hard, reasonably beautiful and difficult to get in larger pieces. The new owner will fell most of the trees anyway, and they were in bad condition since my uncle did not care for the garden at all, so I need not feel guilty for cutting them down.

So this weekend my nephew – the future recipient of a big pile of money – came by and he helped me to move all those fire bricks, fell most of the lilacs and elderberries, and stack it all behind my workshop. I took even some thin lilac twigs, I think I can do something out of them, and if not, my house has a wood-burning stove.

Tomorrow I have to take a can of paint and slather it over all the cuts, otherwise the wood will dry too quickly and crack too much.

A pile of firebricks and a pile of wood.

My hands are a lot better. The bones ceased to hurt completely, but some ligaments around the pointer finger are still probably strained and begin to hurt after some works, especially after writing – so there alas still won’t be too much writing from me for an undetermined time. I think I will have to actually fixate these fingers for prolonged time, otherwise they just won’t heal.

My first Commission – Part 11 – Finished

I am done. It could be better and hopefully, in the future, I will be able to do better. And also be able to make better pictures.

The knife is balanced at the forefinger groove, blade length approx 110 mm, handle length approx 120 mm. N690 steel.

The knife in its simple leather sheath… © Charly, all rights reserved. Click for full size.

…and outside of it. © Charly, all rights reserved. Click for full size.

Blade detail. Etched are my initials and number 1 in Glagolitic script. The false edge is sharp, but not cutting sharp. © Charly, all rights reserved. Click for full size.

Handle from my late cherry tree, coated with hard, waterproof and scratch-resistant boat lacquer. Contrast washers jatoba, fittings stainless steel. © Charly, all rights reserved. Click for full size.

Today I finished taking pain medication for my hands. I will try and abstain from any strenuous work for one more week and we’ll see what happens next. The pain went almost, but never entirely, away. I am OK when I do nothing, but on Friday I wrote a short post on my Czech blog and my hands hurt afterward. The same goes for finishing the leather sheath – I had to swing a hammer a few times to mount the press studs and that caused some mild pain too, despite me being very careful and not needing to hit too hard. It worries me.

My first Commission – Part 10 – Starting the Sheath

First I must say that my writing will continue to be very, very sparse for about two weeks (again). I think I finally found out what is wrong with my hands. I had a pain in my metacarpal bones and joints ever since I worked a bit too much in a too short time. Sometimes it almost went away, but then it came back with a vengeance whenever I did some work. The orthopedist has made an x-ray and has ruled out arthritis, and I have not visited a doctor since because it got multiple times better to the point I thought I am OK.

I think I know what is wrong – I think I have started to develop stress fractures. Those are not visible on x-ray until they develop in a full-blown fracture.

And whenever they almost healed, I did something to aggravate them again. There is only one cure for that – several weeks of no-strain. And due to the nature of the injury, that also means no-excessive writing on PC, no grinding knives, no cutting or splitting wood, etc. I have tried consistently this last week to do that and today and yesterday I was again almost pain-free. But I think I need to keep it up for at least two more weeks for the bones to recover completely. If that does not help, then I am going to the doctor again to try and find out what the hell it is.

What I could safely do was to coat the knife handle with boat lacquer. And this weekend I started, carefully, working on the sheath.

First I have cut the two slabs for the sides and then two strips for the belly and the back. To get the strips to conform with the blade geometry I did not cut them curved but I formed them from a wet leather strip. When it dries, it holds form nicely and it saves material.

© Charly, all rights reserved. Click for full size.

The next step was to glue everything together with wood glue. In case you ever do this, beware. Wood glue on dry tanned leather works really, really fast. Not superglue-fast, but fast enough for you to want to be sure that when you press the parts together, they are in the correct position straight away. Wetting the leather beforehand might give me some time, but I did not want to do that because the clamps would leave impressions in it.

© Charly, all rights reserved. Click for full size.

I have let it dry for a few minutes, then I took off the clamps and I inscribed a line with a knife-tip for stitching and cut the opening for a belt. In case you are wondering why there are round punched holes at the end of the cuts – those are there to avoid stress concentration and thus to prevent the leather from tearing further when used.

© Charly, all rights reserved. Click for full size.

Now I leave it to completely dry until tomorrow evening. In the meantime, I am trying to figure out a way for making my maker’s mark on the leather. I could cut it, but that seems a bit inelegant.

My first Commission – Part 9 – Fitting, Signing, Assembling

© Charly, all rights reserved. Click for full size.

The HDD magnet proved to be very useful when polishing the bolster/handguard. It proved to be strong enough to hold it when grinding on the belt grinder, but also when polishing with the angle grinder. I did not intend to use the magnet in this way, but now I will because it has proven itself to be extremely useful for holding these tiny things steady. Shame that other metals that I am going to use for these things – aluminium and brass – are not magnetic.

The next thing I have done after the bolster was fitted was to make the handle. That did not go too well as you may remember. The first piece of wood had cracks, on the second piece of wood I messed up the drilling and the third time was the charm. It is a nice piece of wood and looks great when the grip is fully shaped, but I do wish that I have managed to get the grain alignment a bit better. But grain alignment is not something that anyone else fusses about that much, so I should not fuss about it either. Here you can see the grip roughly cut and shaped on the belt sander.

© Charly, all rights reserved. Click for full size.

After the grip was shaped, I have also glued to ti the end cap/pommel thingie and I have decided to sign the blade before assembly.  For that, I have tried a new thing, which unfortunately completely and utterly failed.

I have bought photosensitive lack that is used for etching PCB boards. The idea is, you spray-paint your metal surface, you print your design, you put your design on the surface and use UV light to quickly deteriorate the paint on illuminated areas. Then you wash out the deteriorated paint with a 1% solution of NaOH and voila – you can etch.

The paint did not deteriorate under UV lamp as advertised and the NaOH solution did not wash it out of the illuminated areas. I have followed every step of the instructions, multiple times, and it just did not work. So I tried to increase the NaOH solution concentration – and it washed off all of the paint. So until and unless someone shows this particular product to me to work, I am considering it an unfortunate waste of money.

I do not want to make my signatures too big, and I want to number the blades from now on, and the wax is not very conducive to tiny fine details. So I had to revert back to how I did things in the past, with slight improvements. I have covered the blade with plastic adhesive tape. But this time I have used double-sided tape on the parts where the signature and numbering were due to go, and then I glued to it one print of the now useless stencils for the failed photo etching. Then I cut out the letters with shaving razor and a pointy scalpel blade.

Because I did not want to damage this blade, I have first tested this new technique on the failed machete (that fail has proven quite useful, I have hardened piece of steel for experimenting).

© Charly, all rights reserved. Click for full size.

Etching in a cup with solution works, but it takes a lot of space and a lot of solution to immerse the whole blade. So I have built myself a new thingie that allows me to perform etches with very little solution.

I took a piece of graphite and ground it flat to about 20x30x5 mm. On top, I glued a piece of wood and covered it all with excess epoxy glue to protect it against moisture. The next day I drilled a 6,5 mm hole into the wood down to the graphite. Lastly, I took a piece of 8 mm brass pipe, cut M8 thread in the hole and on the pipe, and I screwed the pipe into the hole so far that it has a solid connection with the graphite.

For the etching itself, I have simply put a piece of felt soaked in diluted FeCl3 solution on top of the design, between the blade and the new graphite electrode. Anode (+) on the tang, cathode (-) on the brass pipe and after five minutes the job was done. The etchings are clean and nice looking.

© Charly, all rights reserved. Click for full size.


© Charly, all rights reserved. Click for full size.

Just like last time, I have no pictures of the assembly. Imagine me slathering epoxy mixed with wood dust all over the tang, hammering the handle onto it and then peening the end of the tang whilst being in a constant state of panic that something goes wrong. Nothing went wrong, although I am not happy with how the peen turned out. But the customer did accept in advance that peened tangs can be a bit unseemly. Even unhardened stainless steel does not like to be peened and tends to crack around the edges. And I did not dare to try and weld soft steel stud at the end of the tang, this steel allegedly does not weld well. But maybe I will try something different for the second blade. This one is unfortunately stuck with this, although it might get a bit better with some more polishing.


So the knife is now more or less finished and functional. The last thing to do is to clean and polish the wood to about 300 grit and then impregnate it with boat lack.

© Charly, all rights reserved. Click for full size.

YouTube Video: Original Vs Reproduction – Which is better?

What I find the most interesting about his video is the realization that our modern perceptions of what is and is not beautiful are heavily skewed towards unreasonable and sometimes unachievable perfection. Sometimes perfection that you can only evaluate up so close, that you need a magnifying glass and calipers.

I blame the industrial revolution and mass-produced machined goods.