My welding does not make me proud, but what the heck – I’m going to just forgive myself and move on.
Now that the doors are on and up (I’m still jiggering running wheels and an air-dam at the bottom of those) it’s time to start assembling the machinery into a workable configuration. I’ve decided to do all the cabinets and stuff first, then run the electricity because by then I’ll know exactly where it goes.
The center of the room, naturally, will be the forge. It’s going to be hot, heavy, and I want it to be set up so that there’s no chance of it falling over or anything remotely like that.
All of that means: this is a good opportunity for some overkill(tm).
I want to have the forge on a table, along with the heat treating kiln, so plenty of horizontal space is a good idea. A shelf underneath for sticking things is a good idea, too. I don’t want to have to worry about sparks or radiant heat setting something on fire, so wood seemed like a bad idea. That left tube steel. The stuff is ridiculously strong and heavy and by the time I assemble a table from it, I don’t need to worry about an errant breeze coming through and flipping the thing over.
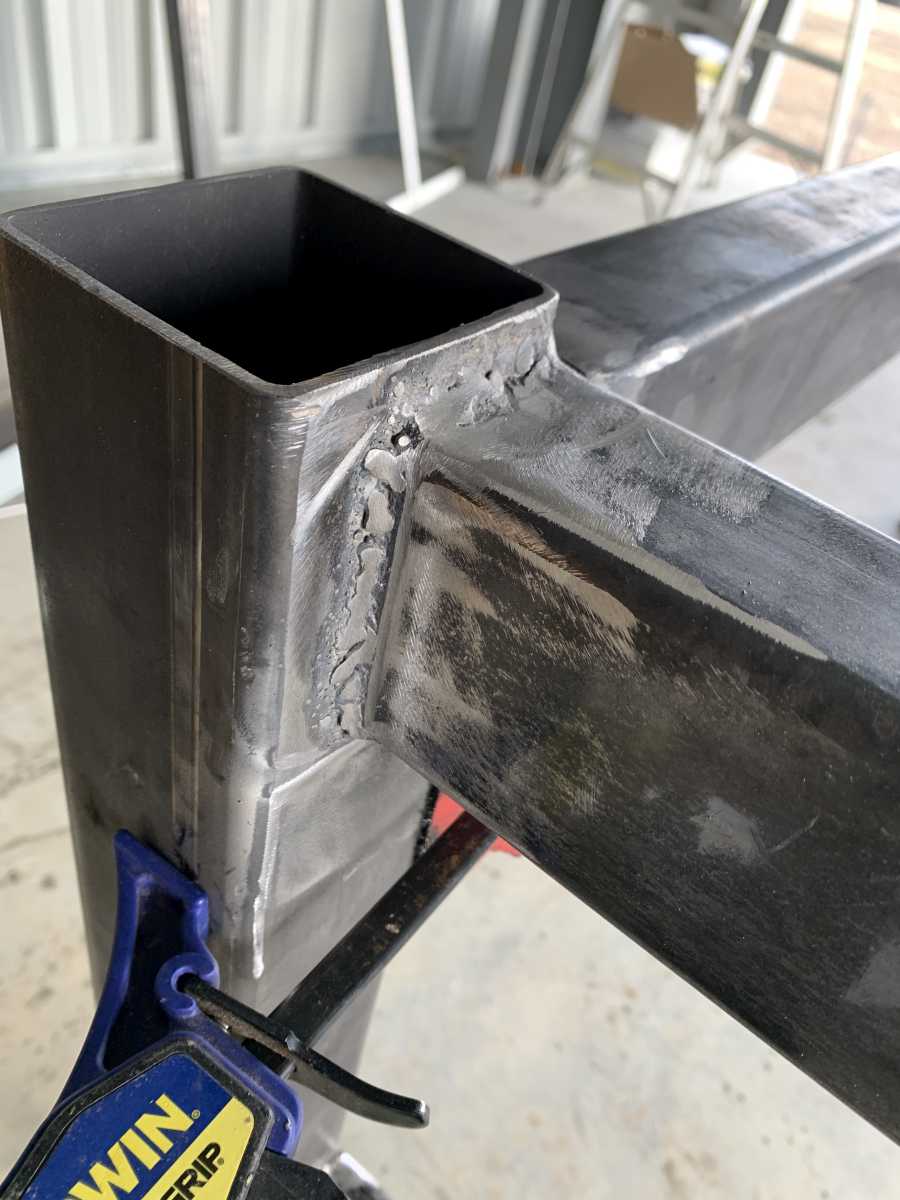
My welding is not great, but it improved considerably by the end of this project! That’s one of the earlier ones. The first few welds, I stuck together, then ground the weld down, then filled the holes, then ground it down, etc. It’s basically impossible to hurt the stuff so, why not?
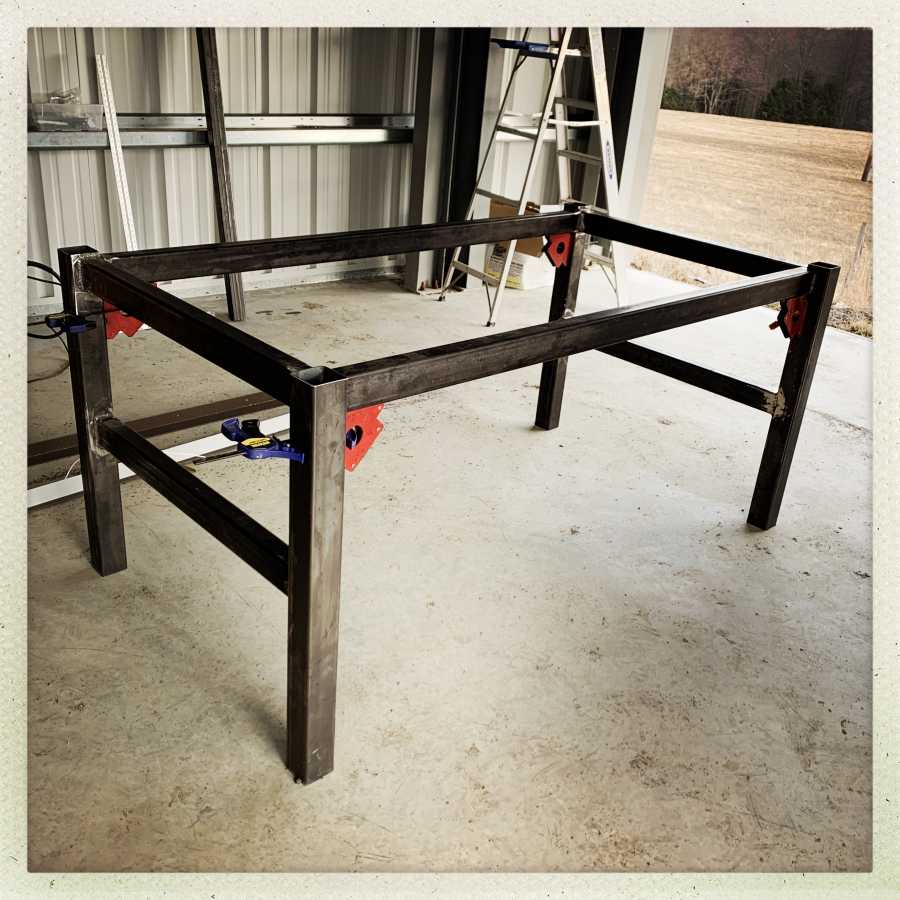
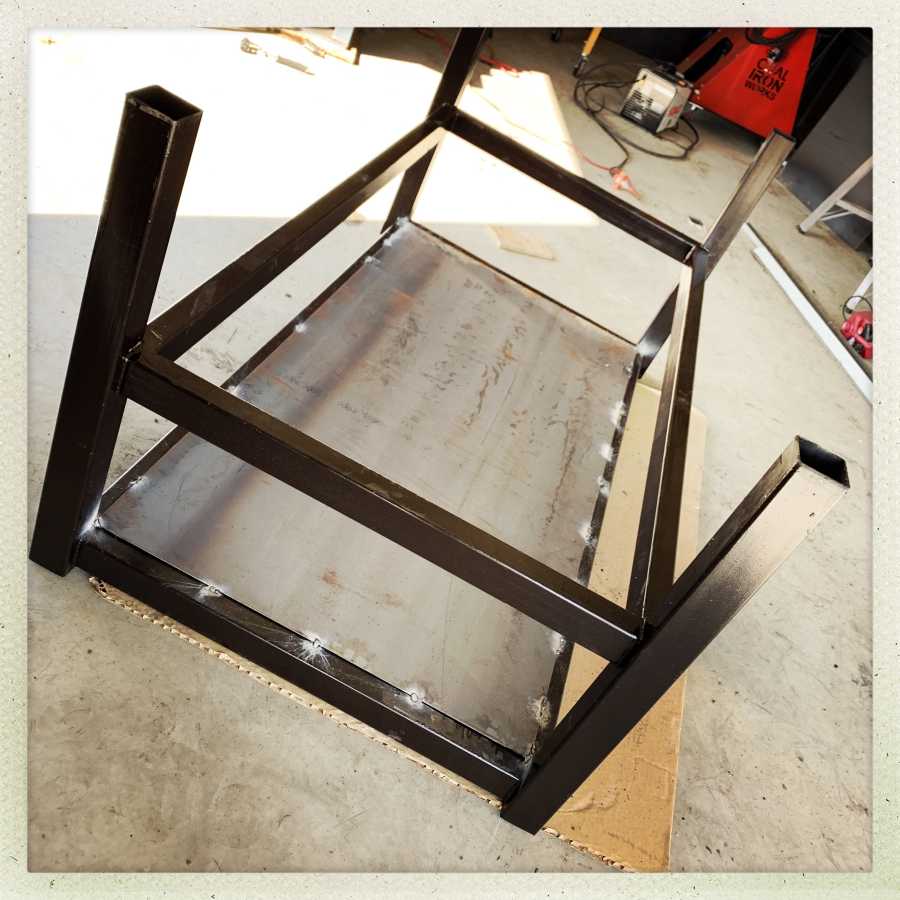
I put the side tubes so they are cheated toward the inner side of the vertical tubes; that way there will be a 1/2″ lip for the bottom shelf and top tray to sit on. The plan is simple: flip it over, haul the 1/8″ thick steel plate into position, then tack it down. Well, that added about 100lb to the thing – it started getting heavy very quickly. Once everything’s tacked together, I made some long weld-lines to seriously hold it all together, then sanded them down and applied more paint.
One of man’s great inventions: paint
I dragged the whole thing outside in the sun where it would warm up and I could smear paint on all the things. When I had it half done and dripping, it started to rain. [In the background you can see the door is off its rail; I was digging a trench for the bottom air dam to run down]
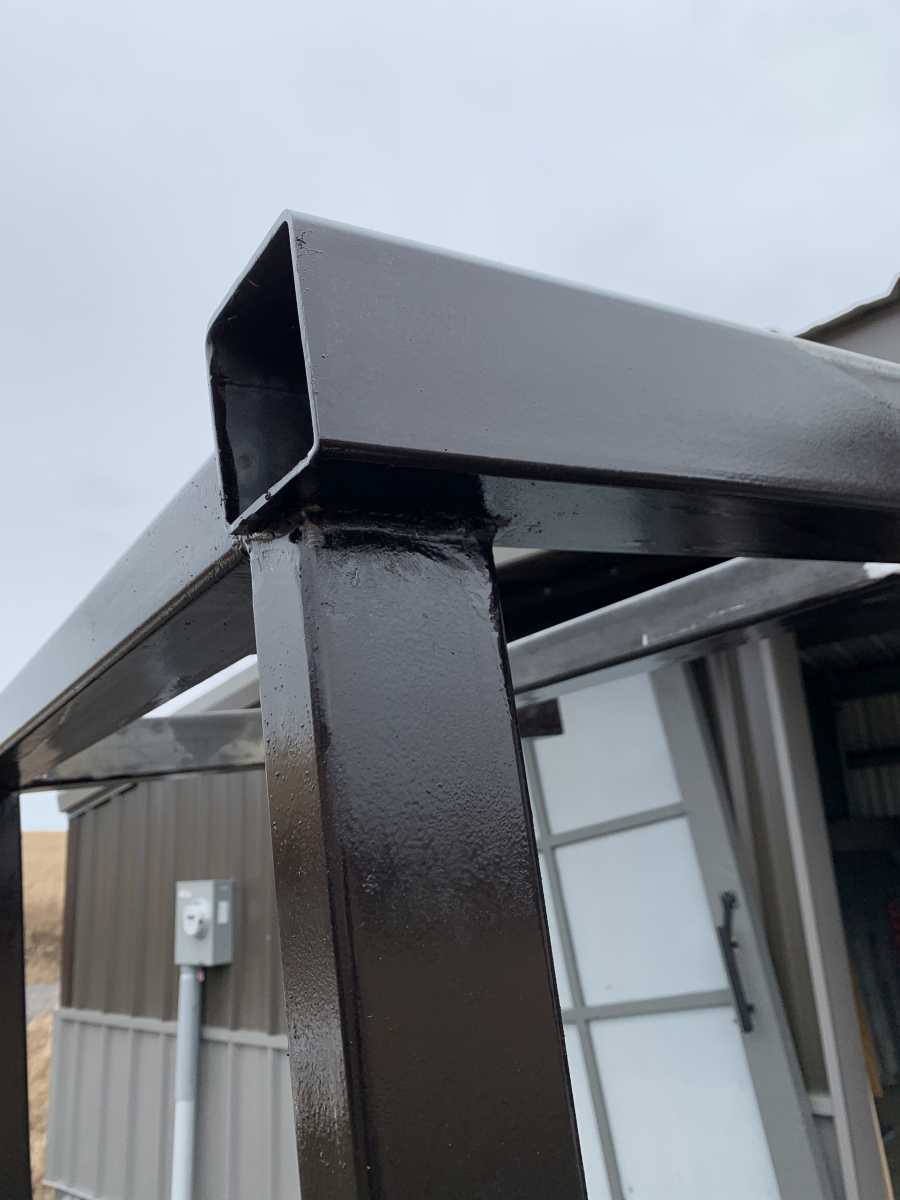
Eventually, I positioned it in what will be its final resting place. It’s cheated off to one side to allow me to swing a piece of hot metal over toward the press (the press will move from its current location) and the floor-holes will allow me to mount the post vise; the anvil will be on the other side. I think it’ll work out pretty well.
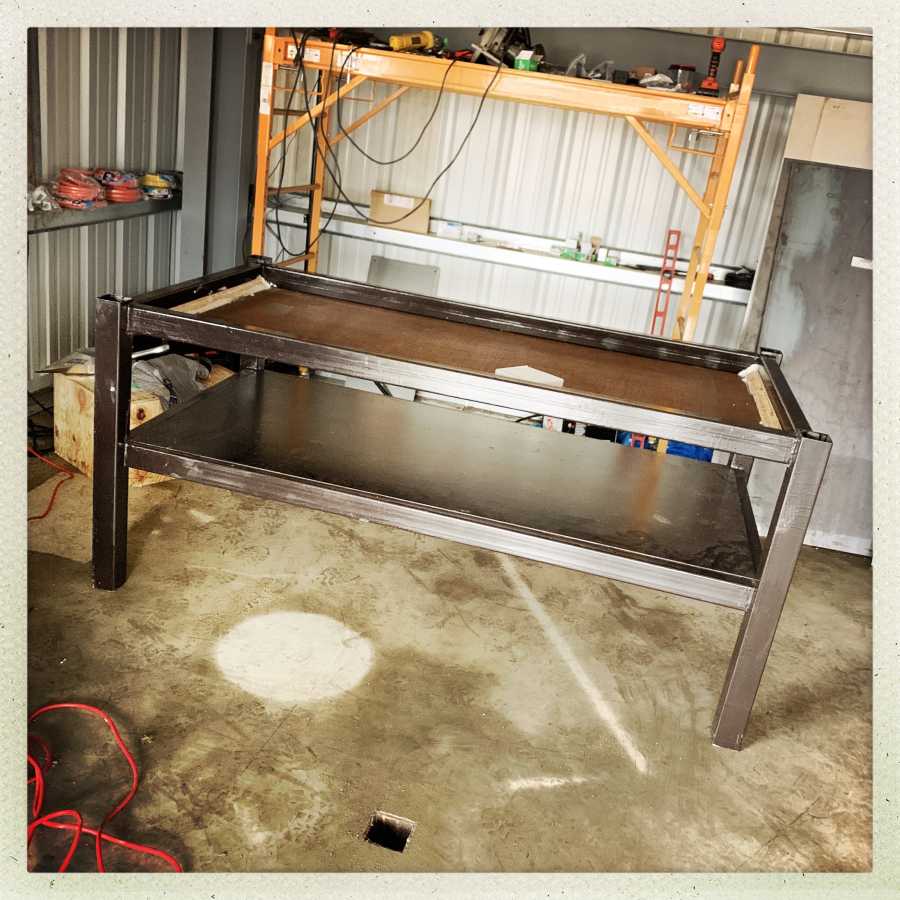
It will have to work out because it’s not going to move much from there. The final stage of setting the table up will be to put a couple sheets of cement board on the top, and fill it to the lip with concrete. It currently weighs about 300lb, and moving it was a chore.
What really sucked was flipping it upright after welding down the top panel. It was just damn heavy. I finally hit upon the idea of putting a steel pipe in one of the legs and getting way out at the end, then using the leg as a lever. My welds are solid enough that picking it up by one leg doesn’t seem to hurt it, so I guess that’s good.
Behind where the table sits, there is room for a couple large floor-cabinets, which will be used to store all the things. I also have two smaller wall-cabinets that will be mounted near the presses and the hammer; I will store dies and whatnot in them. To mount those, I made header-boards similar to the ones for the door track: they’re supported through the beam by hanger bolts and bolted through the steel wall. I make the header-boards with glued up plywood ridges on the back that fit into the corrugations of the wall; I don’t want to crush the metal and it makes for a very positive assembly.
Once I have the cement done, I’m going to assemble and mount the cabinets, then (in parallel) work on the doors for the other side of the building. Spring is here, which is great temperature-wise but it means everything is muddy, wet, or both. Mostly both. If I can seal the other side of the building then it’ll be able to dry out inside, and then I can use a broom instead of a shovel to clean the floor.

I dread assembling the “some assembly required” cabinets. Every time I’ve ever assembled one of those things, I have regretted being born.
Last night, my toilet’s valve failed, so I decided to replace that. Since there is only one toilet in my house, I couldn’t let it sit for days, so I started disassembling things – or tried to. The bolts holding the tank on were a mass of corrosion and they refused to budge. But I had an angle grinder with a diamond cutoff wheel in the shed, so I found myself kneeling with my arms around the commode and a shower of white hot sparks bouncing off the tile floor and going all over the room. You have to be careful with those diamond wheels because they’ll carve right through the porcelain, too, like it’s cheese. I got the job done in about 2 hours (with a break to go obtain one of those weird toilet wrenches) but the whole thing felt like a waste of time. Why don’t they use stainless steel for all of that hardware? It’d raise the price by $1 at most. Oh, yeah, capitalist markets bringing the consumer the best options.
Nothing there that can’t be ground out and rewelded. Even running a bead down the center would likely leave you a ‘gorilla weld’ , a weld that is ugly and bulky but strong. Nobody was born knowing how to weld. It is, IMHO, mostly a muscle memory skill with a visceral sense for what works developed over hours of running beads. Most of the welders, particularly the young ones, seem to do their best work medicated.
In the shop we used to dress up gorilla welds after descaling with a dab of automotive body filler. Strike off a smooth fillet with a gloved finger and let it harden up. A coat of paint and it all looks very nice.
At 18 I did maintenance in a couple of popular bars. Lesson learned: removing toilet bolts cut the side of the nut off instead of fighting the bolt. Got that out of an old plumbers manual I checked out from the local library. This was before the internet.
Traditionally those nuts and bolts were brass or bronze and easy to cut with a hacksaw blade holder. Not to be confused with a hacksaw frame.
https://www.amazon.com/dp/B003VY8WA2/ref=psdc_553220_t2_B078PJDK8D
A fresh 32T flexible bi-metal blade and it was just a few strokes to cut through the nut by slicing down alongside the bolt and popping it apart with Channellocks. The washer under the nut protects the porcelain.
A small 120v grinder will work but the manual saw is, IMHO, usually as fast even after you find a place to plug it in. That said if some overachiever put in steel or stainless bolts a side grinder would be how I would go. Worse were a set of steel bolts too corroded to get the nut off but also too loose to maintain a seal and too tight to lift the toilet. They also lacked the T-heads that are designed to allow them to be rotated 90 degrees and lifted out of the slots in the toilet flange. PITA.
What a mess. After several frustrating attempts standing on my head in the confined space I got it with Vicegrips to hold the bolt stub and a 4″ grinder with an abrasive cut-off blade.
Battery powered grinder or a small reciprocating saw are cheating. Sour grapes: I’m too cheap to buy them, they don’t fit in my toolbox, and they aren’t reliable. The last complaint is from the dark NiCd days when the batteries were always flat, or going flat. Mostly when you needed them the most. Lithium batteries are much better.
I have seen stainless sets sold if you want them. Cheap stainless will corrode with exposure to urine and cleaning compounds. I always go for the softer yellow metal models simply because they are cheaper, easier to cut, and plenty strong for this application. I think of them as one-time-only hardware and get a new set before I start the job.
For the floor bolts you typically have to shorten them to get he caps on. Brass units often have thin spots machined in to allow them to be snapped off with pliers but sawing is so easy it doesn’t save much time.
I need to build some similar tables for my workshop, although somewhat less bomb proof :P They seem like a fairly good novice welder project
re lorn @1:
That is because, if you have to sit there all day burning rods (or wire for a MIG), that routine gets pretty boring. I haven’t been around welders for a long time, but I agree with you. If they were stone-cold sober, their work usually sucked.
dangerousbeans@#2:
I need to build some similar tables for my workshop, although somewhat less bomb proof :P They seem like a fairly good novice welder project
The red things in the corners are magnetic welders’ squares. I used some clamps to make sure they didn’t shift, then assembled the frame with magnets and squared it up, then went around and tacked it. From there, it’s good practice getting your weld-lines straight. There was visible improvement over the course of the project. So, go for it!
lorn@#1:
Lesson learned: removing toilet bolts cut the side of the nut off instead of fighting the bolt.
I used to just use bolt cutters (angling them will crack porcelain, which is how I learned to replace entire toilets)
My toilet is in a sort of corner with a half wall separating it from a tub. So there is about enough room for me to get my head back there if I am not holding a tool, or enough room to get my hand if I don’t need to see. So I did a couple of recon dives and then reached back with the angle grinder and guided it into position with my finger, then found the “on” switch. That process did not make me anything like the slightest bit happy.
In the shop we used to dress up gorilla welds after descaling with a dab of automotive body filler.
Genius! Probably protects from rust, too. Well, it’s too late now and it’s going to just have to look as good as it looks.
hacksaw blade holder
Your typical knife-maker walks around with a variety of broaches and handles for blades. My favorite is a thing I made that’s a drilled steel handle like a scalpel handle that you can epoxy a coping saw blade into. When the blade breaks (as they will) you just burn the epoxy holding the old out out with a torch and epoxy a new one in. Taking a reciprocating saw blade to the belt grinder and thinning it down is another trick.
that description made me nervous, and i’m safely on a different continent