Welding has always seemed like a big scary thing to me. I really have no idea why. My favorite theory is that I’ve seen a lot of bad welding and I don’t like to be bad at anything, so I’ve just avoided it, coward that I am.
There are so many things that we do, which we need to realize that “everyone is bad at it, at first” – which applies, I think, to all learned behaviors. It even applies to most instinctive behaviors; if your parents have every shown you footage of your early attempts at walking, you probably know what I’m talking about. But I don’t want to jump into the whole nature/nurture debate this morning.
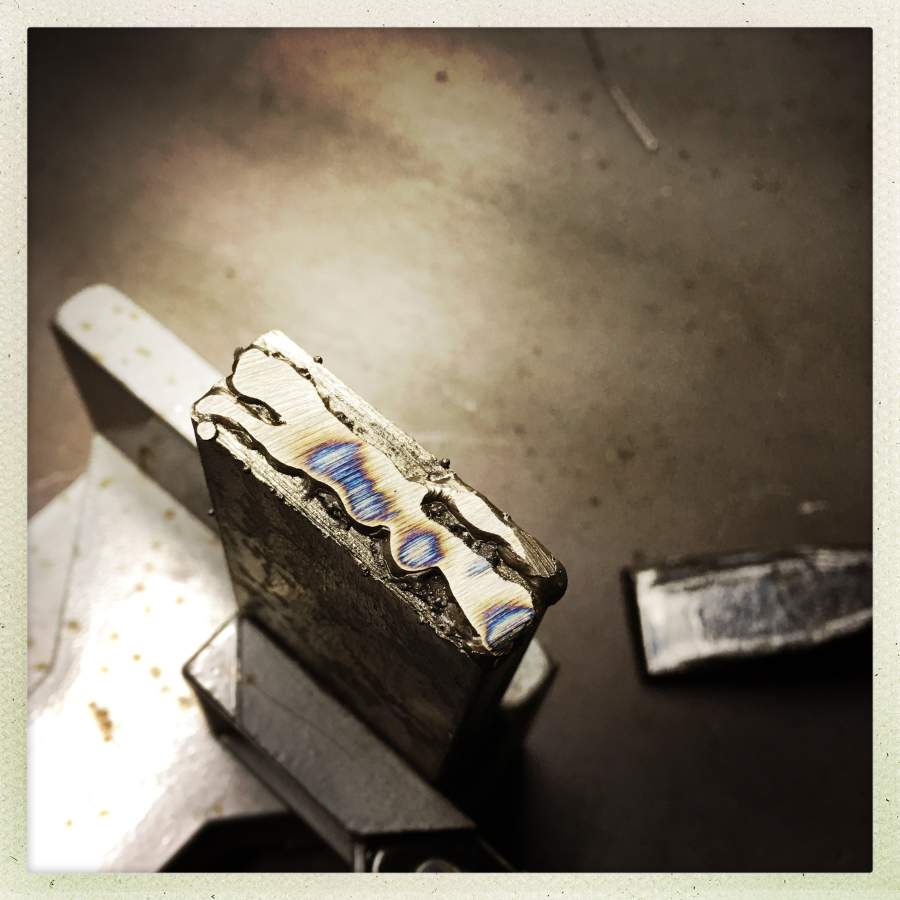
my first weld; ground down to see if the metal was strong
For forge welding, you pretty much are required to have a stick or MiG welder that you can use to tack together your stacked pieces of steel so they don’t shift around when you put them into the heat. It’s also very very useful to have a welder so you can tack a handle onto your work-piece, instead of having to rely on tongs to hold it when it’s in the forge. When I was at Dragonfly Forge, I was constantly struggling to figure out how to get a good grip on my blade without it slipping – more difficult than it seems because the tongs get soft from the heat, too, and then you’re hammering on your work-piece, which tends to shake it right out of the tong’s grip.
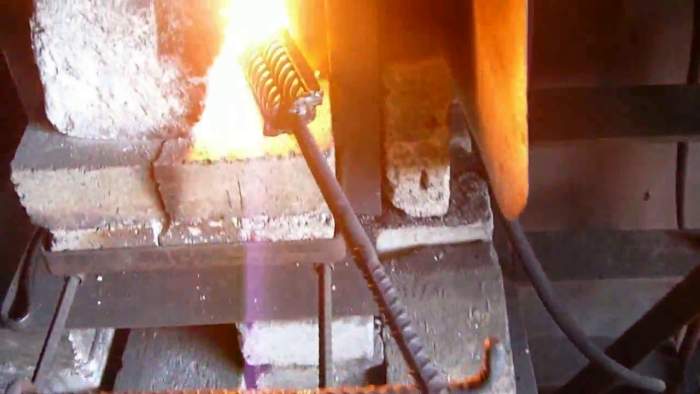
screen-grab from ‘shurap’ showing welded rebar handle on a billet
The state of the art solution is to weld your billet onto a length of rebar. Problem solved. That screenshot is from Ukrainian blade-smith Dimitry Shevchenko [yt] who does remarkable work in steel. When you’re done, you chopsaw off the rebar and grind the weld away.
So, it was a big hurdle for me – setting up a MiG machine requires reading directions and following them, then you gotta get a tank of shielding gas, etc. It was easy to just keep putting off and putting off. Monday I got my tank, yesterday I hooked everything up, and chopped a bunch of chunks off some mild steel stock, and embarrassed myself with a welder for about an hour and a half.
It is intimidating to have that sizzling ball of annihilation right next to your face, but it’s not as bad as I had feared. After an hour I was able to butt two pieces of steel together and not hate myself.

Yeah, yeah, I know that’s as meandering as Hadrian’s wall, but you should have seen where I started! As long as I am improving, I feel OK because I know that eventually I will improve enough that I won’t be embarrassing myself.
Accepting that we are beginners, always, and that we’re always improving – it seems like an important lesson in life. We can never jump straight into being good at things, unless those things are so easy that it’s no accomplishment to be good at them.

Meanwhile: other progress. I had the engineer from the propane company out and he took a look at everything and muttered things under his breath and decided that I needed to drill a 3/4″ hole through the wall so that the feed-line could come in. Sunday, I spent 2 hours with a hammer drill and shooters’ earmuffs and an increasing-sized selection of bits, and made an 18″ long hole through cinderblocks that had been filled with cement and allowed to cure since 1957. That accounts for my relative silence monday: my hands hardly worked the next day.
The propane tank install is scheduled for Feb 7. With a bit of luck I can test-fire the forge then.
Except for the propane, I am ready to go. Oh, yeah, I need to bolt down and wire up my grinder, and make myself a shop apron.
Yesterday I ran across discussion of the work of a bladesmith named J.D. Smith (I know, right?) who does some really gorgeous pattern-welding work. [jds] Apparently Smith has experimented extensively with adjusting the atmosphere in his forge and has figured out that if you run your forge so that the flames are burning all the oxygen up before it gets to the billet, the billet won’t oxidize, naturally. Oxidation is a huge issue when making pattern-welds since oxidized surfaces inhibit welding – the usual response of smiths has been to use flux, generally borax. Borax flux, when hot, corrodes the heck out of anything it touches and also can squirt out of a weld and onto you. The Japanese sword-smiths used rice hulls and grass that would carbonize (steel loves to stick to carbony stuff!) and the carbon would act as a flux. Shevchenko uses kerosene – the kerosene burns off and leaves a thin layer of carbon behind and also serves as a flux. I find all this to be fascinating and all of the crafting I do is that sort of “what if?” directed trial-and-error. Playing with this stuff is going to be a blast.
Tips for MIG welding for beginners: neither paint nor rust makes for a good weld. Have a 4″ or 5″ angle grinder handy for cleaning the joints and chamfering the ends of thick stuff. Its also worth leaving a 1/8″ gap between two thick flat bits for penetration. Oh and crank up the amps a bit, that weld looks cold and lonely all the way up there.
I was a self taught beginner once too, around 35 years ago. You learn pretty quick, MIG is an excellent way to weld. I’ve still got my first MIG welder I bought second hand, damn thing keeps staggering on against all odds.
What you are saying about not being good right at first: man, that is a real hurdle to overcome if you are trying to teach adults something. Children just kind of accept that they won’t get it perfect the very first time, but a lot of adults are just absolutely traumatized at the idea of “making a mistake”. But… ***that’s how you learn***. When I was teaching something I’d tell them, “The man who never made a mistake never made much of anything.” I’d tell them all that they had _permission_ to make as many mistakes as they needed to, to learn how to do whatever that class was about. And I’d tell them, i did not expect them to do it – I just expected them to try. That was all they had to do in my class: try.
So that is really impressive that you are able to allow yourself to make mistakes. I know from experience that if you try, you will be able to learn to do that to the best of your ability – whatever that ability may be, and hey, it might be really awesome. You’ve made a great start!
That would be so cool to be able to do that. I think this whole venture is really exciting.
You’re just fine, Marcus! Welding takes much much practice. Rick has been welding for ages, but it’s one hell of a challenge when you first start out. I have a fondness for spot welding myself.
Playing with this stuff is going to be a blast.
Less so if you keep the flames & sparks & hot metal away from that propane line.
Yesterday I ran across discussion of the work of a bladesmith named J.D. Smith (I know, right?) who does some really gorgeous pattern-welding work.
His blades are so pretty!
We can never jump straight into being good at things, unless those things are so easy that it’s no accomplishment to be good at them.
Or unless we already have some similar skills. I have noticed this several times. For example, if I already have painting and drawing skills, learning calligraphy is a lot simpler than for people who have never done anything that requires having very accurate control over your hands.
This is also why I learn all sorts of art related skills (drawing, painting, digital art, vector graphics, photography, calligraphy). Learning one helps me get better at others. For example, I started with drawing and painting. Then later, when I started learning photography, I found it really convenient that I already knew about things like composition or pleasant color combinations. And learning about shaping light for photography (hard vs. soft light, direction of the light source, color of light) later helped me improve my paintings.
My favorite item on this very topic: https://zenpencils.com/comic/90-ira-glass-advice-for-beginners/
I bought a Damascus steel letter opener yesterday. I’ll let you know when it arrives. It’s made from three different types of steel, one of which is from gun barrels of old Leopard 1 tanks. I think my letter opening struggles will be permanently solved.
Something, something Tactical, something, something …
Lofty@#1:
Tips for MIG welding for beginners: neither paint nor rust makes for a good weld. Have a 4″ or 5″ angle grinder handy for cleaning the joints and chamfering the ends of thick stuff. Its also worth leaving a 1/8″ gap between two thick flat bits for penetration. Oh and crank up the amps a bit, that weld looks cold and lonely all the way up there.
I have a bit of a problem until I can get 220 service into my shop; if I crank the amps up I pop a breaker pretty fast. But I’ll see if I can get it much past where I have it set now.
Gotcha on grinding the edges; I have an angle grinder I was using to remove some of the razor-sharp cut-off bits that wanted to eat my fingertips. A 1/8″gap? That much? I didn’t realize I could go across that big a distance. Needs more experimenting.
I don’t want to be terrible at anything, so I will try get my welding better and be more proficient, but for my purposes (tacking together billets) I am already almost where I need to be. But I hate being bad at things.
I’ve still got my first MIG welder I bought second hand, damn thing keeps staggering on against all odds.
My dad taught me an important principle which was that if you buy real serious tools, it’s better to have a gently-used serious tool than a new toy tool. So I’m always careful to check for availability of parts and whether it has been designed with maintenance in mind and – in the end – I buy whatever’s heaviest!
Raucous Indignation@#7:
I bought a Damascus steel letter opener yesterday. I’ll let you know when it arrives. It’s made from three different types of steel, one of which is from gun barrels of old Leopard 1 tanks. I think my letter opening struggles will be permanently solved.
Old weapons are a great source for high carbon steel of very good quality. The guy I mentioned above, “shurap”, makes knives out of old Moisin-Nagant rifles and stuff like that. Pretty cool. Beat your sword into a letter-opener! Sounds lovely and I am pretty sure you’ll be able to crush those letters’ resistance in short order.
Something, something Tactical, something, something …
You never know when you’ll be attacked by a ninja. Even just opening letters; it can happen. The later Edo period samurai often carried little utility knives build into the scabbard of their sword – pretty much a “letter opener” and maybe an emergency tactical something, something.
Of course a samurai would not be expected to need a tactical flashlight or anything like that, he’d be carrying a wakizashi most of the time, and that’s pretty tactical as well.
I see no indication that there was a market for “non-tactical” gear for samurai. “Look, it’s a wakizashi that is, secretly, a fork!”
abbeycadabra@#6:
https://zenpencils.com/comic/90-ira-glass-advice-for-beginners/
Damn, that is so true.
The thing I find is frustrating is that it’s as though we have limited bandwidth. When I was doing a lot of work in wood and leather, I stopped doing photography. When I was coding in C, that was all I did. It’s as if the more we focus, the better we are, but there’s a limit to how many things we can be really good at, at one time. I always have a sense of allocating my stat points carefully where I want them, and there’s a slight cost (and about 6-9 months) to reallocate them. it’s the 6-9 months of being a complete beginner that are the most fun for me, to be completely honest. I just love figuring stuff out.
Ieva Skrebele@#5:
Or unless we already have some similar skills. I have noticed this several times. For example, if I already have painting and drawing skills, learning calligraphy is a lot simpler than for people who have never done anything that requires having very accurate control over your hands.
Yes. Adam Savage once said a very cool thing, which I think is true – if you want to have a lot of skills, pick skills that cluster and then think about the other skill while you are doing one thing. So if you are 3D modelling on a computer, be asking yourself how you’d approach the problem on a milling machine. If you are making cardboard armor for box wars, you’d be doing the same process if you were making steel armor, except you’d be using a MiG instead of a glue gun, and it’d be a lot slower and heavier. So: if you’re making armor, maybe do your design in cardboard. When I was doing leatherwork I used to make my patterns and mockups using vinyl flooring and duct tape. When I ended up with something I liked, I’d just untape it and I had my pattern for the leather. But it’s a lot faster to prototype in flooring and tape than in leather – and a lot cheaper and safer too.
Pierce R. Butler@#4:
Less so if you keep the flames & sparks & hot metal away from that propane line.
The tech from the propane company was good about that. He took one look around and said, “well, we’ll run all that in armored conduit” and he nodded when I told him that I’m building a blast deflector (my first real welding assignment!) to go behind the forge to keep the heat off the wall.
kestrel@#2:
When I was teaching something I’d tell them, “The man who never made a mistake never made much of anything.”
That is very important advice.
The guys at the welding shop/fabricators in Clearfield are great but they’re really young and they’re not used to an older guy walking in and saying “I am completely ignorant so don’t worry at all about me getting huffy if you tell me I am doing something wrong.” Young guys don’t learn that sort of technical humility, I’m afraid; there’s a lot of toxic masculinity in how some of the trades are taught. Me, I want to learn my mistakes the easy way: at someone else’s expense. I’ll have plenty of time and opportunity to make mistakes of my own but I want to avoid all the burny bloody screamy expensive ones.
Marcus @9
Depends on the thickness, On 3/8″ or thicker that 1/8″ gap aids penetration. 1/4″ or thinner, half that gap. One of my favourite things about MIG welding is its ability to fill holes. No slag from flux means you can build weld into a hole one zap at a time, only finishing when the hole is filled in. Start practicing with a 1/2″ hole drilled into 1/8″ or 1/4″ flat bar, work from both sides on the thicker stuff. Sometimes I need to shift a hole by 1/2 a diameter or less, I build up one side of the hole, grind the surfaces flat and file the hole out in the direction I want to go. Good stuff for rescuing slightly botched jobs.
Another good thing is your ability to quickly make small reinforcing fillets. Take say a piece of 1″ by 1/4″ flat bar with a hole in the end. You bend the holey end at 90 degrees to bolt the leg to another surface. With the MIG you can weld a triangular fillet each side of the hole to stop the leg breaking in the middle of the bend. Saves cutting fillets out of scrap and attaching them with more weld.
Enjoy your 220V supply when you get it, luckily for me Australia like much of the world has it as standard.
Oh and another thing with MIG, if you’re limited in amps you can weld better by drawing small circles with the hand piece, slowly proceeding down the weld line. Extra heat is created that way to make a better join. Also try feeding the wire a bit slower if it builds up too high.
Lofty@#16:
Also try feeding the wire a bit slower if it builds up too high.
I’m still trying to learn the relationship between wire feed speed and work speed. I know it’s a matter of just letting my brain figure it out, but dang is it frustrating right now.
Speaking of frustrating: plasma cutter on 115V 30 amp vintage 1957 ungrounded cloth and oakum insulated wiring. I sure hope the electrician has an answer for that.
Thanks for the hints! I have more experimentation to do. I also have some stuff I actually need to build so I figure having a mission will help focus me (even if the results are embarrassing).
Marcus @17
Not a lot, work speed has more to do with how much the parent metal and the welding wire is melting. Also the way the parent metal removes heat from the weld puddle, a balance between the extremes of a cold weld and a big splatter of melted work piece on the floor. Wire speed is more dependent on amps than anything else.
Also a note on welding visors. When I started I only had a cheap green glass protected flip front helmet, gave me a ripping headache when I did a lot of work. Then one of the guys at the place where I worked for a while suggested a gold flashed visor. Absolutely brilliant, being able to see clearly in natural colour without eye fatigue. The only trouble was their ability to get dangerously scratched, giving your eyes some nasty flashes. Nowadays I have an auto darkening helmet, OK for the little work I do but not a patch on the gold visor for clarity.
In case you do not know – a lot of welding is to be seen on michaelcthulu youtube channel, and he says usefull tips during work as well. For all kinds of welding – MIG, TIG, Acetylene – and even brazing.