This was a really quick build. I completed the top part and the sides, then let it age against a wall for nearly a year, while I more or less decided that the problem it was intended to help with was endemic and it was no use to finish and install.
Final assembly was with foaming poly glue (good for indoor wood projects that will not be exposed to sun or moisture) using drilled holes with hammered-in bamboo chopsticks coated with glue.
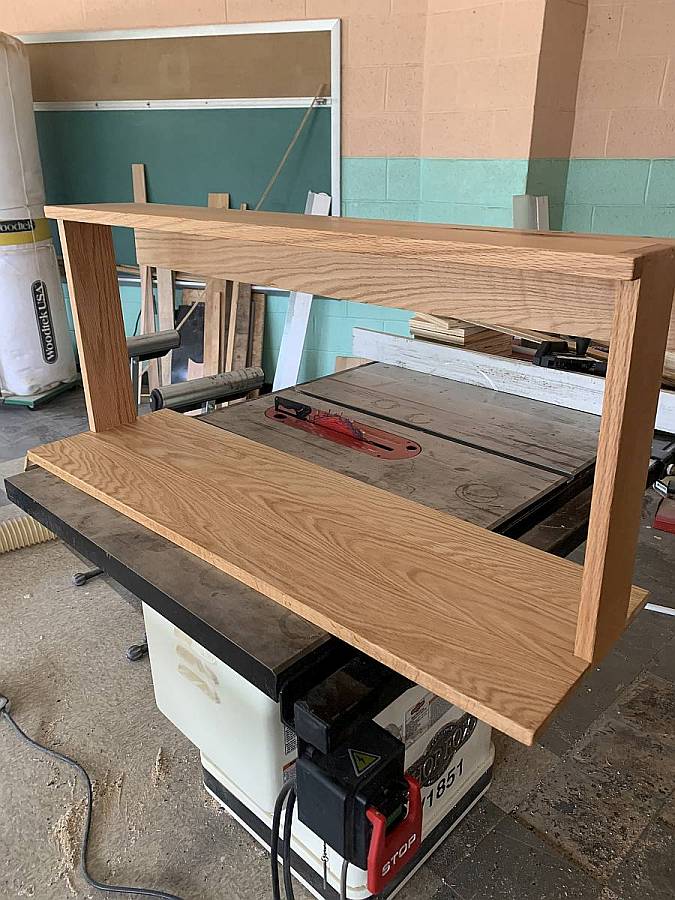
Why did I do that, instead of using stainless steel screws as I normally would? I have no idea at all.
Installed:
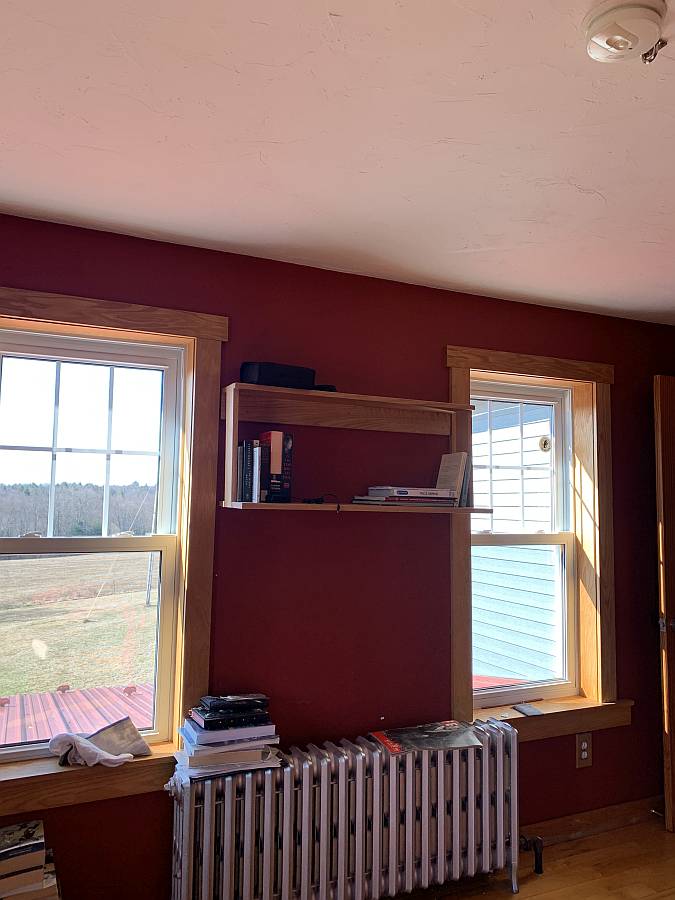
That was last week. Since then, I have loaded it up with books. There was a pretty intimidating pile forming to the left of the radiator, and on top of the radiator, and I moved most of them over to the shop (what, your shop hasn’t got a library?) You can see the remains of the radiator pile, and the pile to the left. Now, it’s nice empty floor space.
I put some time into sanding it until it was smooth as butter, then waxed it with my top secret wax mix. [Recipe: melt 1 part beeswax and 1 part linseed oil in a double boiler, remove from heat, add 1 part turpentine, stir thoroughly and pour off into cans. May add a pinch of frankincense tears to dissolve in the turpentine the day before, to condition the smell]
I knew it was going to be a problem finding the studs in the wall, and it was. Behind the top rail is a whole line of little exploratory holes that whoever owns the house after I do will curse mightily. The overall design of the thing was to somehow match and reflect the room’s finish, with lots of exposed straight wood boards. I’d say I nailed it except I pegged it with glue-covered chopsticks instead of nails.
😃
Useful and beautiful. Wood does give you a starting advantage in the beautiful metric.
It matches the window trim perfectly, and I’m sure it feels good to complete a project and use it to create the zen of empty space where clutter had accumulated.
a whole line of little exploratory holes
Nothing a little drywall mud and some dabs of paint can’t fix. It’s a logical place to hang stuff on the wall, since the radiator occupies the floor space.
Are you telling me that you don’t have a stud finder? I have one that I have used many times with great success to put up shelves in my house without drilling a bunch of exploratory holes. It is a cheap and easy solution.
@Johnson Catman
Are you telling me that you don’t have a stud finder?
I’m guessing based on the radiator that Marcus has lathe and plaster walls, as he mentioned that stud finders are problematic for his house.
I have a house of similar vintage, and usually resort to knocking and then measuring once I’ve successfully managed to locate any studs.
re Tethys @5:
Since that was not mentioned in this blog post, and since my memory is limited to the time since I last slept, I did not know that. My apologies for being so ignorant of the facts.
It’s actually a mix of studs, lathe and plaster, and 2″ thick 14″ wide hemlock plank – the trick is knowing what is where and it’s not telling.
My house is a proper badger’s sett.
The basement has hand cut stone foundations, a well, and a septic – 20 feet from the well. Hey, 1850s. I have a 1/2 mile trenched line for city water. Most of the locals drink strip mine runoff percolated through limestone which’ll give you trumpers for sure.
not a criticism, but just curiosity; why have the vertical side pieces midway, instead of against the back?
(It does look rather nicely done though, as others have said, and pairs well with the window frames/moulding)
I live in an old apartment building with plaster/lathe, and tried a couple stud finders from our local tool lending library (such an awesome resource for apartment dwellers…), and had trouble with all of them, and actually had a lot more luck with an old hard-drive magnet on a piece of string. I’d just drag it along the wall at different heights until it started “sticking”
Are you telling me that you don’t have a stud finder?
Yes. it’s called a cordless drill.
I approve of the cordless drill method of finding studs.
That piece is great, seems practical, and matches the existing décor very well. My only objection is about the chopsticks. I have a small box of pre-made wooden dowels, which are tough and very dry. They are ribbed, which leaves room for glue while also ensuring a very tight fit. I like them very much. I’ve had trouble with PVA-based wood glue not sticking to bamboo, but then again, you use polyurethane and overkill, so it’s probably fine.
Of course I picked the one that most shows off the mis-alignment in the top bracket.
I think that if I did the sides against the back it would have been just as strong and probably easier to construct straight. I chose to make the side stand off from the wall to make it look more vertical and to show bits of book through – I dunno, I guess I wanted it “airy”?
The upper bracket is glued and screwed with long stainless screws. That’s not droop, it’s just just mis-aligned. When I did the pins I just drilled about 3″ in, squirted glue, and hammered in a chopstick then cut it off with nippers. I don’t like using screws in hardwood so much because of all the pre-drilling to keep it from splitting.
A lot of the time when I make things I don’t have a plan, I just charge in and make it and then decide if it’s OK.
our local tool lending library (such an awesome resource for apartment dwellers…)
I’m probably that. I’m the guy in the neighborhood with a 3 story ladder (and a barn to store it in) and various other gear and tools. Often, I lend people a tool because otherwise I have to do the work myself. I don’t let anyone near my nasty stuff (metal lathe, bandsaws, TIG torch, grinders) because of the potential for injury and lawsuits.
cvoinescu@#10:
My only objection is about the chopsticks. I have a small box of pre-made wooden dowels, which are tough and very dry. They are ribbed, which leaves room for glue while also ensuring a very tight fit. I like them very much. I’ve had trouble with PVA-based wood glue not sticking to bamboo, but then again, you use polyurethane and overkill, so it’s probably fine.
I have a biscuit joiner and many clamps and screws. I could have done it that way, with a few stainless screws to hold it together in the interim. It’s just a lot of pre-drilling and stuff like that, and I sometimes want to just hammer some pegs, apparently. Bamboo chopsticks are great because they come in large quantities for next to nothing, and come wrapped in pairs. They are very dry and a standard dimension. They also look great when you nip the ends off and sand them down.
I don’t think I have any PVA-based glue in my shop. Titebond is great, but when I want something glued up insanely strong, I just use G-flex. I had a bad experience with Titebond once when I was assembling something in sub-freezing weather. Polyurethane glue, which activates based on moisture, is OK around freezing. Epoxy, of course, stays gooey since it thermal-cures. Titebond crumbles to dust. [Yes, I owe y’all a post about adhesives]
Also – and this is not just me making excuses for my sloppiness – there isn’t a single straight line or 90 degree corner in my house. It was built in the early 1800s by the family who cut the farm out of the woods, and he didn’t know much about building. And apparently didn’t own a square or tape measure. Or, maybe he was just impatient. I don’t know. But it’s a real hoot to walk around here and see how the mouldings had to be thinned in spots to keep them straight where the walls bulge, or how the angles are carefully resawed so that the door frames are square even if the door holes aren’t. There are a few custom-made wood doors in the upstairs of the house (4 to be exact) all of which had to be laboriously un-corrected in order to get them to look right. It gives the house a certain analogue charm.
That is a not very good picture of one of the few pieces of exposed wall that hasn’t got cal-cote over it. The beam at the top is one of the framing beams that delineates the stairs down to the cellar, which is half above ground, half below. The walls in most of the house are those big rough-cut planks, 2″ thick, just nailed there. Sometime (depression, maybe?) someone went through the outer walls and hammered wet newspaper into all the gaps to keep the wind from howling through the place. Then, in the 40s, a layer of tar shingles was added on the outside. In the 70s the interior was covered in fleckboard/mdf. When I bought the place, the interior was torn down to the boards, then studded, blown with insulation, and cal-coted, which looks a lot like lathe/plaster. The exterior got a layer of vinyl siding because at the time I couldn’t afford cement-board. The walls are mostly a bit under a foot thick, yet when it’s windy there is sometimes a breeze through the hall. Or is that the ghosts of the civil war dead? Who knows.
There is an attic, which nobody has been in since the 80s, with a small trapdoor in the bedroom closet. I believe there have been several resident owls at various times, since you can hear them stomping around up there, which is decidedly unsettling for people who are not used to living with critters. Once night I had a guest and the owl was goose-stepping about and they came running to me in terror. I made some loud bangs with a 9mm and the owl left for the night. But 2 hours later, the Coyote Committee started its meeting right on the nice grassy spot outside the front door. Again, there was a terror-run. I opened the front door and said, “you need to go away for tonight.” And there was silence until the next night.
Straight, square and plumb is hard enough with milled kiln-dried timber, never mind stuff you’ve cut yourself while it was still green. And even if it had all been perfectly straight, square and plumb when it was built, it certainly wouldn’t be by now.
@Dunc – all the beams show marks of being hand-shaped with an adze. The guy who made this maybe didn’t know what he was doing, but he worked hard. Possibly “get it done before winter when we freeze to death”
Well, there’s a lot of different levels of “knowing what you’re doing”… He may not have been a master builder, but building anything from raw timber with limited supplies and hand tools isn’t something to sniff at, and for it to last 200 years isn’t exactly shabby either. Standards were different in those days.
damn. I always appreciate the shots of hand-hewn lumber and such in still-standing buildings. Plus the whole proof-in-concept of the building still standing. I feel like a lot of modern buildings won’t last more than a couple decades, let alone a couple centuries…
When I built my bed (I decided I should maybe stop sleeping on the floor and get a bed, and then balked at the prices of shitty bed frames, so made one out of 2x4s. still had to buy a mattress though…), I read somewhere about using a cheap/old/shitty box wrench to produce grooved dowels, so I bought a shitty/cheap box wrench at harbor freight, and got some dowels, and cut them down to size and hammered them through. I think it worked pretty well? still have my bed almost 20 years later, and it could probably hold a truck, although that’s not something generally useful for a bed. Aint terribly pretty, but it suits me. The chopsticks are pretty clever though, and probably hard to beat as far as economy, I’ll try to remember to keep that in mind for any future projects.
I’d also love to read a post on adhesives.