Most bladesmiths have a “shelf of shame and woe” or a box labeled “fucked” in their shop. If they’re busy smiths, it’s generally pretty full.
When I first went out to Dragonfly Forge, I was almost sent into shock by the stack of katana blades (lightly rusted) stacked against one open piece of wall – what a waste! Now, however, I know that each of those is there for a reason: a bad weld, a chipped edge, a botched quench, a severe warp, or simply that it belongs to that guy who never came back for it. It’s easier to make a fresh start with a fresh billet, than to figure out all that stuff. When Jenna The Welder came over to my shop (to teach me how to weld better!) she noticed on piece that was sitting there (lightly rusted) and asked about it. It was a weird square-ended heavy choppy thing I made as an experiment and I never finished because the shape of the blade made me think it’d be really rough to grind an edge onto. So: it sat.
The problem is, you can’t just tell someone, “oh, take it and go finish it” because it’s a blade you made, and if they go screw it up and then go show all their friends, “Marcus made this…” and the way they finished it sucks, people will conclude you suck. Given all that, I picked the thing up and went over to the grinder and a couple hours later, it had actually turned out pretty well. Coincidentally, I had a block of black linen micarta and some silver rod stock, so “there, that’ll be the handle…” etc.
These notes resume in progress of a blade that was made two years ago, so there is a large gap in the story. I probably have photos of the blade being made, but to find them I’d need to know the date the blade was forged, so I could search my iPhone image archive (which is foldered by day). And I don’t care that much. Let’s pick up with some things about making a slab handle.
The parang is about 1/4″ thick at the spine, so sharpening it meant removing a whole lot of metal. I did most of that with an angle grinder and flap disk, and a die grinder with a sanding drum for the interior curves. Then, I used the platen on the grinder to flatten where the handle will go, and took it over to the drill press for some holes for the pins, and a lanyard hole at the butt, because: lanyard hole! I have been meaning to do a posting about the importance of tangs in knives, and how you must get those right, or else, especially for a weapon. This thing has to withstand the repeated shock of hitting the concrete-hard skull of proud boys, so it’s nice and thick. Besides, if you’re whacking someone on the head with a 19″ long bar of 1/4″ thick steel, it may not even need an edge – just call it “a crowbar” and be done.
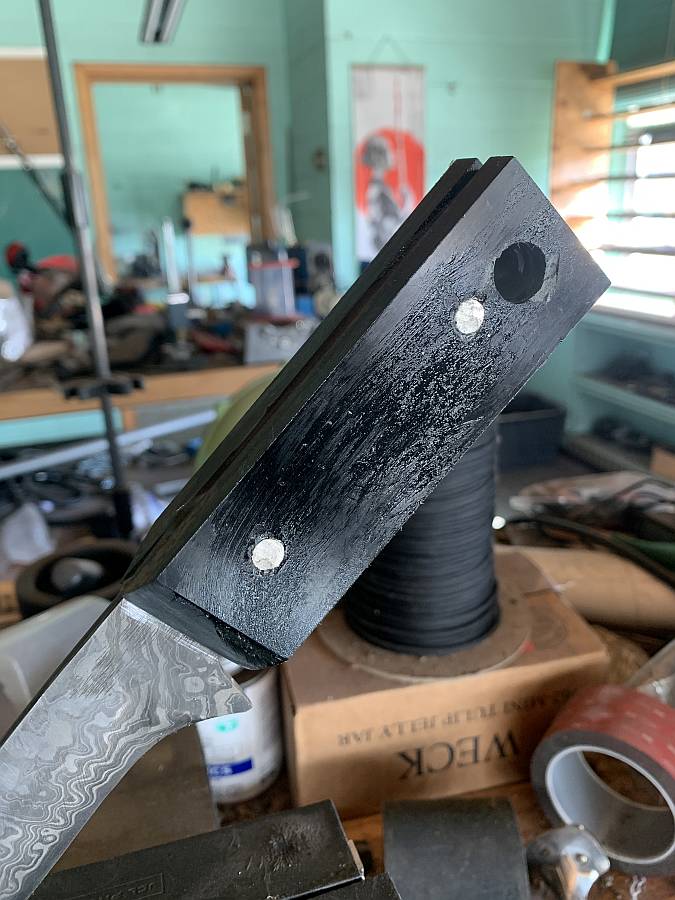
There are a lot of ways of doing handle slabs. I do my handle slabs the taoist way. To do a handle slab, you have to measure the holes so they align exactly with the holes in the blade, or you make the blade holes bigger, or the pins looser, or you spend a lot of time cussing and moaning. Or, you do it the taoist way, which is: Day 1) you epoxy one of the slabs to the handle where you want it. Day 2) Then, you clamp the blade on your drill press, and drill the holes from the metal side of the blade, out through the handle slab. The epoxy will/ought to hold it fine, or you’re not using it correctly. Then, you epoxy the other handle slab on the other side. Day 3) you drill the handle slab from the other side, using the hole you drilled on day 2 as a guide, because it’s not going to slip out of register since it’s already epoxied in place. Day 4) test-fit and epoxy the pins through the slabs and handle, tap them gently with a hammer to expand them a tiny amount, and you’re done
Another thing I forgot to mention: before you put the slabs on, clamp them together and grind/shape/finish the leading edge of the slabs where they will contact the blade. This saves you later having to fiddle around finishing and shaping close to the blade where you can accidentally mar the surface. Also, before you get stuck in to the process of putting epoxy on things, put a nice coat of vaseline or butchers’ wax (or tape I suppose) on the blade and the leading edge of the slabs, so if any epoxy squishes out, it won’t stick and you can rub it off with a bamboo skewer that doesn’t mar the blade. Thus, the taoist accomplishes the same thing, effortlessly, as the confucian who sits with a micrometer and dyechem and lays out the handle holes, risking failure and hours, when they could just accept that mounting a handle takes 4 days. More precisely, it takes 10 minutes, spread out during the course of 4 days.

I made a quick trip to the wood scrap collection and, to my delight, there were two cut-offs of quartersawn oak, 3/8″ thick. I grabbed another piece of oak, stacked them, trimmed them a bit with the table-saw, ran them through the planer a few times to get them consistently thinner – around 3/16″ – then took the inner piece (the non-quartersawn piece) and traced the shape of the hole for the blade, cut it out on Mr Happy Dancing Bandsaw, stacked them and epoxied and clamped them together. If this was leather the inner piece would be called a “welt” – I don’t know or care what this is called, except “scabbard”. The next day it was cured and I checked fit with the blade and – ugh! – it was a bit snug on one side. So, I did what you do in this situation and went over to the stack of discarded bandsaw blades, cut a chunk off one that was the depth of the scabbard, clamped it in vise grips, and hogged out some of the interior of the scabbard until the fit was smooth. Then, since I was done for the day, I epoxied some sand paper onto a strip of cut-off aluminum stock, to use to sand the interior down the next day.
All of that done, I did some shaping on the wood and set the curve of the upper surface and bottom, and generally fucked around with it until I was tired of fucking around with it and it satisfied my eye. There is an important philosophical point to understand, here, namely that when you start making these aesthetic choices, you are creating privileged knowledge. Unless you tell the person who eventually owns the thing “I should have shaped the top of that a bit curvier, but my hands were getting cold and I wanted to head home…” they’ll never know. They’ll assume with their limited knowledge that the way it is, is the way it’s supposed to be. In fact, the way it is, is merely the way that the taoist made it to be, and the shape had more to do with yummy chinese food for dinner, than some kind of complicated design.
Since the handle is black, the wood should be black, and I have a lot of experience with blackening wood (and anything else in the vicinity!) with Feibing’s leather dye. I knew without thinking that the lignin lines in that quartersawn wood were going to pop when the whole thing is black. Blackish.
Then I texted Jenna to remind myself is she right handed or left, and promptly made the scabbard to ride on the wrong hip. But she doesn’t know that, and won’t since she doesn’t read my blog. Shh.
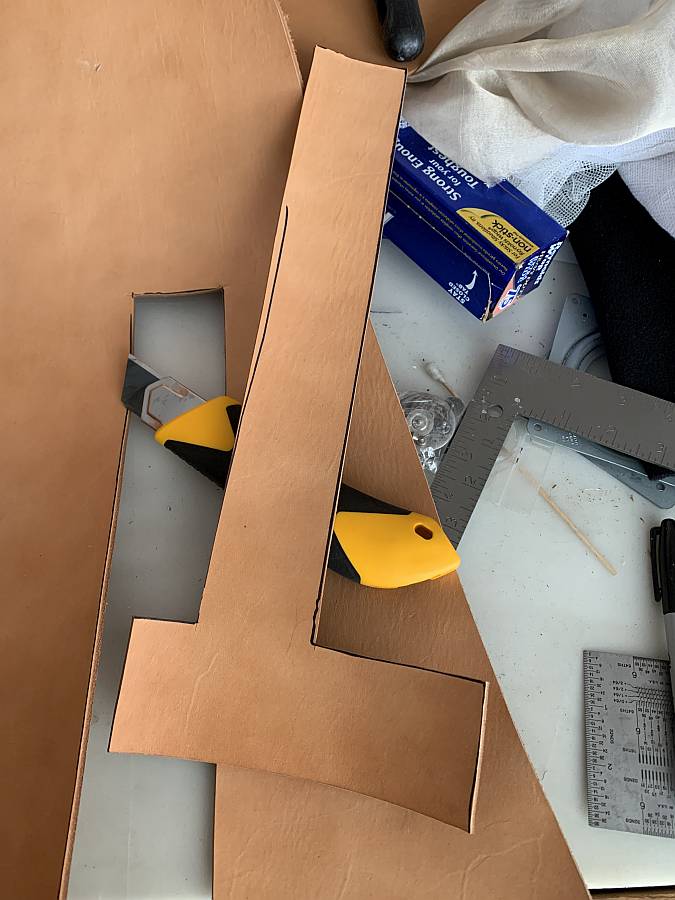
Why’s it asymmetrical? Easy: I don’t want the unmated edge of the leather to align with the glue edges of the wood. My plan is to wrap the leather and epoxy it down to the wood, so it becomes a composite reinforcement to prevent the throat of the scabbard from easily disassembling and letting the blade go into Jenna’s femoral artery. I’m thoughtful like that. Normally, when I do a scabbard like this, I wrap 5 or 6 turns of stainless steel MIG welding fluxless wire (ironically, I did not do that, since this is for Jenna The Welder) Passive safety mechanisms like this are also the taoist way. If something hits her hard enough to rip heavy oak-tanned leather off epoxy and oak, she’s already got severe problems. This is not a theoretical topic – it is entirely possible that someone might have enjoyed Mad Max before Mel Gibson ruined it, and be thinking a parang would be the perfect thing to wear strapped to a leg while on a motorcycle ride. In fact, I know an unwise young fellow who, around 1978, went on a motorcycle trip with a katana slung over his back. Fortunately, there were no accidents, but a small drop and roll becomes a big issue when a katana is thrown into the mix.
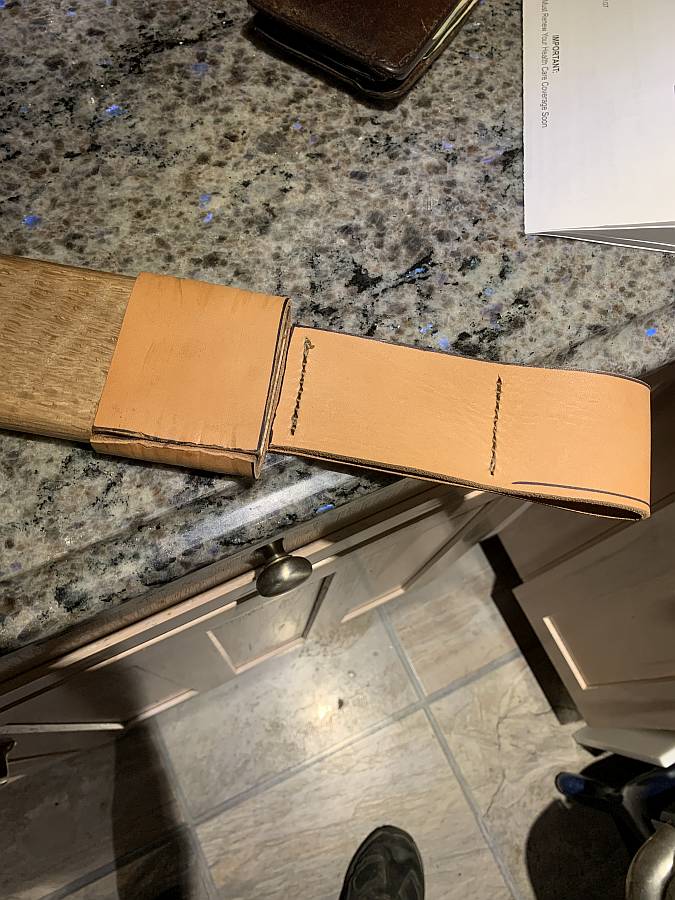
Now, you can drool at the grain in the wood. Or at my hand-stitching skills. Whatever. Since I knew the loop was going to be covered over, I formed it with epoxy and wrapped it with wire and left it to cure overnight. The offset cut is going to be covered by the, ummm, the covering thingie.
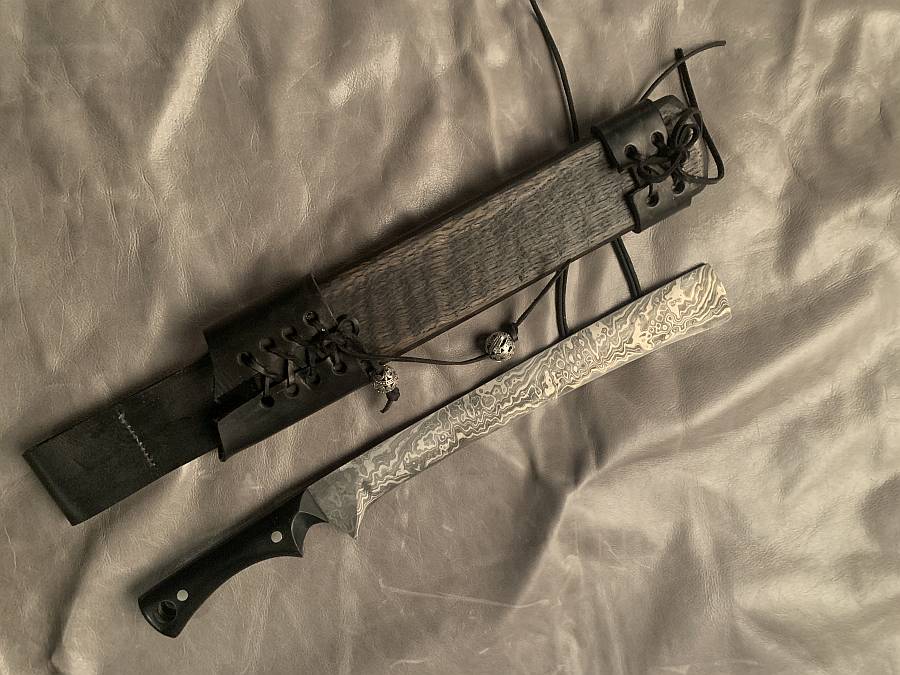
The covering thingie is laced, obviously, but is also epoxied along the back and sides, to hold it in place and further reinforce the throat-piece. Now, if you’re perceptive you might be thinking that the angled bit on the covering thingie is going the wrong way but actually it’s to make it less likely the wielder will hang the top of the parang in their leg when they’re sheathing it. Also, it helps provide drag to keep the parang from bouncing out. Or, maybe, I did it backward. I’m not telling and since you don’t know, neither are you.

You can’t see it in the pictures, but the bottom cover thingie has a loop in the back with a stainless welded D-ring that can carry a piece of paracord to tie the end of the scabbard to a thigh, so it doesn’t slap around. Parangs are intended to be used quietly.
Now, some things about parangs that I don’t really know. My history, here, is based on George MacDonald Fraser’s Flashman books, specifically Flashman’s Lady. I checked, and, as usual, Fraser is meticulous. [wik] At one point, Flashman winds up in Borneo, then known as “Sarawak” and there is some discussion of the use of the parang. Apparently, there was a tribe in Borneo that was known as the Bugei. The fun-loving Bugei were river pirates and their idea of an entertaining evening was to swim quietly along a river until they came upon a ship full of sleeping, stupid British people hauling valuable stuff. You can picture them swimming along with their parangs held in their mouths, if you wish. Then, they’d sneak onto the ship and parang the crew silently, steal all their shit, and swim away. The British were upset and scared by this, and someone apparently told some kids “be good, or the bugei-men will get you.” Later, it got mis-spelled as “the boogeyman” so, there, now you’ve got some valuable cultural context.

One other point: when drilling holes through 1/4″ thick steel razor-sharp thingies, you should 1) drill from the side that places the edge on the left of the rotation of your drill press 2) use a machinist’s clamp. A year does not go by without someone in the knife-making community being too hasty to clamp down a blade, and they hold it, instead. Then, the drill catches, and you have a razor whirligig and suddenly the time saved by not clamping is consumed in trips to the ER and reconstructive surgery. This is one of the many “issues” I have with shows like Forged in Fire that emphasize making knives quickly. The taoist makes knives slowly, and makes 5 or 6 at a time and it comes out the same in the long run. But shows that put a timetable on the maker, ignore the fact that the timetable pulls the maker out of their safety zone, just to entertain an audience. Ugh. It’s disgusting. And Doug Marcaida really needs to study how to cut with a blade if he’s going to pretend to test blades. Hint: you do not whack your target like you’re hitting it with a stick, martial arts stick-boy.
Quick question: do you use different varieties of epoxy for different steps?
I.e. I’ve assembled knives (Green River brand blades and applewood handles from the trees in our backyard) using J-B Weld.
I made leather sheaths using Barge cement and waxed-nylon thread.
Do you use something like West System for everything?
Thanks in Advance
fusilier
James 2:24
I use a variety of epoxies. I should do a post about that.
For example hanging off my porch for 3 years is a block of resin and carbon fiber. It’s crumbling. The West Marine resin next to it looks new. You have to understand your adhesives. I have seen people assemble knives with gorilla glue (urethane) which absorbs moisture and crumbles. Cyanoacrylates are also problematic/not UV stable. I use them for projects that will only be indoors.
Mostly I use PC7, which I have used since the 70s and I have PC7 stuff that is going strong. I once patched a weeping leak on my motorcycle gas tank (UV + solvents!) and it held a decade until the bike died. I also use PC11 because it accepts alcohol-based pigments. Sometimes you need bright red epoxy…
I also use a lot of West System G-flex. It’s more tractable than PC7.
I am on my way right now to bed a chisel tang in the handle. Since there will be air space in there I will use g-flex in a big layer, with chopped carbon fiber stirred in. I want it to reinforce the wood, not just hold the tang in. Then a topper layer up by the neck to keep the CF away from the user. I use clay sculptor’s and dentists’ tools – you can get nylon versions perfect for shoving epoxy into holes.
Barge is amazing. It’s basically polyurethane rubber dissolved in trichlor. It’s slightly stretchy so for the parang scabbard I used G-flex.
JB Weld and PC7 are both steel-filled epoxies. They are absurdly strong. I once cast a crysknife out of JB Weld with a whiff of pearl pigment and titanium dioxide. I want to redo it with a steel edge but, ehhhhh…
Waxed synthetic sinew is amazing stuff.
I would certainly like to learn more about what epoxies you use and why.
And I’ll mention that even though the backgrounds are blurry, it gives me some satisfaction that your shop is just as neat as mine. ;)
In this case I used G-flex because PC7 would have left a tiny but visible gray line.
That’s quite a thing of beauty and will be a joy forever. I’m assuming the parang got its name from the sound it makes when it hits those concrete-hard proud boy skulls.
Thank you! I don’t know why I find your posts about knive and accroutrement making so soothing, but I do. And I get to look at beautiful things.
Oh, and I initially read the headline as “The Prang” and thought “Oh no! Well it couldn’t have been too bad as Marcus can still type”.
The blade is a thing of beauty, well done!
I had to goggle parang and black linen micarta. I’ve always wondered what knife handles are made from, so I’ve learned two things.
I am also fond of blue-eyed granite and what looks to be travertine floor tiles. (I like rocks, I’m just weird that way.) Is the bit of mail that mentions health care in that photo intentionally funny, or a coincidental funny?
Ok, back to swearing at my kitchen plumbing. It’s a holiday tomorrow, so of course it’s not draining, the snake is not here, and I’m having to wash dishes in the bathtub so I can get to the actual sink, etc….
FML
flex@#3:
And I’ll mention that even though the backgrounds are blurry, it gives me some satisfaction that your shop is just as neat as mine. ;)
The nice thing about owning your own building is you can just put stuff down and walk off, to pick it up again whenever you want. The downside is that, “who needs to put things away?” I have some projects that have been hanging fire for years, yet they still occupy some space on the bench. When I first set up my shop (I built the benches, did the wiring, everything) I made these huge extremely solid benches, and now they are weighted down with literally hundreds or thousands of pounds of stuff.
Tethys@#8:
I’ve always wondered what knife handles are made from, so I’ve learned two things.
There are many many options, ranging from rock, to wood, modified or synthetic wood, leather, or metal. Then there are things like bone, ivory, etc. But just saying “wood” introduces a whole lot of options. I’m addicted to insanely rare but exceedingly elegant bog oak, which is semi-petrified wood in the 4,000-6,000 year old range. Probably the most exotic material, leaving aside the bones of your neighbor (Iain Banks fans, sorry…) is mastadon ivory. Since we’ve already driven them extinct, people who find it, sell it for princely sums.
Micarta is a general term for layered composite, usually paper or cloth. There is also a substance called “pakkawood” which is vacuum treated resin-impregnated wood. Resin-soaked anything can be pretty neat, i.e.: resin soaked leather. And, in a contest of whimsy, I did once make a mold for a classical Japanese-style knife handle, which I then cast around a blade using pure JB weld. Man, was that an ugly SOB of a knife.
Is the bit of mail that mentions health care in that photo intentionally funny, or a coincidental funny?
Whoops! Sometimes when I shoot illustrative pictures, it’s too late to go back and fix compositional errors, and I just leave it so long as nothing sensitive is compromised. Now I’m going to have to include some H-bomb assembly diagrams in some of my shots.
I love the metal in that blade. Really something. A thing of beauty all around.
I too would love a post on various glues and epoxies.
I’ve always been a huge fan of southeast asian blades, the Parang, Golok and Ginunting being my particular favorites. That’s a lovely and hopefully practical knife you’ve made there.
A Panabas sword would also be a really interesting project. There’s a very different kind of grace to the Philipino traditional blades than the Japanese traditional blades.
snarkhuntr@#12L
A Panabas sword would also be a really interesting project.
Uff, so it would. I immediately jumped to thinking of wrought iron body with a welded-on 15N20 edge… But then I hauled myself away.
There’s a guy on instagram who makes balinese knives (Kris) that are crazy beautiful. I’m skeptical about the blade-shape, though, I have to admit.
https://www.instagram.com/p/CoNASTAPhfy/?igshid=MDJmNzVkMjY=