The next step in the blade’s preparation is to clay up the edge, heat the whole blade until it comes to critical temperature, then plunge it into warm water to harden it.
Perhaps one of the physics-inclined who comments here can explain “critical temperature” better, but it’s the temperature (around 1750F usually) where steel loses its attraction to magnets. A lot of smiths just go by that: they carry a cow magnet and when the blade is evenly non-magnetic, into the water it goes. Why does it go non-magnetic? I don’t really understand that part. But from a standpoint of hardening, it means the steel is in a state where its crystals are not formed – everything is floating around in the bar very quickly. When it’s quenched, it freezes (literally, I suppose) in one of the crystal structures steel can take. Martensite is very hard and takes a good edge. Bainite likewise but it’s springier. Pearlite is the “normal” state of annealed steel. And there’s another state I forget, because bladesmiths don’t encounter it much. There is a lot of magical thinking around quenching, which I won’t go into. For me, it’s just a process. But it’s also a demarcation-point in the life of your blade; a botched quench may mean there’s something wrong with the metallurgy, or the smith, etc.

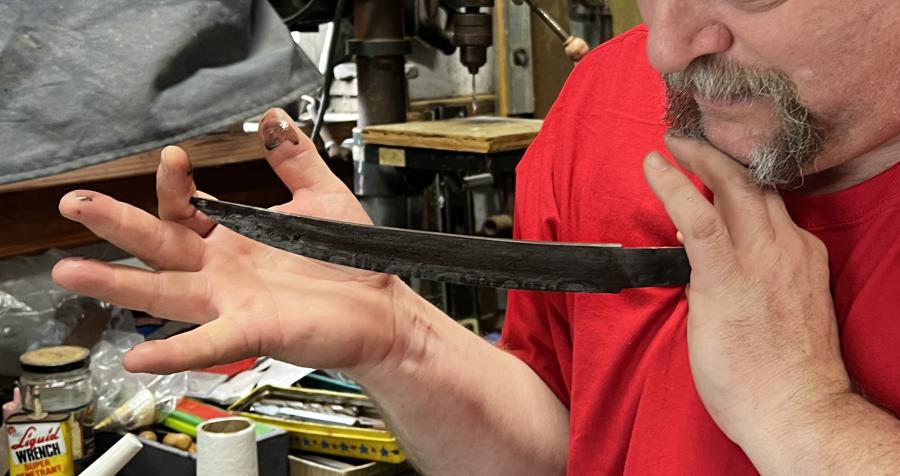
Quenching the badger’s claw. Photo by Mike Poor.
One of the big things that can go wrong is your clay comes off the blade. That’s easy enough to do – you just scrape it a little bit on the edge of the forge while you’re heating it. That’s disastrous because the blade now has one uncovered side and one partially covered side and when it quenches, it will bend violently away from the uncovered side (I’ll get to that) and may crack. You have to anneal it, re-clay it, and retry the quench.
You may notice I’m wearing furnace gloves. That’s because your hand winds up in front of the opening of the forge for about 10 minutes while you slowly raise the blade to temperature. By the end of that your hands are smoking. I like gloves. Some smiths make it a macho thing, but I feel it’s more of an intelligence test. Since my job is to hold the blade carefully and not slip, anything that helps me do that is a plus.
After quench. Crop from a photo by Mike Poor.
The outside of the blade has a thin layer of carbon that migrated; not enough to make much difference to anything, though if you have to do multiple quenches, carbon migration can become a factor.
Look closely and you can see my clay design with the “flying spaghetti monsters” down the edge and the noodly appendages above them. There’s a whiter region along the edge and that’s the temper-line that resulted. There’s no detail in it yet but what you’re seeing is the transition-line between martensite (edge) and pearlite (back and tang) From here on I can drop the blade and chip the tip off, or something like that. Martensite is hard and takes a glorious edge, but it’s not diamond or carbon/carbon or something insanely tough like that.
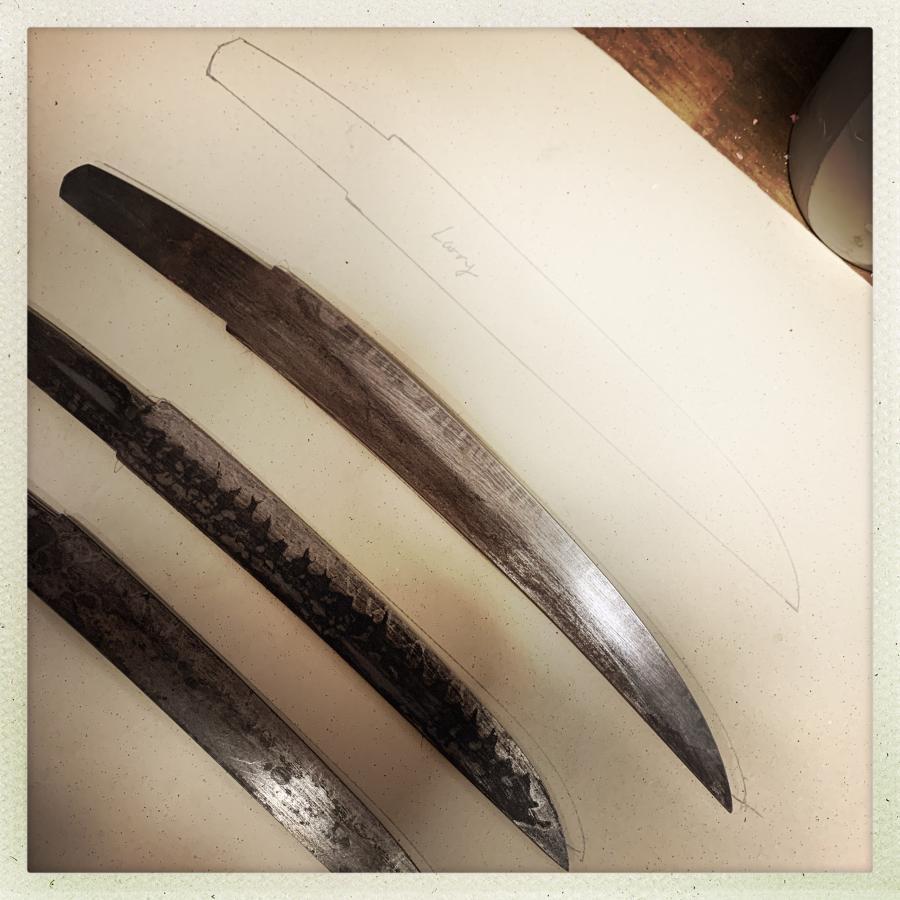
This is tremendously fun: it’s the same paper I photographed the blades on before – we traced a pencil line around the unquenched blades. Now, you can see the additional curvature that the blades acquired in the quench. It’s subtle but it’s not minor. There are a lot of factors controlling it, but the simple form is that the martensite crystals are larger, so since the edge is made up of martensite, it gets a bit larger. That causes the blade to tension internally and the edge bends the back of the blade into more or a curve. Compared to the strength of the steels involved, that is insignificant. The third blade, Mike Poor’s, came up with a very dramatic and pronounced temper-line, which is what Mike was going for – he used a lot of clay and a design that made the transition-zone very fractal.
That’s where the badger’s claw is, now. I’ve actually done a bit more grinding on the cutting planes with higher grit sandpaper, but that’s slow going. I’m not in a hurry, this blade turned out much better than I ever expected and it’s deserving of care and respectful treatment. A bit more grinding and then I will have to build myself a sword polisher’s bench and go at it with stones. I’m thinking of farming the finish polish out to a professional polisher, and making the habaki and fittings for a simple mounting, myself. The stones are pretty amazing as a polishing technique: they are large and planar, so they further refine the planned surfaces of the blade. They also remove metal pretty quickly.
Michael Bell does a small polished region on the blade, to reveal the metal a bit
This is what the metal looks like once you’re past all the scratches from the grinder and the carbon from the quench.

The hamon will be much sharper and more interesting when the blade is fully polished. In the meantime you can see the “gane” (grain) of the oroshigane – that’s caused by the carbon and impurities in the steel being layered over and over while the metal was folded and welded. Everyone in the class’ blades had that kind of action in the steel and we were all extremely chuffed. A well finished oroshigane blade is a really beautiful work of art, and despite the fact that badger’s claw has a few more years on that path, it’s on the way.
Badger’s claw is looking good so far, in my inexperienced (apart from what I have learnt from you) eye. It sounds like a very satisfactory week.
A long time ago at engineering school we studied the Fe-C phase diagram. It explains the presence of different phases of steel/cast iron based on temperature and carbon content.
IIRC (it’s been a couple of decades), the critical temperature is the bottom boundaries of the pure Austenite area.
Addendum: I forgot to say that austenite if paramagnetic, while both ferrite and martensite are strongly ferromagnetic. Hence the reaction to the magnet.
That looks extremely promising! I do hope to see a finished product/polished blade one day. I also hope to be able one day to play with making my own steel too, but it has a low priority now.
I had breakfast links and blueberry pancakes for breakfast/lunch today.
marcus wrote:
I don’t claim any expertise in metallurgy, but I do have a lot of experience thinking about superparamagnetism, which is the effect you are describing: https://en.wikipedia.org/wiki/Superparamagnetism
Briefly, you’ll recall that absolute zero defines zero motion of atoms in a solid? Well, the same goes for magnetic spins. You heat up a magnet, and the spins no longer point in a single direction, but can be found within a cone defined by the crystal lattice. Above a certain temperature, the cone in which you are likely to find the spin has an opening angle of >180°, which means the spin can take any direction. This is the critical temperature, or Curie (Pierre) temperature, Tc.
It’s not that surprising that Fe-based alloys undergo a material phase change at a temperature coincident with their magnetic phase change. It’s not always the case – the system I’m most familiar with, small grains of FePt grown in the element-ordered L10 arrangement have a relatively low Curie temperature of ~650K, safely below the temperature where thr physical structure of the grains is likely to change. These are candidate media that the HDD industry is frantically trying to turn into viable systems as part of heat assisted magnetic recording where the grains are heated above Tc during the recording process. Materially stable grains are a bit of a necessity in this context :)
https://en.wikipedia.org/wiki/Heat-assisted_magnetic_recording
Just look at that blade! The tip and the shape are really beautiful. The grain is gorgeous! What a marvelous thing it is. Are you going to put it on display in your house or forge? You must be so proud of that. It’s amazing! I’m sure it will be even more beautiful when completely finished.