Mike P and I went through the wakizashi fittings-making class at Dragonfly Forge together and have been chatting about knife-making and techniques ever since. Mike’s also a serious cook. He’s from Brazil, though, and uses massive amounts of meat in everything, while I’m trying (and succeeding!) in cutting way back.
Many of the experiments I do are semi-pointless: I just want to see if something works, and if it makes me happy I remember it and maybe do it again. Consqeuently I wind up with some knives that are questionable. For this one, I used Mike as the tester.
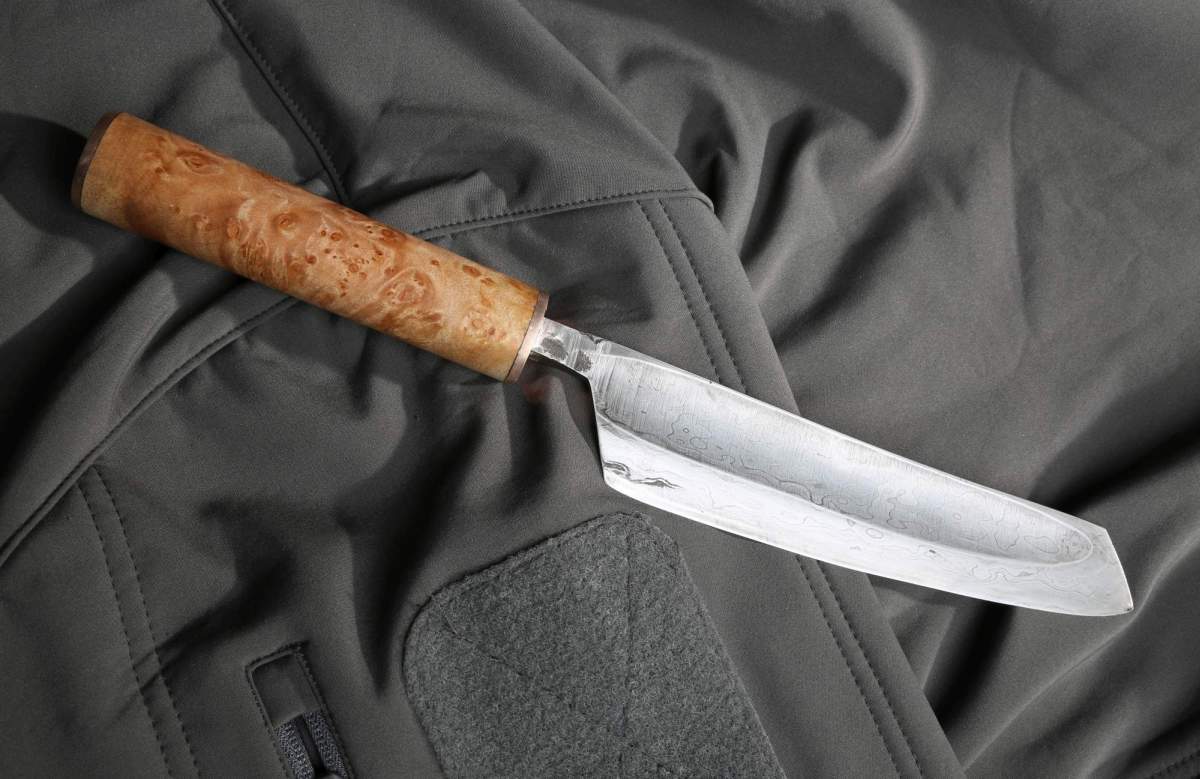
internal designation: “wroughtface bruiser”
The blade is 3 layers: wrought iron, 1095 steel down the center, and more wrought iron. To form it, I forge-welded it in a stack (like an ice cream sandwich), made sure it was stuck, then drew it out into a long flat bar and hammer-forged the tang. Subconsciously I was working for the opposite effect of the small, light and airy paring knives I seem to enjoy doing. But mostly I believe I was returning to the question of the massive fuller, which I experimented with on my long slicer knife that failed. You have to forge and quench/temper the knife in its rough shape before you do any big asymmetric grinds since, otherwise, they almost certainly will distort when you normalize them and quench them.
In this case, since the fuller was ground out of the wrought iron facing, I knew the steel wouldn’t be under stress – wrought iron doesn’t harden – and it would be easy to free-grind the fuller. And that’s how it worked out.
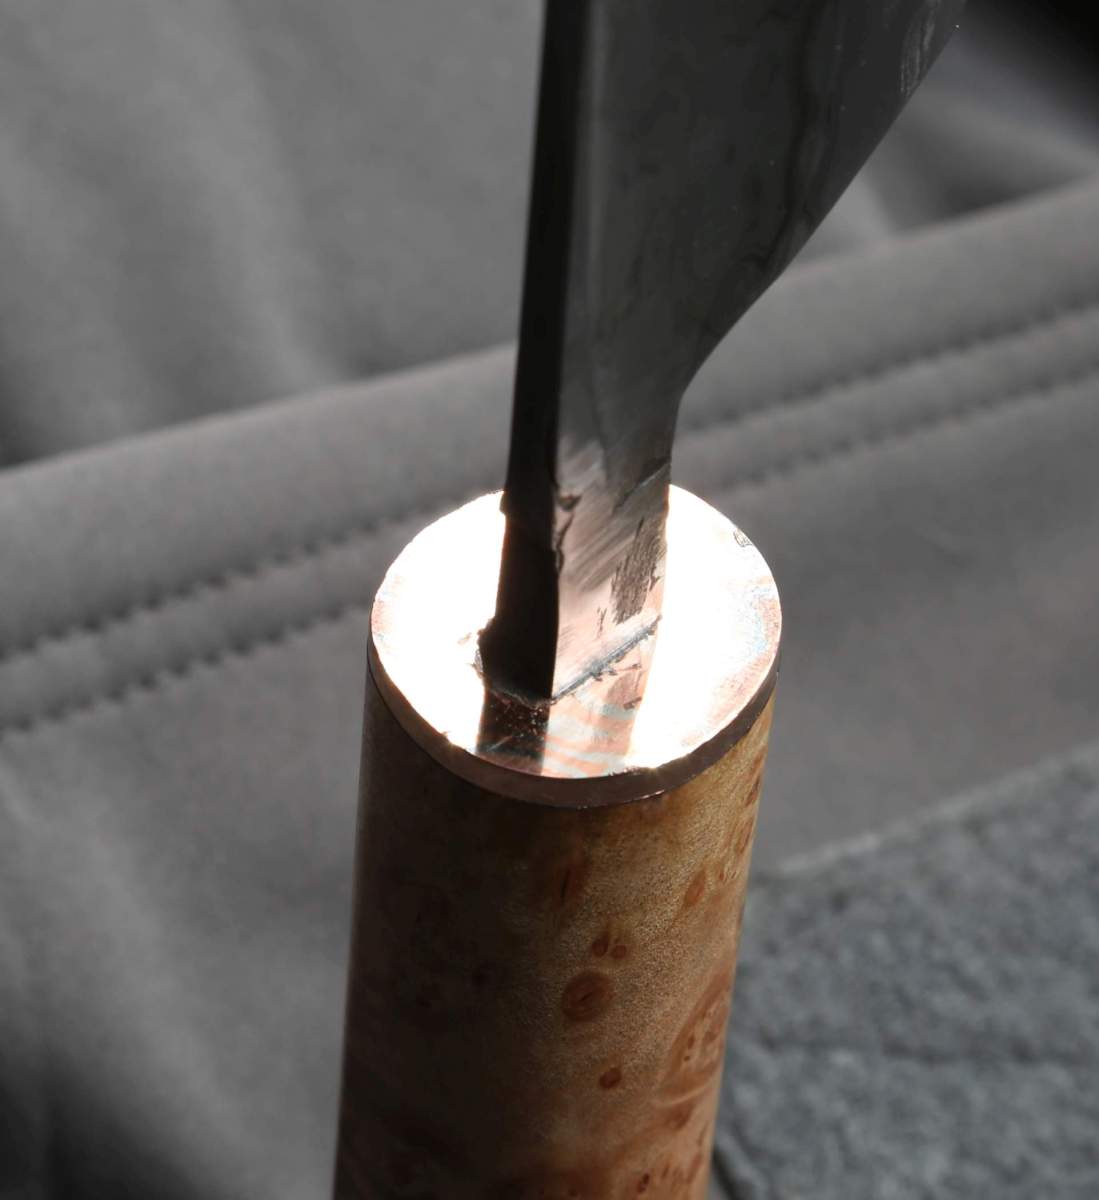
Mike’s a burly guy, so the handle had to be burly, too. So I used a piece of local maple burl that I dried in the oven and resin impregnated under vacuum.* To cap it off and give it a bolster, I used some of my home-grown mokume gane, in nickel and copper. To help keep the cap on, I drilled it and hammered in a 3/4″ copper rod as a pin, which goes pretty far toward the tang – they actually contact eachother near the tail of the handle. The tang on this thing is a great big bar of material; if Mike manages to bend it, it means he’s using it to de-bone jeeps.
mmmmm…okume!
The way I shaped the tang bothers me a bit. When it gets close to the blade I had a decision to make: leave a ridge or grind the whole back down. I decided to leave a roughish transition zone, which unfortunately looks like I mis-mounted the mokume bolster: there’s a line of steel that looks a lot like the mune-machi (rear notch) on a katana. I left it there as a thumb-rest but someone might misunderstand it. I guess it depends on Mike, now.
You can’t really see it in any of these pictures but the front and rear bolsters are polished to a fare-thee-well and you can see the layers of the mokume along the edge of the metal. It’s pretty cool – it looks like puff pastry if you hammered puff pastry down in a 20 ton hydraulic press. OK, what I mean to say is that it doesn’t look like puff pastry at all.
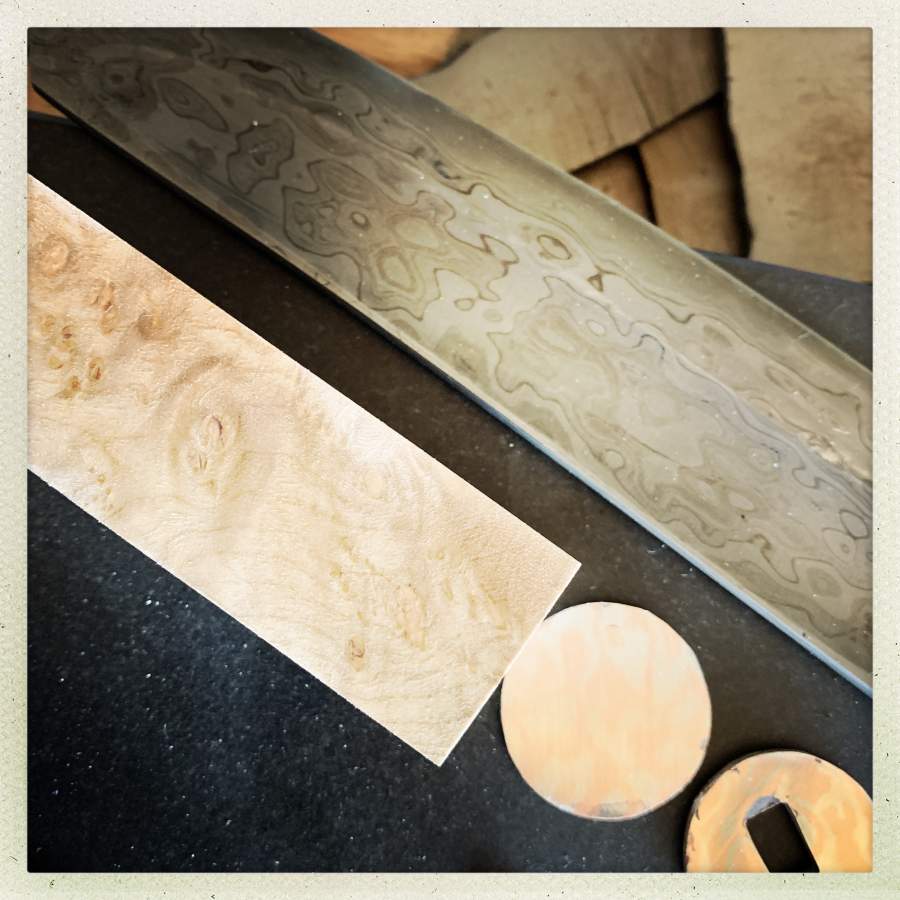
visually composing the components
Before the blade is mounted and the handle is shaped, there’s a period of time when you can experiment with it and do all sorts of weird things, then simply buff them back out. In the image above, I parkerized the wrought iron by heating it in a nice bath of phosphoric acid and manganese dioxide. The result was breathtaking – it raised the contrast of the slag in the wrought iron dramatically. Then, I polished it back off: as Mike uses the knife (or doesn’t) time and moisture and going through red meat will change the color of the blade anyway; the parkerizing is a view into the knife’s future appearance. The copper in the mokume will turn a dark brown/green and the nickel will stay shiny, so those bolsters are going to look pretty radical some day years from now.
Michael Bell says “the blade reveals itself as you polish and sharpen it” and I believe that. It also reveals itself differently as it ages. When I realized that, I began to design blades with the idea that they will be used and discolor and perhaps rust. It’s not going to lose enough molecules to rust that it will matter, it will just change the color and reveal a different knife.
 * And now you know where Gilliel’s burl chunks came from! [affinity]
By the way: the recipes I found for parkerizing all involve heating the work-piece, which is acceptable with a gun but may not be with a knife that’s assembled with wood and epoxy. Some resins are temperature sensitive if you take them close to boiling. So I tried it cold and it worked just great – the reaction is slower, which is better anyway.
I tested the wroughtface bruiser on a head of cauliflower and it worked great. That’s hardly conclusive but if were Andrew Wakefield, I could publish that result somewhere I am sure. “New blade geometry is much better than traditional blade geometries!”
It looks beautiful to me, but then I’ve a bit of a thing going for burl, although mine is bowls and a box. I love the idea of what it will age to.
I have read some very odd things about how you ‘ought’ to hold a chef’s knife, one writer insisting that the only way to be accurate when cutting being to have your index finger along the top of the blade while you held the handle with your remaining fingers and thumb. I tried it and thought it was as daft as it sounded to me, until I caught myself doing exactly that when I wanted to shred a chilli or a red pepper! I realised that how I held the knife depended very much on what kind of thing I was doing with it, precise shredding or chopping, rough chopping, whacking big tough things like winter squash in two or poking eyes out of potatoes. All very obvious when you actually observe what you do, but easy not to notice if no one brings it to your attention.
Hope your foot is feeling ok now.
Ooooh look at that mokume… the patina on the blade in that last photo really is breathtaking. What a shame to polish that off but as you say, it will acquire a unique patina over time. I always try to fix my patinas; I get them how I like and then try and keep them in suspended animation for as long as possible by using jewelry lacquer or something. However that technique is not appropriate for a knife.
kestrel@#2:
I always try to fix my patinas; I get them how I like and then try and keep them in suspended animation for as long as possible by using jewelry lacquer or something.
That’s a great way to put it. I had never thought of knives as something that can be fixed in time, because they can’t. Perhaps that’s because I know knives better than jewelry or perhaps it’s because I’ve handled knives that have been worn down to the thickness of a popsickle stick from work.
That piece of mokume has been sitting on the bench for almost a year now! (time flies!) and it’s got some really radical patina. I may post a picture of it.
Jazzlet@#1:
I have read some very odd things about how you ‘ought’ to hold a chef’s knife, one writer insisting that the only way to be accurate when cutting being to have your index finger along the top of the blade while you held the handle with your remaining fingers and thumb.
Yeah, I’ve seen a variety of weird grips. I think some of them are just being done for flash, but with tools, once you learn a particular grip, it’s hard to unlearn it. For example, I always used to use my grandfather’s files, which he always used to put grips on. Because he worked as a golf caddy in the depression, he had access to golf balls a’plenty and he’d drill a hole in the ball and hammer the file tang in. Presto! I grew up using that and for me that’s a very positive and easy to adjust grip. When I was at Dragonfly I asked Michael Bell if he had any rasp handles and he looked at me as though I had grown a spare head. His teacher had taught him to hold files by the tang like a pencil.
Hope your foot is feeling ok now.
It’s into the “achy and stiff and painful to touch, but doesn’t hurt just from contacting air” phase. Which is a big improvement!