One of the dynamics I always like about making things is that you get into a weird loop in which you’re making things to help you make things – and you spend a lot of time making preparatory things before you can go full production.
I see all of this as being on a continuum between “do everything by hand” and “do everything on a 3D printer or CNC machine.” Part of the art of crafting is figuring out what is the right amount of automation to make you comfortable.
Your desired results also shape your selection of tools – for example, I plunked down for a hydraulic forging-press because I knew that if I wanted to do forge welding, my options were:
- destroy the cartilage in my elbow and wrist by banging on metal with a hammer and never make anything good, nice, or big
- buy a trip-hammer and tear my floor out to reinforce it, plus have to deal with all that “hot metal splash” that feels so unpleasant
- use a forging-press and be slightly limited in terms of the size of the work I can do, but work safely and quietly
There are similar trade-offs at each level of a process. Should I grind edges by hand, or a belt-grinder? Etc. When I am wading into these decisions I always remind myself that there is no moral component to this – there is no “right way”; I’ve seen some lovely knives made on CNC machines, and milling machines, and hammered into shape. We should not feel disrespect for the Japanese master swordsmith, who uses a student as a triphammer. I don’t want to argue about how someone got an artistic result because then we get mired down in “digital or film?” debates when it’s the result that matters. To the artist, the path that they took to get to the result matters (it may be very important to them!) The person who holds the sword, hundreds of years later, never can tell if the hammering was done by a student, or by the hand of the master.
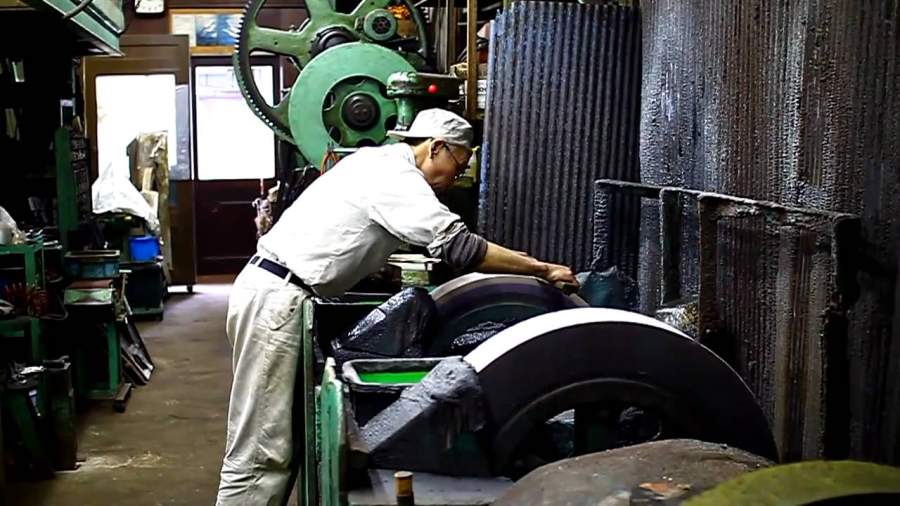
Ashi Hamono – I bet that thing removes metal fast
My interests lean toward Japanese-style cooking knives, which have a very particular grind: hollow on one side, beveled on the other. To get the hollow grind, traditional Japanese knife-makers use a huge water-stone wheel. That’s “too much infrastructure cost” for me, though I’m sure that if one was going to do a life-time of knife-making, it would pay for itself in a couple of years.
Around the time when Charly started posting his build logs of his grinders, [aff] I started designing a grinder specifically for the shape of knife I want to make. A single large wheel for hollow-grind, and a platen with an adjustable rest, that can be set to produce a consistently perfect bevel safely. (The bevel in my little kiridashi was entirely hand-ground)
Since I’d been experimenting with water-jet CNC cutting, it occurred to me that I could design the machine in Inkscape, to be cut out of a plate of steel and then welded together like a pop-up card. It turned out that’s not so easy, but once I’ve got the design done I suppose anyone who wants a machine like mine will be able to just take the .SVG file to a CNC shop and have them whap out a copy. Since I don’t plan to move things around very much, and I want it to be heavy and solid, “why not just use a plate of 1/2 inch steel?” Cut it out and pop it together with a few welds!
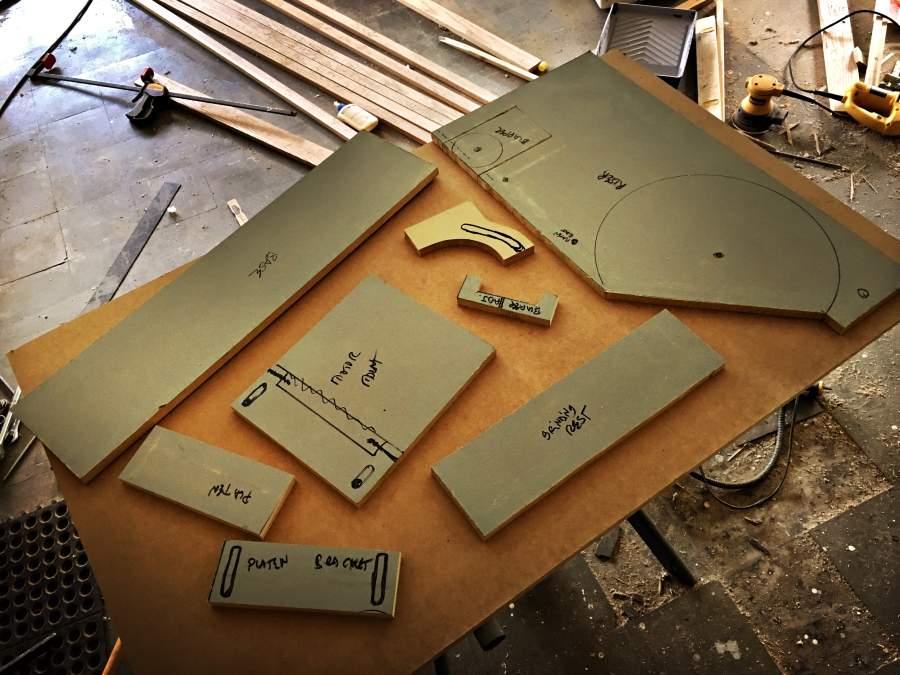
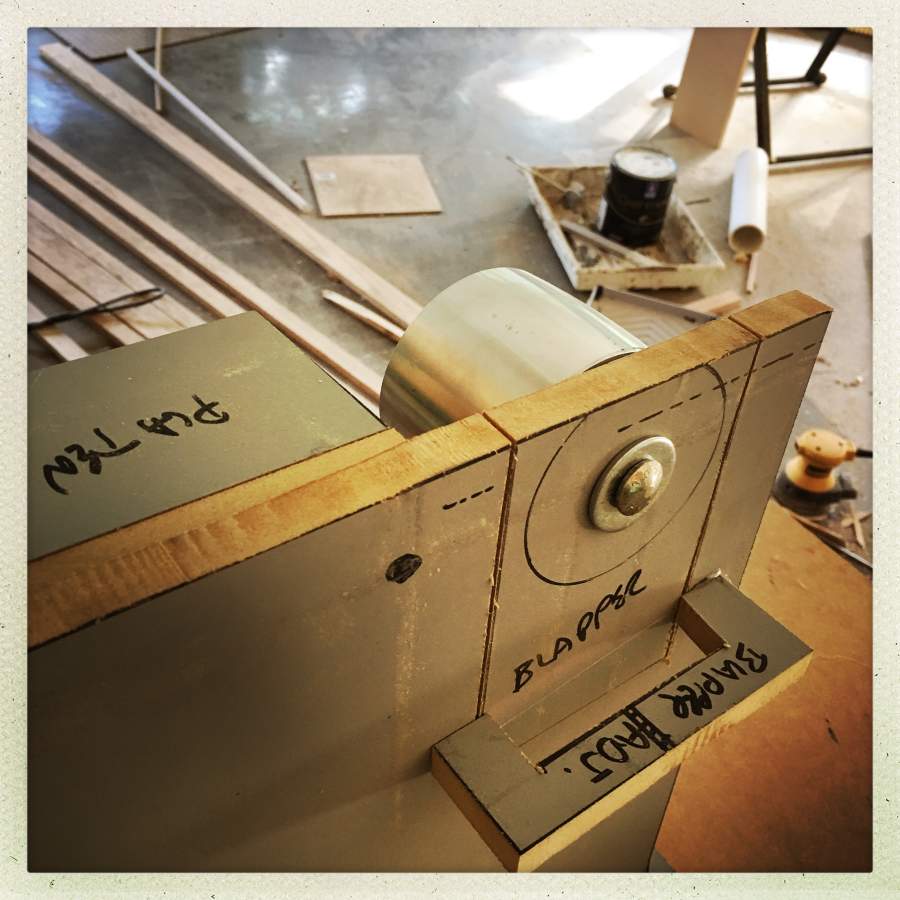
It turned out that visualizing it went so far, because I couldn’t tell for sure if all the parts would fit together right. So I decided to just prototype a version out of fibre-board.
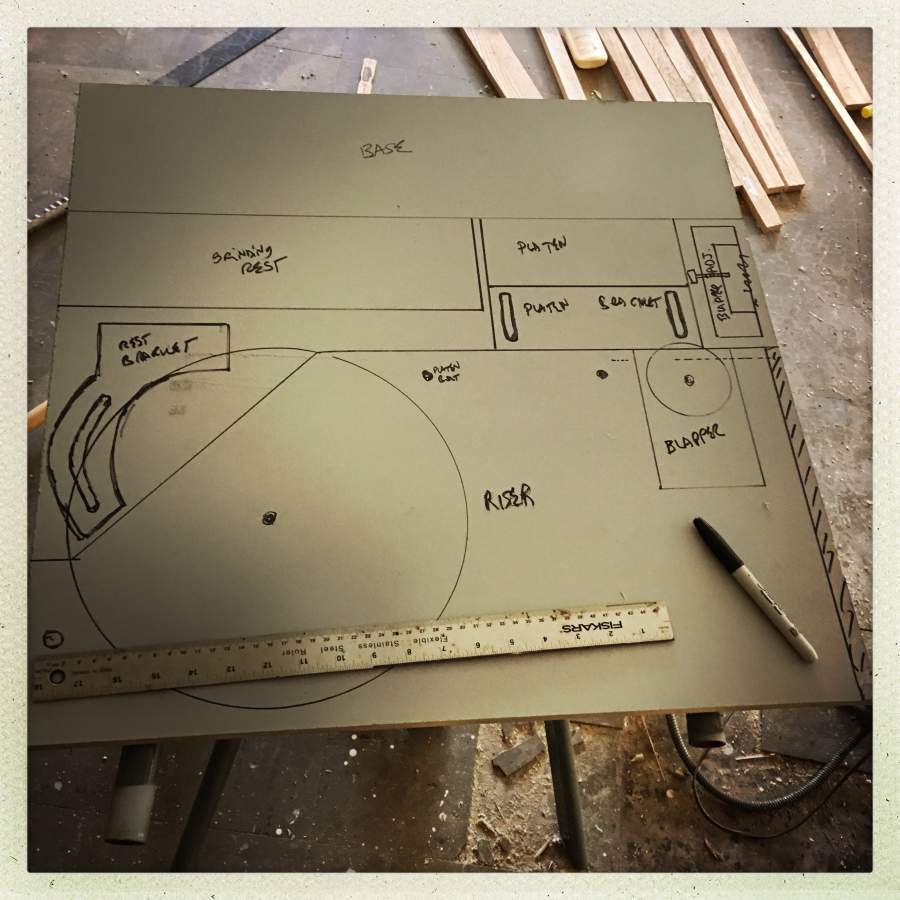
One thing I use a lot of is matte grey primer. It’s a great way of re-surfacing something so you can write on it over and over.
The “blapper” should technically be called the “tracking control” or something but I thought “blapper” was easier. My original idea was to fit it on a single 24″x24″ plate, but it turns out that’s not quite enough metal. I feel like there is no need to struggle to keep it small or light; after all, look how much smaller and lighter it is than Ashi Hamono’s machine!
Then it was time to break out the hot glue gun and stick everything together, to see if it looks like it’ll fit.
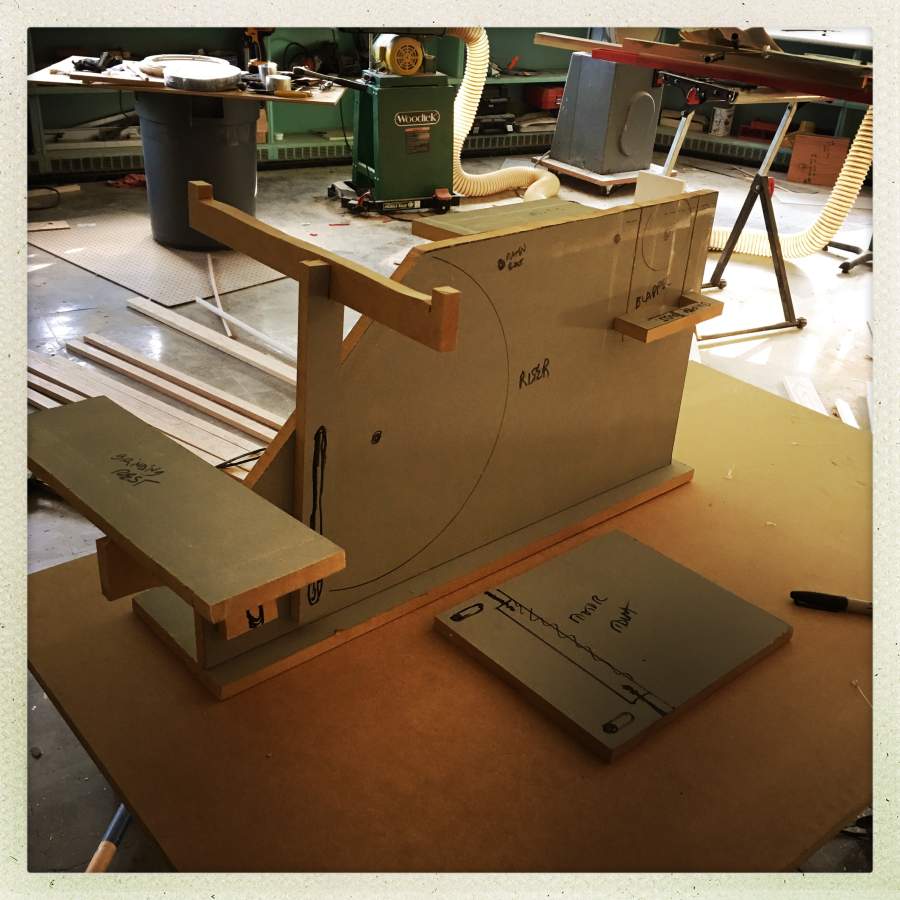
The motor mount/tensioner system is gravity-based – it’s basically a great big hinge that the motor will sit on; as the weight of the motor is pulled down, the belt will tension.
To get my hollow grinds, the big wheel at the bottom has a cross-rest; it doesn’t need to be very adjustable – I’ll get it true and aligned and lock it down and never move it again. The upper rest: same thing. That leaves tracking, which is what the blapper is for. I’m going to drill a hole through the end of the frame and across the top of the blapper, so the idler wheel will be able to change angle. To allow it to go back and forth, I’ll use a knurled, threaded rod, through the blapper arch. Other than the wheels rotating, the machine has basically no moving parts.
The platen and upper support will get adjusted and clamped down into place and will also, probably, never be adjusted again. I’ll make a clamping rod that will go from the upper support and hold a blade so it’s at the correct angle to the belt. I thought on and off about making the belt go through a water trough for cooling, but I think it’d mostly just fling water all over the place (look at the mess-catcher in Ashi Hamono’s shop) – I do not need to do full-speed production.
Several times in the process of designing the machine, I’ve tried to think of how to make it more attractive. Since it’s going to be water-jet cut, it could be metal filigree, so long as it’s strong in the right places. It turns out I’m just not artistic in that way. I’ve asked a couple artists I know if they want to give designing a machine a shot, but it’s harder than it looks. For me, just describing the machine turned out to be difficult, which is why I built the mock-up. I suppose coming up with names like “blapper” for the “tacking control” doesn’t help.
Well “blaper” made me smile, even if it wasn’t helpful in communicating what it actually is.
Argh, “Blapper”
Ashi Hamono’s shop reminded me some what of Abeydale Industrial Hamlet, in Sheffiled, which is now a museum. It is water powered with huge drop hammers which have shafts made of whole tree trunks. They mostly made scythes and production was quite streamlined. The grinding shop has a row of three or four large stone wheels with seats, the grinder sat astride the seat, leaning forward over the water powered and cooled wheel to grind, unsurprisingly they got lung problems after a few years inhaling iron dust. They actually continued production until some time in the early 1940s when a stray bomb, meant for the big steel producers in the east end of Sheffield, detonated near by and blew in the windows of the clayhouse where they made the cruicibles (don’t think that’s the correct word) for melting the ore, as the clay was puddled by barefooted workers having glass in it was a problem. It wasn’t worth digging out the clay and starting again so the whole site was abandoned.
I like the word blapper, although I had no idea what it meant and I’m still a little fuzzy there, but it’s a great word. I believe you are correct that using water to cool your belt will cause much water to be dispersed. Having the belt cooled might be really worthwhile however… although I do not actually know from this application, I only know that when carving stone it’s much better to have the stone cooled. I’ve used an IV drip bag for horses which I got from a vet for about $10.00. I think it holds a couple liters but can not remember right now.
It’s very fascinating to see how other artists work and how they make or build tools to accomplish what they need to do. To me it shows human creativity at its best and most interesting.
Just looking at that photo of the big grinding wheel reminds me of a story of a particular type of industrial injury from the early days of Sheffield mass production… Back then, they were using really big grinding wheels – something like 6ft in diameter – and the guy doing the grinding would basically be sitting on top of the damn thing. But these weren’t nice, engineered, synthetic wheels, with well-known engineering properties – they were natural stones, and some of them turned out to have flaws which would only become apparent when you spin them up to god-knows-how-many RPM and then keep them running for a long time, at which point they basically explode without warning, hurling razor-sharp hunks of grindstone through the body of the operator.
That is going to be a cool machine! Good call on doing a mock-up first. The usefulness of mock-ups/prototypes are something I’m trying to teach my young nephew as he’s progressing in his metal adventures.
Dunc@#4:
Modern abrasive wheels are composite (as you say) and are cast then machined to shape – they are much better.
A decade ago my hay cutter had a bearing go bad on one piece, so I went looking for a place that had a 50 ton press to push it out and install a new one. The way you find a place like that is you go to a machine shop and ask “who would have a 50 ton press?” And they suggest someone and you go there and they tell you “we don’t but you should ask Fred who has a shop outside of town…” etc. It’s a lot like questing in World Of Warcraft. Anyhow I bounced around a bit and wound up at a small business in Clearfield with a friendly machinist who pushed the bearing as sweet as you can imagine. While he was doing that I asked him “what do you make here?” and he explained that they make molds for abrasives – wheels, blocks, whatnot. The molds are machined out of tungsten carbide, because the abrasive powder plus binder are pressed in huge 250 ton presses and then baked (at some relatively low temperature in the couple-hundred range) I gotta say I was impressed by machines that mill tungsten carbide blocks, and I got a cool tour of the place. They finally showed me the door to get rid of me. I was practically ready to get my mattress and move in…
So if you are handling a compressed abrasive there is a good chance that the mold for it was made by my neighbors up the street!
I fully expect that some day someone will show up at my shop “hey I am looking for a block of damascus to make a new haydiddlediddle from and the guy at the machine shop said you do that stuff…?” And I’ll tell them “come on in and have a cup of coffee and tell me more…”
Dunc@#4:
at which point they basically explode without warning, hurling razor-sharp hunks of grindstone through the body of the operator.
Look at the thing Ashi Hamono is leaning up against; it looks to me like a 1″ thick steel plate “splash guard”
Marcus:
Ah, I wouldn’t take that job. Machine tools need to be practical above all, and everything in a shop gets that special shop patina, along with nicks and dings and dents and everything else. I see little point in making one “pretty”, unless it was the art piece itself, and going into an installation.
I think machine tools have their own distinct beauty, but perhaps that’s because I spent a lot of time in a machine shop when I was a sprog.
YOB@#5:
Good call on doing a mock-up first. The usefulness of mock-ups/prototypes are something I’m trying to teach my young nephew as he’s progressing in his metal adventures.
The guy who taught me how to do electrical panel-wiring used to wave a pair of nippers and say “this is a wire shortener. wire stretcheners are really expensive.” He taught me that the old “measure twice, cut once” is actually short on the measuring; if you suck at measuring, like I do, measure about 10 times, cut once.
2×2 sheets of MDF are $13, and 2×2 plates of 1/2″ steel plus water-jet cutting are a whole lot more, and a lot harder to move around. “Shipping and handling” is a silent killer.
The machine looks like it’ll work OK but it sure is ugly and weird-looking.
Caine@#8:
I think machine tools have their own distinct beauty, but perhaps that’s because I spent a lot of time in a machine shop when I was a sprog.
I agree, except you gotta remember I grew up in Baltimore – home of the B&O railroad museum, and just 30 miles from the Smithsonian Institution’s “great exhibition hall” which had been restored to its original glory with all the 1890s’ best machines. So my machine-aesthetics lean toward the victorian steam era, which was not unnecessarily ornate – it was just ornate enough.
By the way, that’s partly why I loathe “steampunk.” Sticking gears on a pith helmet does not make the pith helmet cool, it just makes Marcus wonder “what is the purpose of a gear on one’s headgear? Oh, it’s a stupid steampunk!” Isambard K. Brunel – now that is steampunk!
Bless their hearts, the victorians even put carpets under their machines!
[The carpets are probably early-generation machine-loomed Whiddle carpets, at that. I used to have a Whiddle – it was basically bulletproof and weighed about 500lb. Unfortunately it got wet in a building leak and took on a tremendous amount of water, then grew a tremendous amount of mold, and I had to dispose of it by cutting 12″x12″ chunks off it with a jigsaw and throwing a piece away every couple days so the disposal crew wouldn’t notice.]
PS – boiler cleansing compound. Trump needs to bring back America’s boiler cleansing compound businesses!
Let’s not forget the wainwrights. Won’t anyone think of the wainwrights?!
@12 But what about the Cartwright’s?
YOB@#12:
Build up that wainscotting!
A lot of the Victorian decoration of machines was painted on …
Making tools to make tools? I’m pretty sure that Allah made a present of the original pair of tongs to the first blacksmith – and now we have pretty fancy stuff like yours!
Oh, I see what you did there. By “floor-plate”, you mean “sole”.
I like making machinnes pretty, but not overtly so. That is why I have given my belt grinder two-color paint job, even though one color would do just fine (and any color at that). As long as the decoration does not impede the function, then I prefer decorated over plain.
But what I loathe is “design over function” approach that seems to be so prevalent in modern industries.
However since you have designed this only you can say how to decorate it without said decoration being detrimental. Unfortunately it is unlikely anyone else will be able to help you there.
Machine looks cool. I am used to making my mock-ups from cardboard or paper, on a 1:10 scale or so. When I was planing to build my workshop I first made a paper model of the whole house and grounds and environs to visualse it. Including trees.