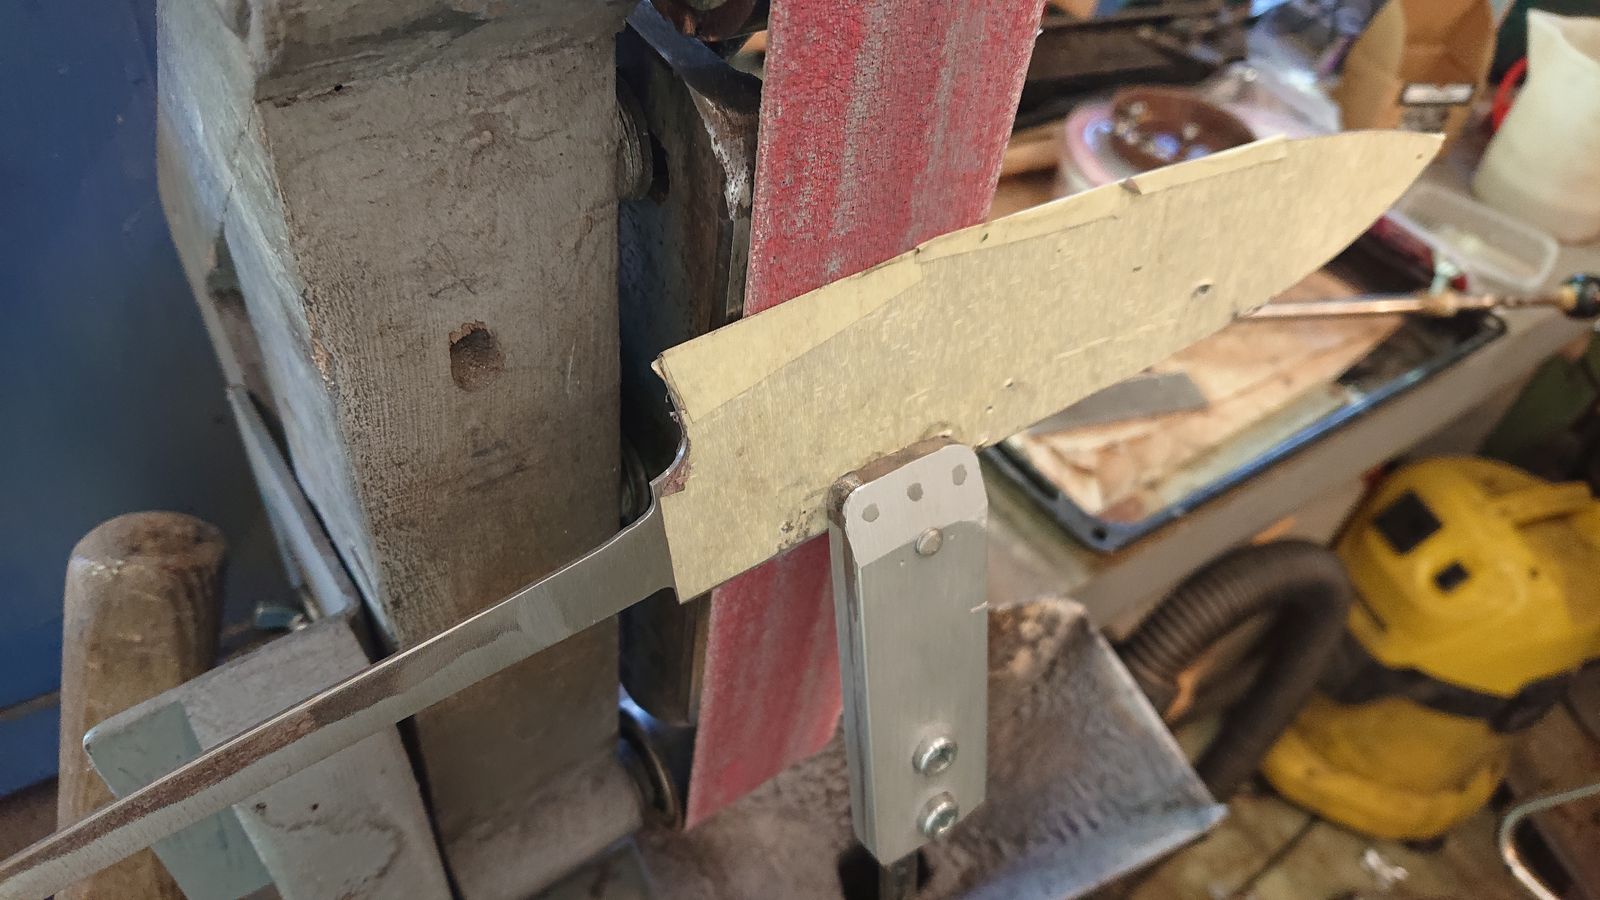
A Commision With a Point

I hope the customer will accept this, I am not completely happy with the result. An acquaintance of mine has given me some deer antlers for crafting and she also commissioned a knife made out of one of them. The antlers are from her father, who is a gamekeeper and she wants to have something to remember him by. She requested a small letter opener with a stand that can also work as a paperweight. Lenticular grind and not fully sharpened edges. Oak wood for the stand because her office has oaken furniture.

From the manufacturing point of view, there were not very many interesting things – I ground and polished the blade and blackened it with oak bark, then I fixed it to half of the antler with the burr at the pommel end. Because the antler is old, scratched, and irregular – as antlers are – I have hammered the pakfong pommel into an irregular shape. I also hammered the bolster and I only wire-brushed and polished them over the hammer marks. A bit interesting was the making of the stand.

To weigh it down, I chiseled holes in the bigger piece of wood before gluing it together and I poured molten solder into it.

© Charly, all rights reserved. Click for full size

I learned this technique from my maternal grandfather. I have never met him – he died long before my parents even met – but he made for my grandmother a top for winding the thread on bobbins and the top has been weighed this way on its circumference. Molten solder cools in wood quite quickly and it does not char the wood on the edges all that much, especially if it is hard and dense wood. I was itching to try this out for years.

The pakfong throat on the stand for the blade was a bit difficult to make and there I had to use a creative solution to make it hopefully solid enough so it does not become undone in a breeze. I did not want to rely only on epoxy, so I soldered two pieces of copper wire onto the pakfong piece, and I glued those into tight-fitting holes. This way it should hopefully withstand even some mild abuse like falling on the ground.

© Charly, all rights reserved. Click for full size

© Charly, all rights reserved. Click for full size

The full finished set weighs about 860 g, I have possibly overdone the weighing a bit. The stand is slightly decorated with pokerwork and the underside is covered with brown natural felt so it does not click when put on a table. The finish is tung oil and beeswax, which are more pleasant to the touch than lacquer or epoxy.

© Charly, all rights reserved. Click for full size

© Charly, all rights reserved. Click for full size

© Charly, all rights reserved. Click for full size

© Charly, all rights reserved. Click for full size

© Charly, all rights reserved. Click for full size

© Charly, all rights reserved. Click for full size

Crafting Perk Unlocked – Hamon

When making the commissioned machete in the summer, I had enuff steel left for one additional blade and two more blanks lying around made from the same steel, thus I decided to try my hand at making a blade with hamon again. So far, I have succeeded only once, with a “mystery” stainless steel, and I had to cheat by carbonitriding it for several hours at ca 500°C. The 54SiCr6 is 0,5% carbon steel, which is not ideal for hamon. 1-1,5% carbon would be better. But I decided to try it nevertheless because if I fail, I can (usually) always harden the whole thing.

Well, I did fail in multiple ways – from three quenched blades, one had to be tossed completely, one I damaged because of unforeseen circumstances, and one turned out OK. This is better than my previous attempts and I think I have a working process now for making blades with hamon. Here is how I did it.

© Charly, all rights reserved. Click for full size

First the used materials – three blade blanks ground with 40 grit. I went for three different geometries to see what happens. A sample size of 1 per geometry is of course not very indicative of anything, but it is better than nothing. On the left is a bottle of liquid glass, a water solution of sodium silicate, a chemical that is sold cheaply in CZ and is used to waterproof cement, make cement go harden faster, and as a binder for heat-resistant cement. Then there is a receptacle with perlite, which I have bought in huge amounts for use both in my gardening and knife-making endeavors. And the last ingredient is fine-sieved dirt from my garden taken from deep below the topsoil – I have a heap of this too from the building of my sewage cleaning facility.

© Charly, all rights reserved. Click for full size

The first step was to cover the blades with a thin layer of just the liquid glass mixed with some clay and sprinkle some more clay on top of that to soak up excess liquid glass and prevent cracking of the layer when drying it with a heat gun (a torch and charcoal fire work both too as I found out later).

© Charly, all rights reserved. Click for full size

Here you see the various phases of the second step, which consisted of adding several layers of perlite. For this, I have used the mixture of liquid glass and dirt again, but I have sprinkled it with perlite. The liquid glass serves as a binder, the clay as a filler to prevent cracking, and the perlite as an insulator. I dried the added layer with a heat gun again and I continued to add these layers until I had about 1 cm thick insulating layer on each blade. To finish it off I have added one more layer of liquid glass and dirt only to make a hard shell that holds it all together.

© Charly, all rights reserved. Click for full size

Initially, I went for three different hamon lines, but unfortunately, this did not work out. After I quenched the machete and one of these blades (I forgot which one) without problems, I had trouble reaching the required temperature again because the coals got smaller and the blown air did not reach under the uppermost layer anymore. So first quench was unsuccessful on two blades, I had to cover them again and try to quench them again. This time I was using the charcoal fire to quickly dry the successive layers and it worked well. Next time I am preparing blades for hardening this way, I will probably combine it with BBQ dinner, combining pleasant and useful.

As I already mentioned, two of these unfortunately failed.

The first fail was the blade with a fuller – it cracked near the ricasso. That is always a risk with hardening steel and it is higher with this method it happens even to masters of this craft because the blades must be quenched in water which is more stressful than oil. So while I am not happy about having to toss the blade, I do not beat myself over the head over it either.

The second fail is the drop-point blade. And I am beating myself over the head about it because this is completely my screw-up. I have read books, internet articles and watched videos about how blades with hamon are made, but I do not remember anyone ever mentioning that a peculiar thing can happen when the hamon line is parallel with the edge – the steel has developed lengthwise stripes that when polished, look under certain light conditions and from certain angles like lengthwise scratches made with low-grit sandpaper. I have ground the blade very thin trying to grind these phantom scratches out, I messed up the grind completely at the end near the ricasso and I had to remove the ricasso and shorten the blade to “save it”.

© Charly, all rights reserved. Click for full size

Here you can see it finished. It is still a blade suitable for small outdoor/hunting skinner knife. Maybe. I will think about it and maybe try to make a suitable handle for it. But I do not like blades without ricasso, not only for aesthetic reasons but also because that way the tang actually really is way too thin for comfort near the handle. But I have finished polishing it because I needed to find out the best finishing method on it before finishing the only successful blade. Btw. it still has those phantom scratches near the tang where the hamon is close to the cutting edge. They drive me crazy.

© Charly, all rights reserved. Click for full size

The best polishing process was pretty standard although very laborious. From 320 grit up I have inserted hand-polishing after each belt-grinder step, removing the angled belt-grinder scratches with lengthwise ones. This leads to very smooth and very flat surfaces and crisp lines and ridges. From 2500 grit upwards it was only hand polishing and only lengthwise. Here you can see the result at 5000 grit, which is the phase at which I left the workshop and went indoors. I have tried buffing the failed blade with buffing wheels and commercial buffing compound but this has led to an interesting effect – the hamon went completely invisible although it could be brought out by etching with oak bark for an hour or two. So for this blade, I have forgone the buffing altogether and went to 7000 grit sandpaper with walnut oil (it is runnier than other edible oils, and does not stink like WD40). 7000 grit is the finest abrasive paper that I can easily buy but it still did not bring out the hamon very well. I could just about see it but it was still nearly impossible to make a photograph of. I etched it with oak bark, but I did not like how it looks so I removed the oak patina again with 7000 grit and I tried another buffing method, one that I have used in my rondel dagger project – very fine hematite.

I put some paper towel cuts in a receptacle with finely ground and sieved hematite dust and shook it a bit so some dust gets caught in the paper towels. Then I dusted the paper towels off to remove the coarser particles that still might be there. I smeared some dubbin on the blades and I tried buffing them manually with these hematite-primed paper towels with lengthwise strokes, using the spine of the blade as a guide. And that has resulted in a nice mirror-polished hardened edge and slightly foggy yet still mirror-polished soft spine, making the hamon really pop out. That way it was not only easily visible but I was also finally able to make a picture.

© Charly, all rights reserved. Click for full size

Hamon is the white line between the darker hardened edge and the lighter soft back.

I am not planning on making very many of these but it is nice to have the knowledge and skill how to do it. I think this blade is deserving of nice fittings so after I etch the logo and serial number, I will start seriously thinking about what kind of handle and sheath to make for it. I am done making blades for a few months however, I still did not dress all of those from last year’s overabladeance and I have eleven kitchen-knife blades in the tumbler now. Unfortunately, I have longer pauses between knife-making days than I like.

Sciencey Thoats About Tangs

Teh almighty YuTub algorithm has recommended this video to me:

Why military gear isn’t always a good idea…

And whilst I do agree with the title and the overall message of the video, I do have some objections to it. It is not an issue that can be distilled down to a universally true video quip.

First the agreements:

Military gear that is issued to grunts en masse needs to be essentially consumable. The grunts will lose it, steal it and/or destroy it with gross abuse and negligence on a regular basis. I read about conscripts in the Austrian army in WWI breaking their bayonets by opening cans. Stealing was a problem even in former Czechoslovakia, with the UTON  even though that was not issued to every grunt but mainly to paratroopers. The knives disappeared regularly as the soldiers reported them “lost during exercise” even though they had to subsequently pay for them and everyone knew they took them home. Those knives are good, but they are not as excellent as some people think they are “military grade” is definitively not always a synonym for “high quality”.

Now the disagreements:

A good bushcraft knife needs not to have a full tang to be reliable. It is more complicated than that – rattail tangs were and are used in even swords and machetes to this very day and they are not useless. Puuko is a survival knife with hundreds of years long tradition for example. The above-mentioned UTON also has rattail tang, and one that does not go all the way through the handle at that, and still it is a knife that can withstand serious abuse. I have put some of my knives with similarly thin tangs through their paces, both full-length and half-length hidden tang and they withstood serious abuse just OK (although I was only using them as knives, see further). Hidden tang alone is not an issue, the overall construction and heat treatment are.

My biggest beef is with the presented “knife gets stuck and you try to wiggle it out”. Sorry, but if your knife gets stuck in something hard right up to the hilt, then you are probably an idiot for using the knife wrong. A knife is not, and should not be used as a pry bar. But let us say one were to use a knife for making firewood splinters from a log by batoning. That is a legitimate use for a bushcraft knife and it can get stuck that way. It happened to me with my working knife and I had to use serious force to get it out. However, if you try to “wiggle it out” by holding it solidly against the ground and pushing at the handle sideways, you are definitively an idiot for trying to remove it in the least effective and most dangerous way imaginable. Simply put, abuse like that shown in the video does not represent even remotely reasonable and appropriate use of a knife, not even a bushcraft knife that should be sturdy.

Another thing I would like to address is the handle material. It is shown to be natural leather rings and apparently, not overly compressed and not glued together or hardened. That is a problem because it is a soft material that can easily be compressed and give way for the tang to bend. A wooden handle – like on European medieval swords and daggers – significantly improves the resistance of the tang against bending. If the rings were glued together and hardened by hot wax or boiling or epoxy, it would improve the durability and resistance of the handle significantly too.

The thickness of the tang and the blade at the weakest point plays a far greater role than the width. The force needed to bend/break a flat profile rises linearly with width but exponentially with thickness. If you double the width of the tang, you double the force to bend/break it. But if you double the thickness of the tang, the force needed to bend/break it can rise approx ten times (I do not know exactly how much, the calculations are complicated and I cannot pretend to understand them). So a knife with a thickness of 3 mm and full width (~15 mm) tang will be about as strong as a knife with a thickness of 4 mm and 6 mm wide hidden tang.

A role also plays the heat treatment of the tang. A fully hardened tang will be stronger and more resistant to bending and will spring back when bent. But when bent beyond the plastic deformation, it will be more prone to permanent damage and/or catastrophic failure when straightened again as shown in the video. Unhardened tang – that is used throughout history for swords from Europe across Asia all the way to Japan I might add – is easier to bend but can subsequently be straightened again.

And lastly – anything will break if used wrongly or excessively abused. A knife is not bad because it cannot be used as a pry bar and a pry bar is not bad because you cannot cut cutlets with it. When I made the custom machete, I tested it by hitting a brick with it – but I still advised the customer not to do that.

Making Walnut Oil

I spend several hours daily now picking walnuts and laying them out in a designated room to dry. Some days “just” one bucket, other days more. And since we did not eat all walnuts from last year yet, I have been thinking about how to process them in a useful way. And I have decided to try to make walnut oil. I have wasted two kg of low-grade walnuts and one kilo of moderately good ones trying to devise a process that works and I did come up with one in the end.

The first try cost me three hours of work, 700 ml of acetone, and resulted in barely 50 ml of oil from 1 kg of shelled walnuts. Not good.

The second try cost me five hours of work, 1400 ml of acetone, and resulted in roughly 150 ml of oil from 1 kg of shelled walnuts. Better, but still not good at all. This second try also resulted in me having a still now. I might make separate posts about that after I test its newest iteration – the first iteration was not very good at recovering the acetone from the solution (acetone is just too volatile) and after I modified it, I found out I don’t necessarily need it anymore.

Because the third try resulted in roughly 500 ml of oil from 1300 g of shelled walnuts after three hours of work and without the use of any chemicals and with minimum use of elektrimcity. And with walnut oil costing around 40€ per liter, that is financially viable since the next batch should be finished faster – I have a functioning process now and there won’t be any fumbling next time.

So, here goes the process:

  1. Drying the shelled walnuts at 45 °C in a fruit dehumidifier for 12 hours. This step is necessary now because the walnuts are freshly collected from the garden and when ground, they do not release oil but make a paste from which the oil is very difficult to extract. My first attempts at drying the nuts for a shorter time (2 h at 80°C or roasting 5 min at 190°C) did not work, thus me trying to extract the oil with acetone. I learned that the important thing is to get the walnuts completely dry, the shelled kernels should rustle when agitated.
  2. Running the dried walnuts through a meat grinder. This picture is from my first attempt but it is representative of how the shredded nuts looked after first grinding in my final attempt too. I am using an old hand-cranked meat grinder because I did not want to use my mom’s kitchen robot for experimentation. I probably won’t use it for this anyway, grinding the nuts is a bit harder than grinding meat and I fear the robot could get damaged. This old thing was made in times when tools were made to last and not break a month after the warranty expires.

    © Charly, all rights reserved. Click for full size.

  3. Running the dried walnuts through the meat grinder again. This time they started to expel some oil already.

    © Charly, all rights reserved. Click for full size.

  4. And finally, I run the thoroughly shredded kernels through another nearly antique kitchen appliance – a hand-cranked juicer. This resulted in 550 g of highly compressed dry matter with some oil residue, and the rest was oil mixed with some fine particles.

    © Charly, all rights reserved. Click for full size.

  5.  Leaving the oil to settle out the particles. It will probably take a few days. I will skim the oil from the top in the meantime and add water for the particulate matter to drop into. I may use the still again to refine the oil further, using some chemicals again, but it can wait for later. For now, I just wait for it to settle. Here you can see how it settled after 24 hours.

    © Charly, all rights reserved. Click for full size

I was not particularly careful about Hi Jean this time. The first 1000 ml of walnut oil (including oil from the first three experimental runs) will be refined and boiled for use as a food-safe wood finish and not for direct consumption. I do not have personal experience with walnut oil yet but allegedly it has advantages over linseed oil. It has a lower viscosity and thus seeps easier into the wood. It dries quicker. And it does not yellow with age as much as linseed oil does so it should not discolor the wood as much as linseed oil does, making it useful for lighter woods as well as dark ones. I intend to make several end-grain cutting boards at some point in the future.

However, I have cleaned all the appliances thoroughly now and next time I am making the oil, I will also make 1 l of cold-pressed oil – or maybe even more – for consumption. Walnut oil is a bit of a luxury foodstuff so we have no experience with its culinary use either but I am sure we will find some use for it in our kitchen should we have it. And an advantage of 1 l of oil is that it takes a lot less storage space than 5 kg of unshelled walnuts or 3 kg of shelled ones. Making it does not cost nearly as much as even cheap cooking oils do in financial terms, picking and drying the walnuts has to be done anyway, so there is only some work on top of that. And whilst it is not easy or quick work, I do have more time than money and I need the exercise anyway.


The Nutkraken

It is the season when the walnut tree is shedding its bounty. We still haven’t eatet yet all the nuts from last year and it will probably take some time to eat them, possibly a whole another year. And this year’s harvest promises to be even bigger than last year’s. Thus I have some nefarious plans with the nuts this year.

Howevah, all plans include cracking the nuts first. We do have a small hand-held nutcracker, but that is good only if you want to crack a few nuts for a snack, not when you need to go through a bucketful every day. I have tried to make a small lever nutcracker from an old drill press. It worked, but not great. So this year we brainstormed some ideas with my father about how to proceed and this is what I came up with later in the workshope when looking for suitable materials to materialize our idea – behold the mighty Nutkraken:

© Charly, all rights reserved. Click for full size

I made it in about 5 minutes from a piece of board, two armrests salvaged from my father’s old armchair, a 10 cm piece of 4 mm fencing wire, and a bottle cork.

The armrests are connected on one end with the fencing wire. That end not only had pre-drilled holes. The armrests have an S – curve that has a nice short curve on the connected end and a long one on the other, making a nice indentation for the walnut and more than enough space for fingers. The lower arm has attached a perpendicular piece of board to it to stabilize it and to allow for it to be fixed to the table via clamps. After some testing I have added the bottle cork so the nuts do not get totally obliterated, making it easier to separate the shells from the meal. With a bit of additional work it could even be made to look pretty, but I probably won’t bother with that. I usually don’t with tools.

My father enjoys his new toy greatly and he cracked and shelled a bucket of nuts yesterday in no time. Those were low-quality nuts, and I intend to test some things with them first either today or tomorrow before I proceed to mangle the good-quality nuts that start falling next week. I will let you know the results of my sciency experimoments promptly.

The Nutkraken works magnificently. No sprain on wrists and fingers, no over- or under-crushed nuts, no problems whatsoevah.

Not a Masterpiece Sheathed

I have realized that I did not show this on Affinity, only on Instagram. With all that is going on, I haven’t done any actual work in my workshop for weeks now, but this one was finished months ago. In the end, I have decided to make a simple, unadorned sheath for my Not a Masterpiece knife. I decided to do that because I felt in the end that an overly decorated sheath would needlessly distract from the beautiful woodgrain in the handle. The striker and ferrocerium rod have simple stainless steel handles. The bronze caught patina, which was to be expected. It does require some maintenance to remain shiny.

© Charly, all rights reserved. Click for full size

© Charly, all rights reserved. Click for full size

The full set is for sale in the Knife Shoppe.

Le Workshoppe Rearangeé

I think I did not show you the inside of my workshop, except for the pieces visible around the various pieces of knives and machinery that I have shown in my crafting posts. And since I have totally overhauled (and cleaned) the shop these last few days, I have decided to give you a quick tour of the new layout. The workshop is a bit ad-hoc and furniture is made from mostly scraps.

So let’s start with the north wall, right behind the door.

© Charly, all rights reserved. Click for full size

On the right, you can see where my lathe is stored. I do not use it very often. Right next to the circuit breaker hangs my woodcutting helmet and fire extinguisher.

In the middle of that wall is a huge shelf packed with various things. At the very top are old baking trays, then a plastic tray with some pieces of graphite. Neither of those things I need often, thus the upper shelves. Then come abrasive cloths and papers sorted by grit. Under them are some cleaning, flammable and corrosive chemicals, and a little basket with magnets inside to collect steel dust. Next comes the shelf with various fixtures and jaws for the vice, follows shelf with knives in progress and knife templates, and a shelf with big massive pieces of steel and aluminium. The second shelf from the bottom is now filled with various lubricants and the lowest one currently occupies interesting-looking stones for suiseki and bonsai. The various plastic bottles are mostly sunflower oil for quenching and one bottle for cutting oil.

To the left of the shelf hangs a board with various chisels, scrapers, planers, and knives.

Leaning against the shelf are various wooden dowels, staves, bow staves, pipes, and long wooden prisms.

To the very left, you see the beginnings of my first workbench, made yonks ago. It is three meters long and would not fit in one picture.

© Charly, all rights reserved. Click for full size

Above and below the workbench are cupboards repurposed from kitchen renovations. In the corner, you can see two racks for thin metal profiles and pipes and the motor belongs to my tumbler. I have put it on this part of the workbench because it is somewhat inaccessible to work on and I have nowhere else to put the tumbler where it would not be in the way. I think I will be able to run it from there too, which is a plus.

The red vice is right under a light and in a spot where all the chisels, hammers, saws, rasps, and files are no more than one step away. On the cupboard right above it is also a thermometer so I know how warm/cold it is. Inside the cupboard above the vice are empty plastic containers for when I need them during work (like for example to sort screws into when disassembling/assembling something). In the drawer below it are small files and brushes, in the next drawer various pliers and shears, next wrenches, and the bottom drawer is filled with clamps.

© Charly, all rights reserved. Click for full size

The forge in the middle is there because it needs repairs – work for tomorrow. Under it is a place for storing the table saw when its not in use, a small stool to help me to reach the upper shelves, a bucket for steel dust, and a shop vacuum cleaner.

Above the forge is a shelf with various writing instruments, gomtry tools like compasses, rulers, curves, the most-often used screwdrivers, and a roll of paper kitchen towels. The papers hanging on that shelf are laminated steel heat-treating charts. I will add in near future data sheets for the steels that I use. Inside the cupboard are nails and on the very top shelf accessories for the greenhouses. Again, the upper shelf is occupied with things that are not used often.

Next, you can see my unbender, now permanently fixed to the workbench. I have also spent one more day making it sturdier and improving the design a bit. Next to it, at the end of the bench, is now permanently fixed my drill press. It is lifted slightly above the bench so I can reach under it with a small broom to tease out the metal chips that collect there. I have also put there a piece of PVC flooring to protect the workbench from dripping cutting oil. The tables hanging on the cupboard above it are a drill-speed table for various materials and a conversion table between trizact and grit abrasive ranking.

Below the drill are various small brooms and seldom-used cutting instruments. In the drawers are some abrasives for my handheld belt sander and some ppe, like gloves.

Above the drill press, right at the end of the picture, you can see a small shelf packed with old cookware for when I need to cook something that is not fit to do in the kitchen. Behind it is a small shelf filled with various drill bits.

Now we come to the south wall.

© Charly, all rights reserved. Click for full size

You have already seen my abrasive belt rack and my small heating stove. The basket and plastic bucket are for wood off-cuts. Normally they are not this full, but I did not need to heat the workshop for quite a long time now, obviously. The grey plastic trumpet is a vacuum attachment for collecting wood dust from the belt sander. The black barrel beside it with a similar metal trumpet is for collecting sparks and metal dust.

The green shelf to the left has buckets with various chemicals and abrasives on the top, some drums for the tumbler on the top shelf, and various metal offcuts on the rest.

Now we are reaching the newest addition to my workshop, one that has spurred the complete reorganization – the east wall with a new workbench.

© Charly, all rights reserved. Click for full size

On the right is now permanently affixed my small bandsaw. I hope that fixing it to the bench will reduce its vibrations and improve the lifespan of the saw bands, they were snapping rather quickly.

Below the bandsaw is a small cupboard with bonsaist equipment and various attachments for the belt sander.

The small brown shelf between the windows contains various screws, glues, popsicle sticks, bbq skewers, strings, wooden wedges, metal foils, and a first aid kit. On the right side (out of view except the baseball cap) hang various ppe, like face shield, earmuffs, respirator, and goggles. On the left side hang various bits of wire. Below it is a cordless drill and my two angle-grinders.

And on the left side of the bench is the belt sander. Originally it stood where the unbender is now, and it was a pain in the nether regions. It got in the way of reaching the cupboards and working on the drill press and it ate a lot of the workbench so some manual works were awkward or even impossible. Here it should not be in the way and there is enough space to the right side of it to build various attachments – I plan a lathe, a drum sander, and a disc sander.

The drawers in the grey cupboard below contain various measuring instruments, ball bearings, cork, popsicle sticks, and some other various stuff.

In the cupboard itself are boxes with assorted screws, spacers, springs, locks, keys, handles, and similar small diverse things that do not fit anywhere else.

Between the cupboard and the new workbench is about 9 cm space. I have thought about what to do with it and I have decided that it would be an ideal storage space for all of my knife- and tool-making steels, so I have put them there.

And on the very left of the picture you see where my various electric cables and gas burners hang.

That was the grand tour through my small workshop. Writing it took a lot longer than I have expected, I hope I did not bore you to death.

A New Workbench

Today was lazying-around-doing-nothing-in-particular-day. I needed it, my back hurt as if I were shoveling gravel. Four days in a row I was working as much as I could on making the best of the bad weather and making a new work bench for my workshop, something that was desperately needed for a long time by now.

I have started by taking some ca 5 m long boards from their storage in my garden-shed half of the workshop building.

© Charly, all rights reserved. Click for full size

These super long spruce boards are reclaimed from attic renovations when a few years ago the old board flooring was replaced with OSB boards. They have some insect damage, but not excessive so they are still strong, and they are super dry. Thus whilst they are straight lengthwise, they are slightly bent across. They also have fitting tongues and groves.

I have cut 10 of 2300 mm long pieces and 17 of 700 mm long pieces and cleaned all the grooves and tongues first with a chisel (they were full of decades-worth of dust) and then with sandpaper. After that I have put five long boards next to each other with the concave side up and I flattened them with my handheld belt sander.

© Charly, all rights reserved. Click for full size

The concave side of the boards required less material removal than the convex side would have, therefore the belt sander was sufficient. And it has also removed the oil oil/wax finish on the boards.

Flaterooned boards could be glued side-by-side together, forming the base of the workbench. To keep them together I have lashed them with four Spanish windlasses.

© Charly, all rights reserved. Click for full size

I have used PU-based glue for his bench but I have used PVA for my first one and it worked too. The PVA only needs a longer time to cure and the PU has a further advantage in that it foams up, filling neatly small voids, etc.

I did not wait for the glue to set, however, and I started sanding the convex sides of the short boards straightaway.

© Charly, all rights reserved. Click for full size

When those vere sanded flat, I started gluing them to the base and attaching them with screws to hold them in place. That was my first workday finished.

© Charly, all rights reserved. Click for full size

So I have two layers of boards, perpendicular to each other, glued at flattened concave sides. The next day I removed all the screws and then came the hardest part of this whole ordeal – flattening the convex sides of the bords in the upper layer and of the five remaining long boards.

© Charly, all rights reserved. Click for full size

The convex sides needed to remove more material than the concave sides, thus belt sander alone was not sufficient. I had to take out the one tool that I actively hate – the electric hand planer. I never figured out how to use it properly. It hogs material away quite successfully, but it also makes gouges in the boards no matter what I do and the gyroscopic force makes its movement extremely difficult and tiring. And it is extremely dangerous on top of that. And it makes an unholy mess.

But I have managed to get the sides at least somewhat flat so I could glue on the long boards as the top layer. again using screws to hold them in place. That was the second day finished.

© Charly, all rights reserved. Click for full size

The next day I again removed all the screws and I filled all the holes and gaps with bbq skewers, popsicle sticks, and/or a mixture of PVA glue and sawdust as appropriate.

© Charly, all rights reserved. Click for full size

It has cured very quickly so in the afternoon I could flatten this side, using mostly the belt sander, but I had to use the dreaded planer too a few times. I made one unseemly gauge on the surface :-/

© Charly, all rights reserved. Click for full size

I had to fill in some voids again, but I was able to give it the first coat with strongly diluted acrylic paint that very same evening.

© Charly, all rights reserved. Click for full size

At this point, I was so physically tired that I could not even sleep properly. Fighting the electric hand planer made my back and neck ache something awful. But at least the 2300x720x70 mm workbench board was mostly finished at this point. It is not tutti flatti perfetti, but it is flaterooni enough.

© Charly, all rights reserved. Click for full size

The third day was thus finished, the first coat of paint dried overnight.

The next day I have again filled some cracks with sawdust and acrylic paint mixture, gave the whole thing a coat of undiluted paint and I weighed it. It weighs approximately 42 kg. It did take some work to get it through the workshop door and into the workshop, but I have managed it and I managed it solo. I was afraid to ask my father for help because he could easily hurt himself. I was more comfortable with banging the board about and eventually breaking something than with him getting some serious injury. Luckily I did not break anything, nor did I injure myself, I was just very, very tired at the end of that endeavor and I have not made any pictures of what I have done inside the workshop. I just remembered to make this one picture at the end.

© Charly, all rights reserved. Click for full size

The board is fixed to the wall on the rear edge and supported by two legs on the front two corners. Under it are some reclaimed furniture cupboards that were there even before, just without a nice continuous workbench above them. Because it is fixed to the wall, it is very sturdy and It can take my whole body weight in the middle without bending.

That was the fourth day finished. I was still too tired to even sleep properly, so I did not.

Now that it is in place, it will get two more coats of paint (one is drying right now) and then I will put on it the machinery. Either tomorrow or the day after that, depending on how fast the paint cures and how I feel.

I intend for this workbench to be a permanent home for my belt sander and band saw and also, in the future, a lathe. That should free my first workbench significantly, allowing me to do manual work more comfortably and have more than one vice.

A Big Commission – Part 9 – Da Pictures

Today the customer has picked up his brand new machete. He was apparently delighted, at least he said so. His exact words were “This is much better quality than I have expected, especially the leatherwork.” So today I did not feel like a total waste of space. Here are some nice pictures for you to look at. I did not have to do too much post-processing after all.

© Charly, all rights reserved. Click for full size

© Charly, all rights reserved. Click for full size

© Charly, all rights reserved. Click for full size

© Charly, all rights reserved. Click for full size

© Charly, all rights reserved. Click for full size

© Charly, all rights reserved. Click for full size

A Big Commission – Part 8 – Photographing

I do not need to make nice pictures for the webshop for this one – unless the customer rejects it, which I hope he does not – but I do want to have nice pictures for myself, for Instagram and, of course, for Affinity. And since it was a nice sunny day today, I took my photography session outdoors. One advantage of that is the sunlight, one disadvantage of that is way too focused light. Shade has, of course, diffuse light, and whilst it is very bright on a cloudless sunny day, it is alas also of the wrong color for this thing and I did not want to spend too much time with corrections in either the camera or on the PC.

So I have rigged up a small thingamajig to make pictures in diffuse light whilst getting the benefit of direct sunlight’s color whilst getting it a bit diffuse. I will have to edit out an occasional ant or piece of debris though, so I am not entirely sure I have saved time in the post-production at all. Well…

© Charly, all rights reserved. Click for full size

A slightly overcast sky would be best but despite my valiant efforts, the weather still refuses to obey my commands. Mind you, if I could command the weather, I would not command a slight overcast right now, I would command a week of slow, drizzling rains and make the pictures indoors.

Pictures will be posted here and on Instagram after the customer picks up the item. I hope it will be tomorrow, but it might take a few weeks too, depending on circumstances.

A Big Commission – Part 7 – Missed Opportunity

AAAARGHHH! Amidiotextrordinaarggh!

Today I have sharpened the machete, thus de-facto finishing the commission. I have decided to test it in a way that poses minimal risks to the nice surface finish and still tests its cutting capabilities. By cutting milk boxes filled with water standing on a pole. That is a good way of testing an edge because a blunt blade just bats the box away from the pole, a sharp-ish one cuts partly through, tears the rest, and throws both pieces away, and a really sharp one sails through the box, the top falls off and the bottoms stays on the pole. A bad cutting technique may lead to a bad cut, but not even a perfect technique can lead to a good cut with a blunt blade. It does not test an edge’s durability – a well-sharpened bronze sword would perform well too.

I considered filming it and then I thought to myself “Nah, nothing interesting ever happens, waste of time”. Then I cut the first box and I immediately cursed my laziness and stupidity.

© Charly, all rights reserved. Click for full size

I cut the top of the box cleanly off, and it stayed on! I have cut dozens of these boxes when I was testing my own machete and this has never happened. And since there was enough of the box left for a second cut, I went on and cut it a second time.

© Charly, all rights reserved. Click for full size

And the blade sailed through like there was nothing there and both cut pieces stayed atop the bottom part. If my hair was long enough to grab and tear out, that is what I would be doing. A rare thing happens and I did not film it because I was lazy to go upstairs and set up my tripod.

Of course, I went upstairs for the tripod in a hope that I will be able to replicate it or at least get some interesting footage from the remaining three boxes that I had at hand. On two I got useless footage because I messed up my cutting technique. Probably nerves. Definitively nerves. On the third attempt, I did manage to get three clean cuts through the box, but the first two stayed on only because they remained connected on a minuscule (~1 mm) strip of paper – I was standing a tiny bit too far from it. After the third cut the top fell off but the bottom stayed on the pole so at least there’s that.

It is a wicked sharp blade, it cuts like a lightsaber. It will be a good tool. But I missed an opportunity for getting good advertising footage. Bigly.

A Big Commission – Part 6 – The Sharpenstone

Today I have made the last piece of the puzzle – a small whetstone for edge maintenance in the field. I expected it to take me two to three hours, it took me twice as much. Partly because it was the first time I was doing it so I did not really have a clear plan on how to properly proceed and what will work best, partly because I screwed up and I had to start all over with one part. But I think that if I were to make another, it would indeed be those two hours that I used for price calculation.

I started with a piece of native, strongly metamorphized phyllite. It has visible big garnet grains and it is very hard.

© Charly, all rights reserved. Click for full size

I cut a strip off with a diamond stone cutting wheel in my angle grinder. I have used that wheel also to roughly shape it and thin it.

For the second, fine layer,  I have used a piece of old roofing shale. Those can sometimes be found around here on building sites and even in my garden.

© Charly, all rights reserved. Click for full size

Those are not native stones, they are the remnants of long demolished houses from before WW2. Initially, I wanted to use a different piece of local phyllite, less metamorphized, softer, and with finer grain, but I screwed up and it delaminated down the middle, becoming too thin. So I went for the shale for my second try because it is stronger and I wanted to be definitively done today.

Using five-minute epoxy, I glued both roughly shaped flat stones on a thin jatoba board, making a small stone popsicle.

© Charly, all rights reserved. Click for full size

© Charly, all rights reserved. Click for full size

© Charly, all rights reserved. Click for full size

After the epoxy cured, I shaped the outline, covered both outward faces with adhesive tape, and submerged it whole into linseed oil for a minute or so to soak the wood.

© Charly, all rights reserved. Click for full size

After that, I had to grind down the faces a bit again, it was just a bit too thick to fit into the pocket. I ground them down with the diamond wheel and then flatterooned them on granite stone with wet&dry carborundum abrasive paper on it.

© Charly, all rights reserved. Click for full size

Both phyllite and shale are soft enough so they can be shaped with abrasive cloth or paper, but hard enough themselves to abrade steel.

This is not a stone for serious sharpening work and I have told the customer so. Its abrasive action will be relatively mild compared to modern carborundum-based whetstones, even on the rougher phyllite side. But it should be excellent at maintaining an already sharpened blade and giving it an occasional touch-up during work. I have used pieces of phyllite or shale for exactly that, although those were stones found by the wayside, impromptu flattened and used out of necessity, not nicely crafted like this one.

Thus almost all work is finished – tomorrow I will sharpen the blade and make nice pictures to present here and on Instagram.


A Big Commission – Part 5 – The Stitchening

The original sheath the customer provided as a template has the tip reinforced with plastic. I cannot do that of course. Making a metal cape would be an option, but an expensive one since I would have to make multiple metal templates to press it and then solder it, polish it and all that jazz. So I have convinced the customer that reinforcing the tip with 4 mm thick leather should suffice. Which I think it should.  But I did make an extra step to make that thick leather just a bit harder – I heated it to 70-80°C in water and kept the heat until it shrank to about 80% of its original size.

© Charly, all rights reserved. Click for full size.

This makes the leather inflexible and somewhat brittle in bending, but very hard. Hard as plastics in fact. Caskets or boxes can be made that way. It has several caveats that need to be taken into account, however.

  1. After it is taken from the hot bath, it remains pliable for some time but not very long and it keeps shrinking for a while. If it needs to be formed in a specific shape, it needs to be pressed into the form quickly and left to cool down and dry in form.
  2. Because it shrinks, any decorative carving that is done can only consist of outlines. Any fancy pressing or stamping simply won’t work. And the shrinkage has to be taken into account – as well as the fact that the shrinkage is not completely regular in all directions and predictable.
  3. As it shrinks, it gets also significantly darker, dark brown. So it reduces the possible dyes that can be used to change the color to any shade you wish, as long as it is black.
  4. It needs to be heated up carefully. If overheated, it curls up and becomes way too brittle.
  5. If there is a risk of any bending stress, it should be reinforced with fabric or untreated leather. It is hard and scratch resistant but breaks when bent.

For my purposes, I needed two flat plates, so I left them to cool down and dry under two flat pavement bricks.

© Charly, all rights reserved. Click for full size.

On the top, you can see the already dry pocket taken out of the form. On the right is a glimpse of my impromptu cardboard template for the sheath.

Working on a complicamaticated thingamajig like this the ooo is very important – order of operations. If one glues and sews together some parts it can make some other parts impossible to add or modify, so I had to think carefully about how to progress. For example, on the outside, I had to first sew on the pocket flap, and only after that I could sew on the pocket itself.

© Charly, all rights reserved. Click for full size.

The kukri sheath is wide open on the back and the blade itself is thus held in place with a flap with two snap-fasteners. To avoid rubbing of metal on metal, I have pressed the lower part of the fasteners on an extra piece of leather and glued & sewn that onto the sheath.

© Charly, all rights reserved. Click for full size.

When making the belt strap, I had to form it, glue it and sew it together about 90% of the way, then I had to leave it with the threads hanging, glue the eye shut, and sew the rest. The strap is sewn from two layers for several reasons – I have used relatively thin leather and I was afraid it would not support the weight of the whole assembly, which will be over 600 g, and the way the sheath was cut, on the strap it would be the suede side of the leather facing out, and on this one, it is not particularly pretty.

I have possibly slightly overengineered the whole thing – there is double stitching along the edges as well as stud reinforcements and I have spent several more hours with it than I planned to. I do hope that it bears out in durability, I need satisfied customers to spread the word.

I have now applied some dye to the finished product and it hangs outdoors in the shade to dry. I have also applied linseed oil to the handle and it hangs outdoors in the sun to dry. Tomorrow I will condition the leather, and sharpen the blade and I am nearly finished. All that will be left is to make a small sharpening stone that fits into the pocket. I hope that won’t take too long, a few hours at most. Although I have some funny over-engineering ideas there too…