Notwithstanding dangerousbeans’s comment at the last article, I did find in my steel offcuts pile a blade that broke after it was nearly completely finished, with etched logo and all. That means learning about the sharpening properties of exactly the steel that I use in exactly the state it is in a finished product. In different steel, the results might come out a bit differently, which means I am mightily glad that I could do my tests on this – an absolutely ideal testing specimen.

© Charly, all rights reserved. Click for full size
I have sharpened the blade stub at a 15° angle which is the angle at which I usually sharpen kitchen knives, and always those that I make from N690 steel. (When tasked with sharpening store-bought knives from unknown steel I occasionally sharpen them at 20°, especially if it is clear from the state of the knives that the customer is not particularly careful about their use.)
I established the bevel with 120 grit and then I progressed from 180 and 240 grit Zirkorund and then Trizact belts (in the evaluation translated into grit equivalents) from A 65 all the way to Trizact A6. I only differed from my usual sharpening procedure in one way – I used fresh belts, instead of old ones. Normally for sharpening, I am using old belts because sharpening is extremely rough on the belt and destroys it very quickly.
The measuring method is wildly imprecise – the testing thread is not homogenous, the angle at which I put the blade on it is not always precise, I do not always hit the center, I am not pushing with constant speed, the kitchen scales do not renew the measured value with sufficient frequency and probably several other variables. I have experience with such measurements from my previous job though and there are ways to get relatively reliable, reproducible, and usable results even so. One of those ways is to make lots of measurements – that is why I took 12 measurements, discarding two of the most egregious outliers and making the evaluation with the remaining 10. There are mathematical methods for discarding outliers but for my personal purposes, the Lookandsee method suffices. (Thirty or fifty measurements would be better, but I am not going for exact values for individual grits, I am going for a comparative assessment between those grits. Anyway, not going to write a boring lesson about measuring).
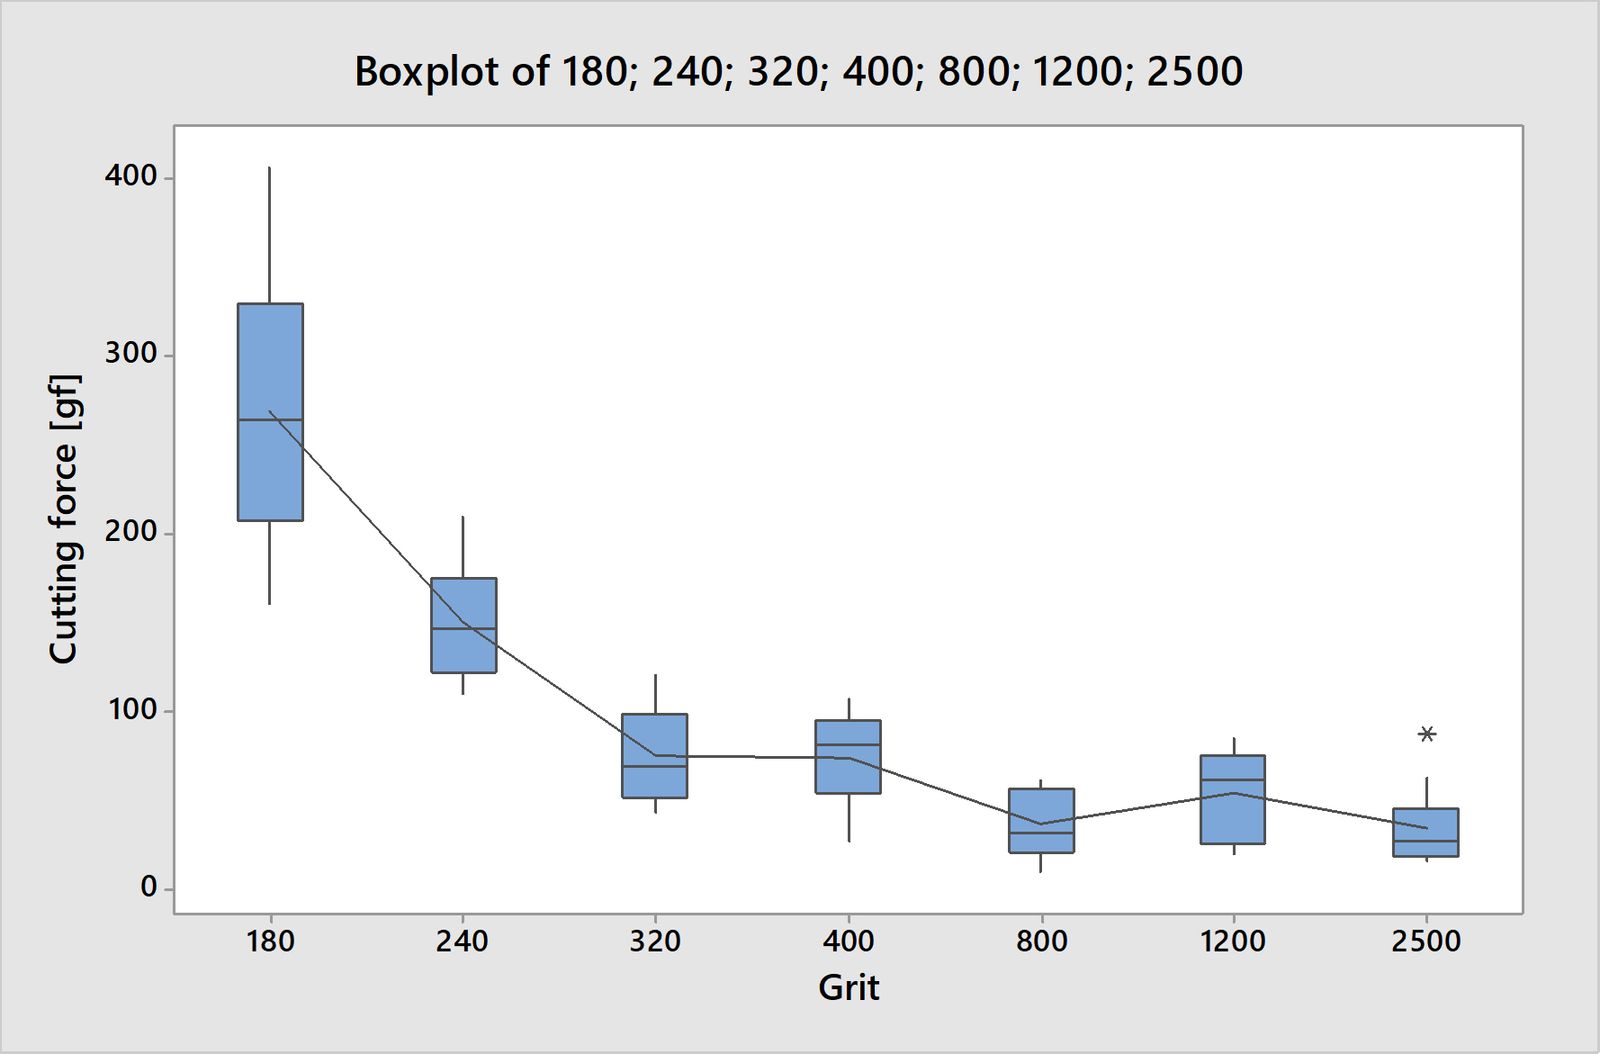
Here is the boxplot of those ten measurements per each grit:
© Charly, all rights reserved. Click for full size
And it looks like my prediction from yesterday was bang-on. Which is satisfying to my ego, but also boring in a way. It would be much more exciting if it were different.
What you see here is the cutting force going rapidly down from ~270 g at 180 grit to ~ 75 at 400 grit. At this point, the blade is capable of cutting freely hanging paper. Then it falls some more to ~40g at 800 grit and more or less stays there till the end (the knife is shaving-sharp at these stages). The slight increase at 1200 is a fluke that would most probably go away if I have made more measurements and/or invested time and resources in refining the method. I made ANOVA test and there is no statistically significant difference between the last three fine grits.
So in conclusion, sharpening knives beyond 1000 grit indeed appears to have very little practical value. At 800 grit the blade is already shaving-sharp and polishing the edge further only costs more time without noticeably improving its cutting capabilities. With more precise measuring method there might be a difference, but it would be very, very tiny. I think that I can replace the last two belts with a leather belt infused with stropping compound and get the same result. And since time is money, I will do exactly that.
I don’t really have anything meaningful to ad, just that I wanted to say that I found this run of posts interesting, and thanks for sharing your results with us.
:)
Hmm, I’m still sceptical. Your theory does appear true for these cutting tests though. I would like
What steel is this?
oops
I would like to see some other tests with different sharpening methods
@dangerousbeans, the steel is N690, I write that in the second paragraph although now that I look at it, I was not clear enough. And since it is a broken blade, I got a nice look at the very fine grain structure too.
You swallowed half of one sentence, what would you like?
Edit -- I found it in the spam.
It seems from the description of the tests that the sharpness is demonstrated by downward pressure alone. But there are two ways to cut, shaving uses downward pressure at an angle while slicing drags the edge while also using downward pressure. What you cut and what results you want from the cut make a difference. One does not shave a steak and one does not slice a beard, unless removal of mold or the head is the goal*
.
*the guillotine had a built-in slice via its angled blade
@Alan G. Humphrey, I am fully aware of that but I fail to see how it is relevant to what the test is designed to ascertain. Especially since cutting by pressure alone is more difficult than slicing and requires a significantly sharper blade. I would not drag my finger along a blade that has been sharpened with “just” 180 grit belt because I know for certain that I would cut myself pretty badly.
Indeed when doing the measurements I have to be careful to not drag the blade across the thread even a little because even a slight slicing motion reduces the cutting force quite noticeably.
I made the comment because it may be relevant to the comments in earlier posts by tuatara and dangerousbeans about their experiences with blades sharpened with much finer grits and how they feel the difference in sharpness during use. They probably can’t feel it during chopping carrots but can while filleting a fish. How that can be tested using your setup is not obvious to me, but others seeing these posts or yourself, may have an aha moment.
Not an aha moment, but maybe defining the problem a little closer may lead to a discussion. And I’ll say up front that even if there is an interesting discussion, the results (if any) would not be anything I would expect Charly to run out and try. Charly may just not be interested.
But to measure slicing ability I submit there are a number of things you would need to take into account.
First, the force of the blade against the material being sliced. I suggest it should be held constant for all tests.
Second, the speed of the draw across the material. That should also be constant.
Third, the distance travelled by the draw. This should be constant, and maybe should be fairly short. If you were trying to compare a knife to a razor, you wouldn’t want to draw the knife any further distance than the razor simply because any cut would be deeper.
Fourth, the material being cut should be soft enough to avoid damage to the blade, but cohesive enough to avoid tearing or splitting separate from the cutting.
Fifth, the material should separate as it is being cut. Otherwise the thickness of the blade will impact the results. If the material doesn’t separate during the cut there may be friction from the non-edge part of the blade against the already cut sides. A blade which is 0.5mm thick throughout it’s width will have less friction then a blade which reaches a thickness of 2mm if there is friction from the sides of the blade against the cut edges.
I may be missing something, but I think that covers the necessary parameters. The result would be the depth of the cut. A deeper cut would mean a sharper blade.
As far as application, the first question is whether the blade or the test piece should move. I’m inclined to think the blade should be fixed as you are probably going to have greater variation in the shape of the blade than the other parts of the fixturing. But it should be somewhat easy to fix a blade to the correct height and lock it in place, while the rest of the fixturing remains constant. The contours of the blade may be difficult to account for, a blade with a significant curve will probably give different results than a straight blade. Then the testing material is run along the blade at a constant force, allowing it to cut as deeply as the sharpness allows.
As far as the testing material, that would require some thought. Off the cuff, maybe layers of thin fabric, like the cotton/polyester material in dress shirts, cut into 50mm X 20mm strips and stacked into a holding fixture. Say 50mm tall (that would be a lot of strips). Then soak the stack of material in something like rubber cement. On each side of this stack, along the 50mm edges, affix a slightly stretched rubber sheet. Once held in the fixture, the bottom of the stack travels along the edge. As each thickness of fabric is cut, the rubber sheets on each side pull that fabric away from the edge. You can count the number of layers sliced, or just measure the thickness of the remaining part of the test block.
There are probably a lot I’m missing from the above descriptions. But it looked like I was working for the last half hour, and now I can home for the day.
Slicing does reduce the cutting force quite significantly. Perpendicular cutting at a right angle thus seems to be actually the best way to test edge sharpness because any blade that is going to perform well in that will also perform well in slicing, but not vice versa. It is also probably the easiest to measure, especially with my cheapo setup. I have worked with highly sensitive force gauges and I know how much they cost. If I had that kind of money spare, I would be happy, but I don’t.
I cannot refine this measuring method too much without a quite substantial investment of time and money, neither of which I am inclined to do right now. I think I have gained usable knowledge already. I too was chasing the “perfect edge” and then I realized that once the blade starts to shave hair, how better can it get, actually? That has led me down the path that over the years culminated in this experiment.
I mean no disrespect to my fellow knife makers and knife users but in light of these measurements my opinion is that the perceived “improvement” of a blade with grits above 1000 is probably more often than not psychological in nature more than anything else, kinda like the placebo effect.
But even if it is not -- it is conceivable that extremely experienced people can differentiate even minuscule differences in blade sharpness and there also is no doubt that there are blade and edge geometries that are highly optimized for specific tasks and for a good reason (razorblade being one of those) -- the purpose of this test was not to dunk on knife makers but to evaluate for me personally how far do I need to sharpen knives for my customers. Because when someone brings me a box of store-bought knives to sharpen, I need to sharpen them enough to leave a good impression, but I also need to spend as little time with them as possible.
Even if sharpening a highly specialized sushi knife for an experienced sushi chef might be justified to 5000 or even 12000 grit, it certainly does not appear to be the case for Otto Normal cutting onions. But even Otto Normal cutting onions will notice a difference between a knife that was not deburred properly and one that was.
And I would be actually interested if said sushi chef would notice the difference between a 1000 grit and 12000 grit sharpened knife if he did not know upfront which is which. But I cannot test that now and probably never.
@Charly
Ah yeah, i missed that. thank you!