When making the commissioned machete in the summer, I had enuff steel left for one additional blade and two more blanks lying around made from the same steel, thus I decided to try my hand at making a blade with hamon again. So far, I have succeeded only once, with a “mystery” stainless steel, and I had to cheat by carbonitriding it for several hours at ca 500°C. The 54SiCr6 is 0,5% carbon steel, which is not ideal for hamon. 1-1,5% carbon would be better. But I decided to try it nevertheless because if I fail, I can (usually) always harden the whole thing.
Well, I did fail in multiple ways – from three quenched blades, one had to be tossed completely, one I damaged because of unforeseen circumstances, and one turned out OK. This is better than my previous attempts and I think I have a working process now for making blades with hamon. Here is how I did it.

© Charly, all rights reserved. Click for full size
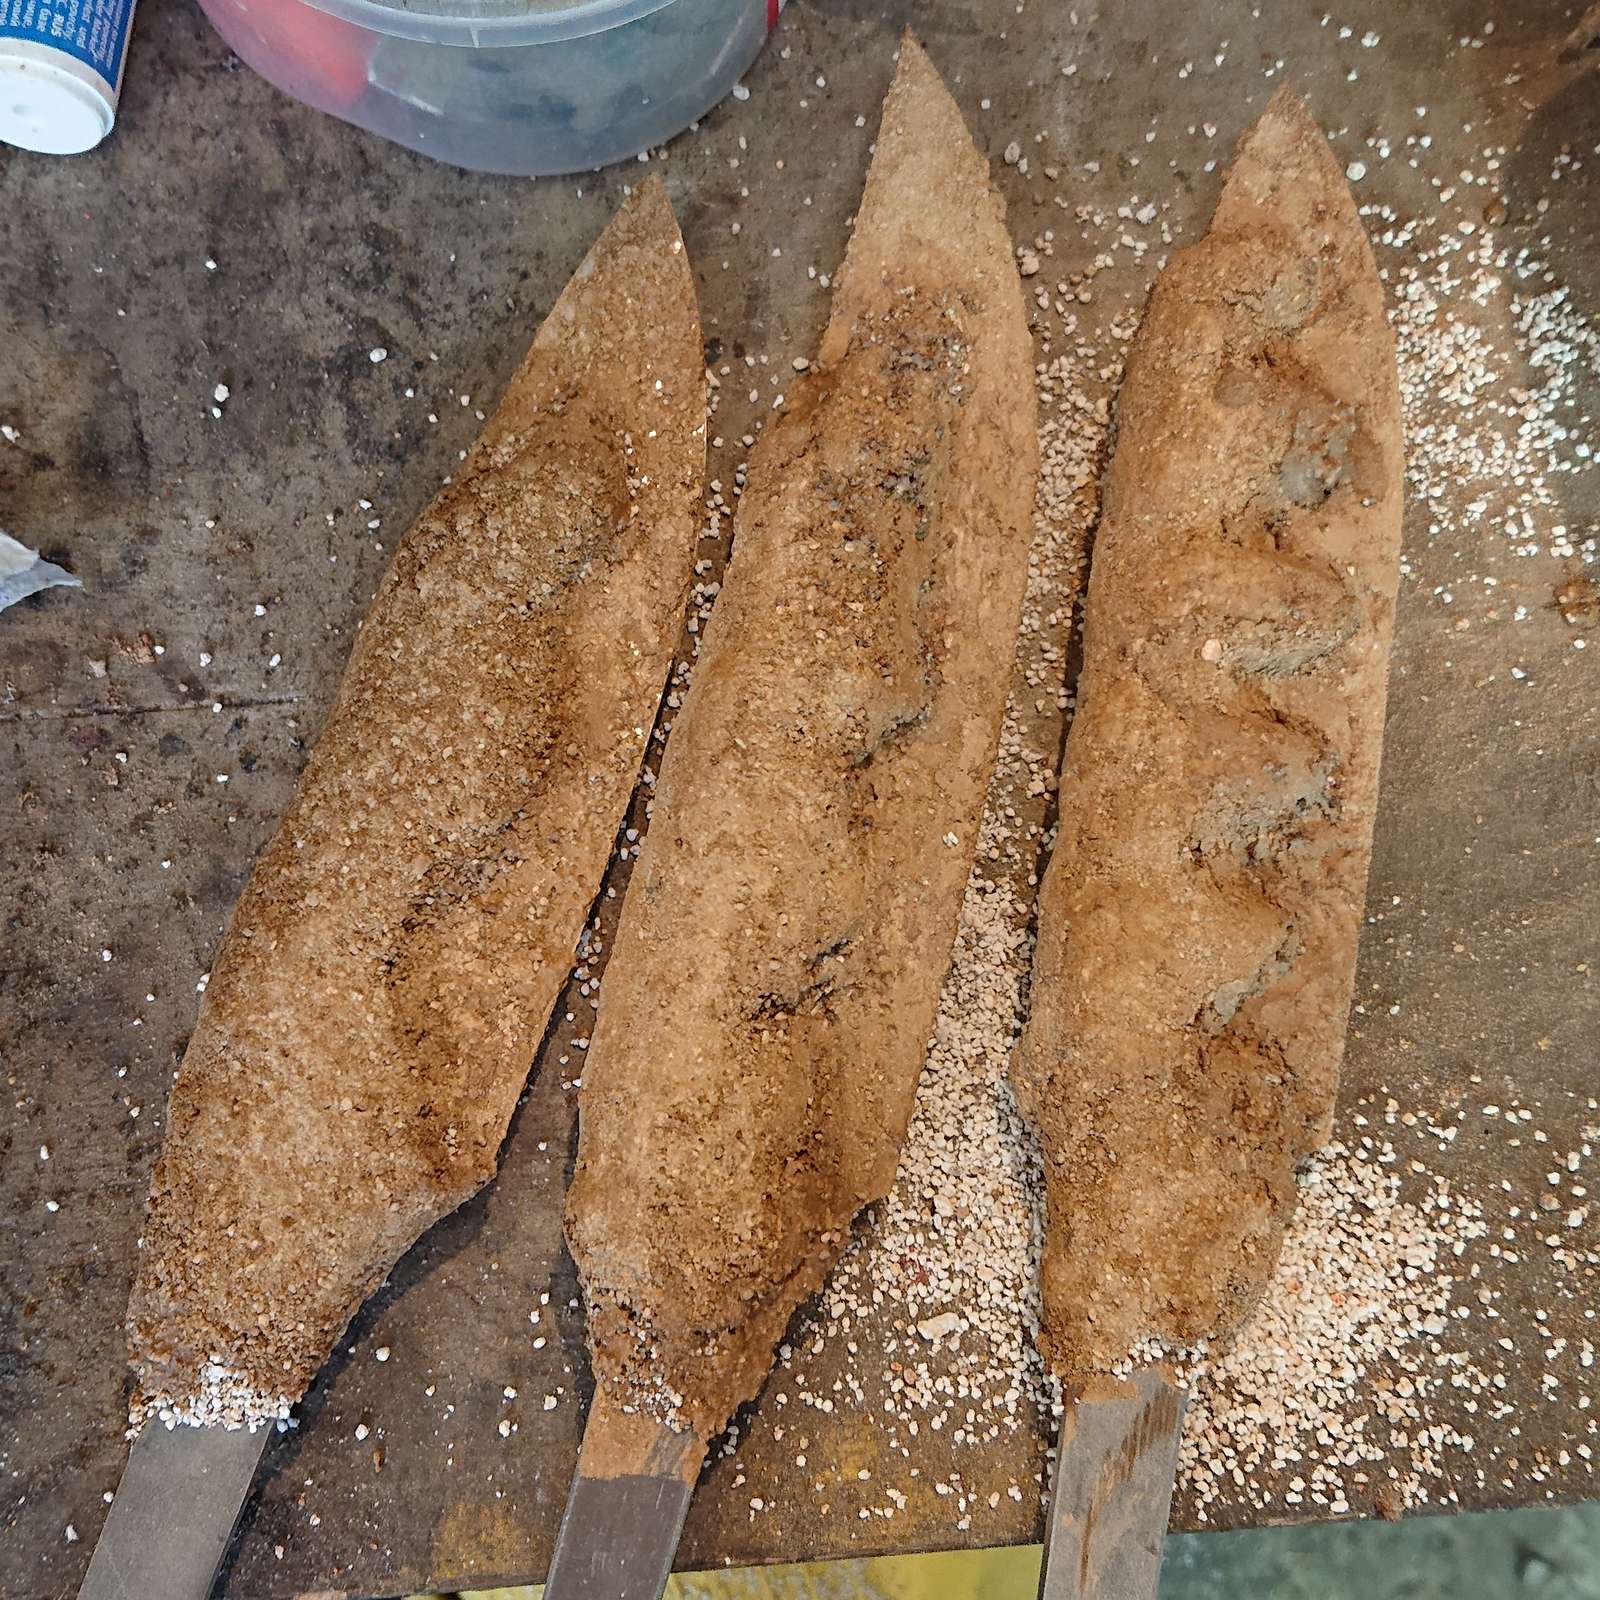
First the used materials – three blade blanks ground with 40 grit. I went for three different geometries to see what happens. A sample size of 1 per geometry is of course not very indicative of anything, but it is better than nothing. On the left is a bottle of liquid glass, a water solution of sodium silicate, a chemical that is sold cheaply in CZ and is used to waterproof cement, make cement go harden faster, and as a binder for heat-resistant cement. Then there is a receptacle with perlite, which I have bought in huge amounts for use both in my gardening and knife-making endeavors. And the last ingredient is fine-sieved dirt from my garden taken from deep below the topsoil – I have a heap of this too from the building of my sewage cleaning facility.

© Charly, all rights reserved. Click for full size
The first step was to cover the blades with a thin layer of just the liquid glass mixed with some clay and sprinkle some more clay on top of that to soak up excess liquid glass and prevent cracking of the layer when drying it with a heat gun (a torch and charcoal fire work both too as I found out later).

© Charly, all rights reserved. Click for full size
Here you see the various phases of the second step, which consisted of adding several layers of perlite. For this, I have used the mixture of liquid glass and dirt again, but I have sprinkled it with perlite. The liquid glass serves as a binder, the clay as a filler to prevent cracking, and the perlite as an insulator. I dried the added layer with a heat gun again and I continued to add these layers until I had about 1 cm thick insulating layer on each blade. To finish it off I have added one more layer of liquid glass and dirt only to make a hard shell that holds it all together.
© Charly, all rights reserved. Click for full size
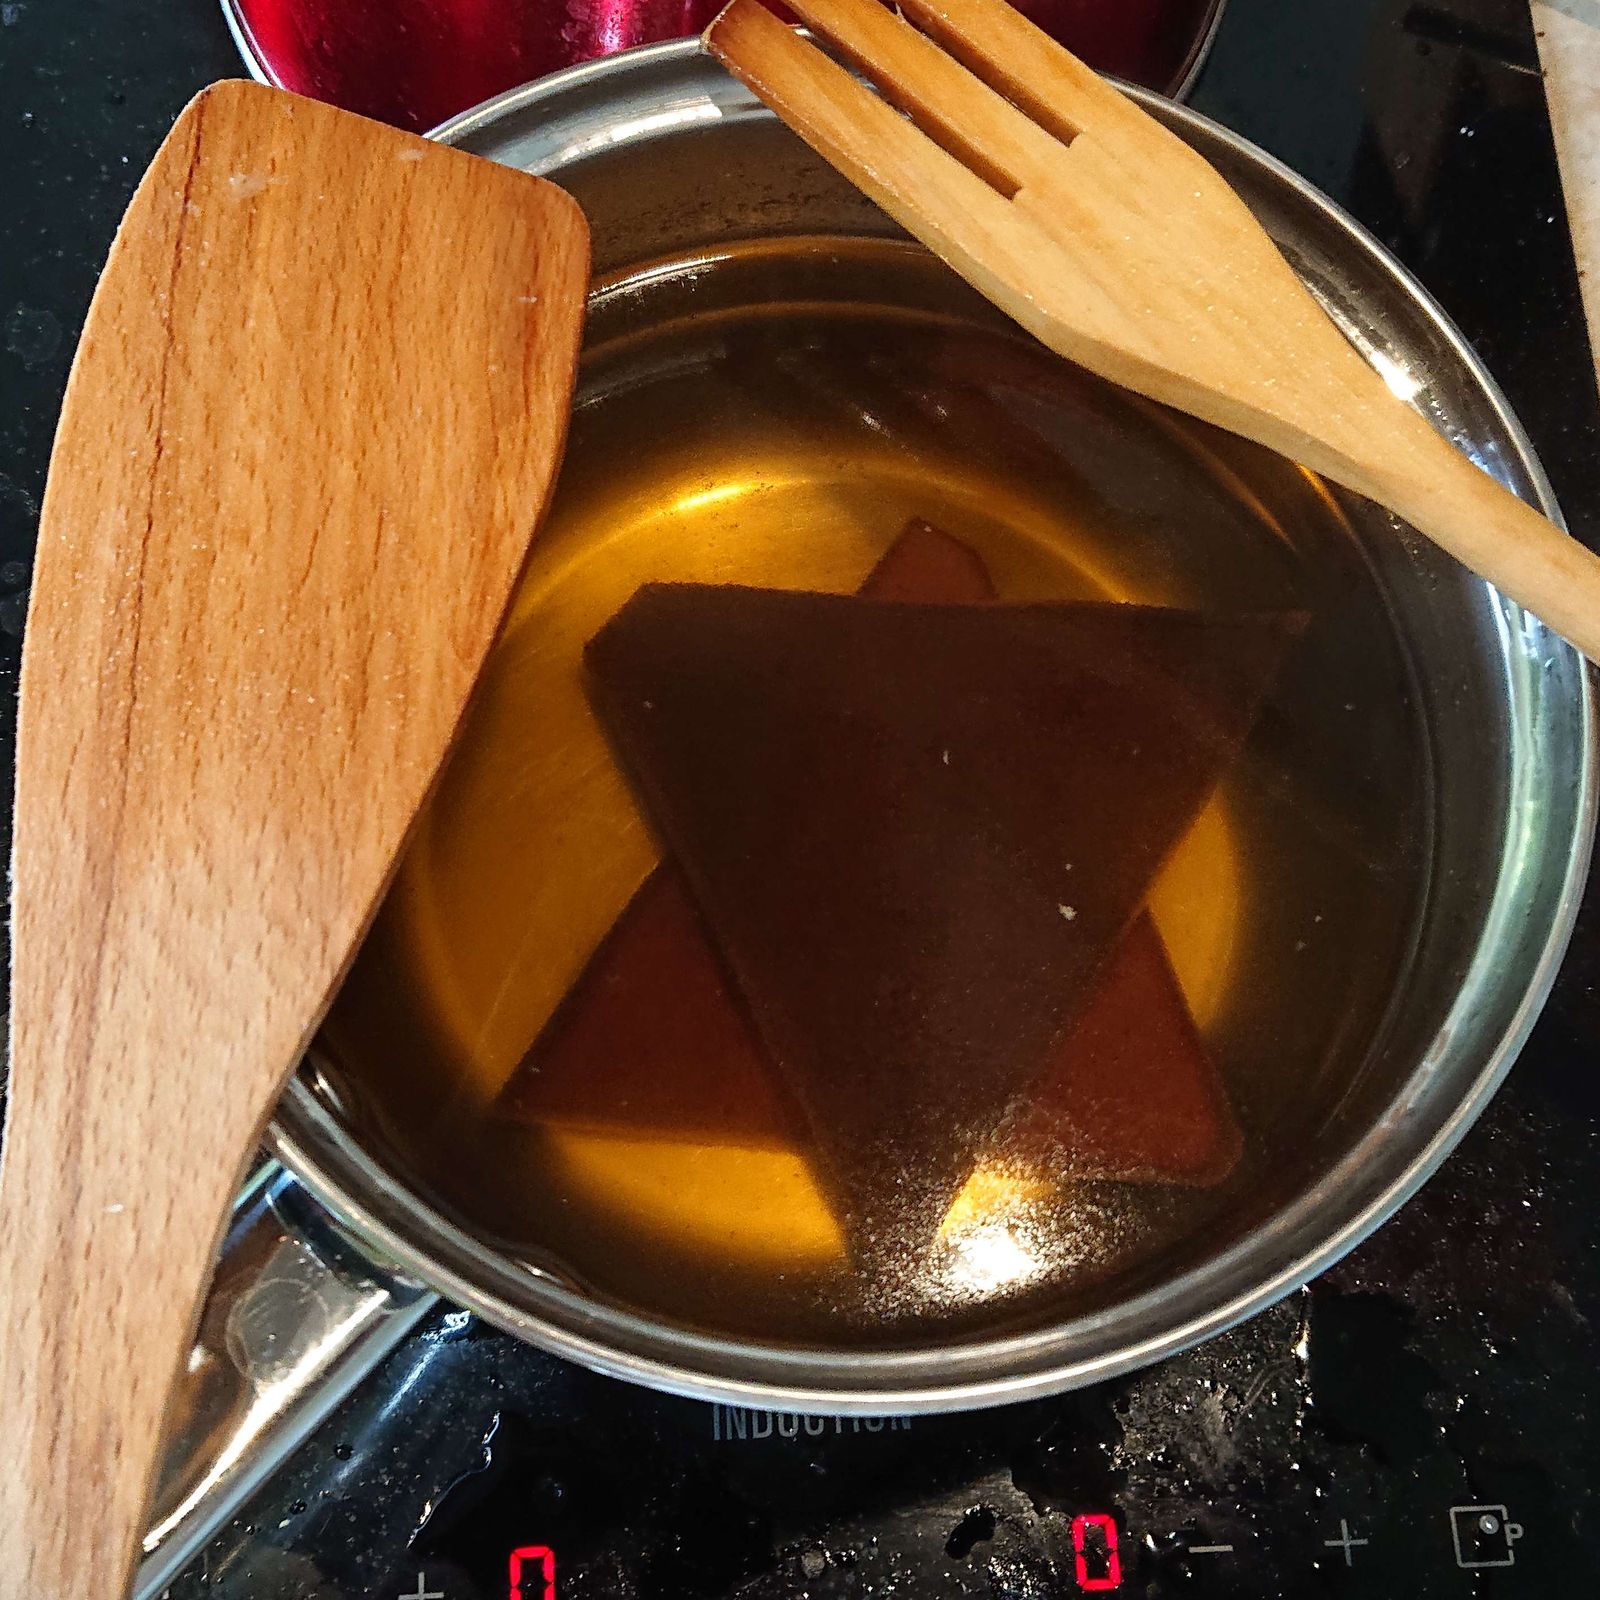
Initially, I went for three different hamon lines, but unfortunately, this did not work out. After I quenched the machete and one of these blades (I forgot which one) without problems, I had trouble reaching the required temperature again because the coals got smaller and the blown air did not reach under the uppermost layer anymore. So first quench was unsuccessful on two blades, I had to cover them again and try to quench them again. This time I was using the charcoal fire to quickly dry the successive layers and it worked well. Next time I am preparing blades for hardening this way, I will probably combine it with BBQ dinner, combining pleasant and useful.
As I already mentioned, two of these unfortunately failed.
The first fail was the blade with a fuller – it cracked near the ricasso. That is always a risk with hardening steel and it is higher with this method it happens even to masters of this craft because the blades must be quenched in water which is more stressful than oil. So while I am not happy about having to toss the blade, I do not beat myself over the head over it either.
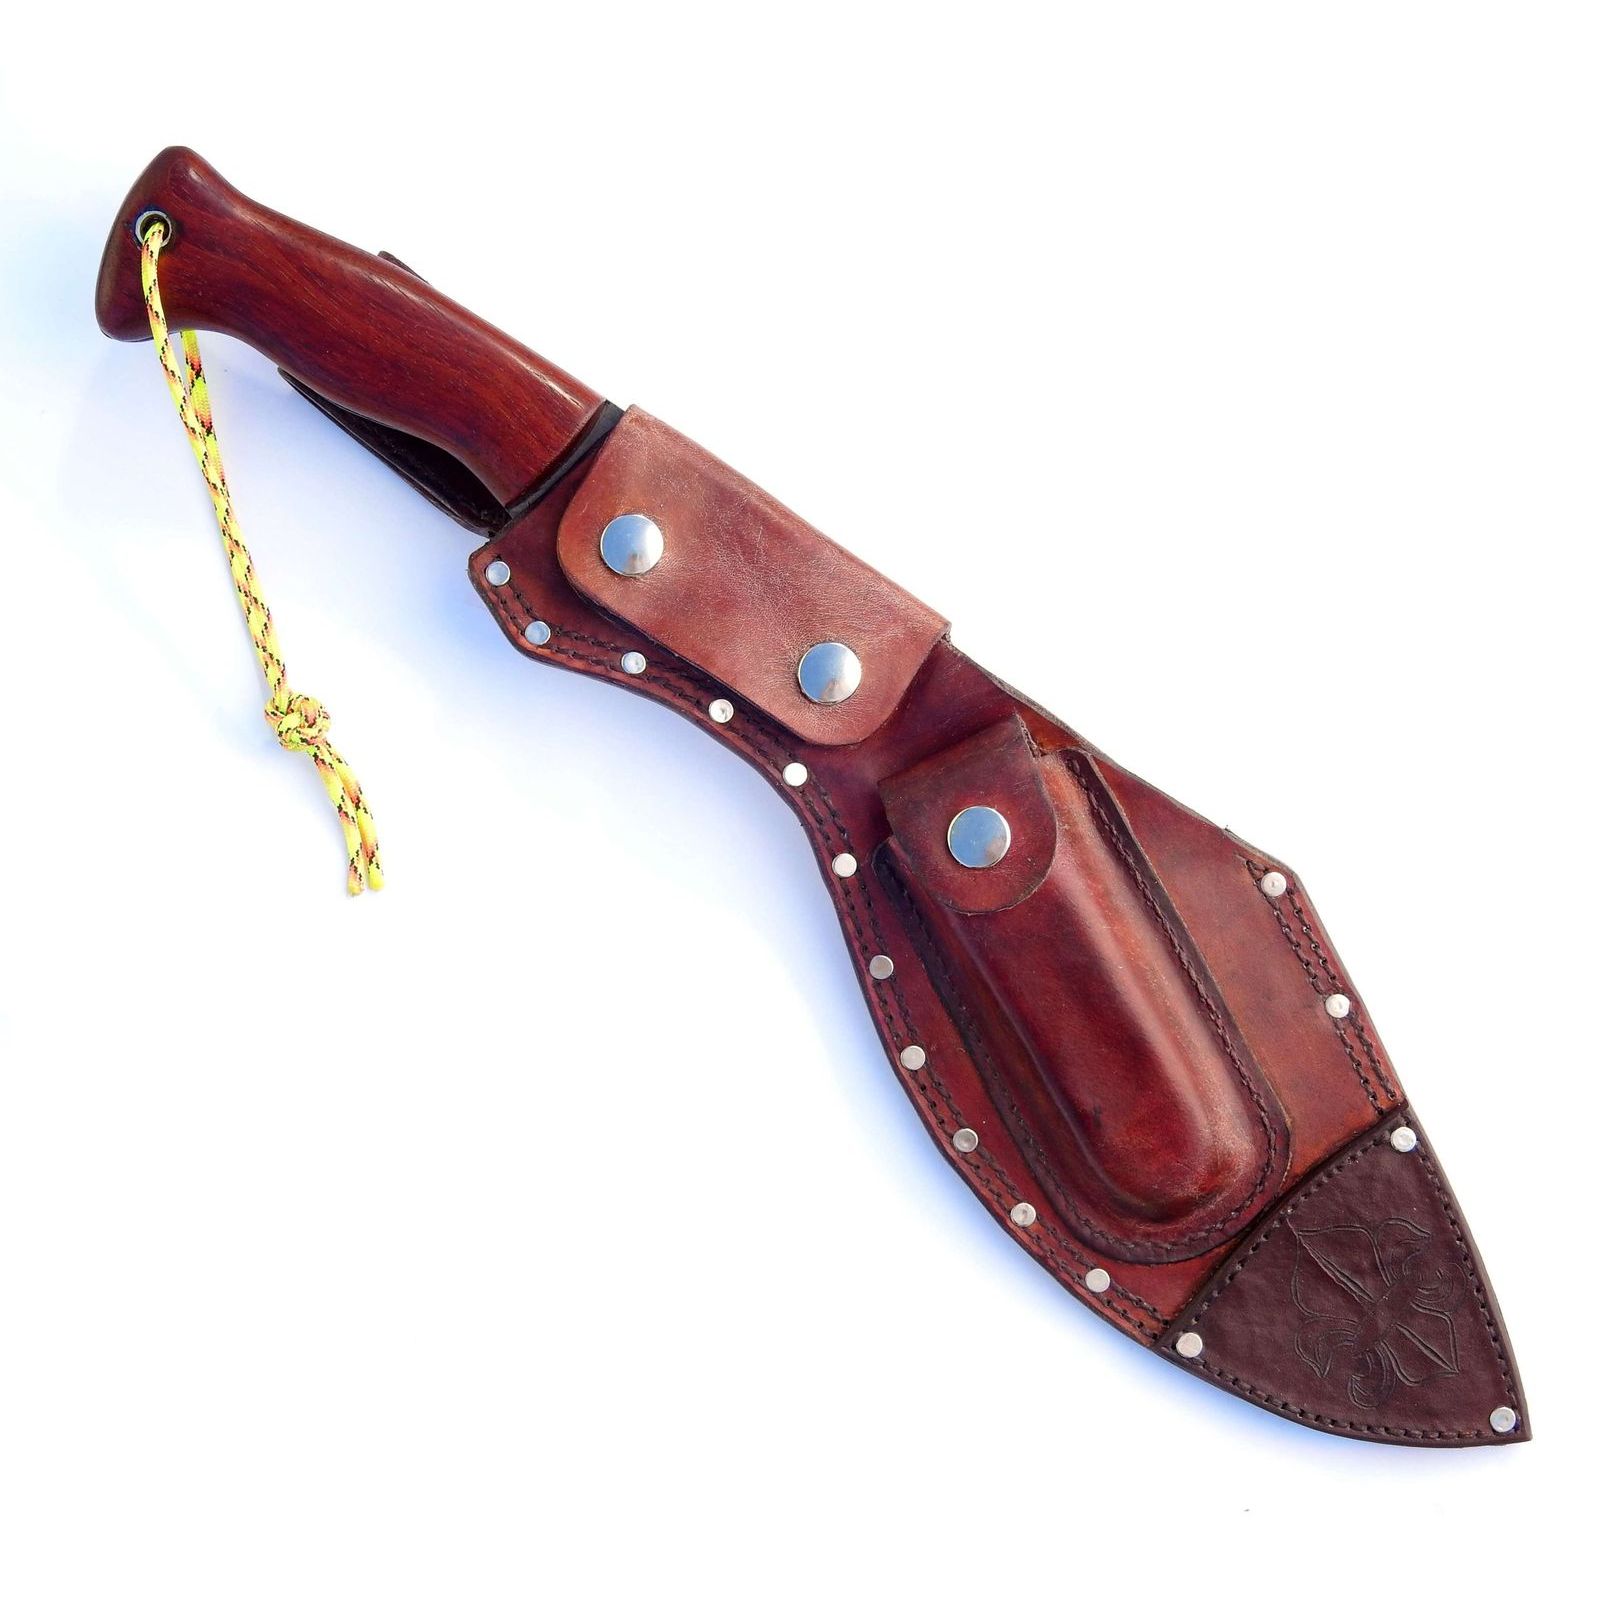
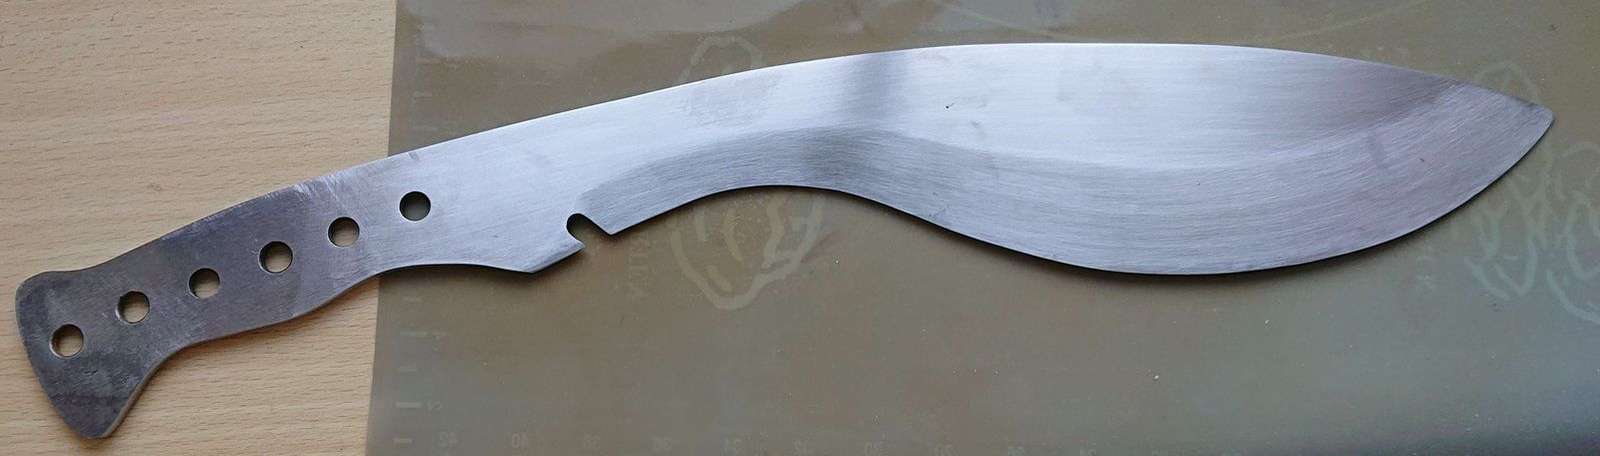
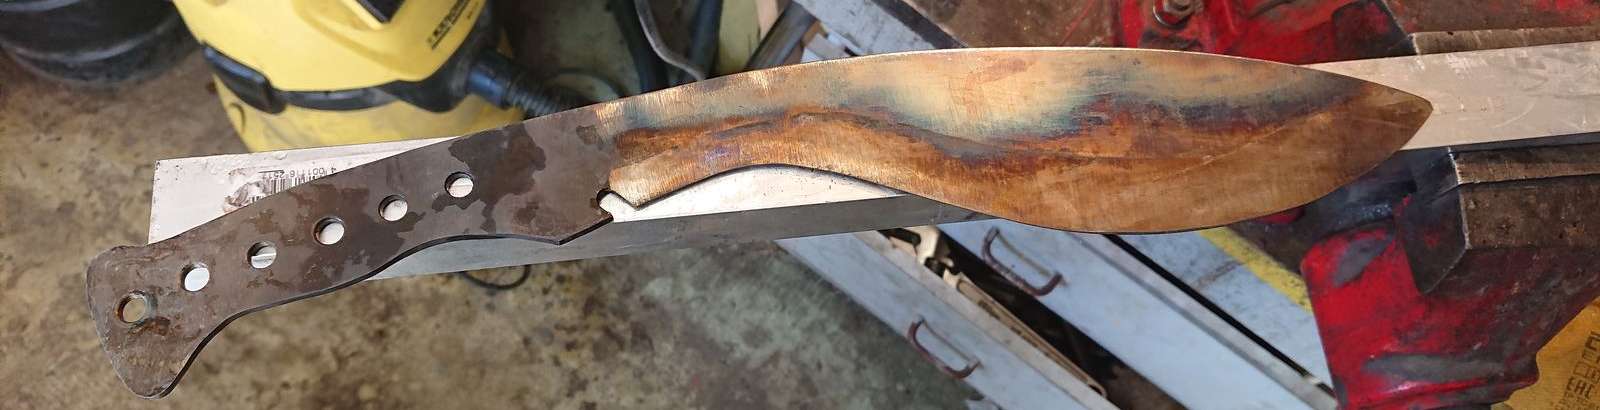
The second fail is the drop-point blade. And I am beating myself over the head about it because this is completely my screw-up. I have read books, internet articles and watched videos about how blades with hamon are made, but I do not remember anyone ever mentioning that a peculiar thing can happen when the hamon line is parallel with the edge – the steel has developed lengthwise stripes that when polished, look under certain light conditions and from certain angles like lengthwise scratches made with low-grit sandpaper. I have ground the blade very thin trying to grind these phantom scratches out, I messed up the grind completely at the end near the ricasso and I had to remove the ricasso and shorten the blade to “save it”.

© Charly, all rights reserved. Click for full size
Here you can see it finished. It is still a blade suitable for small outdoor/hunting skinner knife. Maybe. I will think about it and maybe try to make a suitable handle for it. But I do not like blades without ricasso, not only for aesthetic reasons but also because that way the tang actually really is way too thin for comfort near the handle. But I have finished polishing it because I needed to find out the best finishing method on it before finishing the only successful blade. Btw. it still has those phantom scratches near the tang where the hamon is close to the cutting edge. They drive me crazy.

© Charly, all rights reserved. Click for full size
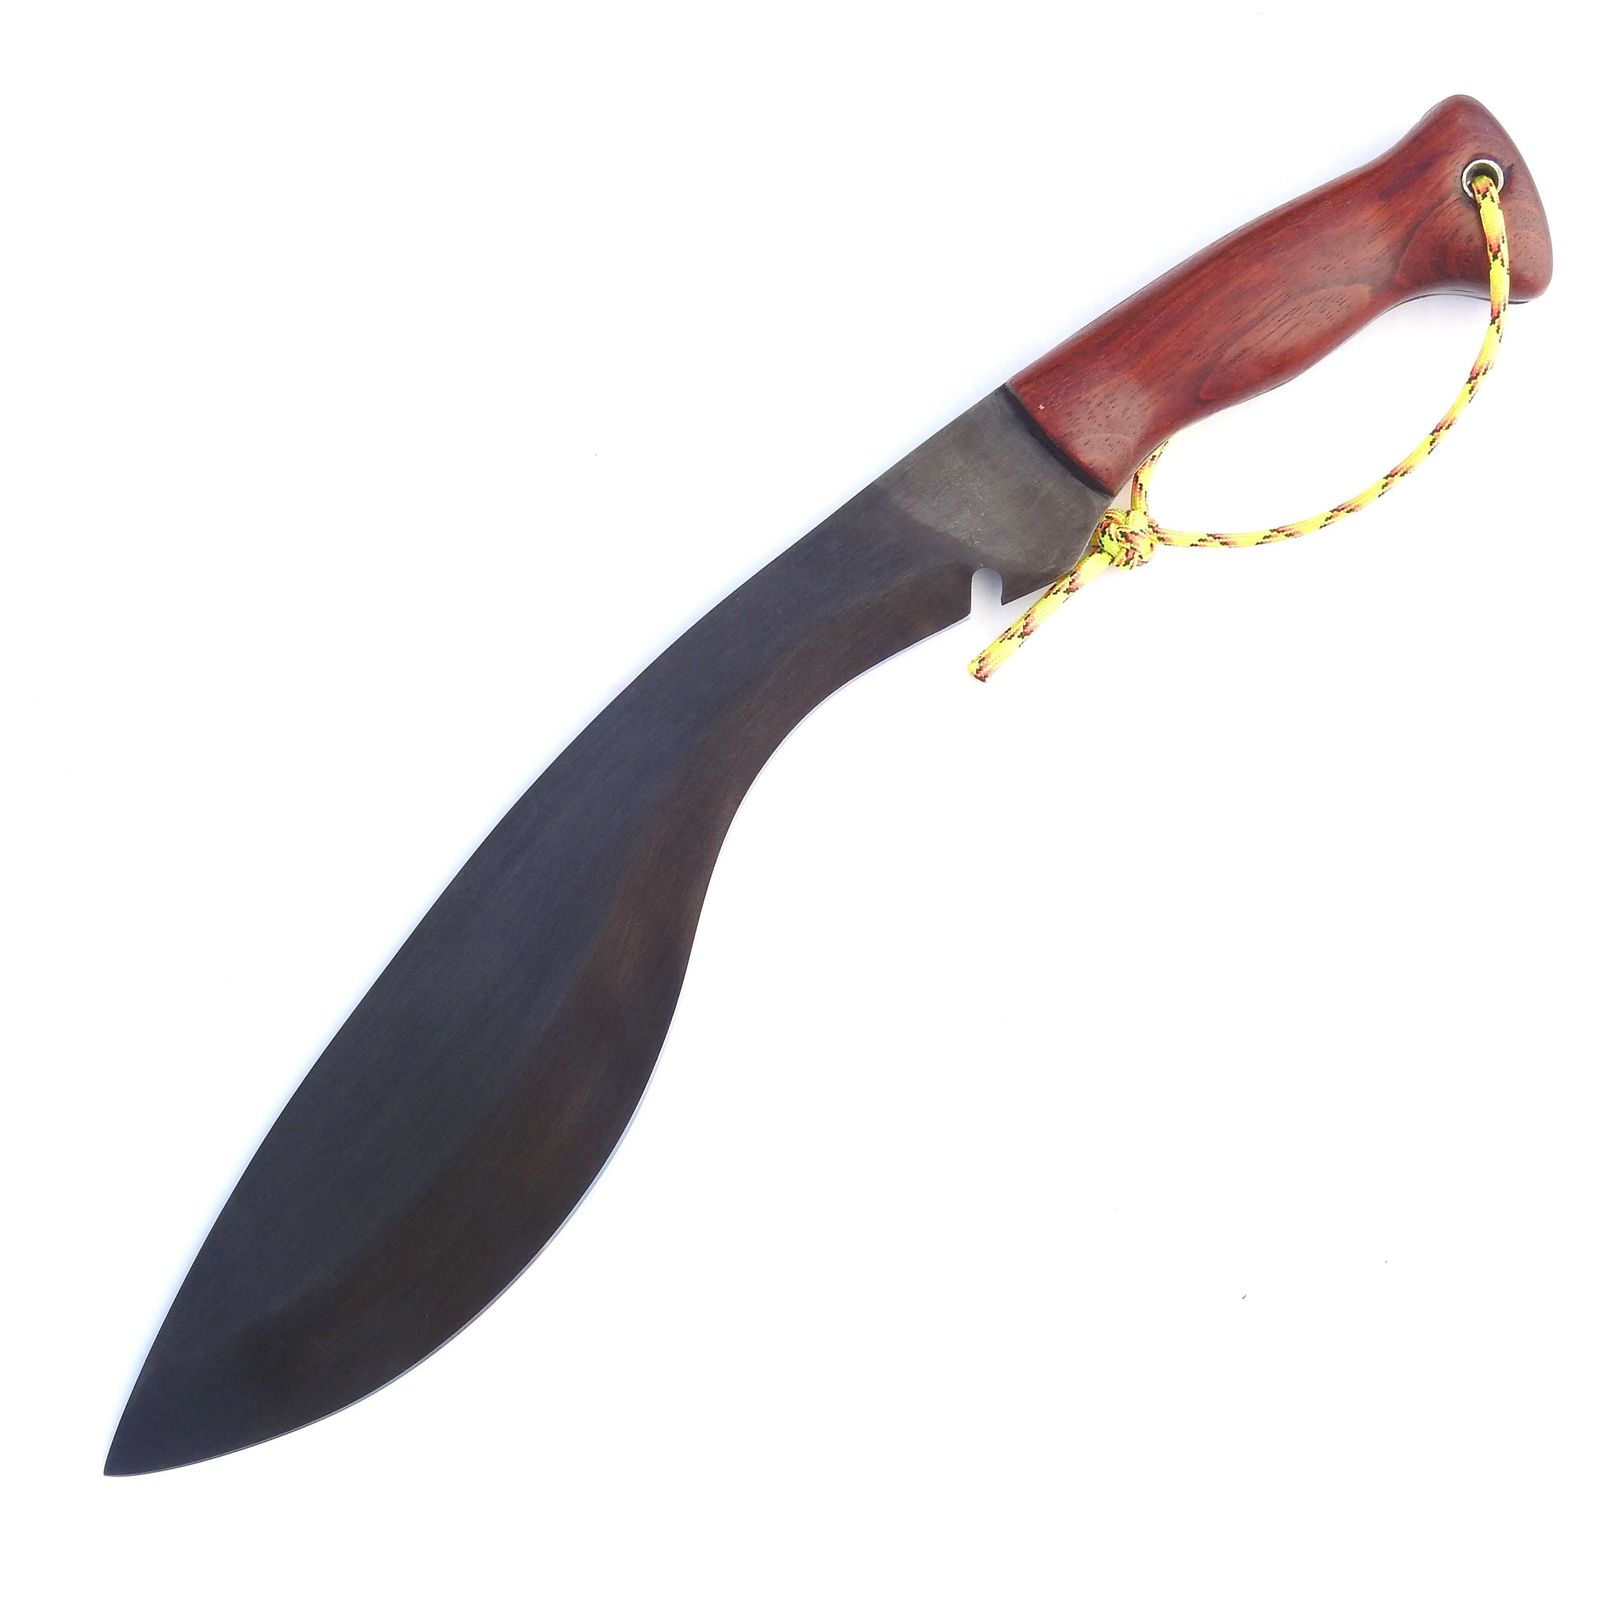
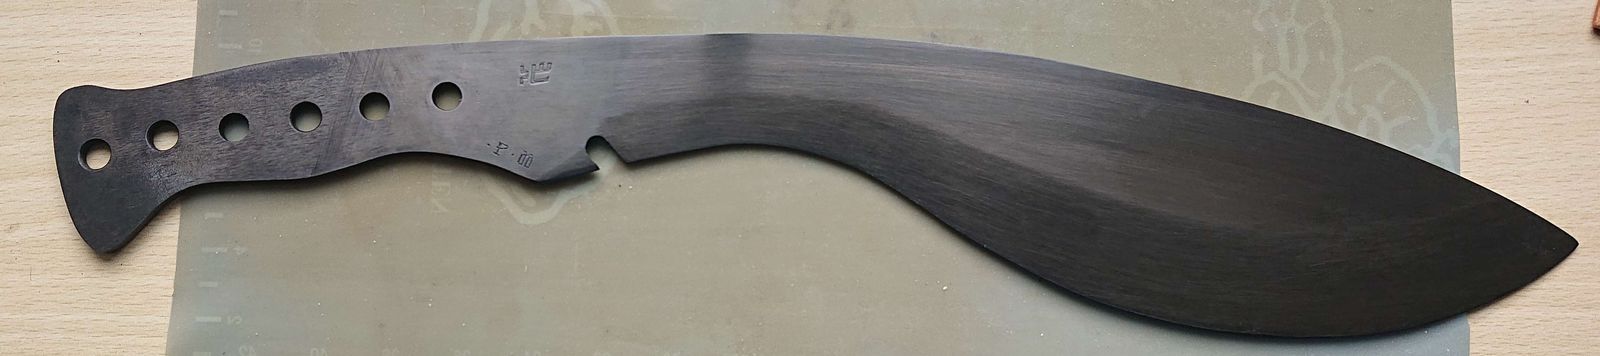
The best polishing process was pretty standard although very laborious. From 320 grit up I have inserted hand-polishing after each belt-grinder step, removing the angled belt-grinder scratches with lengthwise ones. This leads to very smooth and very flat surfaces and crisp lines and ridges. From 2500 grit upwards it was only hand polishing and only lengthwise. Here you can see the result at 5000 grit, which is the phase at which I left the workshop and went indoors. I have tried buffing the failed blade with buffing wheels and commercial buffing compound but this has led to an interesting effect – the hamon went completely invisible although it could be brought out by etching with oak bark for an hour or two. So for this blade, I have forgone the buffing altogether and went to 7000 grit sandpaper with walnut oil (it is runnier than other edible oils, and does not stink like WD40). 7000 grit is the finest abrasive paper that I can easily buy but it still did not bring out the hamon very well. I could just about see it but it was still nearly impossible to make a photograph of. I etched it with oak bark, but I did not like how it looks so I removed the oak patina again with 7000 grit and I tried another buffing method, one that I have used in my rondel dagger project – very fine hematite.
I put some paper towel cuts in a receptacle with finely ground and sieved hematite dust and shook it a bit so some dust gets caught in the paper towels. Then I dusted the paper towels off to remove the coarser particles that still might be there. I smeared some dubbin on the blades and I tried buffing them manually with these hematite-primed paper towels with lengthwise strokes, using the spine of the blade as a guide. And that has resulted in a nice mirror-polished hardened edge and slightly foggy yet still mirror-polished soft spine, making the hamon really pop out. That way it was not only easily visible but I was also finally able to make a picture.

© Charly, all rights reserved. Click for full size
Hamon is the white line between the darker hardened edge and the lighter soft back.
I am not planning on making very many of these but it is nice to have the knowledge and skill how to do it. I think this blade is deserving of nice fittings so after I etch the logo and serial number, I will start seriously thinking about what kind of handle and sheath to make for it. I am done making blades for a few months however, I still did not dress all of those from last year’s overabladeance and I have eleven kitchen-knife blades in the tumbler now. Unfortunately, I have longer pauses between knife-making days than I like.