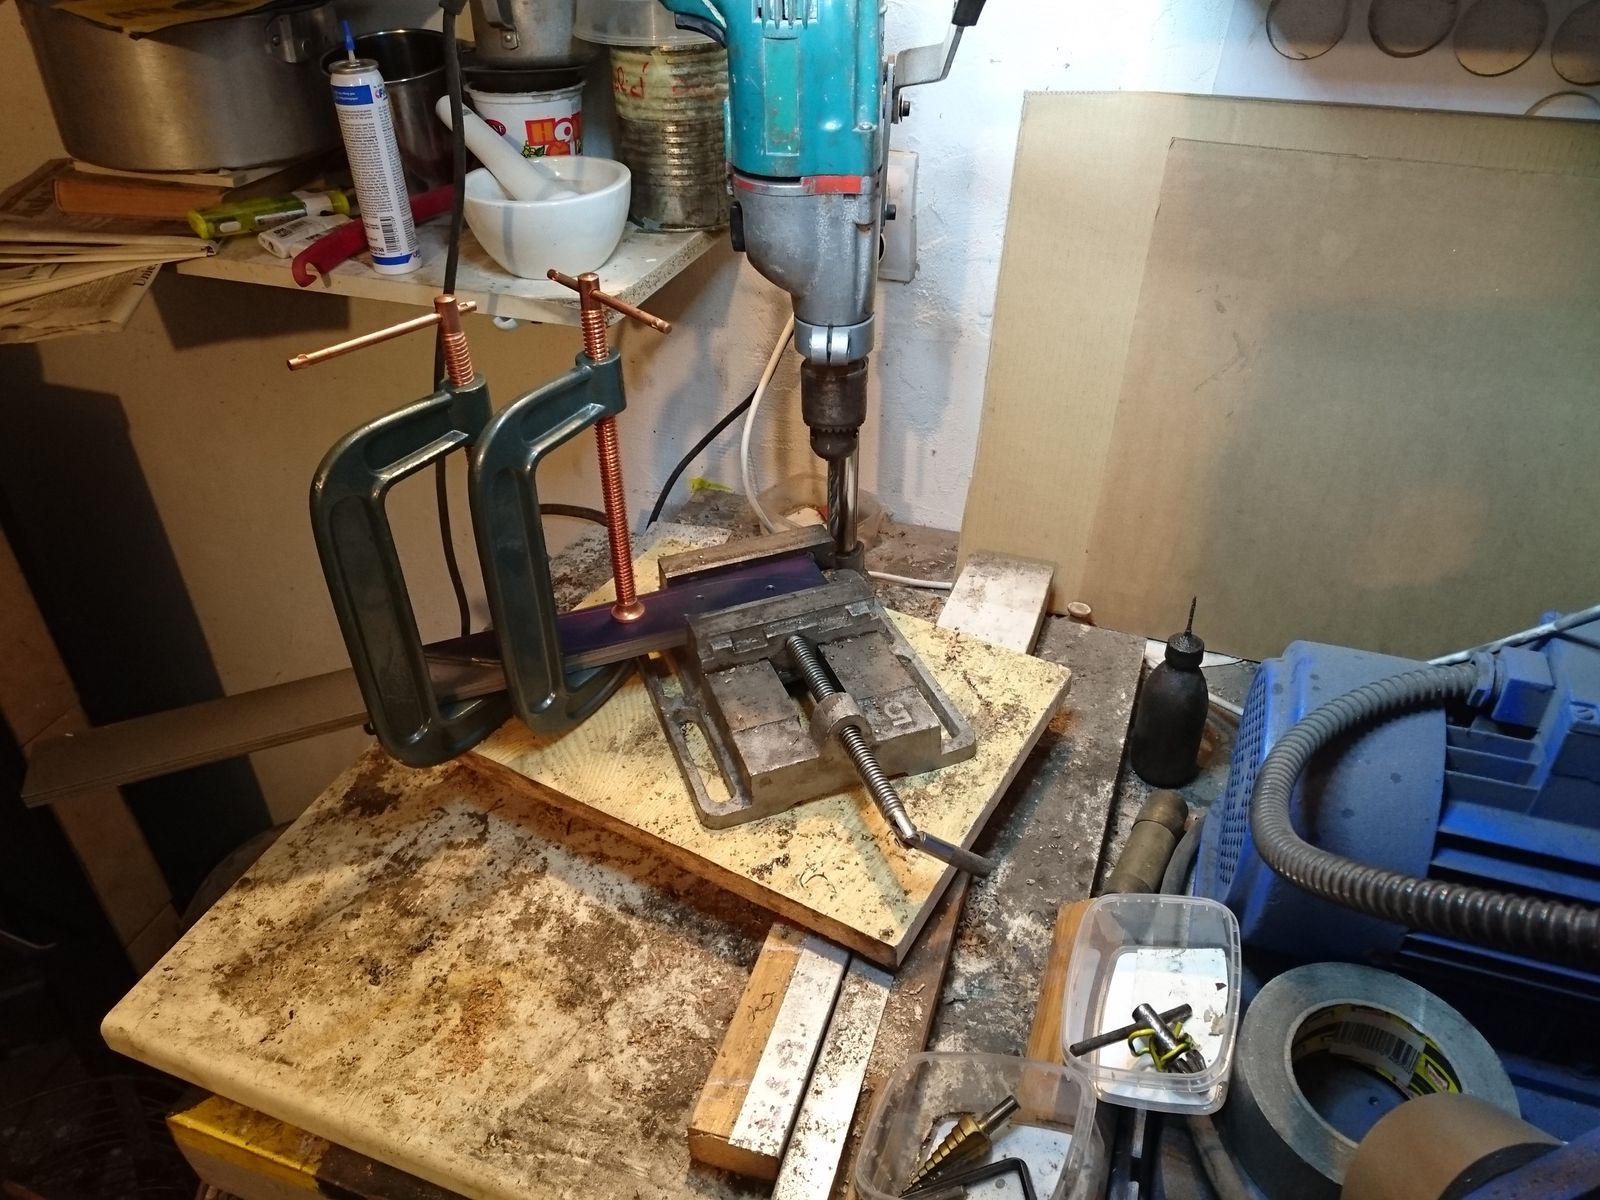
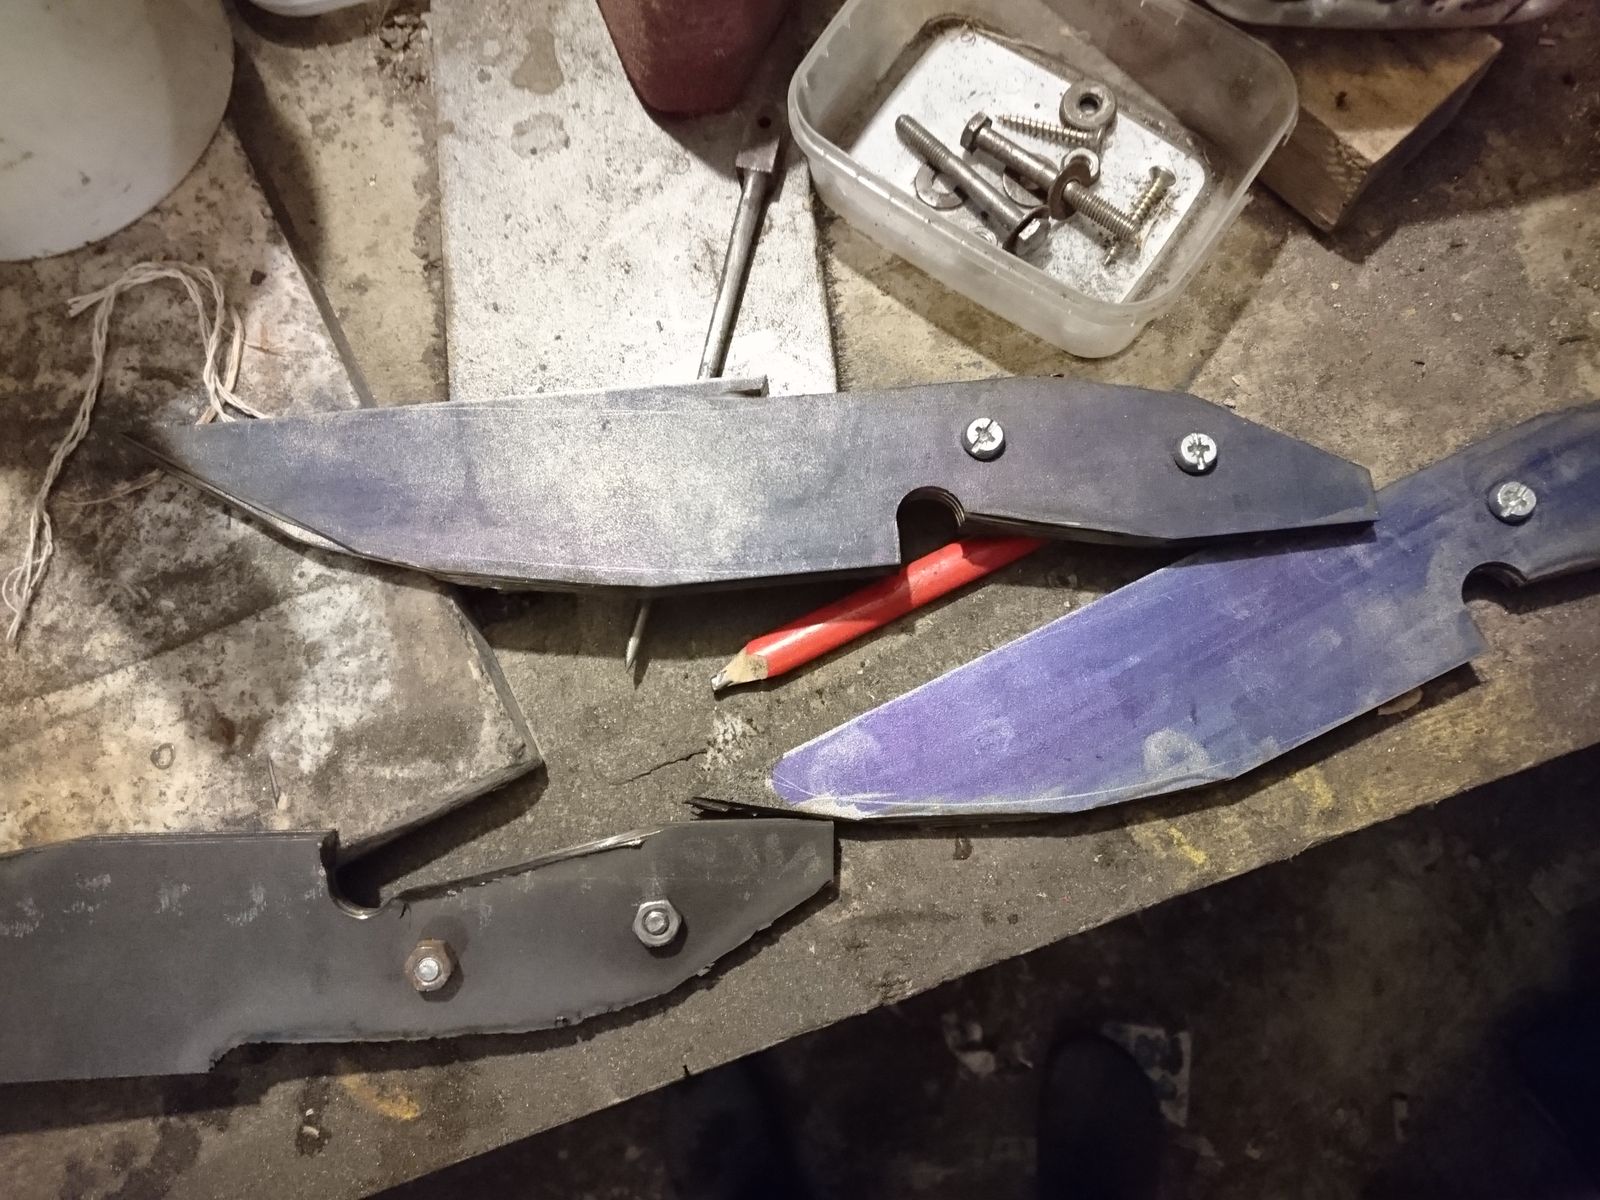
Making Kitchen Knives – Part 7 – Assembly and Finishing

After leaving the handle scales in the ammonia overnight, I took them out the next day,  washed them in running water and quickly dried them. First by letting them for an hour above the stove in my workshop and when they were nearly dry, heating them carefully in 10 sec intervals in the microwave until there was no steam coming out. I do not count this time into the manufacturing time, because I have been doing it this way only to be able to proceed quickly and get the knife done this weekend. Normally I would let it  dry by itself.

©Charly, all rights reserved. Click for full size.

When dried, the scales had to be fitted to the handle – that is done by carefully sanding the faces that are glued on the tang on a flat stone as long as it takes to get them nicely flat. Then I screwed the handle scales without the blade together again and sanded and polished the two forward facing facets, because once the scales are on the tang, nothing can be done about them.

As far as the metal goes, I cleaned most of the scale from the tang with 80 grit sandpaper and then I cut two pins from 6 mm brass rod, hammered them through the holes in the tang and tried whether the whole assembly fits together without unseemly gaps. I was prepared to eventually sand a bit here and there, but it was not necessary, it fitted nicely. So I slathered generous amount of quick drying epoxy cement on all adjoining surfaces and squeezed the whole assembly gently in the vice. I cleaned the epoxy that got squeezed out, first by scraping of the excess with a piece of wood and second by washing the blade with paper towel soaked in alcohol. A piece of epoxy on the back and belly of the handle are not a problem, since those areas will be sanded anyway, but a real care must be taken in cleaning the blade and the forward facing facets of the scales thoroughly, because again, any mistake there cannot be easily corrected.

©Charly, all rights reserved. Click for full size.

The epoxy that I was using was hardening quicker than I was happy with, but our local Baumarkt has “optimized” its wares selection a few years ago and they are only selling quick-setting epoxies now and I will probably have to order some slowly setting epoxies over the internet. I got lucky and I managed to get everything important clean before the glue set, but it was a race with time. That means I could not make any pictures of that process, so what you see is status just before applying the glue.

After the epoxy has hardened – in this case about 15 minutes later – I have made final shaping and polishing of the handle. I did not go above 150 grit sandpaper though, because that would be a waste of time with this wood.

Because the used wood was extremely porous, I had to stabilize it. Marcus has already mentioned the recent fad in knifemaking that consists of infusing the wood with resin. That would be ideal here.

©Charly, all rights reserved. Click for full size.

Well, I lack the equipment to do that. But I wanted at least somewhat stabilise the wood even so. And I wanted to use the same finish that I have used on my mother’s knife, because it has proven itself to be very resistant. So I took the boat varnish and diluted it with acetone at a ratio approximately 1:4. You can see on the picture that the undiluted varnish is a lot thicker than acetone and it has sunk to the bottom of the jam-jar. However after mixing it did not separate again for a few days by now.

For the first dip I have put the handle in the heavily diluted varnish and I waited approximately 20 minutes until no visible bubbles were rising. Ideally It would be better to do this in a vaccuum-chamber, but acetone is very good wetting agent and this should be enough for at least a few mm penetration. After that I took the handle out and cleaned any varnish from the blade immediately with acetone. Then I have let it dry in a dust-free and well heated room. All that is left now is this week each evening after returning from work giving the handle a slight polishing with 150 or 180 grit sandpaper, dipping, cleaning, leaving it dry again until I am satisfied with the surface. I am not going to measure this time exactly because it is scattered a few minutes each evening over a few days. Lets say it is 30 minutes overall, including final signing of the blade.

©Charly, all rights reserved. Click for full size.

That makes it 1:30 or 90 minutes for all of the work described here. That also makes the knife done for the purpose of measuring the time of my actual manufacturing process, so next time we can look at the data and look what (if) can be done there to make it more efficient.

Making Kitchen Knives – Part 6 – Basic Shaping of the Handle

I have decided to make the handle on this knife from an old piece of wood I have cut from a palette that stood outside for quite a while. I do not know what wood it is, I suspect birch. It is extremely weathered and looks kinda crap. But there is a trick to make such old wood look very fancy.

©Charly, all rights reserved. Click for full size.

©Charly, all rights reserved. Click for full size.

I have done most of the work per hand, first splitting the piece of wood along the visible crack, then cutting it with small hand-held saw to very roughly the final shape and drilling the holes for pins. So far this work was pretty uneventful and straightforward.

As you can see on the picture on the right, I have fixed the two halves with screws to make the final shaping. This is where things stopped being uneventful. The wood was not overly hard, but it was very tough and I could not shape it on the big belt sander because that is running too fast and the wood tended to gum up the belt and burn. So I have been stuck with using handheld tools. I thought that it is not a problem because I expected to do it quickly even so.

I was wrong. It took me 1:50, or 110 minutes, to get the handle scales into a nearly finished shape. I should have used my small belt sander, it has slower running belt and is better suited for wood.

Of course it would not be nearly as long work if I have made ordinary rectangular handle and not this ergonomically shaped one. However I consider the handle shape to be an important, even defining, component of this design. Simplifying the handle shape in the name of saving time would in my opinion strip the product of its uniqueness and I see no point in hand-made completely generic knives.

I think that I could reduce this work significantly by working on multiple knives at once, cutting the outlines with band saw and rough shaping with the small belt sander. Due to confined space in my workshop I need some time for setting those two devices up so it is not always worth for a one-off action. But should I prepare say 20 handle scales in one go, It would certainly be worth it.

©Charly, all rights reserved. Click for full size.

Before proceeding to finishing the handle I had to use my magic trick to improve the looks of the wood. That trick is called “ammonia fuming” and consists of putting the scales into a big jam-jar with a bit of ammonia solution and leave them in it overnight of for a few days, depending on what your goal is – the longer the wood is in the ammonia, the darker it will become.

In this specific instance I have left the wood sit directly in the ammonia solution, letting it to soak it up. It is also possible for example to only let the wood above the solution in the fumes (hence the name).

I have experimented in the past with multiple solution treatments and I have at my disposal a few such processes to alter the wood to warying degrees – from mild color change to actually making the wood compacted and a lot harder. The advantage of these methods over staining the wood with a dye is that the color change goes deep into the wood so it does not get scratched off. It also looks a lot more natural in my opinion.

However, to wrap up, this step took more time than I expected it to, but I think I can put it in “low hanging fruit” basket, because I expect working in bulk should reduce time here significantly and I already have the machinery necessary for that.

How Hard is Hard Enough?

This is about steel and blades OK? Just to be clear upfront.

In my article Knifesharpenophobia I have mused a bit about how being all anal retentive about the hardness of a blade is not all that necessary. Now I wish to revisit that heme a bit, after my hardening attempt of a blade did not go as well as I would wish to.

If you remember when I was trying to harden the rondel dagger I was also hardening a kitchen knife blade and I was pretty sure that this particular blade is properly hardened. So I took it to work and measured the hardness on the tang (the knife is not finished yet), where it is hardened, but probably not as well as the blade. And the gage showed HRC 54. From technical standpoint, difference between 50 HRC and 54 HRC is not trivial (HRC is not a linear scale) and that knife is thus indeed properly hardened. What was the difference in the work process? For that knife then I have used the gas forge only for heat-soak, the final heating to 1050°C  before quench was made with charcoal, which allows for more even heating. HRC 54 is still not full potential of this steel, but if the tang has it, the blade has probably more.

But this whole thing got me thinking again – is that even relevant? Do I really need to be afraid to give that knife to a fried as a gift because the hardness of the blade is “just” HRC 50? Am I being unnecessarily obsessive about an inconsequential detail (again)?

So I tried to look at what is the actual hardness of historical blades. I did not spend too much time with it, but the article Sword Blade Hardness: A look at the current research is an eye opener and a good read. To be clear, it is about swords, not kitchen knives, but it still clearly shows one thing – the crappiest knife that I have ever made is vastly superior to most knives that were used throughout history before the invention of blast furnace. Not because of my superior skill, but because I have access to superior steel. Furthermore, HRC 50 is not actually bad at all and someone who takes a good care of the knife would probably not even notice any downside when cutting. And it has an upside too – a blade in this hardness range needs to be sharpened more often, but stropping and sharpening should be reasonably easy and quick and the knife will not break easily when you drop it on the floor by accident.

It is not the best that could be, but it is good enough.

Making Kitchen Knives – Part 5 – Grinding, Polishing, Buffing

I was expecting this to be the most time-consuming part and so far I was not surprised – it was. You have seen my collection of abrasive belts during my Rondel Dagger series. Because the protective coating has proved itself to be way too persistent, I had to start with the coarsest Zircon belt all over again – that is what I meant when saying that I could have spared myself the trouble I have spent with finer belts before hardening. I wanted to give this blade the best surface finish that I can achieve purely by using machinery, so I went thoroughly through all belts, not switching to a higher one unless all scratches from the previous one were removed. Although towards the end of the line with last two Trizact belts I was not too fussy about this, because those leave so fine scratches that whilst they are barely visible, but they will always be somewhat visible unless I go with hand polishing afterwards – and that I did not want to.

So when finished with the finest Trizact belt I went straight to the finest buffing compound and gave the blade a few passes on the buffing wheel.

An important note – this is a knife without secondary bevel, with so-called “convex grind”. That means that during the polishing process the blade is also sharpened to very nearly final stage. Therefore towards the end it becomes a bit dangerous to handle it, because it can actually become completely sharp in places. I do not know what process other knifemakers use for achieving this grind, I am doing it with the slackbelt/hardbelt setup on my belt grander, that way I can do it in one go during polishing. The knife will need some sharpening when finished, but not too much. I like this grind because in my experience it cuts best and also looks best – but your mileage might vary and there is no accounting for personal taste.

speaking of taste – one of my friends when I have shown him my mother’s knife thought that I have made the tip round either due to laziness or because I botched it and making a round tip is easier. If you have such thoughts, forget them. Making a round tip is not easier than making it pointy-stabby. And the round tip is entirely intentional. This time around I actually consulted with my mother what she prefers for this knife design and I discussed with her the work in progress when it still had a point, and we agreed that to us this knife looks better with a round tip. Further, there is no point in having a point on an all-purpose kitchen knife like this, since needing a sharp point is actually a rare occurrence (the only one that I remember from the top of my head is gutting fish and poultry, and even there an actual point is used only briefly).

©Charly, all rights reserved. Click for full size.

Enough rambling  Here you can see the blade before buffing to get a measure of how well the knife is polished after only Trizact belt grinding – after buffing it reflects a lot more.

That picture shows also that the grind is acceptably flat. The fact that the edges of the mirror on the wall are straight-ish and that my face is still recognizable despite being reflected back through a mirror 1,5 meter away is a good sign that the grind is flat.

However that comes at a non-trivial price. The whole grinding and polishing process took me 4:20 or 260 minutes. Buffing was mere 10 minutes from that. As I become more experienced this time will probably go down significantly, but some of that part of learning curve I have already done, so I do not think it will be too drastic. In order to shave-off a really significant amount of time here, I think I would have to either use completely different process (I have an idea there, but it will need a lot of MacGyvering), or be content with a less-than-mirror finish. So in next step I will experiment with different finishes and decide which is the best compromise between time spent versus looks. The problem with polishing is, that whilst it has zero negative impact on the function, it has 100% positive impact on the looks of the thing and negative on the price. And people are buying with their eyes but deciding with their wallets. Talk about contradictory requirements…

Making Kitchen Knives – Part 4 – Heat Treatment

This is when things did go a bit pear-shaped, although I learned that only today. You have seen my “equipment” before, but not in detail. Now you can see it in detail. An IR thermometer on the left, small insulated chamber with gas burner in the middle, a can of sunflower oil, and of course gloves and pliers.

©Charly, all rights reserved. Click for full size.

With a blade this thin I have to somehow prevent carbon loss, because I cannot simply ground away a few tenths of a mm afterwards. There would be barely any blade left if I did that. So, as you can see on the last picture in previous post in the series, I tried to coat it with an experimental solution to prevent said carbon loss as an alternative to the rather expensive stainless steel foil. It worked and did not work at the same time and the knife is now in a stage when it will be crap no matter what I do. I am going to finish it anyway, just to get the measure of time, but this step was a definitive flop. Which I did not expect, because I heat-treated two knives from this steel without problems.


Firstly the gas burner has trouble reaching the necessary temperature of 1.050°C that this steel requires. It can reach them with success (the blade that I have given to my mother was hardened this way), but it takes a long time and it is difficult to heat up the blade evenly. I thought that I have reached the right temperature and quenched the blade OK, which was confirmed by subsequent scratch test with my impromptu gauges. However, as it turned out, the scratch test only passed because the protective coating has made a thin but hard layer on the surface that was bugger all to remove.

©Charly, all rights reserved. Click for full size.

I hoped it would dissolve in hot water – that was the intention – but it did not. It was extremely difficult to clean off in the following step and after I measured the hardness on polished blade (properly – I found out we have HRC measurement at work), it had only about 50-51 HRC. That is weaksauce for a kitchen knife, although it would be OK for a machete. The blade is hardened, just not to its fullest potential. It will cut fine, but it will require more maintenance, so I will probably keep this knife for myself and not give it to anyone. Bugger.

In addition to above mentioned quality problems, this whole step took me more than 1 hour, and I am not counting the 1 hour in baking oven at 150°C, because that does not require my personal presence and thus does not de-facto cut into manufacturing time (and I can load the baking oven with 10 knives at once should the need arise).

At this moment, I do not see any way how to reduce that time. Making more knives at once might help a bit, but for that I would need to set-up heating with charcoal. If I do that, I  estimate that I could harden about 5-6 knives in one go, but that one go would take probably about 3-4 hours of constant work. So a saving of 15 minutes, or 25% time per blade could perhaps be reached on this step, but it is questionable.

A heat treating oven would of course completely change this whole equation, but that would be a big investment – they start at 3.000,-€. Should I ever have to produce knives for sale, a heat treating oven would be a definitive must, or I would have to simply send knives for heat-treatment. Right now I will try to do the heat treatment again by myself, and the next batch of knives will be split 50/50. One half hardened with the use of stainless steel foil, one half with modified coating, and I will either set-up a bigger gas burner, or use charcoal.

This step is put in the “high hanging fruit” basket. There is potential for significant time-saving here, but it is very difficult to reach with my current equipment.

Making Kitchen Knives – Part 3 – Basic Grind

This is the part where work on more blades in parallel is no more possible, but I have tested an improvement that I have hoped for to both save time and increase precision. Grinding symmetrically free hand a blade mere 1,8 mm thick would not be easy. My previous knife of this type was made from 2,5  mm steel and I messed up the grind. I have spent more time correcting my messed up grind than I liked to and in the end I had to opt for a blade without a clear transition between the blade and a ricasso.

©Charly, all rights reserved. Click for full size.

I wanted to do better this time, so I have built an experimental jig. As you can see on the picture, it is a simple 30×50 mm block of hardwood (a leftover from building the belt grinder). Two screws hold the knife on the smaller side, and three screws are right on the edge opposite the knife. Those three screws pop out a bit out of the wood and by how much they pop out is how big an angle I have between the blade and the platen on the belt grinder.

©Charly, all rights reserved. Click for full size.

I did not make a picture on the belt grinder, but you can see on the right the jig with a blade put against a machinist’s square. The advantage of this setup is that if I want, for example, ~0,3 mm thick edge before hardening and with the blade being ground all the way to the back, I know that I have to set the jig so that there is ~0,70 mm between the square and the back of the blade. Which is exactly what I have done, only without measuring, only eyeballing the gap and deciding “yup, that is what I want”.

The jig is set up so that I can screw the blade in two mirroring positions, but I did not bother too much with precision, because I did not know yet whether it will work or not.

It worked, but the imprecision was abit of a problem, as well as the way the blade is fixed. Two main problems occurred:

  1. The tip of the blade lay on the supporting table. That proved to be a problem, because it got snatched by the belt and dragged into the gap between the belt and the table. It messed up the grind in split of a second and I have spent no trivial ammount of time correcting it.
  2. Changing the blade on the jig took way too much time, even with accu-screwdriver. Part of the problem was the imprecision, because I had to monkey with it each and every time to get it right.

So a more precise jig that allows fro quicker change is required, and it also should hold the blade at least a few mm above the supporting table for better control. As a proof of concept it worked, it did indeed improve precision, but there is potential

During the grind I have made one time-wasting mistake, but I did not know at the time it is such. After I have established the grind with ceramic belts which go up to 120 grit, I continued to 240 grit on Zircon-carbide belts. As it turned out,  I could have spared myself those zircon belts alltogether, but more about that next time.

©Charly, all rights reserved. Click for full size.

I forgot to make a picture of the ground blade, but here you can see it as it went into the next step in the process. You can see that I have managed nice clean line all the way to the back of the blade, which I was previously not able to do free hand.

The time spent with this was about 1:15, or 75 minutes. From that time I have spent approximately 10-15 minutes monkeying around with fixing the blade on the jig, and another 5-15 minutes changing belts on the grinder. I also wasted some time correcting messed up grinds. I think that a better jig and above all not going above the ceramic belts should cut this time in maybe a half, but probably not more – it is fidly work and probably the biggest factor is experience. I remember Walter Sorrels saying in one of his videos that he manages this in 10 minutes, but only because he has been doing it for years.

Right now I am putting it into the “low hanging” fruit basket, because I think I can easily get a significant 15-20 min improvement through better jig and not going too fine with the belts. The rest is, unfortunately, entirely dependent on how fast I will scale the learning curve.

Making Kitchen Knives – Part 1 – In the Beginning…

… there was a bar of steel.


After a short break due to harvest I have started two knife making projects and I will share the progress on them as I go along.

The first one is about developing a viable process for making small-batches of kitchen knives.

The knife that I have given my mother for Christmas has proven itself to be an excellent cutter. It held an edge for half a year and still shaved hair when my mother requested honing the edge because it had a few blunt-ish spots. The handle does not show any sign of deterioration too. And it is used daily, by at least two people, on everything from fine chopping veggies to de-boning chicken. So I think that with some adjustments (mostly making it look prettier) it might be a saleable product.

I reckon (I will not bother you with the math and reasoning, some of it has solid rational basis, some of it I pulled out of my nether regions) that in order to be able to eventually barely survive whilst making knives, I would have to be able to make a passable kitchen knife in under five hours spending with the fun work, i.e. manual labor. The lower the better. Rest of the working day would in such a case be eaten by the unfunny part of the job, the actual business of business.

But developing a viable production process is something I have a professional experience with and so I want to have a go at it, even though right now making knives is just a hobby. And I will be sharing with you all the failures as well as the improvements in trying to achieve my time goal.

The first step is straightening the steel. For this project I am using N690 steel 1,8x50x500 mm and all the steel bars had a slight bend to them that had to be corrected. Currently the only way for me to do this is to use a vice and three thick screws. Had the plates had a kink, I would place the middle screw straight on that kink and bend it with ever-increasing pressure until after taking the steel out of the vice it would be straight-ish. However these did not have a kink, they were nearly universally bent in a very slight regular arc.  To straighten that, I first tried to bend the bars slightly at multiple points. It worked, but it was time-consuming and unreliable. Later I have tried to close the vice only slightly on the steel bar and then pulling it through the screws – essentially using it as an improvised roll bender. That worked much faster and reasonably well.

Even soo, all in all it took me less than 1 hour to straighten 12 knives worth of steel. That is less than 5 minutes per knife. I think that building a small roll bender specifically for straightening these thin long bars should not be difficult and it could potentially shave off quite a reasonable chunk off of that too. But right now, I am putting this into the “high hanging fruit” basket, since despite the clearly impromptu setting it takes only about 2% of my time goal. That means, I will ignore this step in the process for now and not bother about improving it.

For the first knife made let’s write down 5 minutes for this step and move on to the next.

Making a Rondel Dagger – Part 17 – Finale

When I have made my first, very crude, knife some twenty years ago, my friend’s father commented:

Charly, people want it to be handmade, but they do not want it to be immediately apparent that it is handmade.

That advice stuck in my mind so when I have read Feet of Clay from Terry Prattchett much later, following line resonated with me:

The thing looked like the kind of pots Igneous despised, the ones made by people who thought that because it was hand-made it was supposed to look as if was hand-made, and that thumbprints baked in the clay were a sign of integrity.

It is not impossible to get a handmade thing to look just perfect, but it takes great skill and experience and I am not there yet, although I might be heading in the right direction. The pictures hide some of the mistakes and imperfections that were not intended and are apparent – for example the blade is not symmetrical against the handle and the hand guard, so when it is in the scabbard the upper part of the guard sticks out more than the lower, and it is visible. Despite my best efforts the blade got a scratch from a grain that got somehow into the scabbard, and the handle got scratched too in the meantime. Which was inevitable if ever the knife were used, and I do intend to use it at least somehow, to see how it fares.


But enough of that, let me present to you the dagger of one of the most kickass characters in fantasy literature known to me, Cirilla Fiona Elen Riannon, aka the Lion Cub of Cintra, granddaughter of queen  Calanthe Fiona Riannon of Cintra, aka the Lioness of Cintra and daughter of Pavetta Fiona Elen and Emhyr var Emreis, Deithwen Addan yn Carn aep Morvudd the Emperor of Nilfgaard. This is my interpretation of the dagger worn by her as a sidearm in the computer game Witcher 3 – I noticed that dagger right on my first encoutner with her in my gameplay and I immediately wanted to make one. I photographed it on a bobbin lace doily that my mother has just made for her sister’s birthday. Bobbin lace is period/theme appropriate and I think it provides nice contrast and improves the quality content of these pictures by no small amount.


©Charly, all rights reserved. Click for full size.

I tried to tie the leather strap as close to how it is done on the in-game model as I could manage. The only significant difference from the game model is the red leather on the scabbard, instead of brown.


If you look closely, here you can see that the hand guard does not stick out symmetrically on both sides of the scabbard.


Overall length ca. 395 mm, blade ca. 257 mm long, 23 mm wide at the guard, single-edged. Good cutting ability although not as good as a dedicated cutting blade would have. It is still a stabbing weapon.


Handle is turned out of maple wood. Rings are allingend perpendicularily to the blade so the shiny lignin spots are symmetricaly with it on both sides of the handle.


Rondel has ten hammered grooves giving it a daisy like look. All metal parts are polished to mirror finish and buffed with jeweler’s rouge.


Although the handle looks massive, the knife is weighed towards the tip when put on a flat surface. I guess it could be thrown, but I do not intend to try it for fear of the blade breaking.


My signature for knives from now on – my initials in Glagolitic script. This is also the writing used in the Witcher games, so it also thematically appropriate.

Making a Rondel Dagger – Interlude 3 – Dubbin

With the work done, I have to protect both the leather covering of the scabbard and the iron fittings against the elements and medieval appropriate medium for that is so-called dubbin or leather food. Google does yield some recipes, but I did not bother searching for or following an exact recipe much – once I have known the rough composition, I plunged right into it as is my wont.

Ingredients in the mug.

So I took a stainless steel mug, put in it a piece of lard, about the same amount of unrefined beeswax (twenty years old, btw.) and I poured an “adequate” amount of olive oil on top of it. Then I lit the fire and stirred until it all melted together. It was quite interesting to watch – the pig fat dissolved of course first and the big beeswax piece last, but it did not take too long. In fact, it was over in mere minutes. I have measured the temperature and when it all was blended together the liquid had about 80°C. High enough to be dangerous, but not so high as to melt plastic or hiss in contact with water. It remained liquid long enough to touch with bare hand.

Finished dubbin in a plastic container.

Even so when pouring it into a plastic container for keeping, I have put said container in an even bigger one and poured cold water around it just to be sure. As you can see, the liquid has had a honey-like colour that I have found rather pleasing to the eye. It does not smell too bad either and when the product cooled enough to be touched by bare hands, I have simply dipped my fingers in it and applied it to the scabbard in no small amount. In fact I sloshed liberally all over it, making an uneven layer that was in parts over 1 mm thick.

Dubbin applied to the scabbard.

That of course does not look very pretty, so I took a heat gun and melted it all until it sunk into the surface. I was careful however to not heat it too much – just about to melt it and no more. Leather does not respond too well to heat and I did not want to damage it.

When that was done I rubbed the scabbard first with a paper towel which took off some of the excess dubbin, then simply by hand. The dubbin is actually relatively pleasant to touch – not unlike a hand lotion in fact, although it is more solid.

The leather strap tied around the scabbard unfortunately did not survive this – it was made from recycled leather of poor quality and tore off. I have cut a new one and this time I plied it with dubbin before tying it around – and that seemed to have worked rather well. The dubbin made the old leather soft and pliable and also sleek, so it was much easier to pull it through the holes and tie the knots than in my previous attempts.

I intend to buy a soft bristle brush at nearest opportunity that will be used for this substance exclusively. It has hardened into a yellow mass that looks like refined beeswax but is much softer to the touch – but not creamy as a hand lotion. I have labeled the lid of the plastic box and I have stored it in my workshop for future use. I think I got carried away a little here and made possibly a life’s worth supply.

If it goes rancid I will let you know. I hope not. And next time you see the “Rondel Dagger” title, there will be pictures, I promise.

Dubbin.

Youtube Video: Nurgle Plague Sword Build

Michael Cthulu is not a smith, he is a welder. And he does not make historically accurate replicas, he makes ridiculous, humongous swords from computer games that have no chance whatsoever to being actually functional in the real world.

But he is entertaining to watch and he has shown some tricks in his videos that are valuable to me in my workshop – like his unique working goggles with replaceable glasses.

He also seems to be a genuinely nice person, at least judging by the ammount of his products he auctions for charity ever since he makes enough money for comfortable living.

Mild content warning – the video takes almost an hour and contains half-naked and very hairy dude in his fifties doing dangerous things with fire, electricity and fast spinning machinery.

Making a Rondel Dagger – Part 16 – Chape

I had a very busy Sunday. My vacation is nearing its end and I have been hell-bent on finishing this project already, but things got in the way all the time.

The biggest problem with the chape was that I could not find any information about how to do it properly. There are some pictures of finished products  and some info about casting them from bronze, silver etc. but not about how to form one out of steel. So I had to start from scratch.

My first two attempts were completely unsuccessful. I do not even have anything to show you  – you are free to imagine some vaguely rectangular and bent piece of metal. What I am going to show you is my third – and final – attempt. I do not call it a success either, but it is at least big enough part of a success to yield a usable product. But I am not satisfied with it and I had to repress the urge to hurl it out of the window with great force.

In retrospect I think my biggest mistake overall was using too thick steel. The shovel that I was recycling was ca 1,5 mm thick and for this purpose probably half that thickness would be appropriate. Unfortunately I did not find any suitable piece of steel in my scrap pile.

Should anyone wish to avoid some of the mistakes I have made, here is the most important thing I learned: do not try to do it without dies and templates. It is a complete waste of time. Chape is a very complex piece of metal, bent and formed in multiple directions at once.

I wanted only the front face to be pretty, but even that has proved to be beyond being doable without a template, definitively without  a skill that I lack. And since I  also lack screw press, I had to do with my vice. So I have built a set of jaws – one formed approximately as the tip of the scabbard, and one with a matching hole about 2 mm bigger on all sides. After this I have heated a piece of steel, put it between the jaws and pressed it as quick as possible. After a few repeating and some repairs/adjustment of the jaws I have finally got a  shape that at leat partly fitted the tip of the scabbard. I might be on the right track here.

However, after a few presses the metal had nowhere to move – so I have cut it into stripes that I have intended to bend around the scabbard. I have again made the mistake of trying it first without a template. Again, complete waste of time.  I have only managed to bend them so they point straight to the back of the chape. I could not achieve the second bend to close the flaps around the backside.

So I had to fish around in my scrap pile some more. Two cuts that were left over from making the jaws have proved to be useful here – when put back to back, they were the same thickness as the wooden scabbard, therefore I reasoned I could make a template out of them.

So I took an angle grinder to them and made two nearly identical halves that mimicked the wooden scabbard. A few touches with a file were also needed in order to round the edges etc. I am not going to toss these, I am going to keep them as well as the jaws in case I need to do similarly shaped chape again.

I have deliberately made this template so most hammer blows will be perpendicular to the vice jaws. No matter how strongly you close the vice jaws on anything, hammering or filing/sawing it will eventually loosen it or break it. That is actually a reason why specially formed jaws with a groove have to be used for holding round stock.

With this I was finally able to bend and hammer the steel flaps all around so the fit more or less snugly around the tip of the scabbard. I did not want to close it all the way around and I intended to leave the stitching visible, because it was more or less clear that I will have to hammer and ever so slightly bend the finished chape onto the tip so it holds and does not fall of. However, I wanted to at least braze the gaps on the sides. I failed to do that, because I run out of silver solder and I will be damned if I spend another 10 € on this. At this point, I was starting to hate the thing. So I brazed as much as I could and sod the rest. Here you can see it all black, covered in solder and slag and scale. I have again carefully ground the excess solder with fine file and collected the silver dust, but I still did not feel like experimenting with making solder out of that dust.

This is when It I have got the only idea during this whole process that I consider valuable – I have found out that old, nearly worn angle grinder wheels are excellent for scraping of the scale and the slag – both of those are harder than files and they tend to smear abrasive papers. So a bit of water now and then to wash of the dust and a bit of scrubbing with an old wheel and I could proceed to polishing without covering my belts with grime. Polishing I have performed the same way I did with the throat. During this I have found out that the chape is much more asymmetrical than I was hoping for and that there are two poorly brazed spots on the sides. leaving unseemly spots, but as I said, sod it, I am not going to do this thing again.

When the chape was finished, I have put it and the throat on the scabbard and gave both parts a few wallops with a wooden mallet on a wooden board so they hold in place (for the throat I had to put a piece of leather on one side between the backside of the scabbard and the throat for better fit). And then I walloped it all some more so it holds.

So now the project is almost finished. All that is left to do is to sharpen and sign the blade, tie a leather strap around the scabbard and treat it with dubbin and make pictures. Neither of those things should pose any big problems and except the signing they cannot destroy anything. I hope.

Despite being a non-believer, I do understand the desire to be able to pray – a desire to have some control.