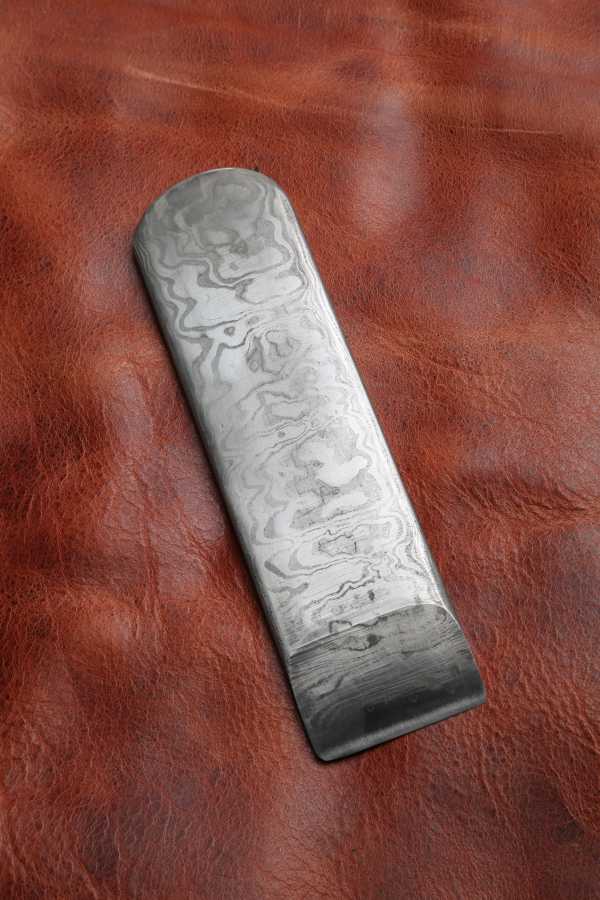
I made a few pieces of experimental suminigashi the other day. That’s “watered paper” steel – many layers of stuff, squished until it looks like marbled paper.
The mix of metals I used was a bit odd. 2 pieces of cheap hardware store mild steel, 2 pieces of 1095 high carbon, 2 pieces of 15N20 shiny high carbon, and a piece of W-2 tool steel. With a pedigree like that, you can be sure it’s going to be stubborn as a mule and (hopefully) prettier.
So the bars laid up OK, I cut them in 4 and cleaned, stacked, and welded them again, then drew them out and cut two pieces off and made a sandwich of suminigashi bar on either side of a piece of 1095, with a thin sheet of pure nickel on each side. Perhaps some of you are thinking “that’s going to look as tacky as the bathrooms at a Trump hotel” but remember that most of the layers are going to be squished so fine they will mostly just register as texture.
Proper suminigashi is made by taking different compositions of steel out of your smelter and stacking them carefully to create the pattern you desire based on the carbon content. Real Suminigashi is, basically, infinitely expensive, made from iron sands collected by apprentices from beaches and rusty patches of dirt. I’ve made some of my own equivalent by making high layer count wrought iron/1095. I did a skiver for kestrel out of 70 layers of that, and it’s deadly strange stuff: tough as Satan’s scrotum and more flexible than Mitch McConnell’s morals. Come to think of it, I never posted pictures of that thing; maybe I should. Ok, here:
When I was starting out I asked JD Smith, ABS Master Bladesmith (MBS) about welding 1095 to wrought iron and his reply (and I quote) “why would anyone want to do that?” Well, I suspect kestrel could skive a jeep with that, if that was the intent. A 1/4″ thick chunk like that is not flexible, at all: you could put that against a piece of ordinary steel, hammer on the back end, and peel it like a carrot. But please don’t do that.
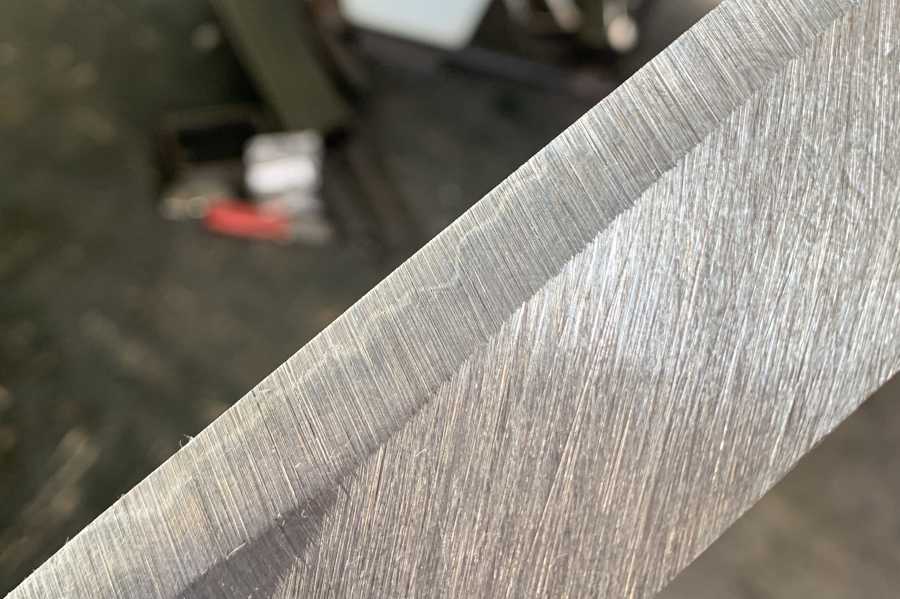
Usually once the welding is done and the blade is approximately shaped, you “profile” it – figure out what the outline is going to look like – then clean the flats off and maybe etch it so you can see what you’ve got.
After a while you learn to read it like a book. The watering looks nice and tight, there are no carbon spots that indicate bad welds at all (yay, me!) and the core is nicely centered in the bar, the nickel transition zones fused in nice and tight and it looks like all systems are “go!”
Then it’s time to tweak the shape until it looks about the way you want it once it’s glass hard and not so flexible anymore. Once this is quenched and tempered I can’t bend it into a shape; I can only grind it. It’ll be about as flexible and forgiving as a car spring: bend it and it will bounce right back. Not that I am strong enough to bend that once it’s hard. Right now, I can adjust it with a tap of my hammer or a vise and a crescent wrench, but once it’s hard I won’t be able to permanently change its shape short of snapping it in half.
Oddly, until it’s tempered (to soften the steel from its quench hardness) it’s quite delicate. I couldn’t bend it, but I could snap it in my hands. I actually did that with one blade – I turned and hit the tip on the vise and snapped the end 3/4″ cleanly off.
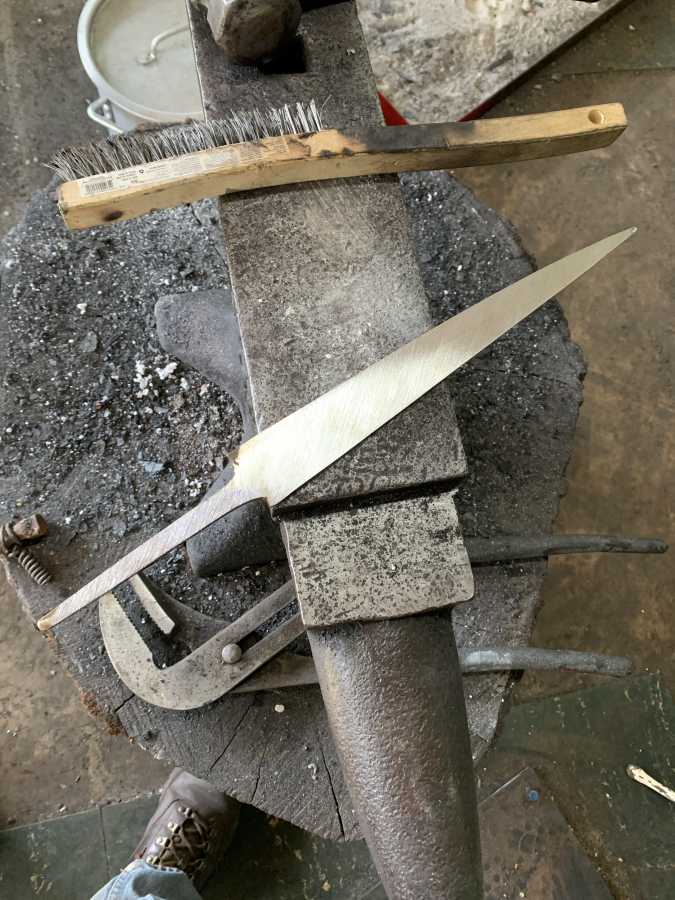
Looks like another pwning knife. 12″ blade, yeah, that’ll cut some things.

By the way: I don’t want it to seem like I am turning my bloggue into Shameless Commerce Central by doing lots of auctions. So, after the last one, I will probably stand down for a while, though I have one more item that needs a home (assuming it comes out OK) – a left-handed sushi knife. Now, I just gotta see how squishing those silver 1 yen pieces works.
It sounds like you are having a lot of fun.
The pattern on kestrel’s skiver is amazing. The knife looks…effective.
Where did you find silver 1 yen coins?
So as I’m scrolling down reading this I start to see the tip of the skiver and immediately I recognized and thought what the… that’s not a **knife**! LOL. Now I see. Good to know it will work on a jeep, if I should ever need to do so… the right tools get the job done!
The pattern on that knife is really cool. It will be a thing of beauty and function once it’s all finished. Your work just gets better every day.
Beautiful.
Marcus, I saw this and thought of you:
https://twitter.com/rainmaker1973/status/1187687982628818944?s=21
@chigau: ebay!
wait… is your anvil just sitting on a stump?
I was under the impression it was pretty common to pound spikes/nails/etc. in and wrap them over the “feet” or whatever… (it’s been a long time since I’ve read anything on blacksmithing, and even longer since I’ve actually tried any, so I’m a bit rusty at best…)
Anyways, I like the look of high-layer damascus/pattern weld, I think because sometimes it looks similar to woodgrain to me, and I like natural type patterns/features.
lochaber@#6:
wait… is your anvil just sitting on a stump?
I was under the impression it was pretty common to pound spikes/nails/etc. in and wrap them over the “feet” or whatever… (it’s been a long time since I’ve read anything on blacksmithing, and even longer since I’ve actually tried any, so I’m a bit rusty at best…
It’s not just sitting there. When I got the log round, I traced the footer of the anvil and routed a 1″ deep cavity for it to sit in. I also put a thin sheet of silicone pad under it to keep it from rusting. Seems to be OK.
Blacksmiths I’ve talked to say they wrap chains around anvils (or whatever) to reduce the bounce. That appears, to me, to be a misunderstanding of physics – the anvil does not bounce, the metal on the top does.
I used to have a copy of The Edge of the Anvil that I picked up at a Library book sale, but I must have gotten rid of it during one of my purges. Probably because I realized I’m very unlikely to take up blacksmithing in a studio apartment… So, I no longer have that to reference, and now that I think about, I’m not certain why. The two things that come to mind are preventing the anvil from shifting/creeping during work, and possibly to add more mass to the anvil. I now question that a tree stump would add significantly more mass unless it was a fairly small anvil and a rather large stump.
Cutting out an inset with the router sounds pretty fancy, and would definitely keep the anvil from shifting about.
Anyways, thanks, both for the initial article and pics, and the response. I kinda enjoy seeing your shop set up and such.
lochaber@#8:
Cutting out an inset with the router sounds pretty fancy, and would definitely keep the anvil from shifting about.
I am sure that somewhere in the world there is someone who can hit a 100lb anvil so hard it bounces an inch straight up. But I’m not that guy!