Right-o, we’re back on the highland dirk.
Where we left off was the entire final stage of the knife: the handle. I do not generally enjoy making handles, but (as a friend says) “I don’t enjoy doing it, but I enjoy having done it.” In a sense it’s a comforting process because, once the blade is done, you can screw the handle up horribly and just smash it off with a hammer and try again. I have had to do that, maybe a dozen times, and I do not enjoy it at all; it is better to avoid screwing up. But, it’s just wood – after hours of grinding steel, wood is so ridiculously malleable that it’s easy to bear down into it and, whups, there it’s gone.
All handles start with some kind of bolster or guard or whatnot. OK maybe some of yours don’t but mine do. There are two primary reasons: 1 is to protect the knife while it’s being sharpened since you don’t want someone whacking a piece of 4,500 year old oak with a piece of stone and 2 is because sometimes the knife’s architecture depends on a bolster to conceal a blind hole in the handle for the tang. I know some knifemakers who fit the tang holes super precisely and just leave them open and visible, but I like to pack a lot of PC7 or something in the hole and it’s easier to shape the hole with a drill and/or a probe-saw, and that’s not super precise. I don’t know a proper word for what I call a “probe saw” it’s a tool I make myself – you get a 10″/25cm carbide-tipped sawzall blade, then use a grinder (keep it cool!) to remove the back of the saw blade until you have a long thin flexible saw, then drill a hole in a golf ball and epoxy it on for a handle. If you’re making a pocket hole and you use a round drill, you wind up with round-edged holes, which blade tangs usually aren’t – the probe saw is a great way of squaring off the edges quickly and easily or removing small bits here and there without the more wide-area effect you get with a drill. I just went through my camera roll looking for a picture of one of my many probe saws but I can’t find one. If any of you want to see one, let me know and I will post a picture. They are really a useful tool, especially since for holes shorter than the blade you can reach around and grab the other and and work it back and forth with great control.
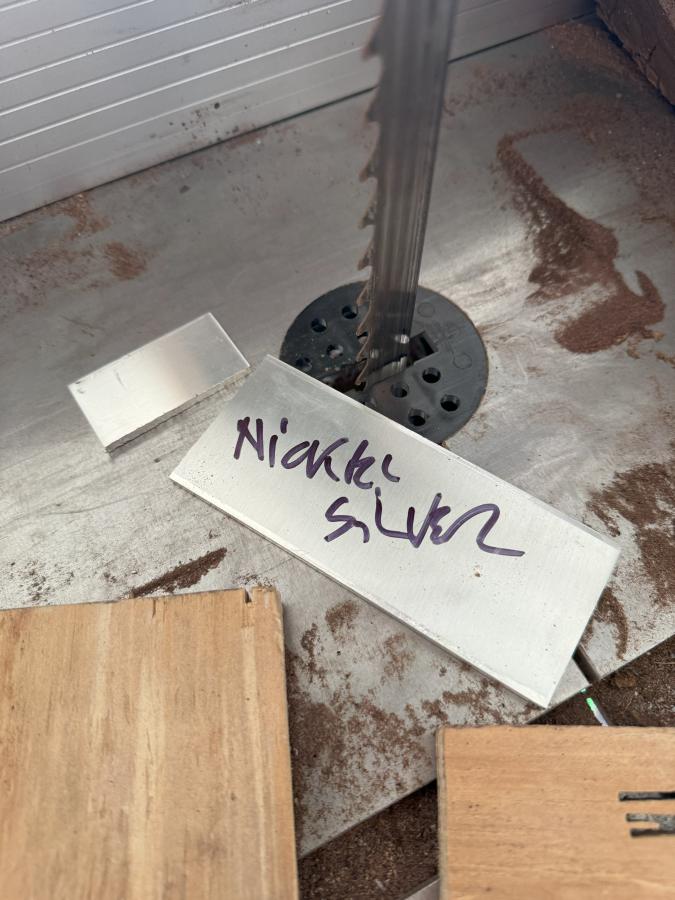
I buy most of my stock from Rio Grande and I always label stuff I cut off, because my memory is going and I don’t want to be fumbling around going, “I wonder what that is!?” I’m not sure why I cut that on the bandsaw, to be honest, when a hacksaw would have been plenty quick and a bit safer. I usually lay out the holes by just placing the tang on the metal and tracing it with the edge up, and the flat down, then cutting the holes well inside the lines and doing the rest with hand files. Lately I have been using carbide single flute drills, sometimes, to enlarge holes enough to get a file in (saves using a teeny little needle file) I usually don’t take pictures of this process because it looks as boring as it is. There is also some filing to clean up the shoulders of the blade, and then some filing on the inner contact surfaces of the bolster’s hole for the tang, so it’s all nice and snug.
Lately I have been using a sneaky, lazy, trick, which is to use a small ball peen hammer and texture the front face of the bolster, instead of polishing it. First, it saves me time but second, if I want to make the bolster’s hole tight all I have to do is tape the blade, gently clamp the tang in a vise, and use a hammer on a ball bearing (!) near the gap, to close the gaps tight. I had not thought of that trick, yet, at this time so I went for a mirror polish on the bolster. Nickel silver is gorgeous stuff and holds up a bit better than pure silver, but to be honest, I only used nickel silver because Rio Grande doesn’t offer silver bar stock 1/4″ (5mm) thick but they had nickel silver in stock and I had a couple projects coming along that I knew I’d use that hunk for.
The other piece of the handle is 4,500 year-old bog oak that I sourced from Ukraine back before the war. I keep a stash stacked in my wood oddments closet and sometimes I dip into it. I thought that for this project it was, basically, mandatory.
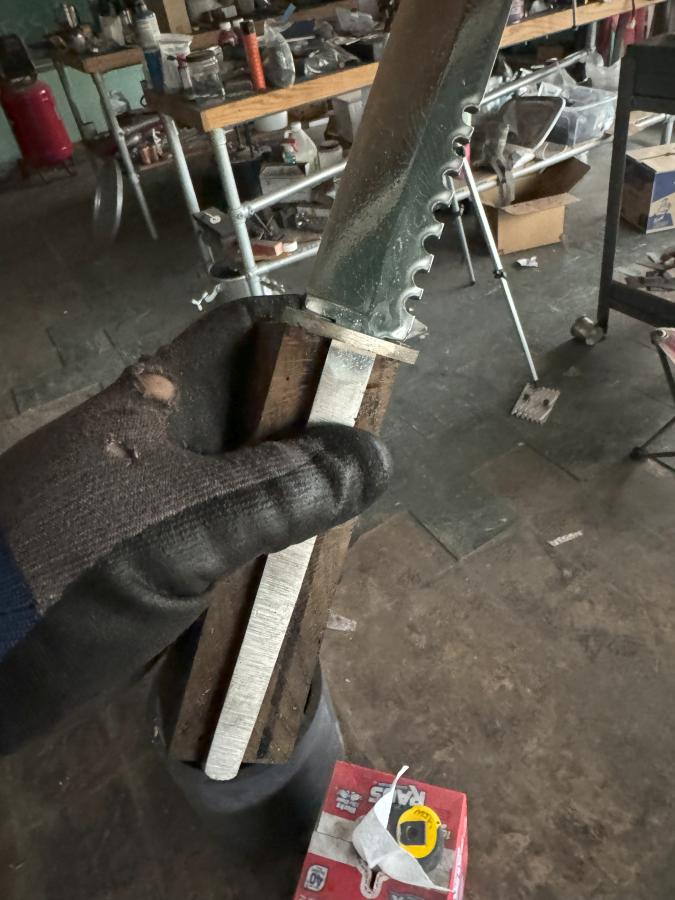
The gaps on the bolster are just because it’s not all snugged down, don’t worry. Once I have picked out my chunk of wood, I roughly mark it, then drill it. In this case, I want the butt end of the tang to protrude out the bottom of the handle, so I can put a matching butt-plate on it. When I drill handle pocket holes I usually clamp everything in the drill press with the drill run all the way down, so I can make sure everything lines up, then I drill it and it’s back over to the other room for fiddly filing, chiseling, and cleaning up with the probe-saw. Then there’s lots of test-fitting. In this case, I decided to tap the bolster in place and put a small amount of G-flex on the back where it meets the tang. When that was cured, I could put more G-flex in the pocket hole and put clamps on the now epoxied-in-place bolster to hold everything together relative to itself. That left the tang end sticking out, which I forgot to mention I had ground down to 1/4″/5cm or so and rounded with a mill file. I let that cure, and the handle and bolster were now solidly in place and correctly positioned, so I glued and clamped the butt-plate. I know this was possibly 2 steps more than I had to do, because I could have just glued it up in one shot and hoped for the best, but I think it’s wise to be methodical when working with something older than your culture.
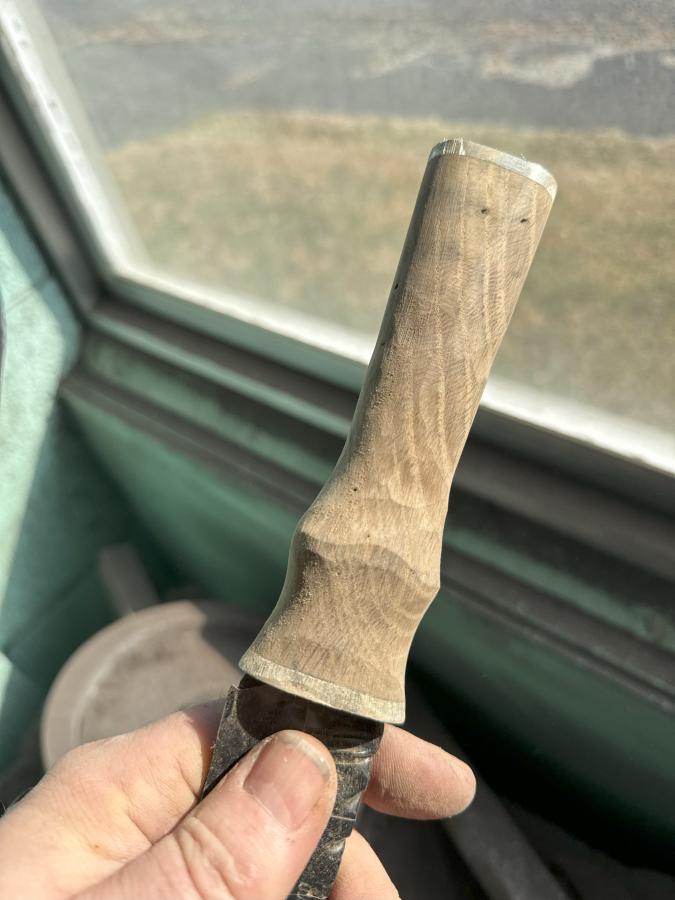
Since the thing was ridiculously sharp, I thought it would be good to protect the blade from further corrosion due to uncontrolled blood leakage, so I wrapped it in 3 layers of electrical tape, with a thin strip of kevlar cloth down the edge. That’s a trick I came up with the first time a dagger worked its way out through the tape – memo to self: WD40 makes a blade slippery and slippery means it can shift against the tape, which means the whole mess just magically comes apart when you grip it. Anyhow, here’s a picture of it all taped up:
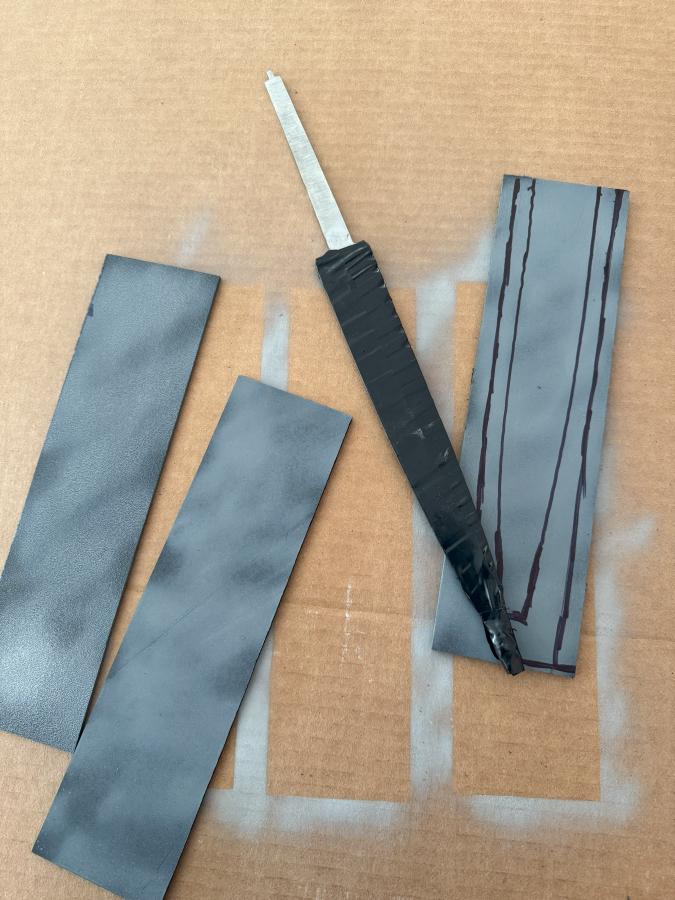
Now is a good time to draw the outline for the scabbard while you’re at it, since there’s no handle or whatnot to get in the way. I use ABS plastic a lot of the time, but that’s next episode. Here’s a hint: spray gray primer on stuff that you want markers to show clearly on, and you can also erase mistakes by just shooting more gray primer. You can also trace things by putting them on something and spraying gray primer at it. I could have done that with the blade except I was going to have to fiddle with the markings anyhow to expand the space so it’d have a welt. But that’s next episode.
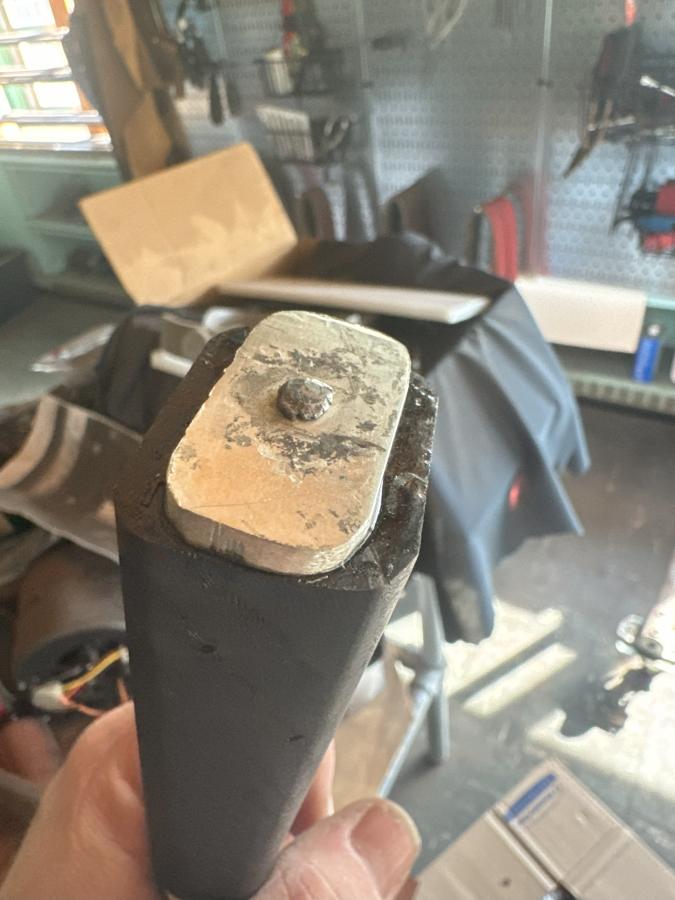
You don’t have to be a physicist to figure out that if the end of the tang is attached to the blade, you should hold the blade while you are peening the butt-plate. Of course, holding a razor sharp blade with your hand while whacking it with even a small hammer is a great way of encouraging yourself to use a small hammer and small snappy strokes. I did it cold, because G-flex melts at high temperatures, so I just took my time and tapped away, doing the best I could. There was a certain amount of cursing because I knew that I was going to have to clean that rivethead until it was pretty, round and shiny and the nickel silver was dead flat and shiny and that’s what little files and sandpaper are for.
So, then I put the whole thing down on the bench and spent a couple days quaking with terror because, having assembled all that, now was my chance to fuck it up.
Usually, I do the rough shape of the handle and correct any errors using a 120# belt on the belt sander.* It removes wood mighty fast! The rough shaping below took about 5 minutes, maximum. Really. And the room was filled with the heady smell of hot bog oak and silver. I love my life.
This is basically the same shape as the sgian dubh I made years ago. It fits in the hand, it echoes some traditional dirk and sgian dubh handle shapes, and the guy who ended up with the sgian dubh never said anything about it being ugly, so, yay, let’s go! It is absolutely terrifying to see the wood dematerialize as you shape it down, and you’re constantly in fear that you’ll cut into the pocket hole, which I think I have done 2 or so times in my entire life. All you have to do is stop, hold the blade, and look down it – the tang is pretty much dead straight and unless you got sloppy cutting the pocket hole, you’re fiiiine.
Then it’s over to the traditional way of making swoopy things less bumpy: a file
Fileitty file, fileitty file, rasp and gasp, scrape and scratch, then sandpaper sandpaper sandpaper, 60#, 120#, 220#, etc. Once you are past 220# on the wood, you’re done there but there are still the bits of nickel silver which need to get to 1000# and no scratches, before you can steel wool them or flitz them to a gleam.
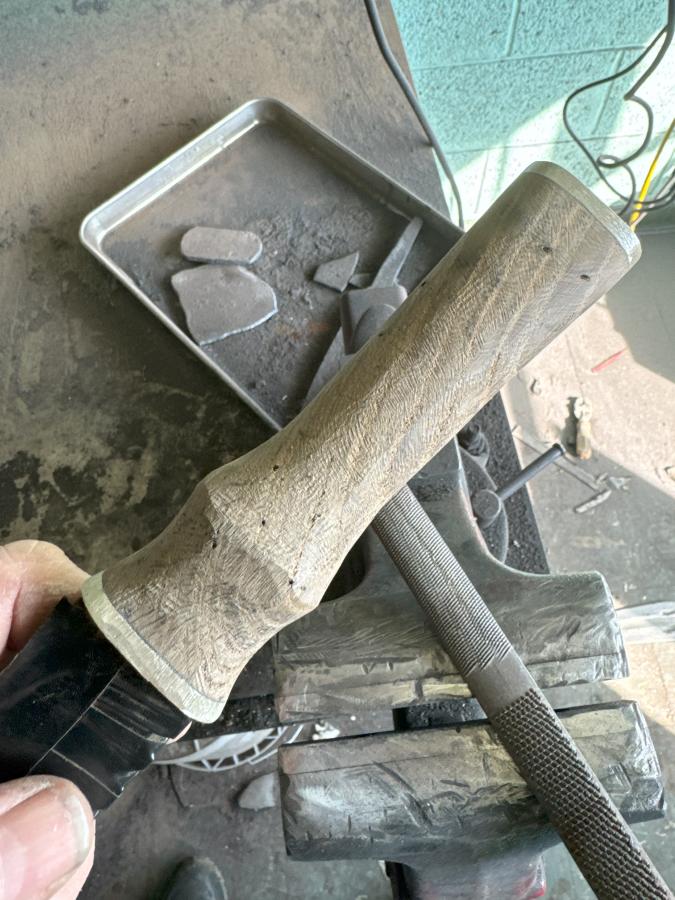
Once you’re into sandpapering, it’s pretty impossible to screw it up. You’re not taking much off. So around about the time that I took the picture above, I had concluded I was Out Of The Woods.
I know, it looks like ass in that picture. In face, at 220# it still looked like ass, because it was covered with dust and stuff. So, and this is almost embarrassing to admit, I do a thing: I put some of my home-brew tru-oil mix on a piece of cloth, close my eyes, and give the handle a rub-down. Then, I open my eyes.
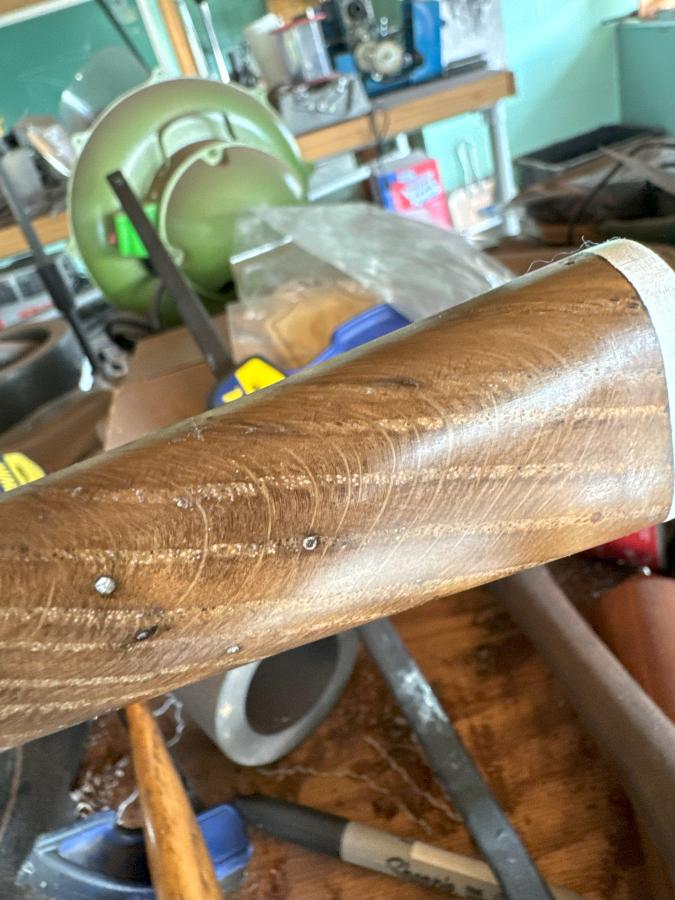
Yeah, that’ll do. There’s going to be some boring work with popsickle sticks that have various sandpapers glued to them, and maybe a touch of filing and tweaking, but it’s done and it came out. Definitely out of the woods. The wormholes filled with epoxy and sawdust, so I very carefully stain them black with a sharpie then let the fine-finishing process blend all the colors. Sometimes, when I am thinking, I put a bit of black colorant, or metallic gray, in the epoxy when I mix it, but I forgot. It’s OK. At this point, it’s all OK. I get a brief rush of dopamine and peel off the tape then wrap the whole thing up in felt with some WD-40.
Next episode, scabbard.

* “Correct any errors”- sometimes, no matter how hard you try to fit everything and glue it up straight, you may notice that one side of the handle or the other is bigger, or it’s offset, or not straight or whatever. The first thing I do, while it’s all still in the form of a block, is to correct it so everything is nice and straight relative to the blade. There have been a few near-disasters where I have noticed late in the game that the handle is at a pretty serious angle (a couple degrees or more!) and I just tell myself it’s going to bring out the grain better if it’s slightly angled. So there, fates.
(This is the second ‘The Sean O’Rambo Knife – 3)
It is looking pretty amazing already :-D
Oops! Thanks!
No real comments, but enjoyed reading this and seeing the pics, so thanks for sharing. :)
I work with wood mainly, and one trick I recently heard about, which you may already know, is that to both clean the remaining dust off before staining/vanishing and to get an idea of what the color of the wood would be like if you simply applied vanish (no stain) is to wipe off the wood with mineral spirits. It won’t raise the grain like water does, it helps wash away the dust, and most importantly it evaporates without a trace. So it cleans up the wood while allowing you to decide on a different finished later.
I’m finishing up some wooden doors and used this technique after my 240-grit sanding and was quite happy with it.
Again, you might already know this. What’s new to me may be common knowledge for others. But since it worked so well I thought I would pass it on.
I’m definitely enjoying the build posts.
It’s coming out very nicely! I can visualize your probe saw on a golf ball but might I suggest you get a few items from Rio Grande to make that process easier?
Firstly, a jewelers saw and multiple packs of blades for cutting metals. The wire blades are especially useful as they don’t bind and snap as easily as the flat blades. They make it easy to cut out complex holes in flat stock.
You can also buy abrasives that are already in the form of emery boards for getting into the tight corners, though wrapping sandpaper around popsicle sticks or pencils does work. It merely eliminates the need to hold the paper in place while you work, but it’s very convenient.
I think bolsters for knives with hidden tang fulfill a third function too – they distribute the force of the blade across the front face of the wood of the handle and thus prevent it from splitting both during the assembly and later during use. the same goes for the metal pommel/endcap.
I discovered the trick of tightening holes in metal bolsters with a peening hammer independently last year too. I used it successfully a few times even for polished bolsters – I tap the inside of the bolster with a tiny cross-peen hammer against a flat surface. On the inside the bumps get covered anyway and on the outside the polishing does not remove enough material for it to matter. I had to use it for both of my last two knives because I made the holes for both accidentally a few tenths of a mm bigger.
I am cleaning the wood with denatured alcohol before I apply the final finish. It does not raise grain as much as water would, it dries without trace too and it does reveal how the wood will look after I apply the finish.
That piece of bog oak looks very light, so far all the pieces I saw were nearly black. It looks very pretty in the last picture and it is recognizably old wood.
Nice storied journey – I’ve enjoyed following along, especially the photos. Just wondering why your Scottish highland dirk is for an Irish fellow named O’Rambo?
Miranda31@#7:
Nice storied journey – I’ve enjoyed following along, especially the photos. Just wondering why your Scottish highland dirk is for an Irish fellow named O’Rambo?
My Irish half and my Norwegian half couldn’t come up with anything else between the two of them. MacRambo sounded like some kind of fast food that blows you up. I got nothin’… Maybe he married into the family?