I’ve been sweating getting the doors for the shop done, which has been an emotional nightmare for me (strong sense of failure) as I watch my self-imposed deadline for getting the shop online recede into the distance.
Every day I drive past the opening and imagine the wind ripping through the building, uninterrupted. But, I am making progress. That’s what happens when you bite off more than you can chew: you just take smaller bites and keep chewing.
My first plan was to use PVC board, so I would not have to paint or prime or worry about UV. The first attempt was wobbly as spaghetti and clearly was going to come apart in the first blow. So, I asked my friend Mike for help, and he came up and we spent a day designing and building a frame out of laid-up 2x4s. It was heavy and solid, but when I assembled it with the fiberglass sheet in it, the fiberglass could pop out under pressure; I realized that I needed the screws holding the frame together to go through the fiberglass and use the fiberglass to stiffen the frame while holding the fiberglass in place. So, I sat down and did more cursing and swearing and came up with Plan C.
Plan C is based on the realization that, in laying up the frame of 2x4s, Mike and I were reinventing plywood. Why not use layers of plywood and position them so that they flattened out against each other and kept each other straight?
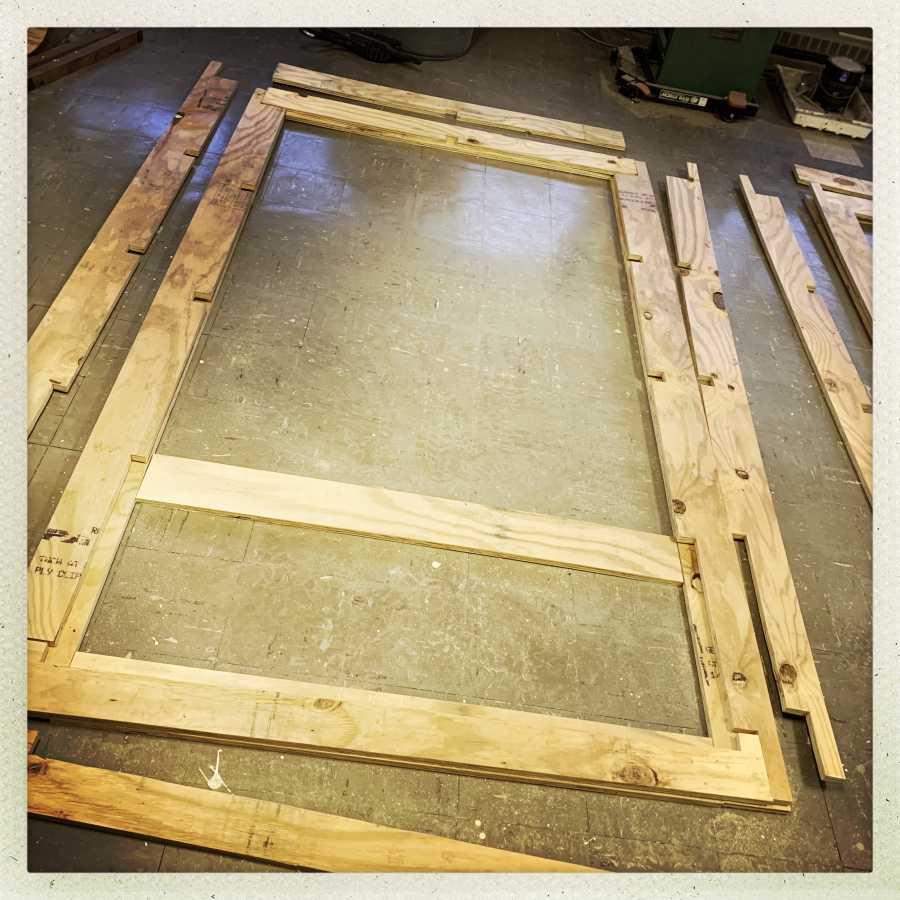
It helps to have a lot of space, too. So, what I did was design the pieces to interlock and hold the fiberglass in the middle. At the bottom, there are cutbacks in the edges and sides to allow a big piece of plywood to fit, which will stiffen and weight the bottom. The side-rails will wind up being massive: 4 layers of 3/4″ plywood, hanging from the rail pulleys.
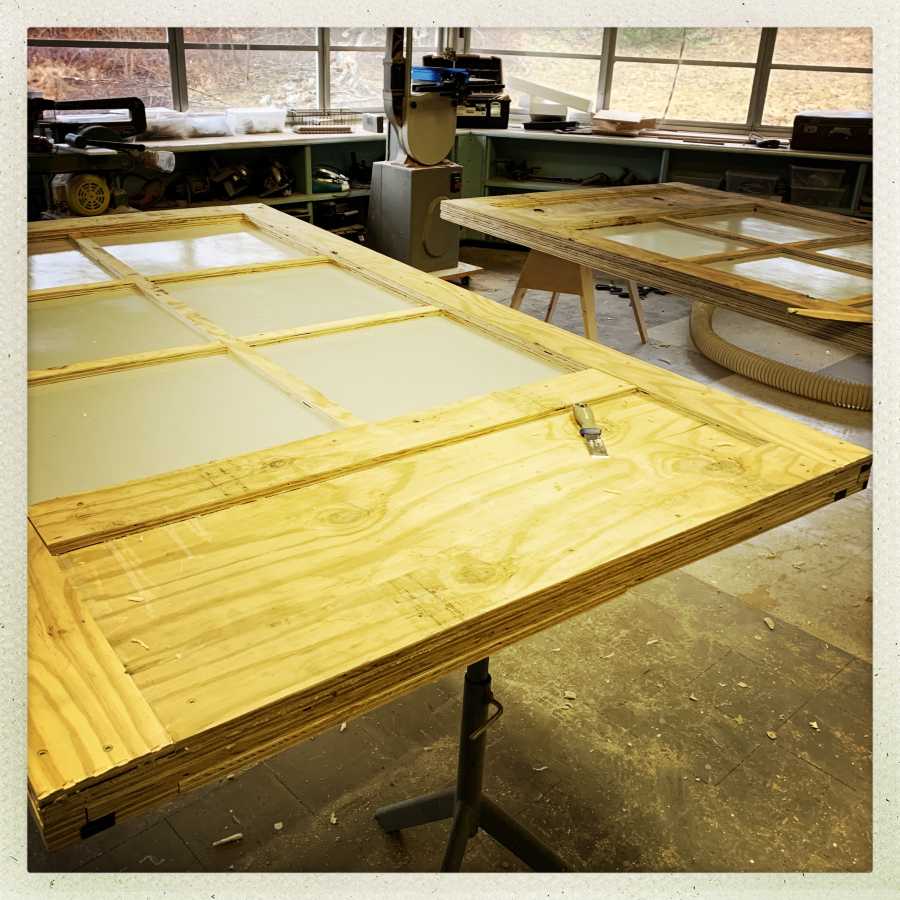
Since the two doors are the same, and the layers are symmetric, I need to make 4 pieces of everything. All the measures are done right on the wood, which is stacked and all 4 pieces cut at once with my hand reciprocating saw, mitre saw, or table-saw. It’s pretty straightforward once there’s a design, though.
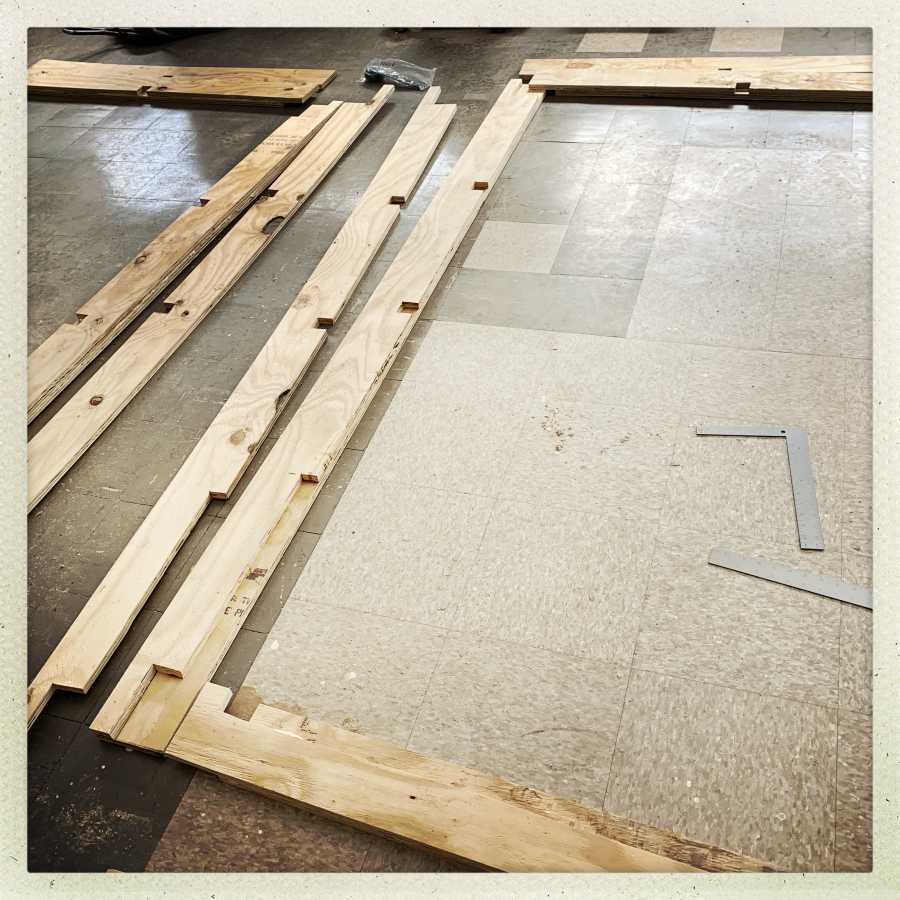
I have to be honest: I am not great at measuring things. So I designed and built these using a method of “experiential design” i.e.: I test-fit a sample of one of the pieces, then (and only then) make the other 3. If I were more self-confident, I’d do it as one series of cuts, but instead I made a model, made sure it all fit together, then made the other pieces.
Back in the 00’s I drove a great big suburban with high tires and a roof rack, which had a rear area that could absorb an entire sheet of plywood without difficulty. While my Tahoe is probably considered “huge” by some of you, it’s not big enough for sheets of plywood, so I’ve gotten to know the Fine Young Folks at the Lowe’s in Clearfield – they advertise that they’re willing to cut plywood sheets you’re buying, so I accepted that offer and loaded the back of the truck with 4 sheets cut in half lengthwise and 2 sheets cut in half widthwise. I’m really unhappy about being 58: I can no longer sling around a sheet of 3/4 plywood like it’s paper – I grunt and struggle and it’s embarrassing when some 20-year-old asks me “do you need a hand sir?” Well, I can sling around a half a sheet of plywood. Time crushes all egos.
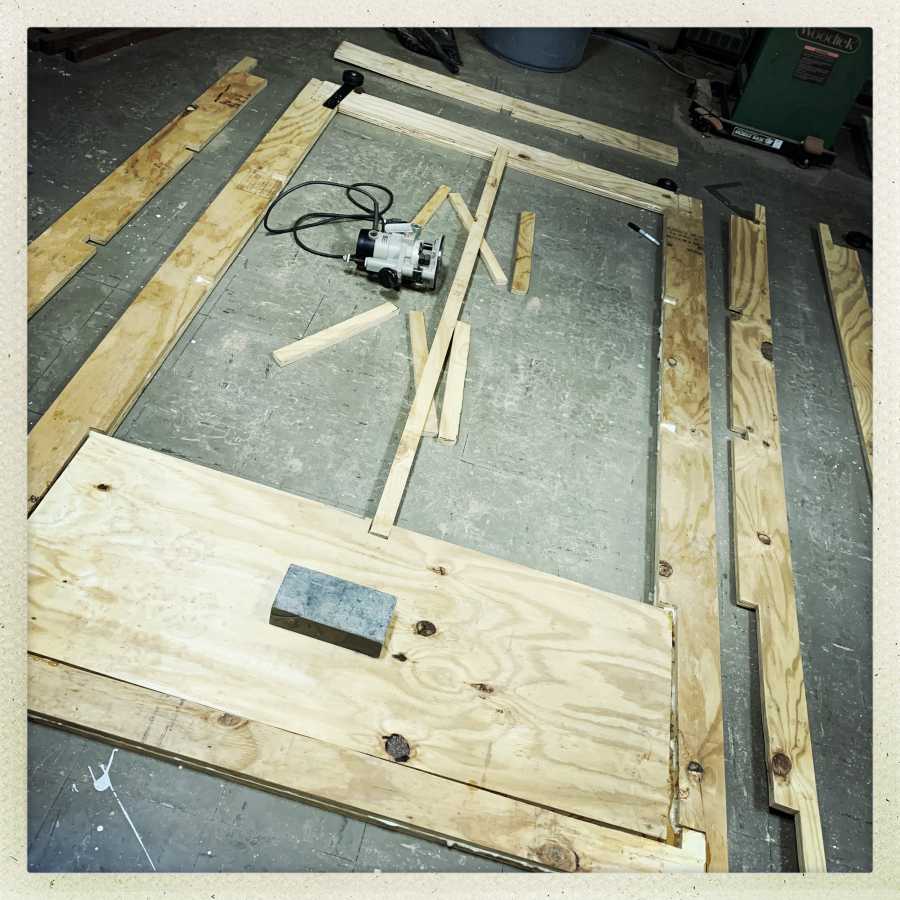
You can see the cuts in the sides for the cross-pieces (more 3/4 plywood!) and the way the kick-piece fits in the base. I made the opening a bit loose but, so what? None of that is visible and the whole frame is locked together with screws, their heads hidden by the layers that go atop. I had to make a mental map of where the screws are so I don’t put a screw down on top of a lower layer screw. Because each layer will be hidden by the layer over it, it doesn’t matter if I put a screw in a place to hold it while glue cures; I just have to take them out in the morning.
Here’s a knifemaker’s trick applied to doors:
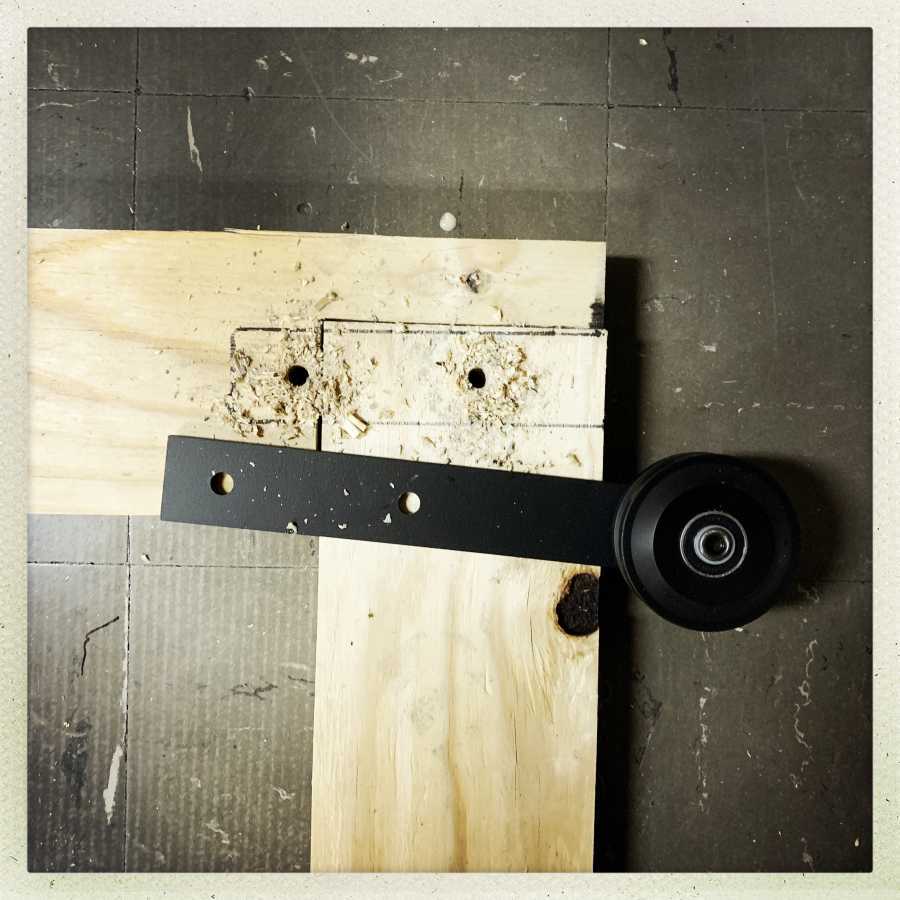
I drilled the holes for one side of the hanger, so that when I put the upper layers on, I can correctly locate where the hole needs to be without measuring: I just drill from the other side. I rather sloppily routed out a pocket for the hanger, and, when I did the over-layer, I put plenty of foamy urethane glue in to lock everything nice and tightly.
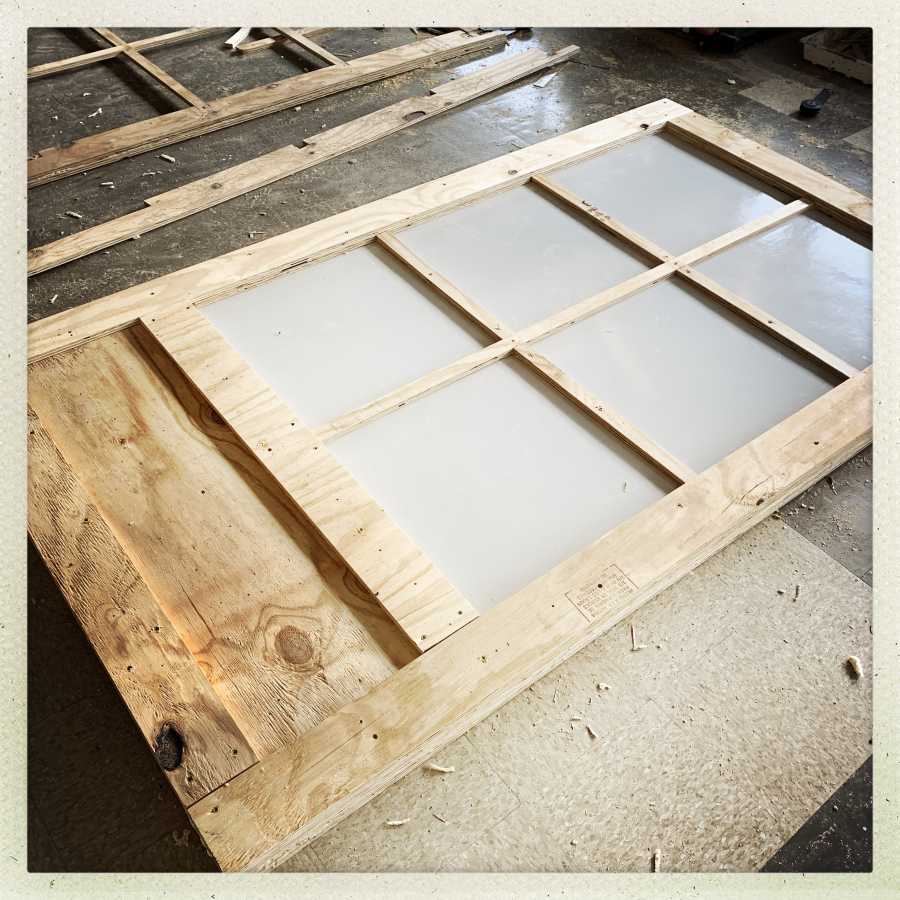
That’s how it looks with the fiberglass sandwiched in the middle. There are screws near the edges of the wood that go into the fiberglass (which is some really tough stuff!) and the cross-pieces are screwed through the fiberglass into the plywood cross-piece on the other side.
Once that was done, it was time for some serious grunting and complaining, as I lifted the whole thing up onto jackstands, so I could masking tape off the fiberglass and smear some paint on things.
The trick is, you lift one side and put the jack under it, then go around to the other, put a putty knife under the edge so you can pry it up enough to get a finger under it, then curse your mild arthritis and lift the damn thing anyway.
Paint covers a lot of evils, and foaming urethane glue fills a lot of voids. Since this is going to be exposed to the outdoors, I decided which side is “outside” and went around with a caulking gun and filled cracks in the plywood that might collect water, freeze, and pop.
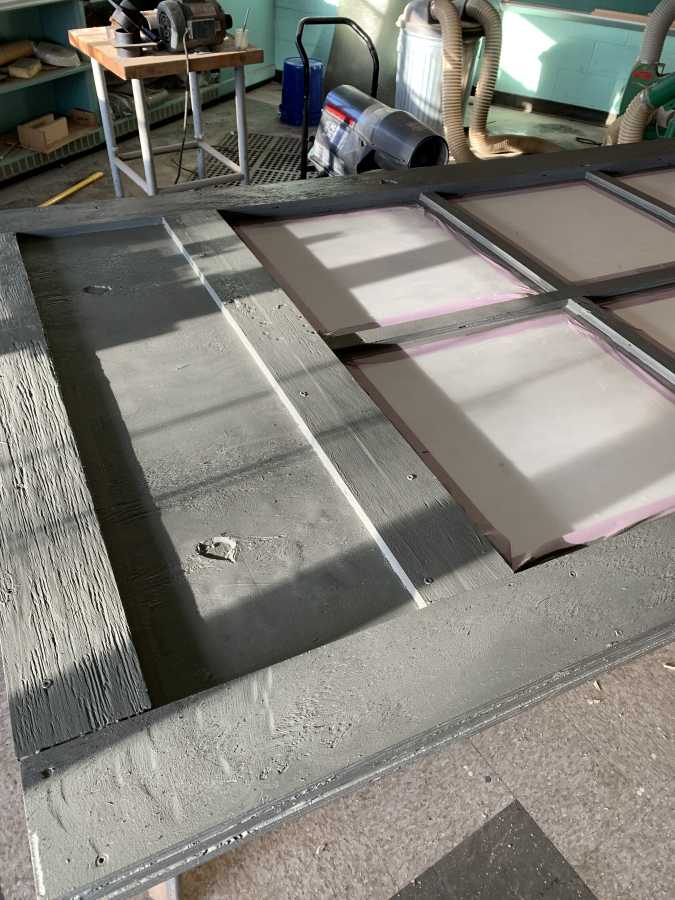
The recommended temperature range for the paint I’m using is 50-75F, and it’s about 40 in the shop. The stuff I am using is cross-linked acrylic, which separates into uncurable goo if you freeze it. (Don’t ask how I know that) So, I keep the can of paint at home in the kitchen, then put it in a cooler full of warm water to keep it happy while I’m using it. I can keep the shop’s air at 75 with the reddi-heater. I run the heat up while I’m working in the other room, then come in and turn it off, lay paint, and close the door to let it cure. I want to minimize the time I am standing in a cloud of diesel exhaust from the heater. But compared to some of the other stuff I breathe it’s not significant.
I hate painting. Holding a small tray of paint in my left hand, and using a roller/brush in the right leaves me with an unusable left elbow the next morning. Oh, well, that’s painting.

Next up is making the mounting rails for the outside of the building. That should be relatively easy: more plywood laid-up into a 17-foot beam 6″ wide, covered with aluminum fascia to keep it weather-proof. I’ll position that and drill through the wall and mount it with stainless steel carriage-bolts to counterpart beams I’ll build that will go inside and hang from the cross-beam that goes over the door. Piece of cake. If I don’t kill myself in the process.
Now imagine being born with a weak female body and never having been able to lift heavy stuff, even in your twenties.
The weight of plywood varies and I’m not exactly sure how large a sheet of plywood is in the USA, but I know from experience that I couldn’t lift half a sheet of the plywood that’s sold in Latvia. I just asked people at the shop to cut the thing for me last time I wanted to make some stuff.
And I know that I don’t really have a right to complain—unlike me, some other people actually have real disabilities that limit their ability to make stuff.
All acrylic-based paints and mediums are destroyed upon being exposed to freezing temperatures. I know this because art supply stores don’t ship anything with acrylic in it during winter. They also put prominent warnings for their customers reminding them not to order this stuff if the temperatures are below freezing in their part of the world.
You probably know this by now but anyways:
1. Ice the shit that’s going to hurt tomorrow, tonight.
2. Ibuprofen tonight and tomorrow. NSAIDs FTW.
2a. Ibuprofen WITH FOOD and don’t make it a habit. It eats your stomach lining. Don’t ask.
+1 on ibuprofen points 2 and 2a. I would add: take each ibuprofen with a full glass of water.
I asked this before with no answer so I will try again. Why not paint the pieces before you put them together? Then you dont have to tape anything or worry about paint getting on things you dont want paint on. Just curious.
Looking good so far, sorry it was so much more work than you thought it was going to be after Mike’s visit.
StonedRanger @#4
I don’t know what Marcus’s answer would be, but mine is – if you are gluing the joints for extra strength you want to be gluing wood to wood, not paint to paint.
Coming along nicely! Those will be some really nice doors when you’ve finished them and got them set up. This can’t be the funnest time of year to be working outside though, so I can see there could well be delays in getting the things installed to your satisfaction.
Maybe you need a spray gun if you’re planning to do a lot of painting?
dangerousbeans@#7:
Maybe you need a spray gun if you’re planning to do a lot of painting?
I have one. Sprayers seem to be best for when you have large, flat, more or less-prepared surfaces. If I were painting walls, I’d definitely go for a sprayer (although last time I painted walls, in 2008, I used a brush because I was painting cinderblock walls that were un-primed, god have mercy on my soul) (he did not)
stonedranger@#4:
I asked this before with no answer so I will try again. Why not paint the pieces before you put them together?
It’s as jazzlet says @#5: sometimes the paint does not stick as well as the glue, in which case the materials are substantially weaker. Think about it this way: wood glue is optimized to glue wood to wood. It may not be the best thing for gluing acrylic paint to other brands of acrylic paint. I suppose you could test a lot but if you are working with wood to wood, you can lean on the glue manufacturers’ experience.
There are very dedicated adhesive fans out there who love to test various adhesives in various situations. So you can find pages (on knifemaker forums!) about what epoxy is best for holding bocote wood to steel, or carbon fiber to brass. A lot of those guys do destructive tests that are kind of ridiculous.
Anyhow, since I know wood to wood joins with gorilla glue really well, I am very confident in their strength at this particular temperature (I made a bench in subzero weather using gorilla glue, once) it’s a property of the micro-foam that urethane produces, and its insane ability to stick to things… to the point where you are ready to use a flamethrower to get it off (btw, that works!) So while I could paint it while it is disassembled, I would be moving from a known situation into an unknown, and risking building something that fell apart the first time it got cold or wet.
By the way, foaming urethane plywood to plywood gluing is, in most tests (and in my experience) tougher than the plywood itself. Which means if you try to pry it apart, the plywood delaminates first. In this case I want that plywood-to-plywood bond with a nice topcoat of paint to keep moisture and UV out of it. (urethanes are moisture curing, and therefore moisture sensitive)
kestrel@#6:
This can’t be the funnest time of year to be working outside though, so I can see there could well be delays in getting the things installed to your satisfaction.
I had 1/2″ of ice come down last night. It flippin’ sucks but it’s an excuse to stay home tonight and watch a movie and drink red wine with my dinner.
I did get the Tahoe down the driveway and to the shop, then successfully up the driveway there. So I got 2 more coats of paint on the outer side of the doors AND I rough-profiled and prepped for quenching the sgian dubh I am working on. I’ll be over tomorrow and will be listening to MLK’s “I Have A Dream” speech on infinite repeat (it is a very subtle speech) and will do another couple coats of paint on the inside, maybe lay up the header board, and possibly quench the sgian dubh assuming there are no signs of cracks in the steel.
The doors look great. Sturdy and aesthetically pleasing.
Since it’s your stationary arm that aches when painting, Perhaps some type of neoprene support would help. Alternately, maybe a small paint tray on wheels (I’m thinking Of something like what hairdressers use) would spare you having to hold the paint tray at all. If neither of those will work, perhaps while listening to Dr. King you could make a point to stretch your left arm out and do a few rotations and flexes with every repeat (about 16 minutes).
voyager@#11:
If neither of those will work, perhaps while listening to Dr. King you could make a point to stretch your left arm out and do a few rotations and flexes with every repeat (about 16 minutes).
Or I can alternate between hammering on steel, holding a blade to grind it, and painting! Thus, I am well-rounded.
Why does everyone seem to interpret StonedRanger’s “Then you dont have to tape anything or worry about paint getting on things you dont want paint on” as meaning paint every surface of every piece before assembling? Partly assemble each half sandwich of the door, lay on a flat work surface, paint the ‘exterior’ surface with as many coats as desired (won’t significantly run onto the mating surfaces if sitting on kraft paper), finish assembly of complete sandwich with fiberglass, and finally touch up the outer edges/perimeter and any screw hits.
Being the weird little shit that I am, I would probably make similar doors using concrete board instead of plywood for extra weight and rot resistance (could add wood texture during finishing/painting). Or go all out and create a textured mold for casting glass fiber reinforced concrete door halves/panels.