This is the status of what I think of as “voyager’s jaw.”
When the silicone was cured, I cut it lengthwise to release the jaw, and did some experimental wax pours.
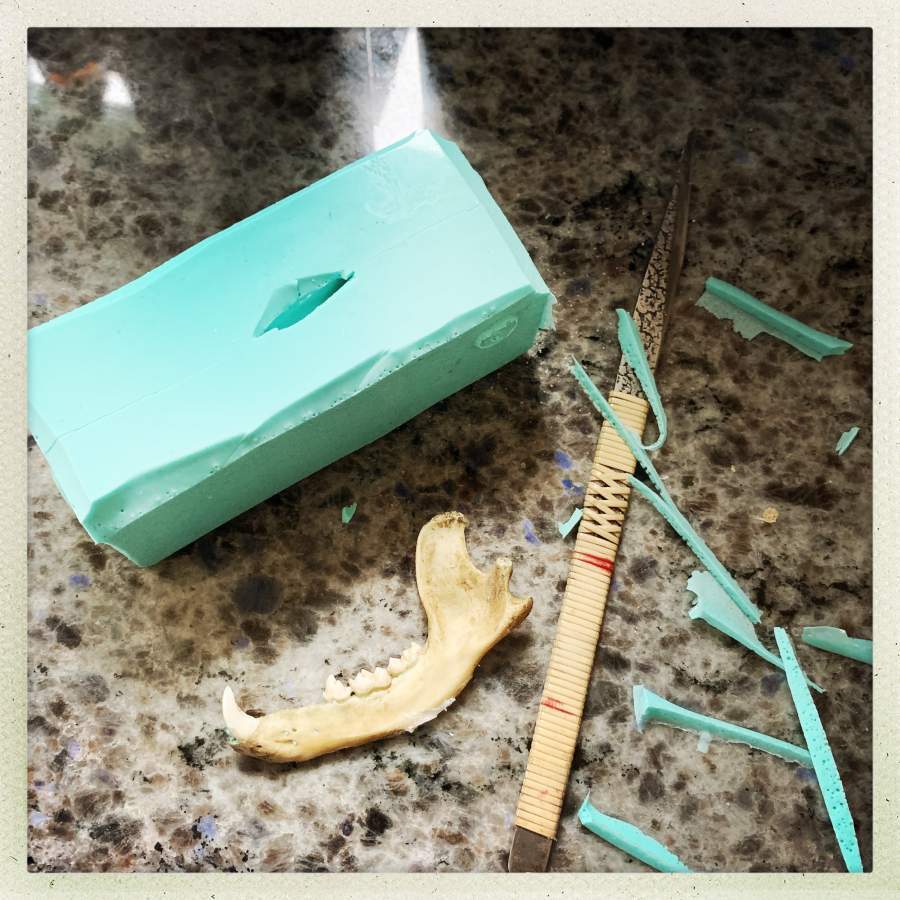
I use a vintage tamahagane kiridashi as my silicone-cutting scalpel – it feels like being a paleontologist digging a fossil out of a rock: you carefully cut and poke and pull the silicone away from the object, teasing at it and slicing it cleanly with the tip. On the bottom of the jaw you can see a bit of polyurethane glue I used to hold the jaw to the counter-top so it wouldn’t float in the silicone. That gives me a minimal cue for where to cut when I remove the object. When I am planning the mold-pour I spend a while looking at the object from all directions, trying to figure out what angle is the best, and where there is a disposable/reconstructable “edge” that I can use for where the opening in the mold will be.
Proper mold-making entails using clay to build a “dam” then pouring half of the mold, flipping it over and removing the clay, then pouring the other half. I’ve done that but it takes 2-3 times more work and time than just doing a single pour and cutting away with a knife. Besides, I can easily recreate the line and texture of the bottom of the jaw on a belt sander.

A “real” jeweler would use a pressurized wax pump and vacuum to completely fill the cavities in the silicone but I am stubborn and lazy and surreal, so what I do is thin or thicken the wax’ composition by adding beeswax so it flows better. The beeswax is less durable than official jeweler’s casting wax, but it’s cheap and it’s thinner, so I can manage how well it pours and the melting temperature.
The pour above did not work – the bottom of the fang-tooth wants to capture air and make a bubble, so it refused to come out. Now, here’s a dirty trick you can do if you don’t have a pressurized wax-pump: you pull the mold open and make a small cut down the part of the mold that shapes the fang. Then, you pour the mold full of wax and quickly pull it apart at that spot, so the air gets out, then push the mold back together and top it off with more hot wax. Of course this gets hot wax on your fingers and countertop but, anything for art. You wind up with “flashing” – thin transition areas where the wax bled into the cuts in the mold; they snap right off with a little nudge from your fingertip of a flick from the tip of the kiridashi.

I can see we are far from out of the woods, yet. Look how thin the bone is at the top of the mandible! I have no idea how that is going to cast in metal but my guess is “badly” Unfortunately, it’s going to take a while before I try to cast this because I feel as though the cast should be done under vacuum and I don’t have a frame for the investment handy and I haven’t got the vacuum rig set up yet. That means, probably, this wax is going to sit until December or thereabouts. I may find a frame for it and cast the investment plaster, then just put the whole thing on the shelf until I am ready to melt it out and give it a try.

When we look at pieces that evolved, it’s easy to see how someone might think there was a great designer behind it all. The thicker edge of the mandible strengthens the animal’s jaw in the dimension where it needs strength, and the surface area of the top of the mandible allows the muscles to attach. It looks like an airplane part, designed by a master machinist, except it’s not – it’s just evolution resulting from foxes (or whatever this was) that had jaws that were strong in the right place, and survived to pass on its genes.
The other mold on the countertop is half a walnut. I was wondering how it would come out and whether it would make neat jewelry, so I gave it a shot. It came out OK but I’m not sure what I think, and whether or not it’s worth trying to cast it.
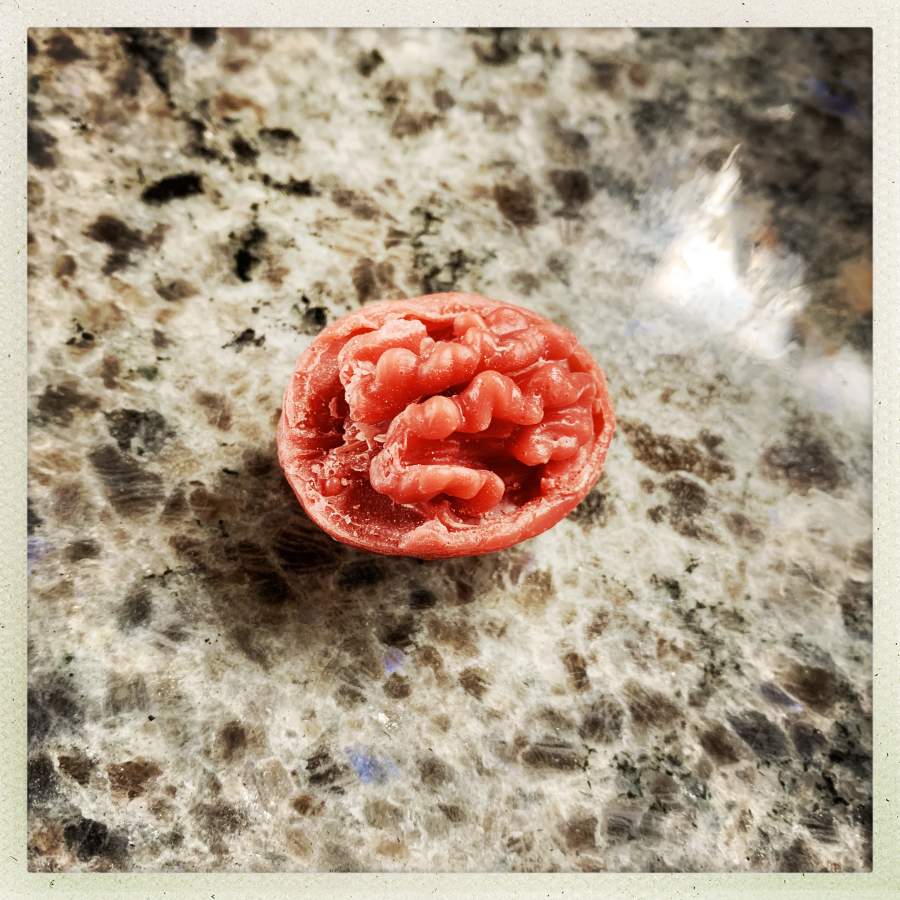
Both of them look good, although I can see the thinness of the top of the madible will be difficult to cast. I like the walnut, though I am rather fond of them both inside and out. One of the few treasures I have kept from childhood is a walnut that instead of being split into halves is split into three equal parts, I don’t know what the inside looks like as I never opened it, it just pleases me as it is.
That thing about wondering at the latest result of long evolution is what I was getting at when I was talking about you having injured your forehead rather than your eye in your faint the other day. Having something poked in it’s eye would obviously be detrimental to most creatures, the lack of vision being the result for the lucky; the unlucky would get an infection that would be highly likely to spread to the brain and be lethal, so those with less protective orbits died before breeding and we end up with orbits that permit us a good field of view, but also deflect objects approaching the eye. I hope you are healing well, when it comes to that point moisturising scabs both stops them itching and reduces scarring (because you don’t scratch the scab off too early).
Make stylized ‘brain’ jewelry with a zombie aesthetic out of the walnut one.
The detail on both of those is pretty impressive, although I’m partial to the jawbone.
It would take a bigger animal, like at least a wolf/large dog, or bear, but I’ve seen some knives handled with carnivore/omnivore mandibles as handles. I think it was more common with Native Americans? I wonder how a metal jawbone would look as a handle?
When I was younger, I used to hit up some taxidermy shops for animal skulls. For critters without antlers (and maybe tusks?), they often use purchased forms, and just chuck the skinned head. I got a bear skull that way, and knew of some people who got lion, mountain lion, and a few other critter skulls that way.
I can’t get over how thin the bone is on the jaw. You can almost see right through the wax. It does look like it’ll be tricky to cast, so good luck!
As for the walnut, I agree with Abbycadabra. I think it looks like brains and would make great zombie jewelry.
Dunno, but there’s something about the 2nd and 4th photos… ;)
Hey that looks great! Yeah… that one area on the jawbone may be problematic.
I like your mold cutting tool, it’s really a beautiful tool.
I sometimes ventilate my molds by making a cut or so to the outer air, and then putting talcum powder in the cut/s. The powder holds it open a very tiny bit, just enough to get the air out, and usually I don’t even get any flash from it. However as you point out I normally inject under pressure; I am not sure if a simple pour would be enough to get the air out. You never know though it might!
Hm, walnutbrains!
I may re-do the mold by thickening the upper mandible slightly with modelling clay. If I brush it to texture it, it ought to look indistinguishable from bone once it’s been molded in wax. Only a forensic fox jawbone expert would notice it’s a bit thick.
kestrel@#6:
I sometimes ventilate my molds by making a cut or so to the outer air, and then putting talcum powder in the cut/s. The powder holds it open a very tiny bit, just enough to get the air out, and usually I don’t even get any flash from it.
Dang, that’s smart! I knew about the talc but didn’t understand how it worked until you just explained it.
@Marcus, #9: LOL! Well wax is cheap. And so is making cuts in your mold and talcum powder, so it will be super easy to find out! Here is hoping you get perfect success!