… I am really proud of this knife and I think I have done a good job. I genuinely think I am getting better.
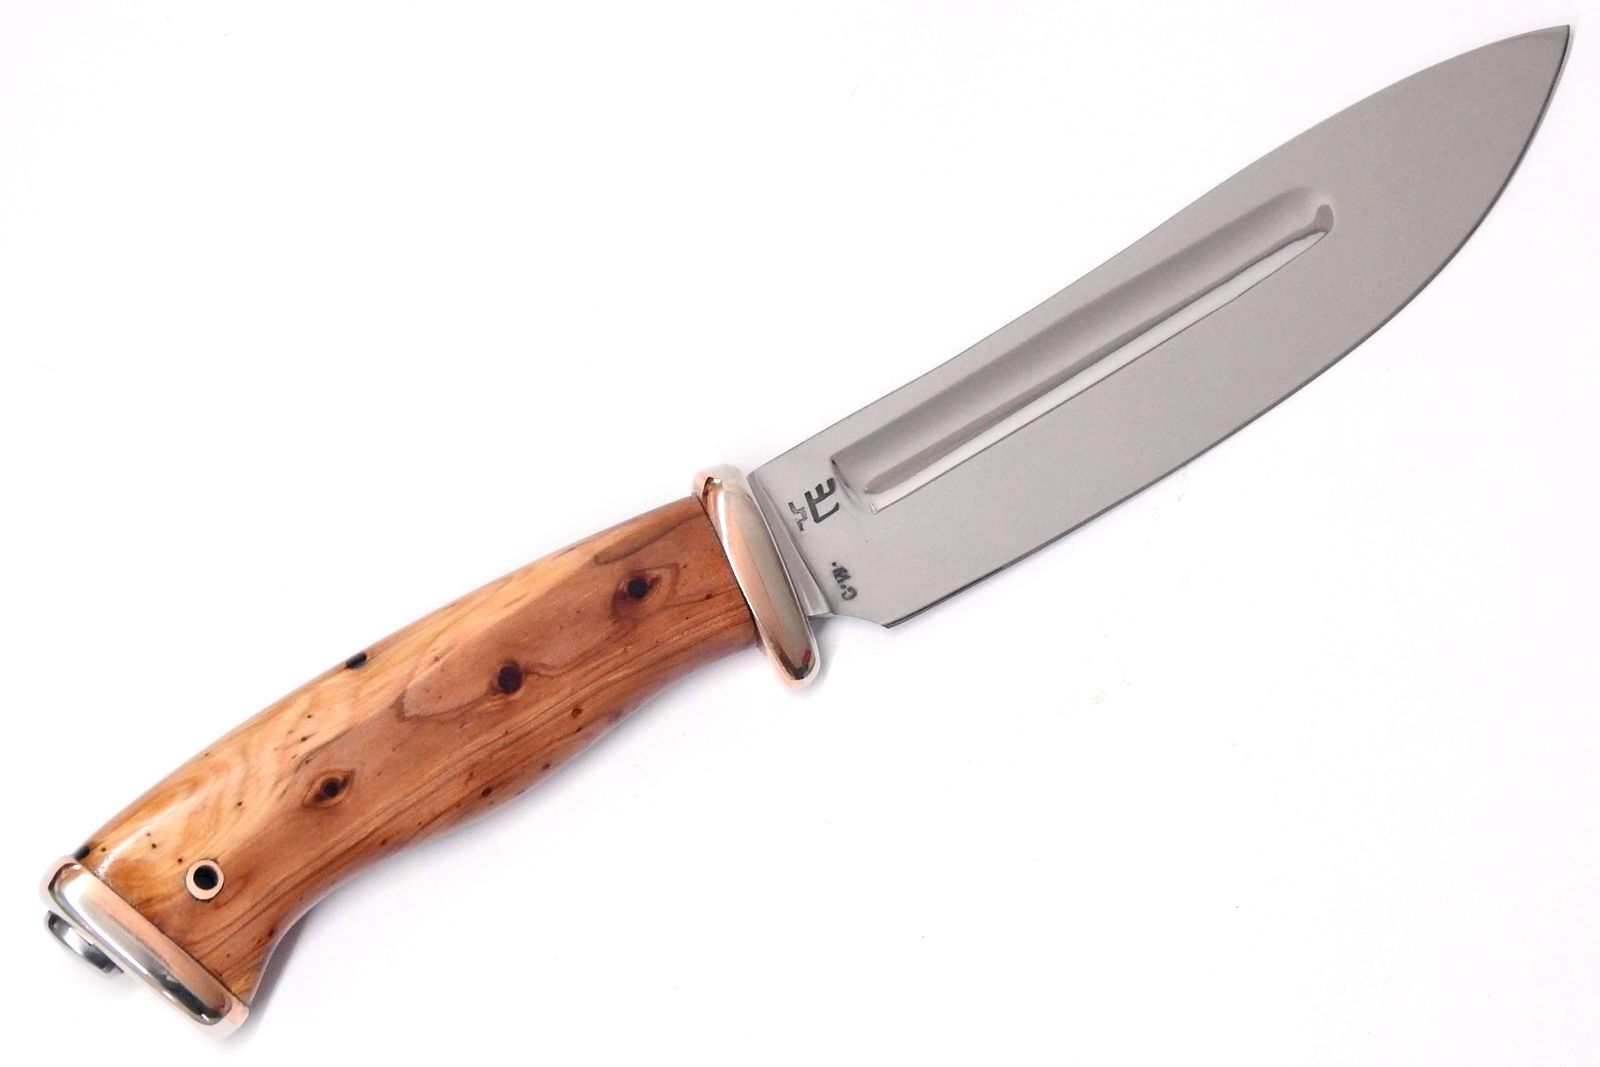
You have already seen the blade, twice. It is a big, fullered, mirror-polished, 5 mm thick at the base blade based on my working knife from a failed attempt at making a machete and a bushcraft knife that I have made for my friend. It has some issues – the fullers are not entirely regular and they are not symmetrically positioned, especially towards the tip. But it is a well-hardened blade and the geometry has been already tried and tested by both me and my friend and it is suitable for camping tasks, from preparing small firewood to cutting BBQ ingredients. So functionally, it is a good blade.
But the asymmetry was bugging me, so I have decided to make a visually asymmetrical handle too. First I have tried to use a piece of black elder, a light-colored wood with dark knots that I have thought would work nicely with the mirror polish. But that piece of wood failed me so I had to seek out an alternative
And I am glad it turned out that way because the alternative I chose was a piece of an old and gnarly juniper wood (probably Juniperus x media). Any piece of that has pretty much guaranteed stark asymmetry in every piece and it is a reasonably hard softwood (oh the peculiarities of the English language!) with very small pores, so it is suitable for small woodwork.
The wood also has two distinct colors – white-ish sapwood and reddish-brown heartwood and lots of small knots, which quite coincidentally ended up positioned in – in my opinion – aesthetically quite pleasing places, especially on the right side. It has curly bits too, so it changes in some places color depending on the viewing angle. My original intent was to make the fittings from pakfong with bone plates for color contrast, but I thought that a combination of pakfong and bronze would look better and would fit the wood’s color palette more. And when I see it, I think I was correct. The pakfong part was stamped out of 1 mm sheets but the bronze half had to be made out of 4 mm sheets simply because I did not want to spend another day making a second set of punches. But I probably will at some point if I make more knives in this design. I was thinking about whether to solder or glue the two halves together and I have decided to go with epoxy glue since I needed to fill the hollows anyway and the knife tang stops them from experiencing any great shearing forces so it should be fine. And if someone uses a knife like this instead of a hammer or tosses it into a fire, then, well, some conditions do not have a cure…
Anyhoo, enough of babbling, here are the pics:
© Charly, all rights reserved. Click for full size.

© Charly, all rights reserved. Click for full size.
It is a big, big boi. ~18 cm long blade, ~14 cm long handle, ~270 gramms. Balanced on the index finger but still packs a punch.
I did not make a sheath yet and I would like to ask you if you do not mind giving me some ideas to consider in the comments. I want to make something really fancy, keeping the two-color scheme. With a pocket for a striker and ferrocerium rod. Maybe some basket-weave with differently colored weaves? Or dragonskin?
I also need to find a suitable paracord, none of those that I have in stock fit the color scheme, I might have to go with a simple beige color.
Oh Charly, that really is a beautiful combination.
I think no to the basket weave, because it would be too regular, and so against the spirit of the whole knife. Snakeskin is a better possibility if you stain it right, what I mean is that real snake skin would have natural variation in colour density so you should aim for a little of that in your staining. And on rereading, thankfully before posting, I realise you wrote “dragonskin” -- I have no idea what that is like so can’t comment.
oh wow, that is really pretty.
Would making a “scabbard” out of the same wood as the handle, maybe with fittings to match the hilt/pommel be a possibility?
I really like kydex sheathes, but those aren’t pretty AT ALL, and would not fit with a knife like this.
I don’t know much about hard sheathes/scabbards, but I vaguely remember seeing one for a smaller knife, that had something like oil-soaked felt(?) on the inside, both to grip/cushion the blade, and also to keep it constantly coated in oil for corrosion resistance. Although, I could imagine a lot of problems with a set up like that, especially for outdoors use.
I also feel like I once heard something about mirror finishes being somewhat more rust/corrosion resistant for carbon steels than beadblast or tumbled finishes. I don’t know if it was just a surface area thing, or that there were less “crannies” or whatever available to retain microscopic amounts of moisture, or if it was something else.
You should absolutely be proud! Elegant and functional!
Such a beautiful knife! Yes, it is worthy of a really nice sheath. And I agree, you should be very proud, it turned out fantastic.
I saw one where it was not so much the stamping or carving that made the difference but a dye job that had very nice light to dark shading. Such a dye job might be really nice for this knife. Here is a link to a photo of one: https://www.rickhindererknives.com/product/the-emmett-handmade-leather-sheath/
I am glad you like it.
@Jazzlet, I think you are right about the basket weave. No matter what type of weave I make, it would be arranged in a regular grid and that would not go well with this knife’s curves. With “dragonskin” i simply mean some stamped pattern that would look like reptile scales.
@lochaber, a wooden scabbard would be nice, but I do not see how I could fit in it the striker and ferrocerium rod without it becoming too bulky and heavy. The steel is N690, so corrosion won’t be a problem unless used in salt water or exposed to some very strong acid.
@kestrel, that is a good look, but I have only seen it done in a video where the leatherworker had used an airbrush. That is not something that I have or can afford to purchase. Do you perchance know how to obtain a similar effect without it? When I have done a similar look in the past like on the knife with a roe deer head, I always had to have a cut and stamped boundary between the light and the dark regions, that way I can simply apply the dye with a brush/sponge/cottonball.
Charly could you get a graduated effect by using different materials that pick up different amounts of dye? Start with the material that picks up the least, then before the dye is dry do an area over with something that picks up more dye, repeat with something that picks up even more dye? I don’t know if the darkest part would just end up too wet or if there would be too much bleeding from the darker areas so everything ended up the same colour.
@Charly, #5: there’s a couple of ways to do that. One is to use a type of dye called antique dye, made by Fiebing, where it’s a sort of gel and is therefore not as immediately darkening but you have time to wipe off and burnish the high parts. They also make products that are a type of resist to the dye, that help to accentuate the effect. You can also use some different products made by Liquetex as shown in this video where they are doing an “ombrè” effect on some leather shoes: https://www.youtube.com/watch?v=ZBZ_Ki8OOYU&ab_channel=DeJesusCustomFootwear
It looks like that person has more than one video about doing a color gradation like that. I’ve also been able to get a gradation effect by getting part of the leather wet… it takes up dye differently when dry, and where the water has started to soak into the dry part you can get a gradation, but this is sort of hit or miss. Might be worth a try though because it does not require any fancy type of dye. Now, an airbrush might be easier and faster, but you can definitely do it by hand.
All of it takes practice to get what you want, but that knife is really worth it.
Great work, the habdle has a really cool variety of colours. A very good choice in my opinion.
Dragonskin would definitly be a looker for the big boi here but the other suggestions sound cool, too.
It is a handsome knife.
The knot furthest away from the blade on the right side is very much like a human eye. Once you see it, you can’t unsee it.
@kestrel, thank you for the tips, I will buy some gel dyes next time I am ordering leatherworking supplies. The supplier I am buying from has some in stock and that is good news. I will try a simple two-color look, without any stamping.
@Ice Swimmer, I did not realize that it is noticeable in the picture too. It is even more noticeable irl because of the iridescence of resin-infused wood.