
Irving Bacheller. Eben Holden’s Last Day- a-Fishing. New York Harper, 1907.
via: The Internet Archive
Irving Bacheller. Eben Holden’s Last Day- a-Fishing. New York Harper, 1907.
via: The Internet Archive

Annie S. Swan. Doris Cheyne; The Story of a Noble Life. Cincinnati, Cranston and Stowe; New York, Hunt and Eaton, 1890.
via: The Internet Archive
This tiny fellow was climbing the wall behind my computer screen today. These little buggers are difficult to photograph because in addition to being tiny they rarely stop moving.
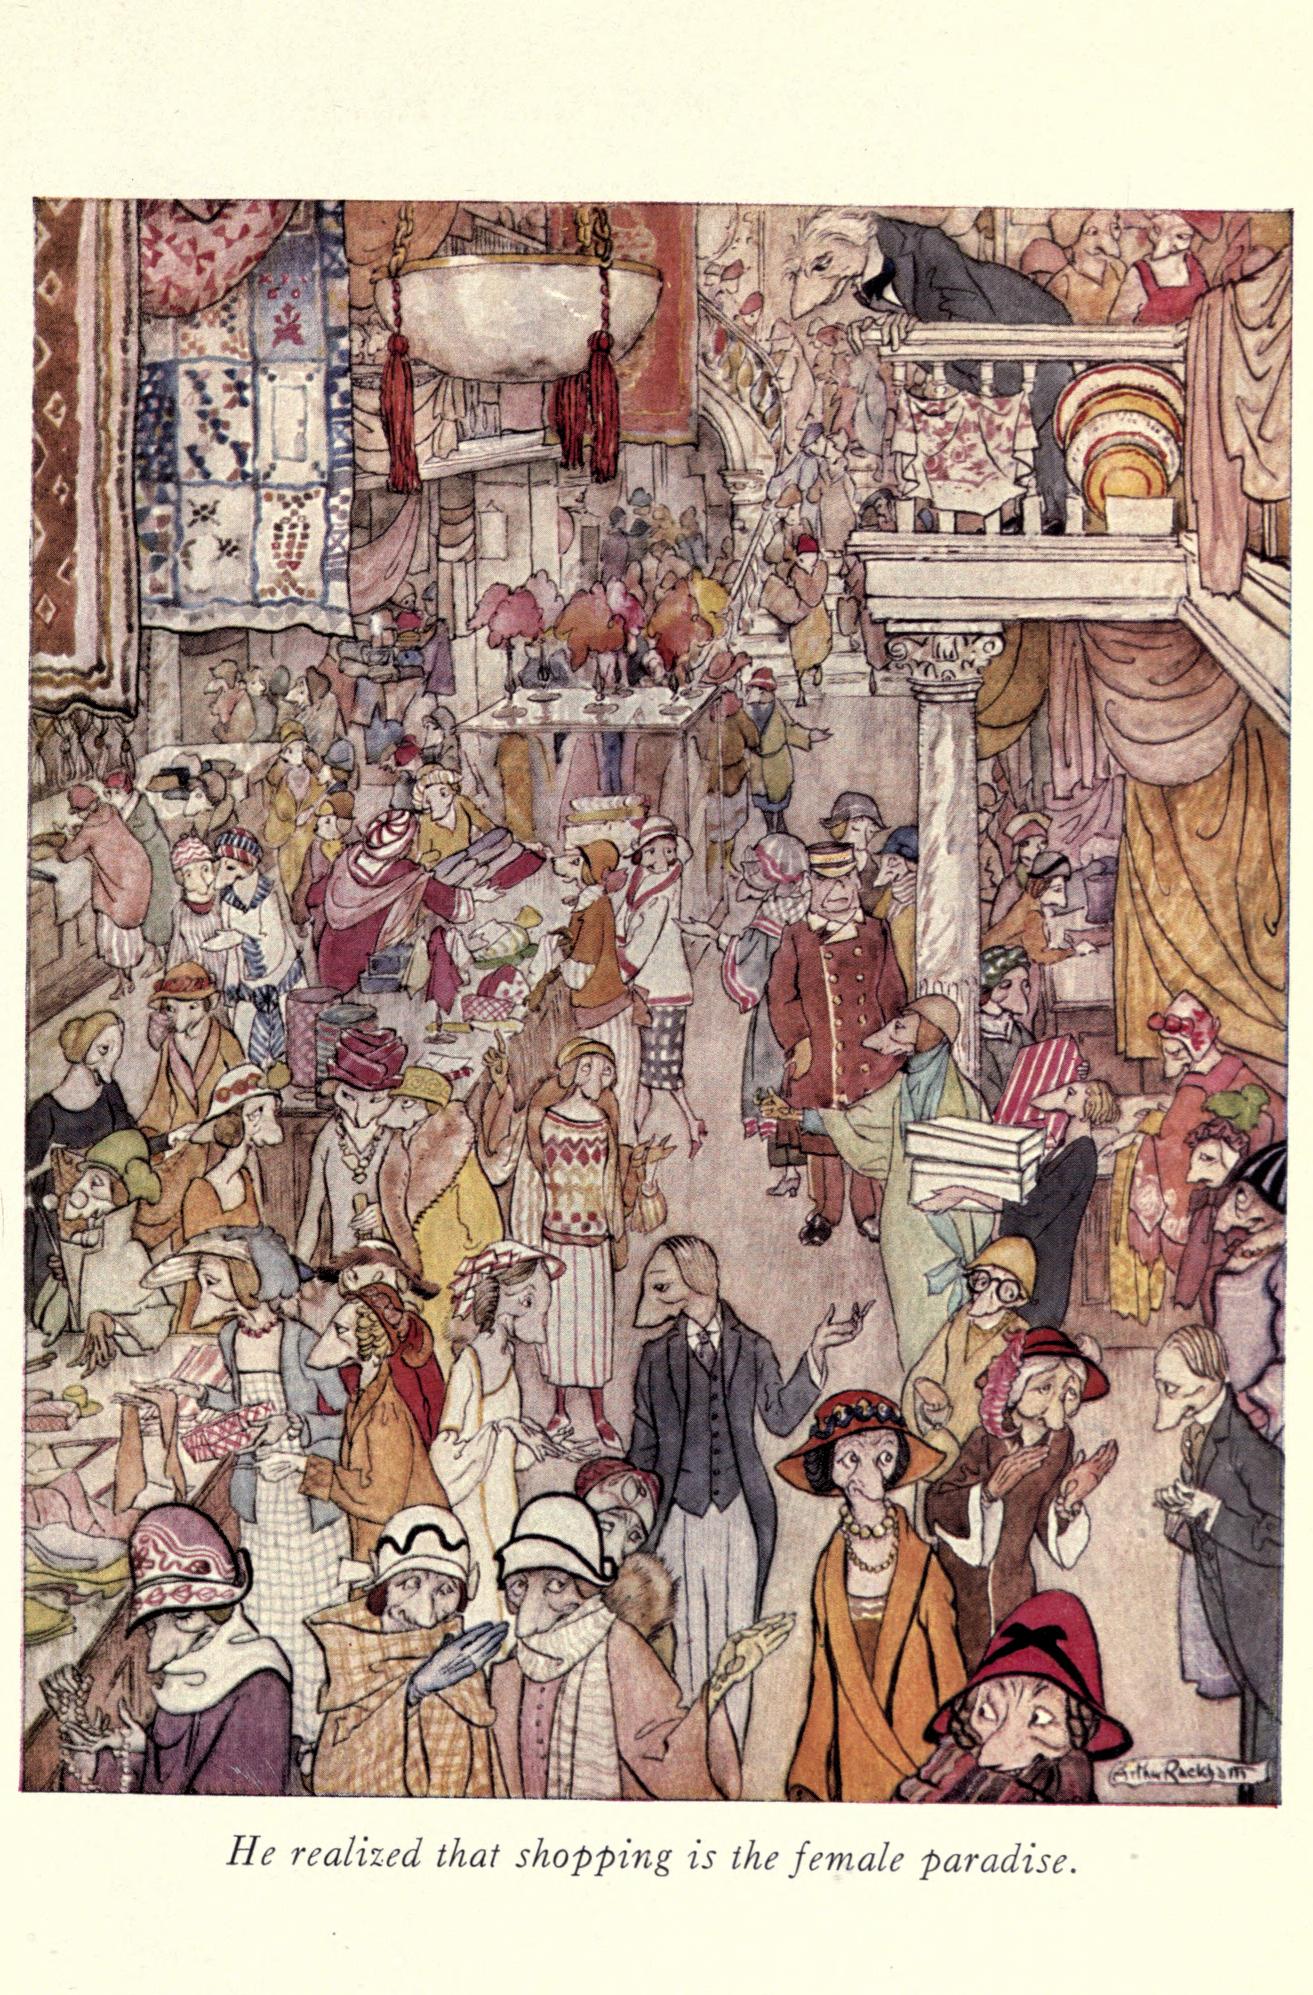
More allegory than a fairy tale, this book is a delightful dog story filled with the imaginative and charming artwork of Arthur Rackham, one of the great artists of the golden age of book illustration, which lasted from about 1880 to 1920. There are many line drawings throughout the book, but only 4 full-colour illustrations, all of which I’ve attached. Enjoy.

Christopher Morley. Where the Blue Begins. Illustrated by Arthur Rackham. Philadelphia, Lippincott, 1922.

Frontispiece, Where the Blue Begins.

Page 28, Where the Blue Begins.
Page 92, Where the Blue Begins.

Page 148, Where the Blue Begins.
via: The Internet Archive
Cover Photo via Abe Books
Tomorrow you will get a break from this project, I promise. But today, the Great Flattening from yesterday has continued.
After some deliberations I have decided to try and go for fully blackened brass fittings. That means that the blade will be dark grey, and the fittings really, really dark gray. What kind of handle material should I use? Marcus has sent me a nice piece of stabilized spalted maple, but I do not think it is the right material for this project. Ditto, any of the dark woods that I have. I think the blade deserves the poshest material I have available – bone. I think it will provide a nice contrast to the dark metal.

© Charly, all rights reserved. Click for full size.
Which meant I first had to rough-cut the scales with a hacksaw, which is one hell of a job, let me tell you. Bandsaw or any electrical saw is a big no-no for cutting bone, this has to be done manually. Including pre-cutting he flat sides, before grinding them truly flat.
Thus I had to spend the whole working day with a respirator and my fingers are all sore now. Because the grinding had to be done manually too. Belt sander does work on bone, but it destroys belts way too quickly for my liking and as I learned in the past, these thin flat pieces would have a tendency to be dragged out of my grasp, increasing the risk of injury or bungled work. So flatstone+glue+sandpaper it was. Maybe after I build myself a disk-grinding attachment this work will be easier, but now it is not.

© Charly, all rights reserved. Click for full size.
The scales are ever so slightly bigger than the tang and thicker than the bolster now, and they will remain so. I do not intend for a flush fit, but for a proud one ( I have seen English-speaking knife-makers refer to it as “heirloom fit” although I was not able to find anything specific about it, so I am not sure that is the correct term).
The principle is the same in carpentry – whenever two surfaces join, you can make the joint either hidden or visible, but it should not be visible because you failed to hide it. So if you make it visible, it should be apparent that it was intentional. Like gluing in spacers, making the surfaces meet in a groove and not on a flat, etc.

© Charly, all rights reserved. Click for full size.
Today’s work ended in the kitchen, where the two rough-ground scales ended in a pot at 60°C for an hour or so with circa a teaspoon of washing soda and one spoon of washing powder in 1 l of water to dissolve and wash out as much of remaining fat as possible. In the end I have added a teaspoon of hydrogen peroxide to whiten the bones a bit, although complete whitening is not possible on these.
Tomorrow when they are dry I shall fill the hollows on the inside (where marrow used to be) with epoxy to make them flat. After that, I can start the remaining works, i.e. fit and polish the pommel, drill all the holes, and finally, the glue-up. We will see how that goes.
Today I have started the work on the handle, starting with brass fittings. First I have cut four pieces of brass, two for the bolster, two for the pommel, and I drilled 2,5 mm holes in the bolster pieces. On the left piece, I have then cut M3 thread and on the right piece, I have widened the holes to 3 mm.
For pins, I am going to be using a 3 mm brass rod. I cut 4 small pieces and on each, I have made a bit of M3 thread to go into the left side of the bolster (and later on the pommel). The M3 threads are, strictly speaking, unnecessary, but I find they help with two things. First, they help to keep track of which part is left and which is right, so I do not confuse them at some point and make a false cut with a file. Second, fiting the two halves together is easier, because the pins hold fast in place and do not fall off when manhandling the assembly.
I guess these preparations should not take me too long. They took me over five hours. The drilling, cutting etc was not the biggest issue. The biggest issue was the tang. During polishing of the blade it became noticeably thinner, and because the polished area bleeds over to the tang, the tang was not flat anymore – it was a few tenths of a mm thinner at the bolster. So I went and flattened it on a stone.

© Charly, all rights reserved. Click for full size.
As you can see, the tang has relatively deep gashes cut into it with the edge of the grinding wheel. Those are there for three purposes – they reduce the weight, they provide a good grip for the epoxy later on, and they reduce the area that needs to be manually ground off when making the tang flat.
Even so it took me a lot longer than it should have because I did not have the correct sandpaper readily available. What you see here is green corundum, which should be used only dry and only for wood. I have to buy very coarse wet & dry sandpaper, but I keep forgetting and the coarsest I have in stock is 120 grit, which is not nearly enough for this.

© Charly, all rights reserved. Click for full size.
And this is where I am now. Next, I will polish and finish the front side of the bolster but not assemble it. Then I will make the handle scales, fit and drill those, and only after that is done I will drill and fit the pommel part. I have not decided yet whether or not the pommel needs a hole for a lanyard.
The way things are going, I have still quite a few days of work ahead of me.

Barry Pain. Another English Woman’s Love Letters. New York & London, Putnam, The Knickerbocker Press, 1901.
Kestrel mentioned some commercial blackening compounds containing Tellurium and that train of thought sent me down a path of thinking whether I do or do not have some chemical compound containing sulfur anions, which too react with copper to make a black color. And I realized that I do because a solution of polysulfide is sold as a common fungicide. It does not work on brass directly, but if that brass is first coated with copper, then it does work. So I did exactly that, and voila! It takes a long time, but it works.

© Charly, all rights reserved. Click for full size.
It is not pitch-black, it has a bit of bluish-grey tint to it, but under a coat of wax or lacquer, it would be a lot darker. I consider it a definitive success.
I am wondering whether it would be possible to make pictures on brass with different patinas. As a kind of colored etching process. I do not see a reason why that should not work.
I haven’t seen the whole video yet – it is a long one – but I am posting it anyway. I have checked her Instagram and Twitter accounts as well and she seems to be a real SJW on top of her craft. I think she would fit right in here.
Well, I’m working on a somewhat bigger project, but there’s always some side projects you can do. First is two bracelets:

©Giliell, all rights reserved
A matching one for the Archipelago Necklace, though the upper band turned out a bit too thick

©Giliell, all rights reserved
The other one has got blue and gold pieces in it. Sometimes I just pour leftover resin on a silicone mat and swirl the colours around. Then I cut up the result when it hasn’t hardened completely and use the pieces in other projects.
So much for the fun…
… now for the failure.
I wanted to make a freeform dish/sculpture with seashells and lights. What I didn’t consider was that it’s considerably warmer now than it was when I made the last ones, which means that the resin cures much faster. So I poured my resin in the evening and tried to form it the next morning, but it had cured so much that it would no longer bend but tear.

©Giliell, all rights reserved
Fuck. And it was soooo pretty. I have some ideas to recycle at least part of it.
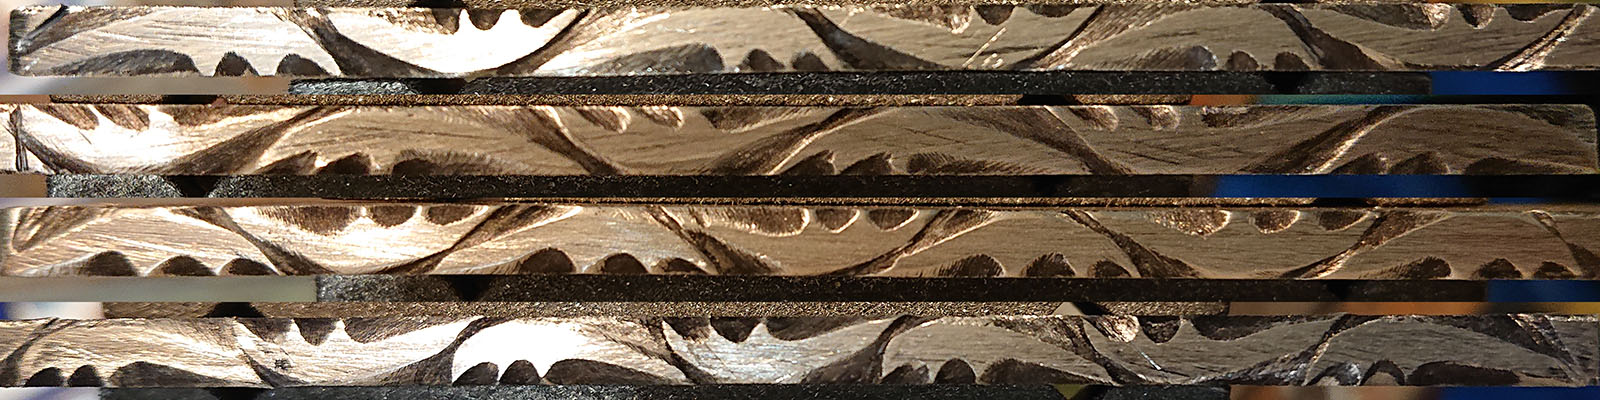
I want this knife to be special because the blade deserves it. That means not only patined fittings but also decorations. So I have decided to do some filework – definitively on the tang spine and possibly the belly too.
However, I did not do a lot of filework yet. I did some, but that was twenty years ago and not only was it rubbish, but I have also already forgotten everything I learned back then.
So I am in this conundrum – I really want to make something I know I am not good at making. So I have decided to do today a practice day. I took a piece of mild steel, ground it to roughly the thickness of the tang, straightened it and I went on to figure out the hows and whats.
© Charly, all rights reserved. Click for full size.
What you can see here from top to bottom is a progression both in time and (I hope it can be also seen) in quality. The top one took me over two hours, the last one under one hour. Whilst the photo magnifies all the little imperfections to an unreasonable degree, there is still definitively a lot of space for improvement, some issues are still visible even at arms-length viewing distance.
I am bloody nervous about doing this because if a file slips, there is no way back. It was a huge problem for the first three patterns actually – establishing the first cut was the biggest issue I had. Files have angled teeth and they cut best when drawn perpendicularly to the edge. When you run a file at an angle, not only has it a tendency to slip and wander off, it also behaves differently when used left-handed as opposed to right-handed. Once the cut is established, all these problems are a lot less pronounced, but establishing that first cut precisely where you need it to be and at the right angle is a major PITA.
For the fourth pattern, I have finally found out how to best establish that initial cut. I have a beat-up knife made from an old saw blade in my workshop, that gets used for all those jobs a knife is good for but simultaneously not advised for. Like putting the edge on a piece of steel and hitting the spine with a hammer, to establish a cut line in the metal surface. Which is what I did here. Essentially like a center-punch for drilling. And just like center-punching prevents drill bits from wandering, line-punching prevents files from doing the same.
Now to beat my anxiety and to convince myself that I can do this…

Source Unknown. An English Woman’s Love Letters. Chicago, Donohue Bros. (190-)
