Supposedly, “osoraku” is an old Japanese word for “perhaps.”
Kiyomari Minamoto chiseled just that word onto the tang of a dagger he made, in 1830-something. [more on Kiyomori]. As my sensei said, “every smith wants to make one, and they usually only make one.” I promptly asked him if he’d made one and he smiled, “several.” Just to make sure I am properly humble, this is what a masterpiece looks like:
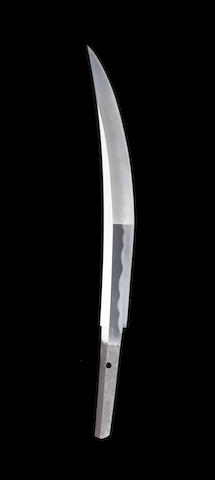
[source]
Anyhow, that’s a quintessential example of an osoraku dagger, and now I feel properly humble.
The yokote, that distinctive grind-line that defines the transition-point between blade body and tip, is something I do not know how to do. Apparently you polish the tip one direction, and the body another, and the sharpness of division must be absolute. Japanese blades are a special thing because of the mindset of the smith: there is nothing you will not do, to make it better. They’d all sell their souls, if there were devils buying.
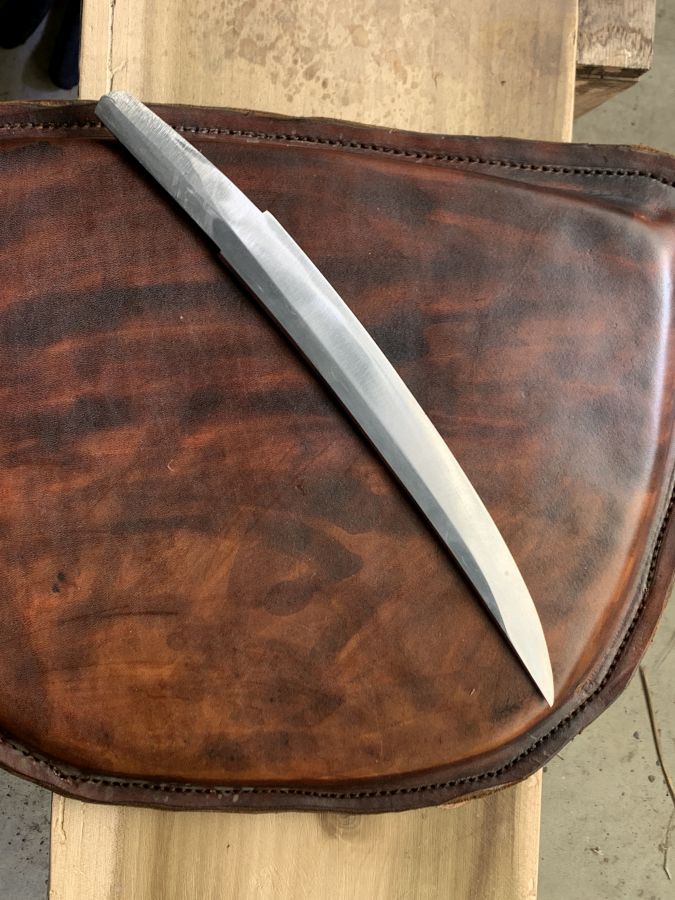
Enough on that. This is my version. It still has a long, long way to go. But you can start to see the temper-line peering out of the steel. Someday maybe I’ll live to see it fully developed. Perhaps!
So, a few more things about this particular blade – it’s made of “oroshigane” – “shop metal” – which is a Japanese thing resulting from the island’s general lack of natural resources. There’s iron sands and that’s about it, so traditional smiths would build a smelter (“tatara”) and cook down iron sands in charcoal, resulting – after about 4 days of shoveling charcoal – in a smallish dribble of liquid steel that could be consolidated into a bar, then folded, welded, folded, welded many times to distribute the carbides through the bar. The Japanese did not do this because they wanted to – it was material shortage. But the results are amazing, by the time the steel is consolidated and the carbides are evenly distributed in it. It’s called “tamahagane” (“jewel steel”) and it has a glittery sparkly interior to it that is worthy of the name. Tamahagane is ludicrously expensive and you will not find a Japanese smith who will knowingly let tamahagane off the island. There are, of course, Americans and Europeans who specialize in making tatara but I think it’s a total of about 5 people doing that, so the Ameri-Euro market for tamahagane is far from flooded.
We stood around for about 5 hours while the propane screamed and the fan whirred and the crucible charged with pure iron, a few nails, a drill bit (for the vanadium) and a bunch of charcoal (for the carbon) glowed yellow-white. Then we called it a day and the next morning we uncorked it and spark-tested our foamy little chunk of steel. After that, 13 folds and welds later, it was chopsawed into 4 pieces and a piece given to each student to form a knife with.
Fun? Oh hell yes, I know how to have fun.
I’m probably going to get a professional to polish my osoraku because it’s worth it, and I don’t know how to do the yokote right. Sword polishers today have 2+ year waitlists, so my blade is on one, but I can still mess with it until that time. And the polishers don’t mind if you cancel, because it’s not like they are looking for work.

oroshigane
I could write 20 pages about what you’re seeing, there. Notice, for example, that the scratches run front-to-back and at an angle. And there are other scratches near the edge that are at a different angle, still. Those tell where the grinding action is removing metal and where it’s not. You have to remove all the scratches from the previous angle, or you’re just wasting your time because – for example – a scratch from a 120 grit abrasive is deep enough that you can spend days with an 800 grit abrasive trying to get it out. If you did, then, of course the whole blade is now polished at 800 grit (mirror polishes begin around 3000) But if there’s a scratch at 800 grit, you will never get it out until you drop back to 220 grit, polish it out, then walk back to 800 grit through 400 grit, 600 grit and finally 800 grit. There is no optimism, no negotiating with the steel. You have to do it the right way or you’ll end up with a blade that looks good except there is this one glaring scratch.
Anyhow, that “watering” look is the “gane” or wood grain, resulting from the 13 folds and the varying carbide formation as the metal was hammered over and over. Contrary to anime legend, that does not make the blade better or stronger. What is going on is that that is the way you make a good strong blade if all you have is iron sands or some iron, carbon, and a drill bit and a broken bourbon bottle.
So, when you’re charging the crucible with its contents, you want to keep oxygen out so it doesn’t all oxidize in there. What do you do? You break a bottle and put chunks of glass in with the materials. As the iron/steel melts, the glass floats to the top and makes an air seal. It’s also a great indicator: if the glass is melted you hit at least 1700F, which is 800F short of the goal of melting the iron, but it’s an indicator of something. This technique, incidentally, was used by everyone it seems: there are old viking smelting sites with little middens of ancient molten glass which make them pretty easy to date because the glass traps all kinds of good stuff for isotope analysis. Filling a crucible with iron or steel and covering it with glass and melting it into a hockey puck is how steel-making was done for a very long time.
Think about it: steel was the military technology for 1000 years. First and foremost, the technique spread quickly. So did the steel. Isotope analysis has found some 9th century Viking swords have steel in them from India. For that matter, you have probably heard of “Damascus steel” and I bet you can guess where it came from…? That’s right! India! Seriously. But there were some smiths in Damascus who were the ones who really studied the process and appear to have figured out what was going on with the smelt-downs. The technique is called “wootz” (“oroshigane” if you’re Japanese) (“bulat” if you’re slavic) (“fuck this!” if you’re a viking) etc. The original “damascus” steel looks a lot like that polished region of osoraku in the picture above. Before the Victoria and Albert re-arranged their displays, you could go to the Japanese section and look at Koto-period tachi blades, then go down the hall and look at a Persian shamshir by Assad Ullah, and the metal looks the same. The Persians went with thin blades that were completely hardened and tempered, and it appears the differential hardening the Japanese do is unique.
There are several slavic smiths on youtube that specialize in bulat – Dmitry Shevchenko in Ukraine comes to mind – but it’s a new technique we call “cannister damascus” You take a piece of tube steel and weld a bottom onto it, spray the inside with any paint containing a lot of titanium dioxide, and fill it with powdered steel and scraps of whatever, then weld a top on. You now have a little crucible that ought to be anoxic, and you can set the weld by squishing it while it’s hot. In principle you should be concerned with the possibility of squishing it and having a squirt of molten white-hot iron come out, but you don’t need to get to melting-point this way, you just need to get it thoroughly up to welding temperature and then press it. I made that motorcycle chain cleaver 3 years ago (omg! was that 3 years?!) using this canister technique.

These days I weld the lids with stainless steel stick welding rod, so I can tell if I’ve got any wandering stainless steel sticking into my block that I’m creating. Oh, and the titanium dioxide paint: it’s like “anti-weld” – it keeps the stuff inside the can from welding to the inside of the can. The old way of doing this was to just laboriously grind the can off. Then someone started painting the inside with white-out. Then I posted on the bladesmith forum that “white out is just collodion and titanium dioxide. the collodion is nitrocellulose and that’d burn off so …” and I tried a can with Killz spray-paint and now white out sales have mysteriously dropped. I feel like I was involved in the ancient bladesmith’s art of trying to make it a little better all the time.

One other thing: that is the kind of tang that you find on a man-killing knife. The stress on a blade of actually chopping an armored guy, or hitting someone’s pelvis, is extreme. When you look at something like the garbage knives Hollywood often promotes, it’s really funny to see the little piece of steel connecting the handle to the blade. Sure, that’s great, Rambo, so long as your objective was to break the blade off in the person you stabbed. It is the over-the-top ruthless practicality of Japanese weapons that first attracted me to them. Also, my osoraku blade is about 3/8″ thick at the spine. There are forces that could break that easily, but they won’t occur under normal stabby action.
Interesting. Thanks, Marcus.
I have used titanium sunscreen on my nose during those times I was out in the sun every day for long hours. Is the titanium in that product also titanium oxide I wonder?
A quick look of sunscreens at Amazon and Target shows zinc oxide and titanium oxide. So not the same. It was fun to think about.
Your osoraku blade is really beautiful. I can see the first photo you posted of an osoraku is stunning, but yours has its own beauty.
I do not envy the sword polishers. Although it must be amazing to see that grain start to come out.
having polished a couple of blades with hamons i could see sword polisher being a really satisfying job. a lot of hard work, and requiring a lot of focus and skill. sadly it seems like the sort of thing you have to dedicate your life to.
I don’t think i like the yokote, i think the blade would look better without it. The overall profile looks cool. Your one looks cool too
@ seachange
Yes, titanium oxide is often in sunscreen too
All the history of Japanese iron smithing is fascinating, and the blade looks pretty amazing IMO. I spotted the gane effect straight away, well done!
The mention of Viking swords and tangs made me go look at several Viking swords.
They have very small diameter tangs, which would have been wrapped with leather. It seems like a rather lightweight sword which wasn’t really designed to cleave bones. They are meant to dance through the air at great speed and slash throats, decapitate, or disable the sword arm. . For skull bashing the battle ax or a mace was preferred. Swords were expensive and rare, but everyone had an ax and a polestaff.
The Varangians were elite Viking warriors from modern Sweden, who were employed by Byzantine era Emperors. I’m sure I read some Roman historian that wrote about how iron smiths from India were specifically brought/abducted to Damascus in order to produce ‘Damascus’ steel.