Mold-making can be a pain in the neck. And it’s a truism in the model-making community that the better you are at mold-making the better your objects will look. So, it’s not uncommon for good casting artists to spend an inordinate amount of time on their molds.
Probably the first big secret in mold-making is to understand what the mold is for. Are you going to cast plaster in it, or concrete? Will you be casting wax or resin? Are there a lot of undercuts and how do you arrange the object in the mold so that it will tend to cast cleanly. Or does that not matter so much?
The basic mold technique is a block mold: you stick your object to a base (so it doesn’t float up if it’s lighter than rubber) and put some kind of frame over the base, then pour it full of silicone or polyurethane rubber. When it hardens, you take a sharp knife and cut a slit down one side until you can remove the object. Then, you cut a funnel (to pour the material in) and tie the mold back together with string, pour the material, let it cure, and demold. Done! Very simple. 90% of the molds I’ve made are that type.
Sometimes you need to do an object in 2 castings, and then you need to think in terms of a mold where you can cast one part of the object with the mold open, close it, and cast the other half. Or something like that. For about a year I’ve had a design for a Pimp Hammer on my bench – I have lovely wax castings of the hammer head but the handle was elusive. So, I decided to do a patient mold.
Typically for a two-part mold, you embed the object halfway in clay up to the part-line. Then you pour the mold material and let it cure, flip it over in the mold, remove the clay, apply resist so the mold doesn’t stick to itself, and pour the other half. Then it should separate cleanly on the part-line where the clay was. It’s a monumental pain in the butt to do all the stuff with the clay. I know that serious mold-makers do it all the time, and are very quick about it, but I hate that part. So this is how I do it:

First, you make a mold box that’s about the right size. You want it roomy enough that there will be a fair bit of mold around the object, but you don’t want to spend a lot of money on expensive $150/gal rubber. I make my mold boxes out of various things, in this case some lightweight ABS plastic scraps that I did a quick and dirty slice-up on my table-saw. I hold them together with fiberglass-reinforced strapping tape, and am careful to keep all the tape on the outside because once there’s rubber in the box it’s a lot harder to get the tape off under the rubber. If the tape is on the outside you can just slice it apart at the corners. When I use a mold box I cut the corners, flatten it out, and store it in my drawer of mold-making stuff in case I need a box that size again.
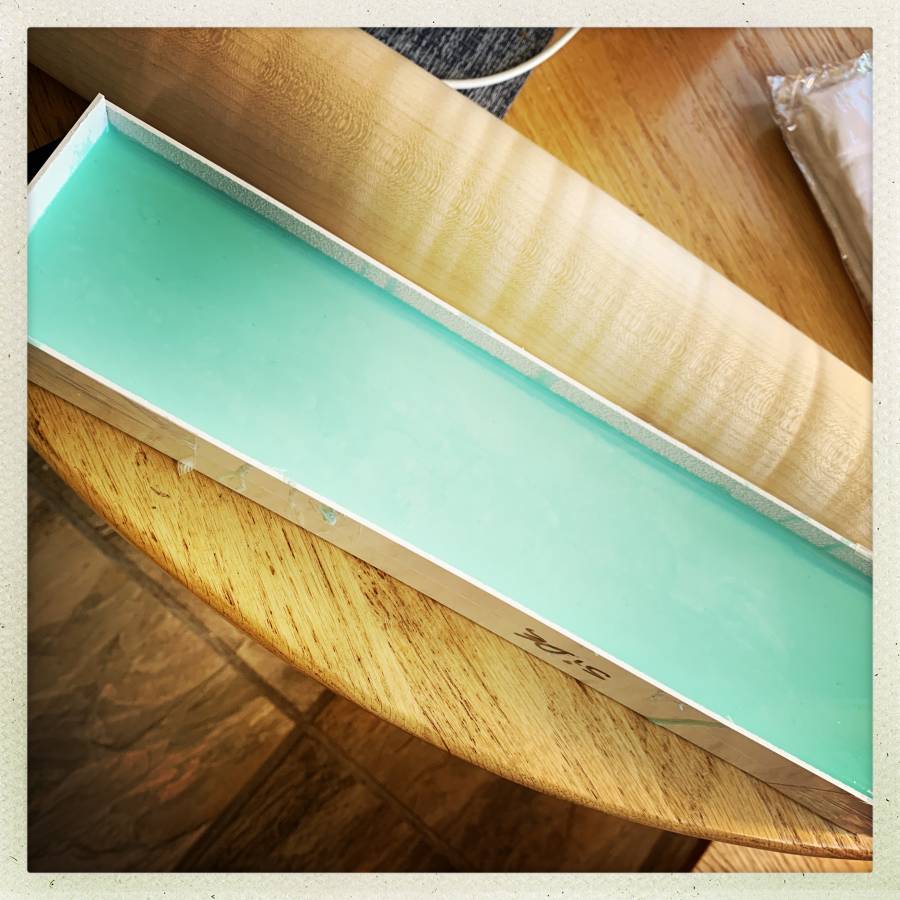
Then, you decide how thick the mold will be on the sides, and pour that much into the box and let it cure. That’s the bottom of the mold, now. Doing this takes virtually no effort but consumes a day while you wait for the silicone to cure.
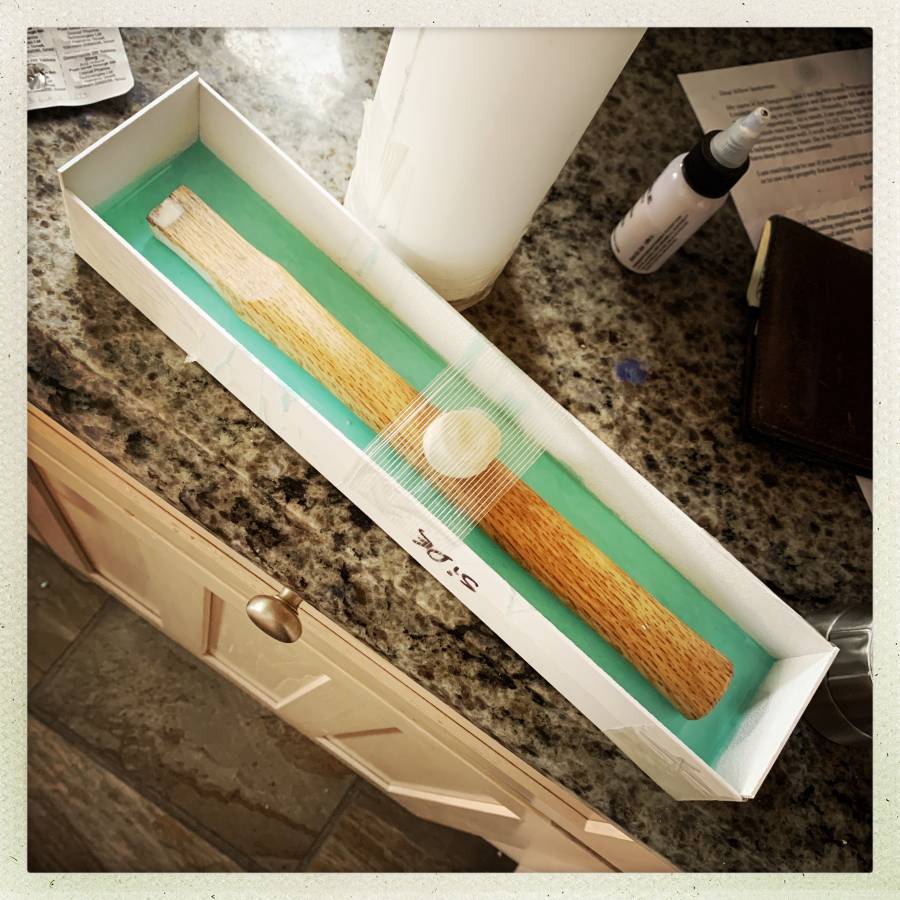
Then you position your object in the box, attaching it down if need be. Since the wood of the handle is lighter than the silicone, it’s necessary in this case. Modeling clay and strapping tape provide an adjustable top-down attachment. Also, you can see there is modeling clay on the handle at the top – there were some flaws in the wood that I’m fixing in the mold by just claying them up; editing the mold. If I wanted “love bumps” on the handle (I thought of that) I could add them using clay before this stage of the process. Adding clay to edit objects is a tremendously fun thing mold-makers do – you can easily produce “object mashups” that are quite entertaining. I.e.: now is your chance to put a clown nose on Robert E. Lee for that bronze statue you’re making.
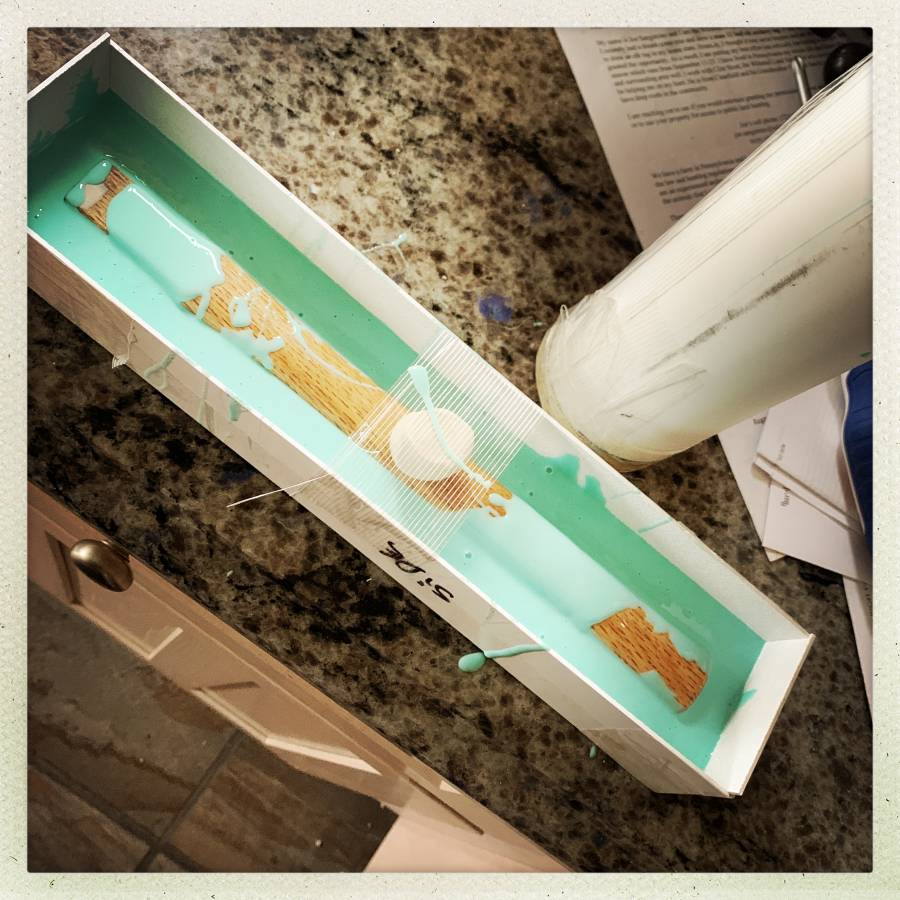
Pour the liquid rubber in to where you want the parting-line to be. Make sure you tilt the mold as you fill it, to drive any air out from under your object. At this stage, things can get quite messy.
The good news is that all the over-pour can just be trimmed away with a sharp knife (kiridashi or scalpel) when it’s cured. So don’t worry too much if it looks like you threw up into the mold box.
In this example, since I want most of the handle to come out during the first casting (I’m going to position Swarovski crystals in clear resin and I want to do the first pour with the top off so I can fart around in the resin) I’ve offset the object where the part-line is going to be. If there are a lot of undercuts and such this process may not work or you might have to do the orientation vertically. Another trick I’ve seen done for undercuts is to paint the object with rubber to fill undercuts and make a god awful mess, then complete the pours.
So far, this process has consumed 2 full days – one day for each pour to cure.
Since silicone does not stick to anything except silicone I have also seen a variant of this trick in which you use alginate for the floor and first half pour, then when the silicone is cured, flip the mold over, tear the alginate out, dry it with a hair dryer and pour the second half. That saves you a day, if what you are molding is one of the original Maltese Falcon props and its owner might come home and notice it’s missing from their safe.
Not shown is the object clean-up and resist application. It is crucial to know what is compatible or incompatible with your molding material. For example, the resist for silicone is vaseline. The resist for polyurethane is silicone oil. If you use silicone oil to resist silicone you get a solid weld.
In this case I carefully smeared vaseline all over the exposed face of the second pour. Don’t worry about the object – silicone won’t stick to it and the vaseline would remove detail – just keep the overpour silicone from sticking to the built-up silicone base.
So now we’ve consumed 3 days of clock-time but spent very little effort aside from some rigging and mixing silicone. Doing the whole rigamarole with the clay is effort-consuming but saves 1 day of clock-time.
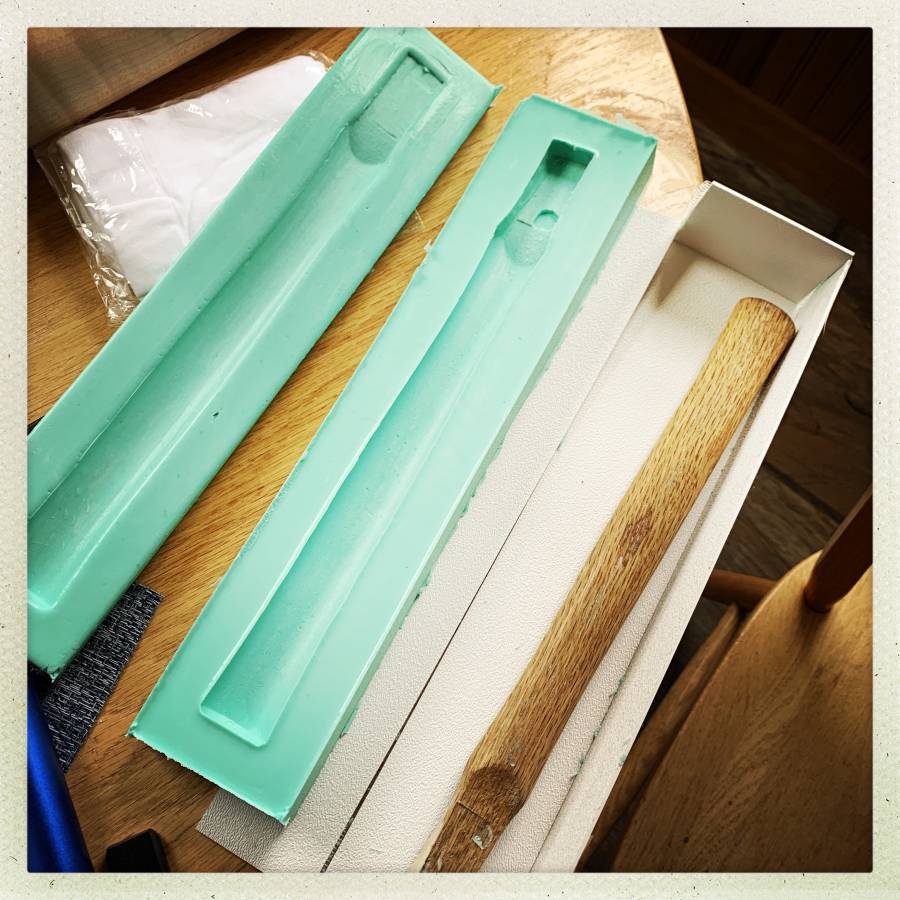
As you can see, I screwed up a bit: there’s a big bubble on the top of the handle. When I start casting it, it won’t matter since I’m going to have to sand the bump off to get it into the head of the hammer. Before, I discussed using clay to add material to the object – now that we have a mold we could add clay inside the mold (hard to get things to stick to silicone!) that would remove material from the cast object. I am too lazy to do that sort of thing but it would be possible to thoroughly clean the silicone of vaseline and use silicone caulk and a little spatula to fix that right up.
So the plan is I’ll fill the deeper side of the mold with resin, let it gel and add Swarovski crystals, push them around a bit with a toothpick, let that side cure, then I’ll cut a pouring-channel in the top piece, tie the sides together with twine, and pour the top-off load of resin in. If I want the crystals to sit in the middle of the hammer handle I’ll do 3 pours: a ground layer (thin) a bulk layer that I’ll add the crystals to, and a top layer.
I don’t have cats. If you have cats don’t leave sticky resin open on your counter-top. They will get hair in the resin, or maybe the whole cat, depending on the curiosity of your particular feline.

Another technique that’s fun is to assemble objects then make sand molds and go directly from object to mold to poured metal. That requires a great deal of infrastructure to pull off, though. When I used to go to craft fairs there was an outfit that called themselves “Max Cast” that did whimsical works in iron. [maxcast] I loved their stuff but it was out of my price range. And now they don’t do much anymore. But, I believe Max Cast are the inventors of the much ripped-off “lawn gator” and other quirky designs.

Interesting. I do hope to use someday the things that I learn from you.
At work we used to do silicone casting for prototypes (this was before you had lots of specialized companies doing that).
After mixing the silicone, we degassed the mixture in a vacuum chamber. After pouring, the mould was degassed again.
(The same vacuüm chamber was used to mix and pour the casting resin in a vacuum.)
Such a big professional vacuum chamber is quite expensive.
But these days you can get vacuum degassing chambers for around US$ 100 on amazon. For $150 you can get one complete with a vacuum pump. I don’t think the ones from amazon would stand up to professional use. But for a hobby they’re probably fine.
I doubt that I would ever work with resin, but I do have cats. However, my cats DO NOT get on my countertops or tables. Two of them are too old or fat to get up there, and the youngest one knows better. But I would probably shed some cat hair because it is ubiquitous in my house and on my clothes.
Maybe you should make the handle out of CHRP? (Cat Hair Reinforced Plastic)
That is one natural resource that cat owners tend to have in abundance. :-)
rsmith@#4:
Maybe you should make the handle out of CHRP? (Cat Hair Reinforced Plastic)
Old plaster and lath walls used to have horsehair blended in the plaster to reinforce it. So why not?
I had an older cat who was an experimental physicist. If he saw something near the edge of something he’d slowly ooze over there and then nudge it off with a paw. Then he’d look amazed and satisfied that he was still in a gravity field. A cat knocking over a mold full of resin and the resin curing on the floor – that was the cat disaster I was imagining.
rsmith@#2:
But these days you can get vacuum degassing chambers for around US$ 100 on amazon. For $150 you can get one complete with a vacuum pump. I don’t think the ones from amazon would stand up to professional use. But for a hobby they’re probably fine.
I have one but I mostly use it for getting the air out of bog oak so that resin will soak in. I don’t know why I don’t degas my silicone – probably just laziness.
Marcus Ranum@5,6
If I had a home workshop where I worked with resin, I’d definitely keep the cats out. Otherwise there’d be a sticky mess waiting to happen! And basically the only way to get curing thermoset resin out of hair is a pair of scissors.
I forgot to say that I’ve only tried degassing with polyaddition type RTV silicones. The polycondensation types would probably keep bubbling. And of course you need a silicone with a sufficient open time to do proper degassing. I’d usually add a little bit of retarder if I wanted to degass and pour say 10 liters of silicone.