My friend Jenna sent me a care package of bones. I immediately started putting them in mold boxes and pouring silicone.
These are basic open mold investment castings. To make these, I am keeping one whole side of the model open to the air; it means I have a lot less to worry about regarding pressure buildup and steam explosions, etc. I’m pretty comfortable with that, really – exploding splats of molten silver sound like no fun at all.
Investment casters use a steel “flask” that they position the wax model in, then surround with plaster (“investment”) then they heat the flask until the wax soaks into the plaster leaving a hole. You then pour molten metal into a port that leads to the hole. For 360-degree objects instead of open molds like mine, you need a centrifugal pouring system or a vacuum system to suck the metal into all the corners of the mold. I’ll be doing vacuum molding eventually, as soon as my hot shed it done and I can build my casting table. In the meantime I am really happy with the open molds, though let me mention that those can be mighty intimidating when the silver starts bubbling and hissing and I run across the room and hide, wondering if it’s going to belch at me.
I got a couple of feet of steel square tubing (3×3″, 4×4″ and 4×6″) and let Mr Happy Dancing Bandsaw turn them into flasks of varying depths. It’s really incredible how efficient you can get at building stuff when you have the right gear: the bandsaw does its work while I clean up the razor-sharp edges of the previous cut-off, using a flap wheel on an angle grinder. Total effort to make a flask, for me, is on the order of 60 seconds, most of which is walking across my shop.
You’ve already seen this; this is just a better photo:

Then there’s the fox femur:
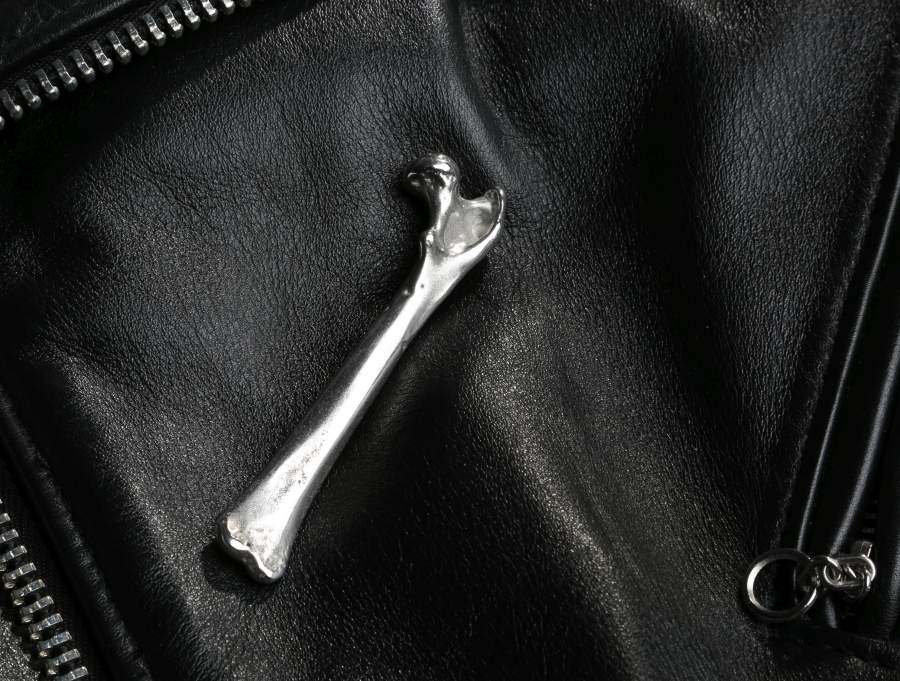
Because the molds are open, I have to sand/file down the back and shape it to look about right. The rest is polishing. Polishing is a great big pain. “Real” casters use a tumbling system with stainless steel ball bearings to peen and hammer away the textured surface. I use 2000 grit sandpaper and steel wool and silver polish, and my thumbs hate me for it. But the results are absurdly satisfying.
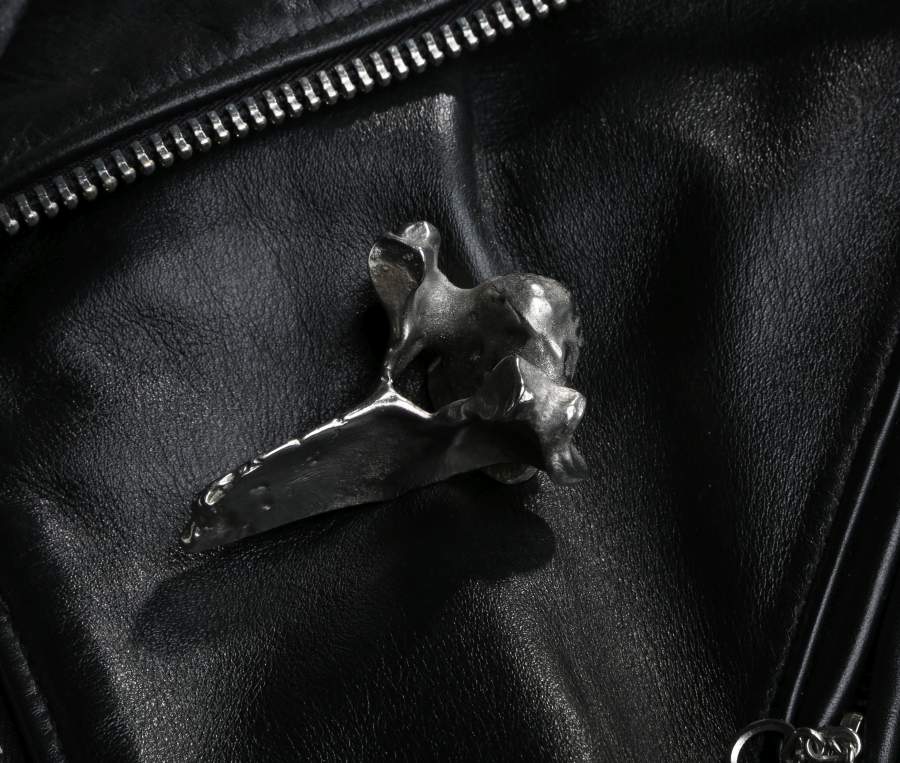
The vertebra took 4 troy ounces of silver and about 2 of tin. It’s heavy, sleek, complex, and satisfying. I have some tapered carbon fiber rods (i.e.: golf club sticks) and have been thinking of filling the top of one with epoxy, screwing in a 304 stainless steel pipe fitting as a ferrule, and making a threaded adapter to attach one of these onto it. You’ve got to admit a black carbon fiber walking cane with a silver vertebra: that’s mighty tactical.
I’m waiting to see how the cat skull turns out, though.

I’m going to put one of the fox legbones and the skulls up for an FTB benefit auction. I don’t know about the vertebra – it’s about 5 hours of polishing and my poor aching thumbs say “no!” I suppose I could release one of these in “you polish it!” condition (including steel wool and 2000-grit sand paper!) but that seems cheesy. I’m also concerned that there’s a lot of silver in that; I would have to set a minimum bid. Then again, I could just as easily whip up some bronze. OK, that’s scary “I’ll just melt up some bronze” is not a normal thing for a person to say.
Product photography notes: This was done with one huge softbox (to camera right, looking over my shoulder) and a smaller spotlight to camera forward right to pop the objects off the background. You ought to be able to “read” the locations of the lights by looking at the specular highlights in the silver and the shadows on the leather. I have actually not moved the lights in my studio for months – all I did was throw the motorcycle jacket on my little wheeled stage-stand and drop the silver objects onto it in cunning position. I switched to the jacket because the silver will reflect the black of the leather and really pop the contrast, and it does. I also positioned the jacket so that the zippers made a hopefully interesting composition which also “sell” the size of the object. By using the same background for all 3 objects I am not being lazy: I am representing the proportional sizes of the pieces. And I’m lazy. Speaking of lazy: you’ll also notice how the rear spotlight creates a hotspot that sort of vignettes the whole image without my having to do any photoshop. I love photoshop and have spent months of my life in it, but the best photos are ones you can use right off the camera, because lazy.
Mr Happy Dancing bandsaw’s coolant recirculation drain blocked up with chips the other day and it vomited a bunch of coolant oil in the floor. This is how we learn what things have to go on the preventive maintenance list.
Try a rotating electric toothbrush and different grades of polishing compound for these tiny coplex things instead of thumbs and polishing paper. Your thumbs will thank you. And unlike buffer, the toothbrush is perfectly safe to use for even the tiniest things with the most complex surfaces. But it is not as fast as a buffer is.
This idea I actualy tested, so I know it really works.
IIRC, Paul Revere learned that, to his detriment.
One thing about your 2000-grit sandpaper, it takes off the fire scale, and that’s a thing that has to be done. Of course I use a buffer for that, and only then throw said object into the tumbler. But sandpaper etc. works well too.
The fox femur would be cool as a hat pin or tie tac, or, I suppose, with the correct finding soldered on, it could be attached to about anything like a purse or even a belt or bridle for a horse. It’s a little bit big but not too bad, and it would certainly make a statement!
Does the cat skull still have the teeth in it? That’s going to be interesting…
DonDueed@#2:
IIRC, Paul Revere learned that, to his detriment.
I was wondering about that, but I couldn’t find any references to Revere having an injury (on the other hand, the guy was an amazing craftsman who was very influential at the time…) I also thought he had an injury but I wonder if I was confusing him with the children’s propaganda novel Johnny Tremain. I was forced to read that as a kid as part of my US indoctrination.
What happened to Tremain in the book I don’t remember because it still makes me squeamish. Something about an incorrectly sealed mold. That doesn’t sound right but maybe I mis-remember.
kestrel@#3:
Does the cat skull still have the teeth in it? That’s going to be interesting…
Yes, and getting the wax into that part of the mold is not going well. I’m using thinned-down wax, which flows better, and my last attempt involved holding a sheet of polypropylene across the bottom of the silicone mold and whacking the hot wax-filled thing on the kitchen counter. Mess potential high, but I made it OK. I have not demolded yet. I can build the teeth with wax and carve the silver if it comes to that.
Charly@#1:
Try a rotating electric toothbrush and different grades of polishing compound for these tiny coplex things instead of thumbs and polishing paper. Your thumbs will thank you.
That’s a cool idea! I’ve got a Dremel tool and a load of felt wheels for it, but the felt doesn’t seem to abrade enough to get the job moving forward. (I soaked the felt in linseed oil and aluminum oxide grit)
I think I must elaborate – I tried the toothbrush instead of a buffer for mirror polish on hardened steel, not to remove scale from a cast. It only buffs, it does not remove material. And I used commercial hard buffing compound (probably alluminium oxide).
From my work on the rondel dagger I think that oils are not good for self-made polishing compounds, because they are not sticky enough. I intend to do some experiments with beeswax and dubbin on next project.
Will you auction on Ebay or just in a posting on this blog? I’m interested in the cat skull.
ooh, i want to use that vertebrae as a guard for a knife. imagine that with a long, thin stabby blade coming out the front, a sculpted handle with a hook sort of shape at the end.
so yeah, i guess i’ll buy one if you sell it. i can provide my own 2,000 grit, steel wool, and sore thumbs :P
dangerousbeans@#9:
I bet if I rummaged through the archive of bones that K sent me, I could find something suitable for a pommel. There are a few fingerbones in there, I think.
I’ll have to see if I can make more castings of the vertebra. I tried one in bronze yesterday and it decidedly Did Not Come Out. My casting set-up is still pretty amateurish and will be amateurish until this winter. I’ll see if I can pull one in pewter and I’ll dig through the bones; if I find something suitable I’ll email you a picture. Using the vertebra as a guard had never occurred to me.
cjheery@#8:
Will you auction on Ebay or just in a posting on this blog? I’m interested in the cat skull.
I’ll just post here. Ebay is a pain in the butt.
I don’t know if I will produce the cat skull or not. First off, I have to produce it for myself and it’s a tough shape. I’ll get it eventually I predict but it may take me months and it may be too hard for me to want to try again. It looks like about $250 worth of silver just to take a shot at casting it, too. That means a bigger crucible and stronger tongs. Eventually this stuff is not going to fit in the mouth of my forge so it may all have to wait until next year. Building a smelter is on my winter schedule.