I don’t feel that my hammer control is very good, but once the shape of the blade gets refined, good control is more and more important.
The entire day wednesday is heating the blade in spots, then tweaking the shape. Each time you hit it over ${here} it causes a change over ${there} and then you have to adjust that, in turn. For example, you might want to make the blade a bit wider, by hitting on the metal close to the center of the body, with the hammer at an angle – that drives the metal from the body out toward the edge, but it also thins it and lengthens the blade a tiny bit. In fact, there is no way to hammer the blade back to being shorter, so everything amounts to slightly lengthening it, over and over. There are tapers that need to be established everywhere in the blade – tip to tang has to be tapered as well as the overall thickness across the back, and the width from the back to the edge. The more symmetrical it is at this stage, the less grinding will be necessary. I like to grind and I’m very comfortable with it (more so than with a hammer) but you can’t just start grinding until all the metal is in the right place.

It looks a lot more like what it looks like, now
The instructors are magical. At one point I was having trouble getting a certain piece symmetrical and asked Michael Bell for help. He made a few gentle taps ${here} and over ${there} then straightened the back on the anvil and it looked perfect. Then, I went back to trying to make it more perfect. This part of the process is humbling because you realize quickly that you’re chasing a standard of perfection you’ll barely ever be able to fully achieve – but you have to or you’re wasting your time. Then, when you think it looks as right as it can, Gabriel Bell will point out “it’s too thick ${there}” and yo can see it’s totally too thick right where you thought it was fine a few seconds ago.
After that, around quitting time, I normalized the blade. That’s when you release any stored up forces in the metal by bringing it up evenly to around quench temperature, and let it cool slowly. Since the blade is longer than the forge that means slowly moving it in/out until you get it evenly heated, then putting it edge up to rest on the hot upper surface of the forge (which is about 600F) for an hour or so. Some of the guys snapped pictures of me normalizing my blade, but I don’t have them yet, so here’s one of the other students working on normalizing his:

my blade is the one sitting on the top of the forge
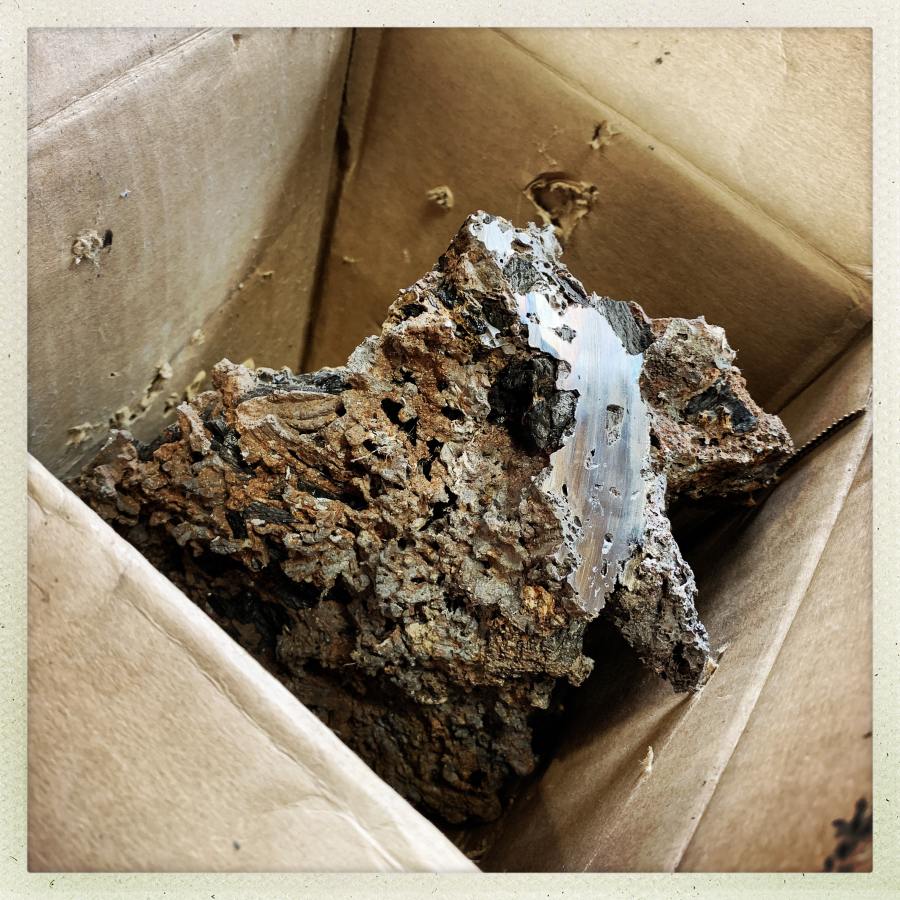
The shop is full of endless fascinating things! This is a big chunk of bloomery iron that someone sent Michael Bell. They’re refining their own iron using the Japanese method, and are hoping to sell tamahagane to swordsmiths that want the steel without having to do that part of the process. It’s full of inclusions and voids but it’s iron. To turn that into workable steel for a sword, it would need to be worked with a lot of carbon, to absorb it, then folded repeatedly to distribute it evenly through the piece.
Today we are going to grind the scale off and take the blades to the sander/grinders to start making some of the surfaces ready for quenching.

One characteristic of nambokucho-style blades is that they usually have a full-length bo-hi, or lightening groove. The groove increases the surface area of the blade and lightens and stiffens it. But forming it is a process that involves extreme patience. Once the blade is quenched the back edge will still be mostly unhardened, and you use a scraper to grind the groove into the steel.
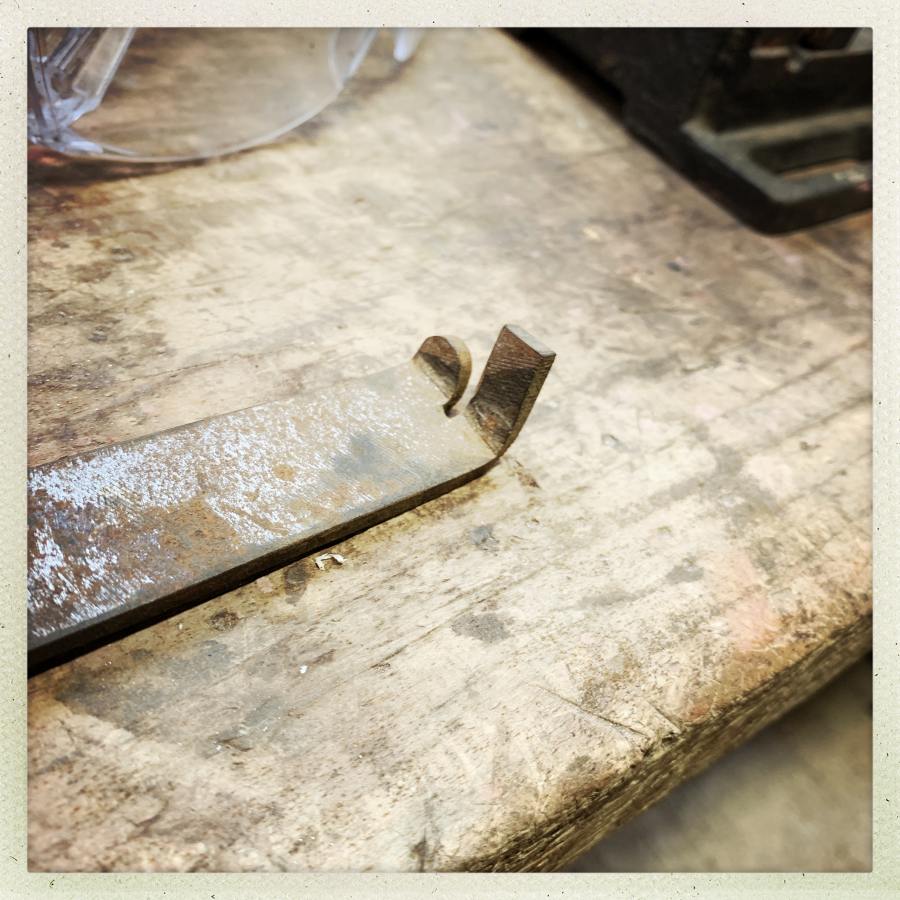
That’s the tool: a file that has been cut and bent so that one piece will run along the back of the blade, and the rounded surface will scrape away the steel. This is described as an agonizing process that takes about a week to complete, and it’s why nobody likes to make nambokucho-style blades any more. “Oh, boy!”
It seems to be going along nicely. I really hope the welds hold together well in the quench, two bars welded together? That seems just to be asking for trouble, especialy when quenching in water. Fingers crossed. This is a gamble, I think even experienced smiths lose some blades this way.
I have a question and a nitpick.
The question: Why not normalize it by heating it up and letting it cool in a metal bucket/pipe filled with wood ash/pearlite? It would cool that way much slower (several hours slower).
The nitpick: The fuller does not increase stiffness of the blade. There is no conceivable way of increasing stiffnes of a beam by removing material from it. What fuller increases is the stiffnes to weight ratio, because it reduces weight much more than it reduces the stiffness. So a blade without fuller will be a lot heavier and slightly stiffer than a fullered blade of identical thickness and geometry.
The only way to ad stiffness to a blade is to make the blade thicker. Stiffness is pretty much defined by how much material is the farthest from the center – a thick walled pipe is for example almost as stiff as a full cyllinder of the same material.
huh. Kinda surprised they made a fuller via stock removal, I would have thought it would be easier to forge it in, but maybe that would make the blade more liable to warping or something similar during tempering.
@lochaber apparently stock removal is the traditional way to make fullers. I’m guessing it’s because a fuller would make the blade more likely to twist in the quench, especially with older shallow hardening steels?
I suppose the way to develop better hammer control is to do more hammering :P
lochaber@#2:
Kinda surprised they made a fuller via stock removal, I would have thought it would be easier to forge it in, but maybe that would make the blade more liable to warping or something similar during tempering.
I can’t think of any other way. When you’re setting up the blade, things move around. Since the back of the blade is not hardened, it’s not a problem doing it last.
Charly@#1:
The only way to ad stiffness to a blade is to make the blade thicker
Yes, so you make it wider (thicker) and lighten it with a fuller.
“increases the surface area” is a proxy for talking about the object’s geometry. Consider a 2″x2″ steel bar versus an I-beam that has the same amount of metal – the I-beam has more surface area and is stronger and stiffer.
Why not normalize it by heating it up and letting it cool in a metal bucket/pipe filled with wood ash/pearlite? It would cool that way much slower (several hours slower).
In a lot of ways, I am over-geared compared to the good folks at Dragonfly Forge; that may tell you something. They only just got their first hydraulic press the other day. A lot of their process is stuff that has worked for decades. That doesn’t mean it’s the best way – it only means that that way has worked for decades.
I really hope the welds hold together well in the quench, two bars welded together? That seems just to be asking for trouble, especialy when quenching in water.
Japanese swords have been multi-bar for a very long time. The traditional katana would be what we’d call “san mai” today – a hard edge-piece in a sort of taco-shaped facing. That’s because fine carbon steel (tamahagane) was and is insanely expensive in Japan. Quenching is not done at welding temperature, so that helps. But mostly it’s what “welded” means; a correctly stuck weld is no longer two bars – it’s one. Now, if the weld is bad and there are spots where it didn’t take, then it can blow apart on the weld-line, which you want because that way you won’t make the mistake of carrying that blade anywhere.
This is 20 years old and I’m sure there’s nothing in here you don’t already know, but since watching it helped me better understand of a lot of your previous Forge posts, I thought I’d post it anyway. I particularly liked the clay examples showing how the folding works.
The other thing I thought was cool was the romanticism in how he lights his forge. Now that’s some tactical ignition! I was also amazed at the guy polishing with his bare thumb. If the polishing compound takes off metal, what’s it doing to his skin?
Anyway, send The Press back and just get yourself some disciples!
@ridana, #6: Thanks for sharing – fascinating!
@ridana,
Thanks from me also. What an interesting video. It answered a lot of questions.
I think they are called “students” not disciples. Michael Bell explained a bunch of how that works to us: watch a video of a master and student hammerers, he has a set of signals he uses. He’ll just tap the blade in a certain spot, then let his hammer bounce three times on the anvil. That means “3 full power hits on the spot I indicated.” They say this part of the training is to let you learn hammer control plus analyze where and why the master would hit if they were hitting. I do some of that with Sensei Bell – I make a map in my head of where the sword needs a grind, then I watch what he does and see if I was right. It’s exhausting but not as bad as doing the hammering.
In the video I posted, the narrator kept calling them “disciples,” which amused me, imagining you imparting your wisdom from on high, hence the comment. It also showed the tapping thing. But I also now understand the “hamon” you were talking about in the Day 5 entry. It helped me dispel my automatic association of the term with the super-breathing technique from JoJo’s Bizarre Adventure. :)
On a random, but somewhat related tangent, there is a 15th generation master swordsmith named Kunihira Kawachi who restores historical swords and is currently working on the Ishikirimaru sword (crowd-funded to the tune of 3/4 million dollars by fans of the otome game/anime Touken Ranbu, which features famous swords anthropomorphized as cute guys). His son, however, apprenticed with the son of his father’s master and still works out of his forge (wonder about the behind the scenes on that), and while he does have a student helper, he also uses a mechanized press. So even the old ways are changing, I guess.