Bonsai Tree – Persimmon Still Mysterious

Previous post.

This year the tree took its time to start growing – it only started a few days ago, at the beginning of May. I was already worrying again since this is the only specimen that I have and if it dies, it is unlikely I would ever be able to replace it – it took about ten years to find one seed, dammit. But it started to grow, finally. and it looks promising.

© Charly, all rights reserved. Click for full size.

Last year it grew three branches on the main stem in the end. I cut them all down this year and they all are sprouting 2-3 buds so it is branching out, which is good.

We shall see what form the tree chooses. Preliminarily it appears to be suitable for formal broom style. I am reluctant to use wire on this wood at all, it grows relatively fast in thickness and length so there is a great risk of ingrowth, plus it is a very hard and strong wood so it would probably be prone to breaking when stressed incorrectly. And broom style often does not require the use of wire, just judicious pruning. And spreading the soft twigs apart early in the spring, which can be done by simply inserting a piece of cardboard between them as a temporary spacer. Which I did last year and I probably will have to do this year again since the tree still has a very strong tendency to grow straight upwards. That is normal for seedlings and it should slow down as it matures.

I have also worked on my other bonsai, repotting them. When they are picture-worthy again, I hope to write a few more articles about species suitable for beginners. Right now, I am very tired. A bit more than usual because in addition to re-planting the trees, I have also built a shade over them. It was necessary because my trees suffered greatly these last few years when it rained very sparsely and the summer heat was abnormally intense. I had to, on occasion, put some trees manually into the shade near the house, so I have decided this year to bring shade to all of them right from the start. I hope it will also mean I will need less water for the trees during the summer.

© Charly, all rights reserved. Click for full size.

I have re-purposed welded U-poles for a clothesline that we used to have in our garden before we got an electric clothes dryer. I put the poles over the bonsai bench and instead of clotheslines, I spanned between them thick 4 mm wires. And instead of hanging up clothes, I spanned a shading net between those wires, using our old clothespins. Should the clothespins not hold up to windy weather, I will sew the net to the wires with a rope. Although I do hope the clothespins will suffice because I will need to take the nets off again before winter.
Project Phoenix – Part 6 – Finished

I worked a bit in the garden, I got over 1 cubic meter of wood from the coppice already stacked away in bags. That’s about 10% of my yearly firewood usage so it is a good haul this year – there will be at least as many bags of wood chips from the smaller twigs etc, totalling somewhere around 20%. Given the current prices of firewood, that’s a significant cost saving.

But winter does not want to give up so quickly this year and after my injured hand had healed, a short spell of frosty weather hit us again. I have used that time to be a useless couch lump and also to finish the bobbin lace phoenix.

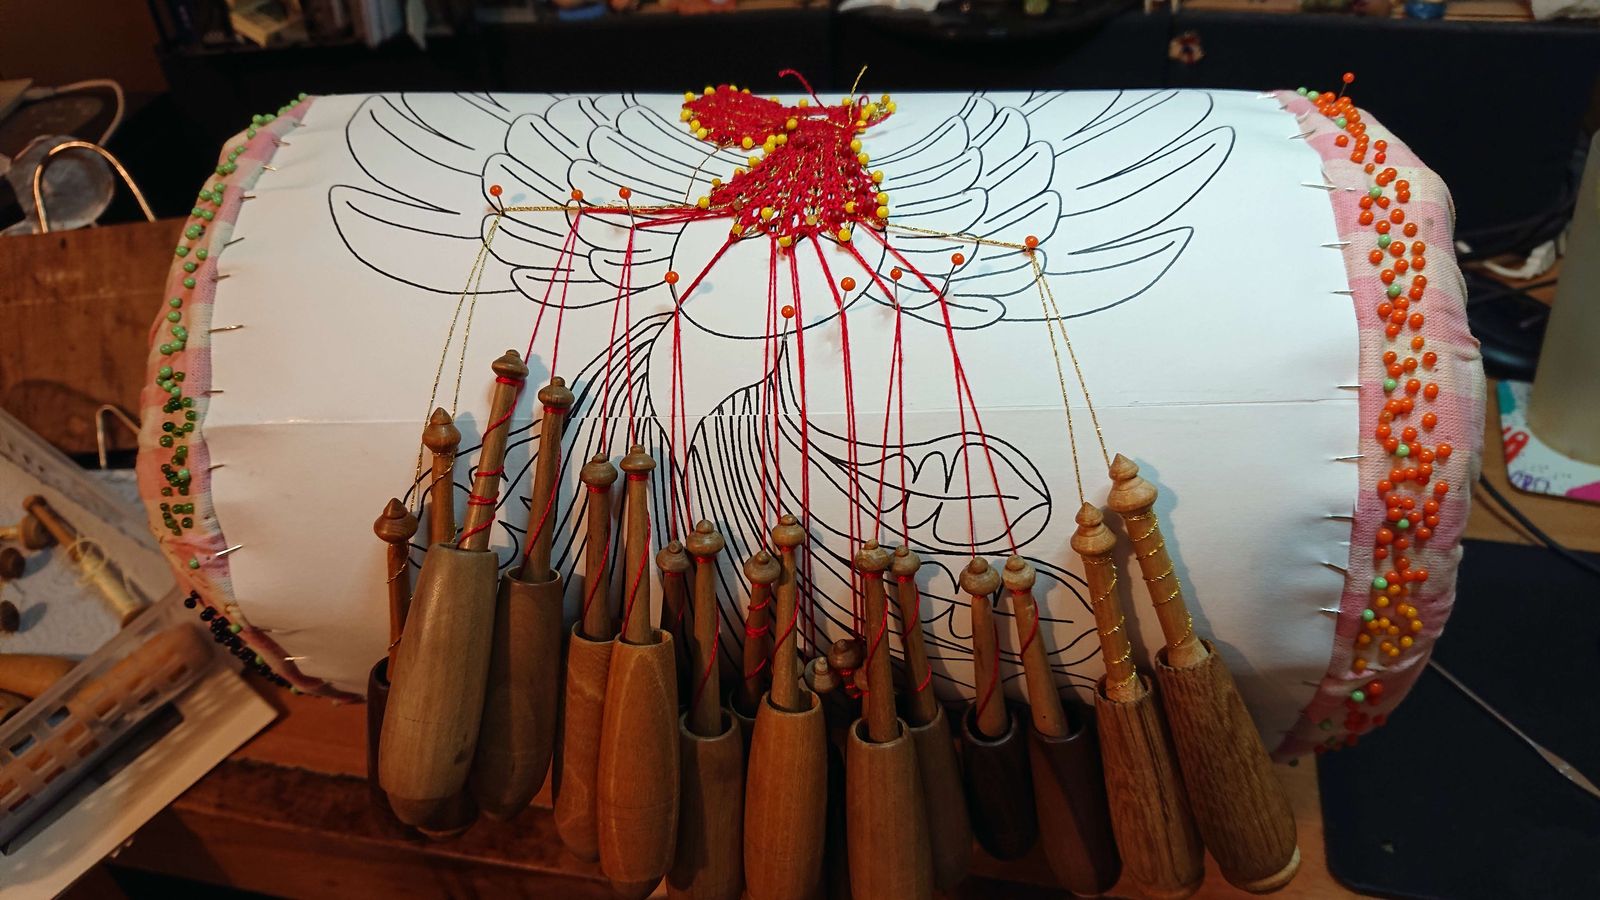
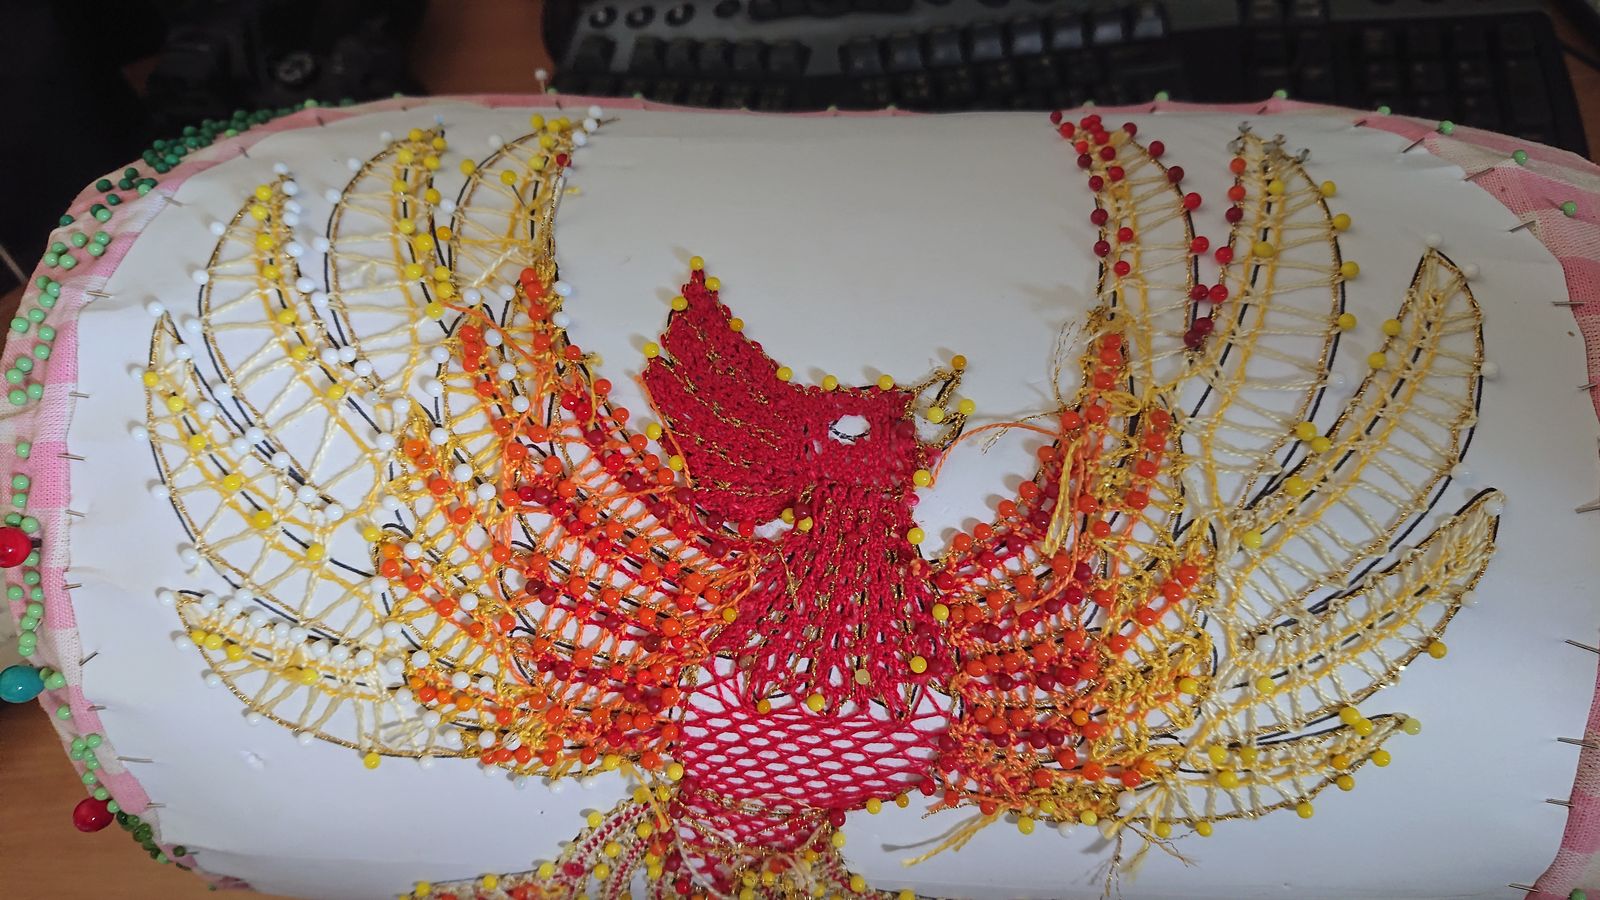
Here it is finished still on the lace pillow.

© Charly, all rights reserved. Click for full size.

After this, it took me about one hour to take all the pins out and approximately another hour to frame it. Completely finished picture is below the fold.


[Read more…]

Plush of the Month: Meet Ferdinand and Sweetie

We haven’t had a plush in a while now, for a couple of reasons. For one, the patraeon patterns I was getting were either not quite my style, or so elaborate that I wasn’t feeling up to them. Not for lack of skill, but for lack of patience and time. I need a bit of instant gratification from my hobbies, so spending weeks on a project didn’t appeal to me. Also, with my back fucking up, sitting was painful and I needed to conserve my sitting down time. But my back got better (damn, you , exercise) and the little one came to me with a project. She’s in the school cheerleading team. Now I must clarify for my American readers: we do not have a school football team. While there are American Football clubs here and they do have cheerleading teams, it’s also purely done as the amazing sport that it is (and deserves recognition), so one of the teachers who loves cheerleading and is involved with a sports club cheerleading team is also training the school team. Their school team is the Flying Bulls (because the teacher’s team has a similar name) and she wanted to make a mascot. We went pattern shopping and soon created Ferdinand (named after this good fellow). Of course the wings were not included, so I had to make up my own pattern for them, but he turned out really cute:

Black plush bull with white and green wings sitting on a table

©Giliell, all rights reserved

Black plush bull with white and green wings full frontal view

©Giliell, all rights reserved

Black plush bull, face close up

©Giliell, all rights reserved

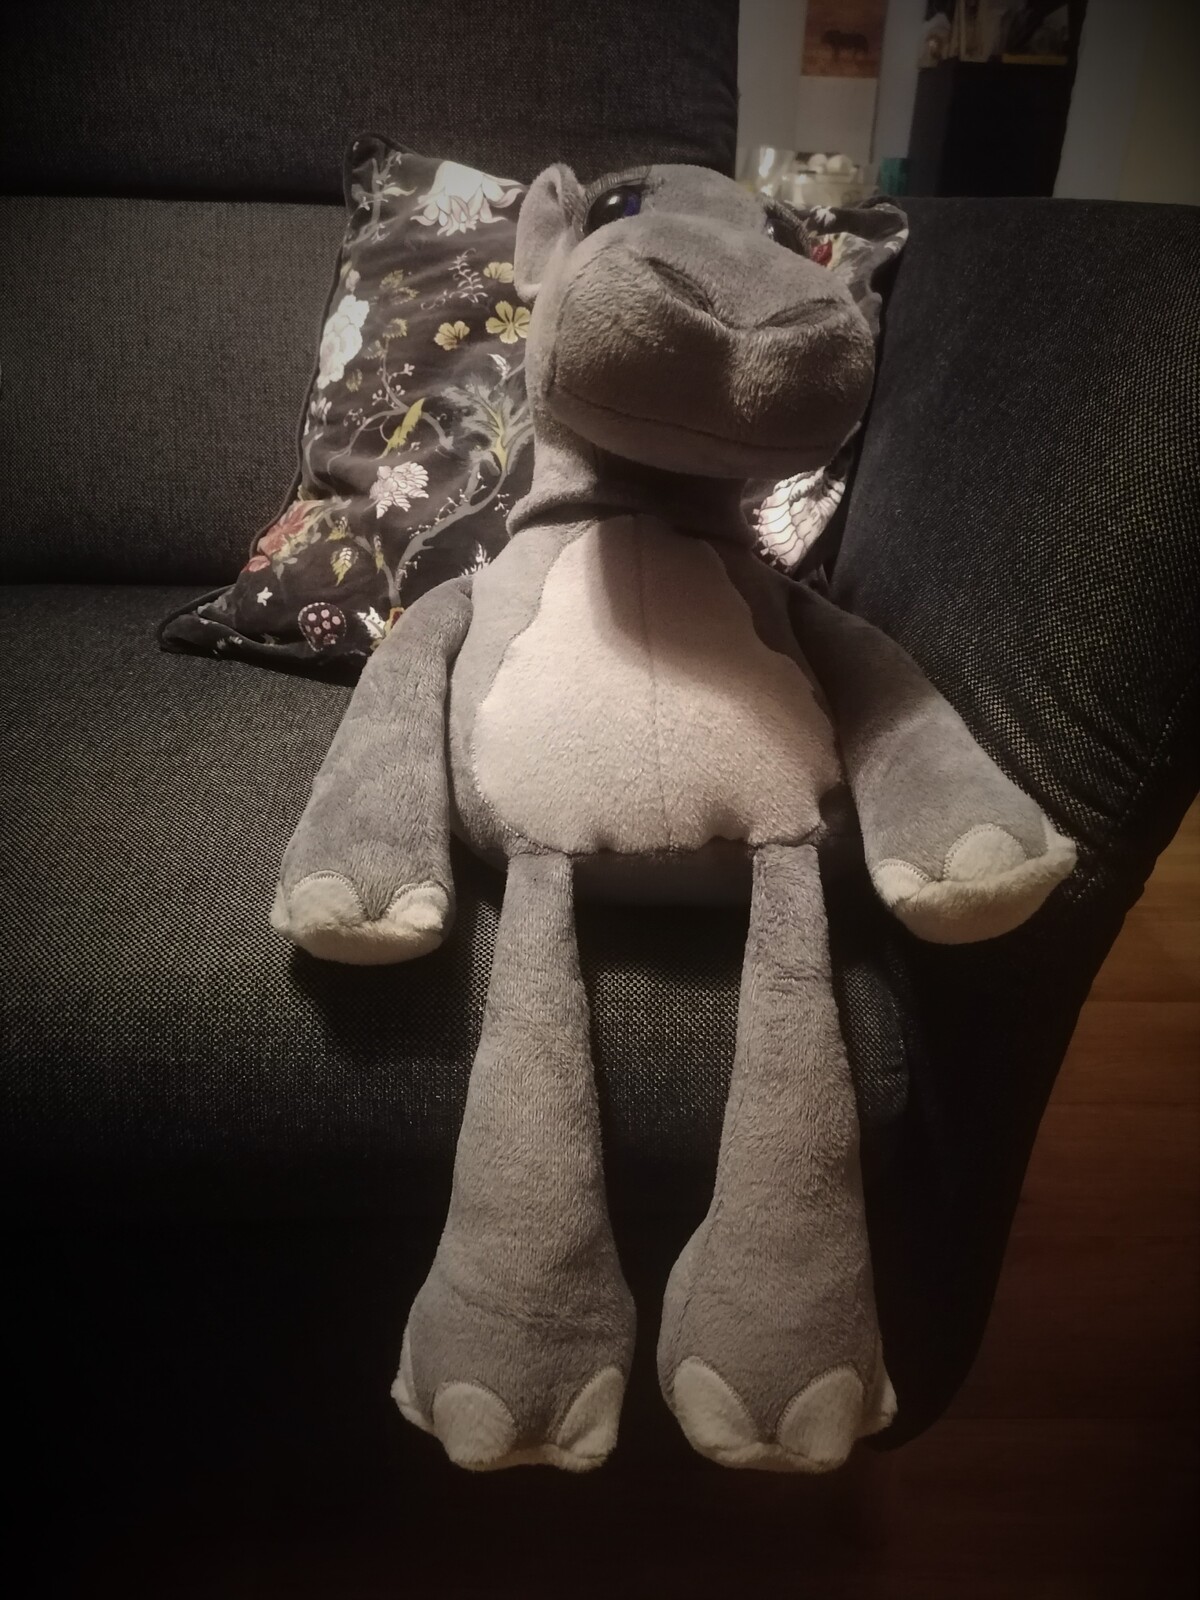
Isn’t he handsome? The eyes are made from epoxy and UV resin and secured with screws. The wings get their stability from pipe cleaners. While Ferdinand was a big hit with the cheerleading team, saying goodbye was hard and I needed something to comfort me. Well, why not make another plush? I have to say that Ferdinand is a completely different style from the last plushies I made and I quite liked it. Instead of the machine embroidery, these designs live from old fashioned eyes and designs. The creator has a couple of plushes in that style and one of them is my favourite animal, a hippo, so I had to go for it. Please meet Sweetie:

Grey hippo plush sitting on a couch, full vieew

©Giliell, all rights reserved 

Grey hippo, torso and arms

©Giliell, all rights reserved

Grey hippo, view from above

©Giliell, all rights reserved

Yes, she’s incredibly adorable. It’s amazing how much of that look comes from adding the eyelids. Depending on how you place them, you get dreamy, sad or angry. She’s moved in with us and has become a full member of the hippo crew. I hope she can brighten your day a little as well.

Women Crafter on Youtube – Knitter – Engineering Knits

My mother used to knit and we still have two straight knitting machines of a solid metal build. I did learn how to knit as a child but I already forgot it all and it is unlikely that I will ever need it. My mother-made sweaters have served me well for years by now and I expect them to continue to serve well for enough years to not need a replacement.

She has also knitted several pairs of thick socks that come in handy on winter travels when I need to sleep in some poorly heated room. Or when the winter is so cold that despite heating, sitting at the PC gives me cold feet. But we do not have a circular knitting machine, all the socks she has made had to be made by hand. Thus I have enjoyed watching a circular knitting machine in action because that was the first time I saw it.

Pity the machine seems to be made of cheap 3D printed plastic. It won’t have the durability that my mother’s knitting machines have – those are still fully functional after decades of intensive use.

If you are interested in knitting and its history, Engineering Knits has a lot of videos on that topic.

Jewellery meets Art: Hokusai’s Great Wave off Kanagawa

Hokusai’s Great Wave off Kanagawa is one of my all times favourite pictures. The churning water, the two tiny boats struggling in the waves, Mount Fuji in the background, almost an afterthought.

IHokusai's famous print showing a wave crashing down on two boats.

Source: Wikimedia

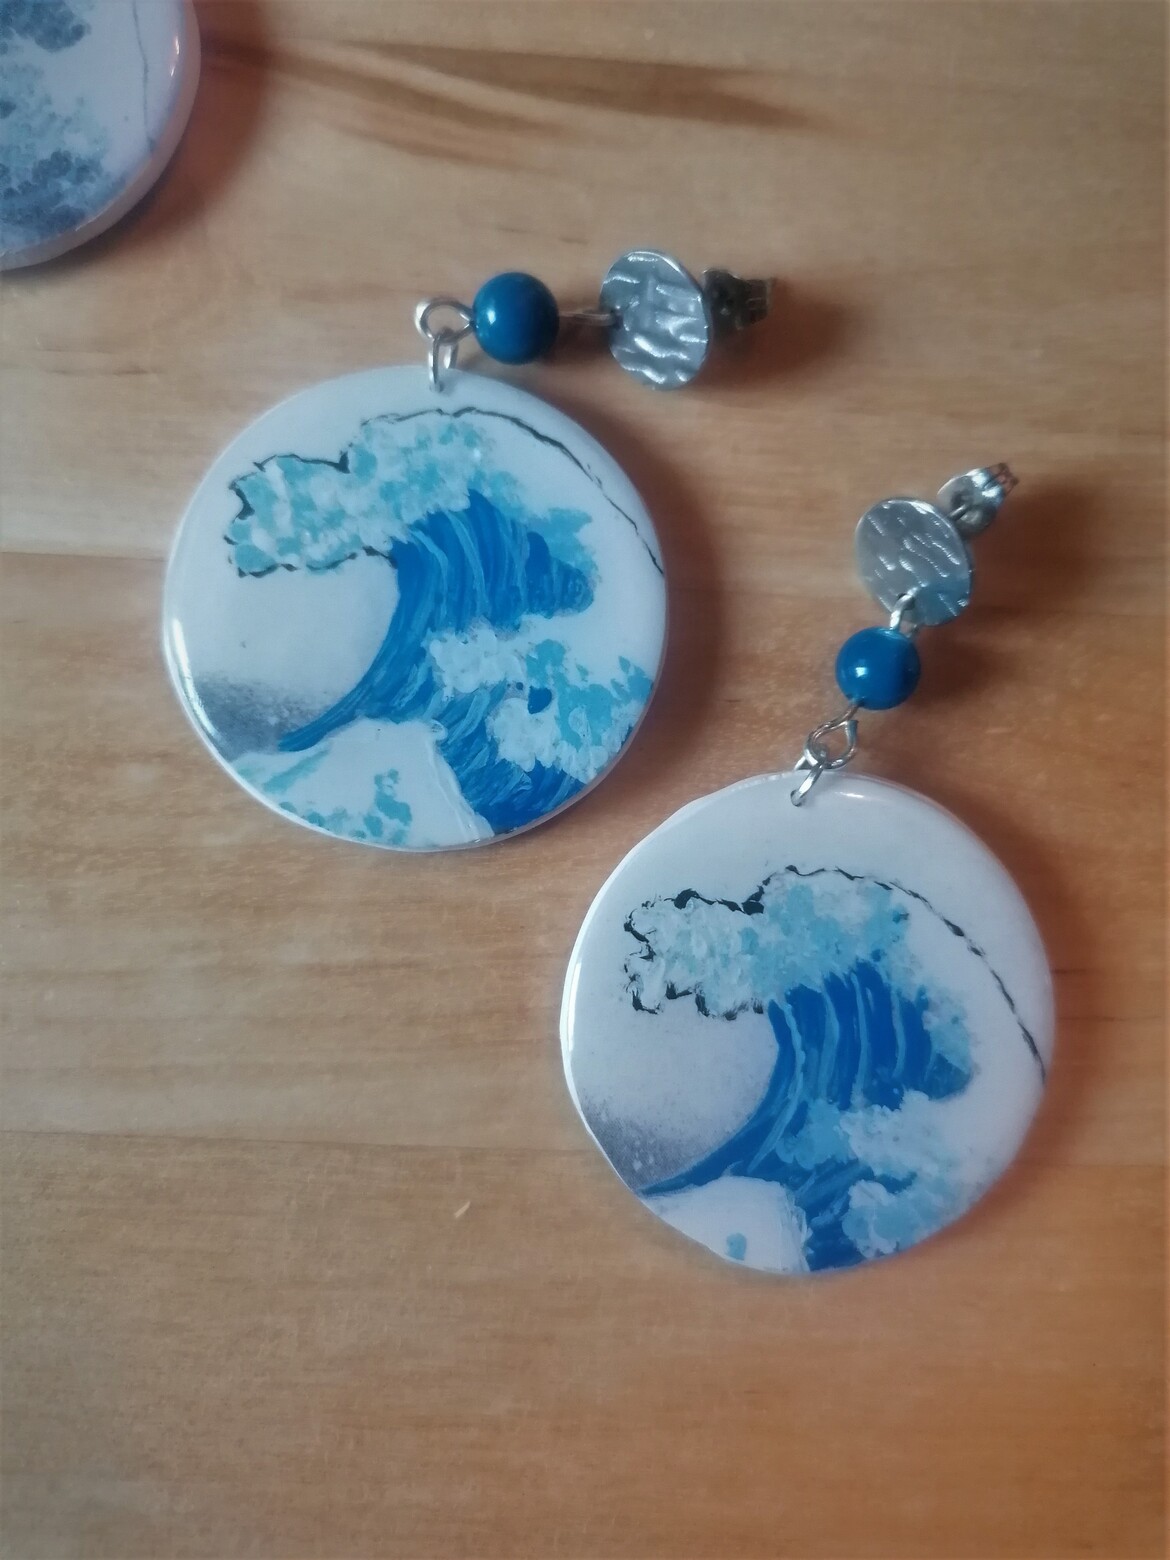
Also, it is blue. In short, a perfect image to use for trying an image transfer on polymer clay. If you have a laser printer, image transfers are pretty straight forward: print, put upside down on clay, add nail polish remover to the back, wait. Trying this with my cheap toner wasn’t very satisfactory, though. The printouts are always rather pale, and since only part of the toner transfers, the result on clay was visible, but not brilliant. I dared to add two tiny versions of the image to a bunch of things I had to print at work anyway and tried again, this time with high quality print outs. The results were much better, but still not as brilliant as I would have liked. But since I never found a crafting problem I didn’t want to beat into submission, I decided to use the first weak transfer clay and paint in the details with acrylic paint, and while I’m not usually good at painting, I’m quite happy with the results:

Round earrings showingt the crashing wave

©Giliell, all rights reserved

Yes, of course I forgot to mirror the image. Both times. But I love how this has a look like ceramics now.

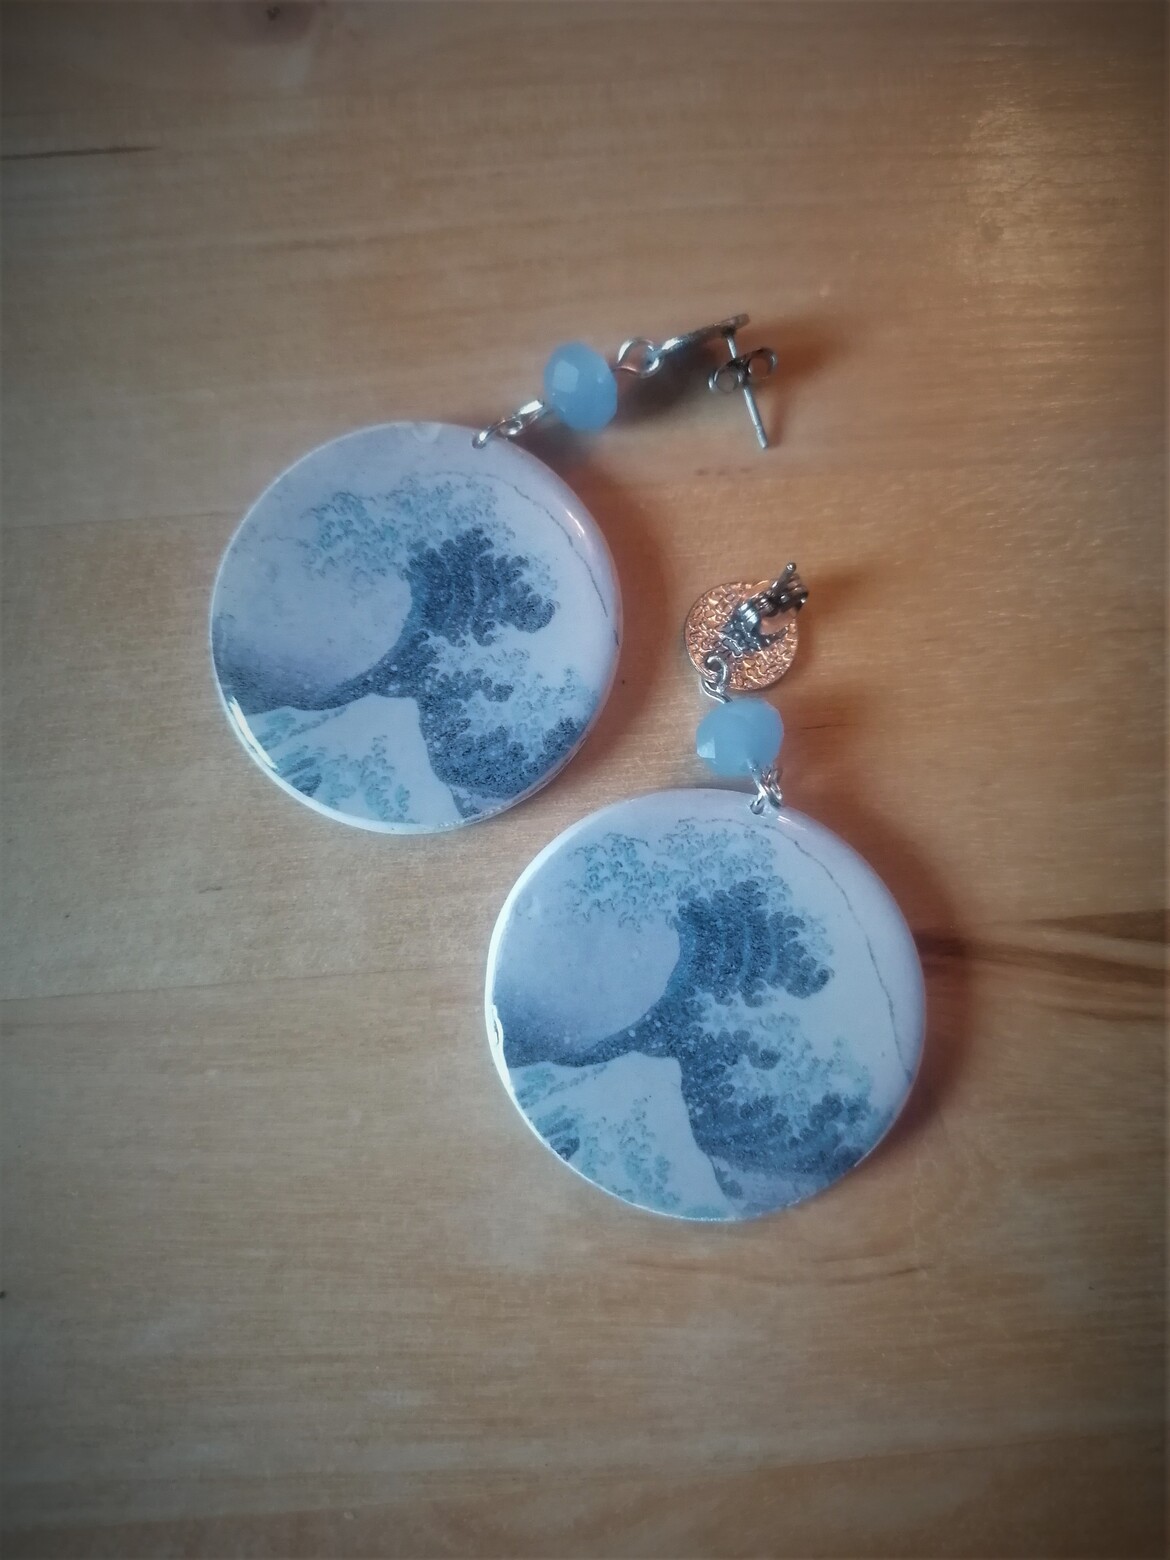
And here’s the version made from the quality printout:

Round earrings showing the central wave in great detail but mute colours

©Giliell, all rights reserved

You can see that it’s lacking contrast and brilliance, even though it is rich in detail. I’m thinking about using the transfer plus acylics method with other paintings as well, I think van Gogh would be a good candidate for these projects.


Project Phoenix – Part 5 – The Tail Finished

Here you can see most of the tail with most feathers finished.

© Charly, all rights reserved. Click for full size

The tail is completely finished now. Each feather, whether big or small, took me over two hours to make, so with all the prep work, etc. about twenty hours for the whole tail. The reason why small feathers took nearly as much time as the big ones is that what I wrote previously – the narrow long straight-ish part starts with eight bobbins but the ends are 16 bobbins of different colors so it is not exactly easy to keep track of them.

I started doing the wings too, but I had to stop the works for a few days again because I am depressed as hell and it is difficult enough to get out of bed and heat the house, let alone do something on top of that. I started the wings in red, did not like it, and had to undo it. So here is a picture of undoing the lace. It is the same as doing it, except going in the opposite direction.

© Charly, all rights reserved. Click for full size

I did not like the red color directly near the red body and I also did not like the weave being so tight. I have used a very tight weave on the head and neck, but I won’t be using it on the wings because I think the wings will look better with the thread pattern being more obvious. If I won’t like the result, I will have to undo it again.

Jewelry: Tales of the Raksura

The author Martha Wells has risen to fame during the last years for her Murderbot novels, but actually I discovered her long before when stumbling upon the Books of the Raksura, which have the richest worldbuilding I ever saw. It never feels like The Other Mother’s house in Coraline, just enough for a superficial layer, but you always get the impression that you could go deeper and deeper and find more.

For those of you who have not read the books (mild spoilers ahead), the Raksura are dragonish shapeshifters that live in courts, ruled by the reigning Queen, who has one or more male consorts. The books revolve around Moon, a very unusual consort and the adventures of him and his court. The courts are always named after a queen and a consort, often the founding couple of a court.

I’ve always admired fan art, but I’m useless with a pen, so I decided to put my other talents to use and make some earrings. Malicious rumours claim that I have a pair for every day of the year, but those are absolutely not true. I counted them and I will have to repeat them after June 20th. Though, seriously, if any of you fancies a pair, just let me know. Unless it’s my favourite pair, I’m happy to send it to you, since polymer clay always yields several pairs for one design. Anyway, let’s get started.

First, Indigo Cloud, the primary court in the novels

Blue and white marbled earrings

©Giliell, all rights reserved

blue and white marbled earrings

©Giliell, all rights reserved

I did a classic swirl here to get the idea of clouds in a blue summer sky. Look at that blue… [Read more…]

Project Phoenix – Part 4 – The Tail

Originally, I intended to make the wings first but all those bobbins prepared for the tail feathers would be in the way so I am making the tail feathers first. Each feather starts with 8 bobbins – 4 golden for the edges, 2 red for the central line, and 2 very light yellow for the weave.

© Charly, all rights reserved. Click for full size

Towards the end broad section of the feather I ad 2 red, 2 yellow, and 4 orange bobbins. I had to use different knotting techniques for that part to get the pattern right.

I was a bit worried that I won’t know how to make the lace since it is two years since the last time I did it. My mother told me that it will come to me instantly and indeed it did and I seem to be a bit better at it than I was last time although that is not saying much. But I am using more advanced techniques for these feathers than I have used so far.

© Charly, all rights reserved. Click for full size

I finished two tail feathers today and they took me about 6 hours. I had to take a long pause after every two hours of work because my shoulders hurt something awful and my trapezoid muscle was stiff and on the verge of cramping. At this rate, it should take me approx three more days to finish the whole tail. I do hope that I have enough of the various colors, it is quite difficult to gauge upfront.

Project Phoenix – Part 3 – Beginning the Work

I printed the outline on two A4 sheets, glued it onto a thicker paper and pinned it onto the lace pillow (I think that’s how its called in Eenglush).

© Charly, all rights reserved. Click for full size

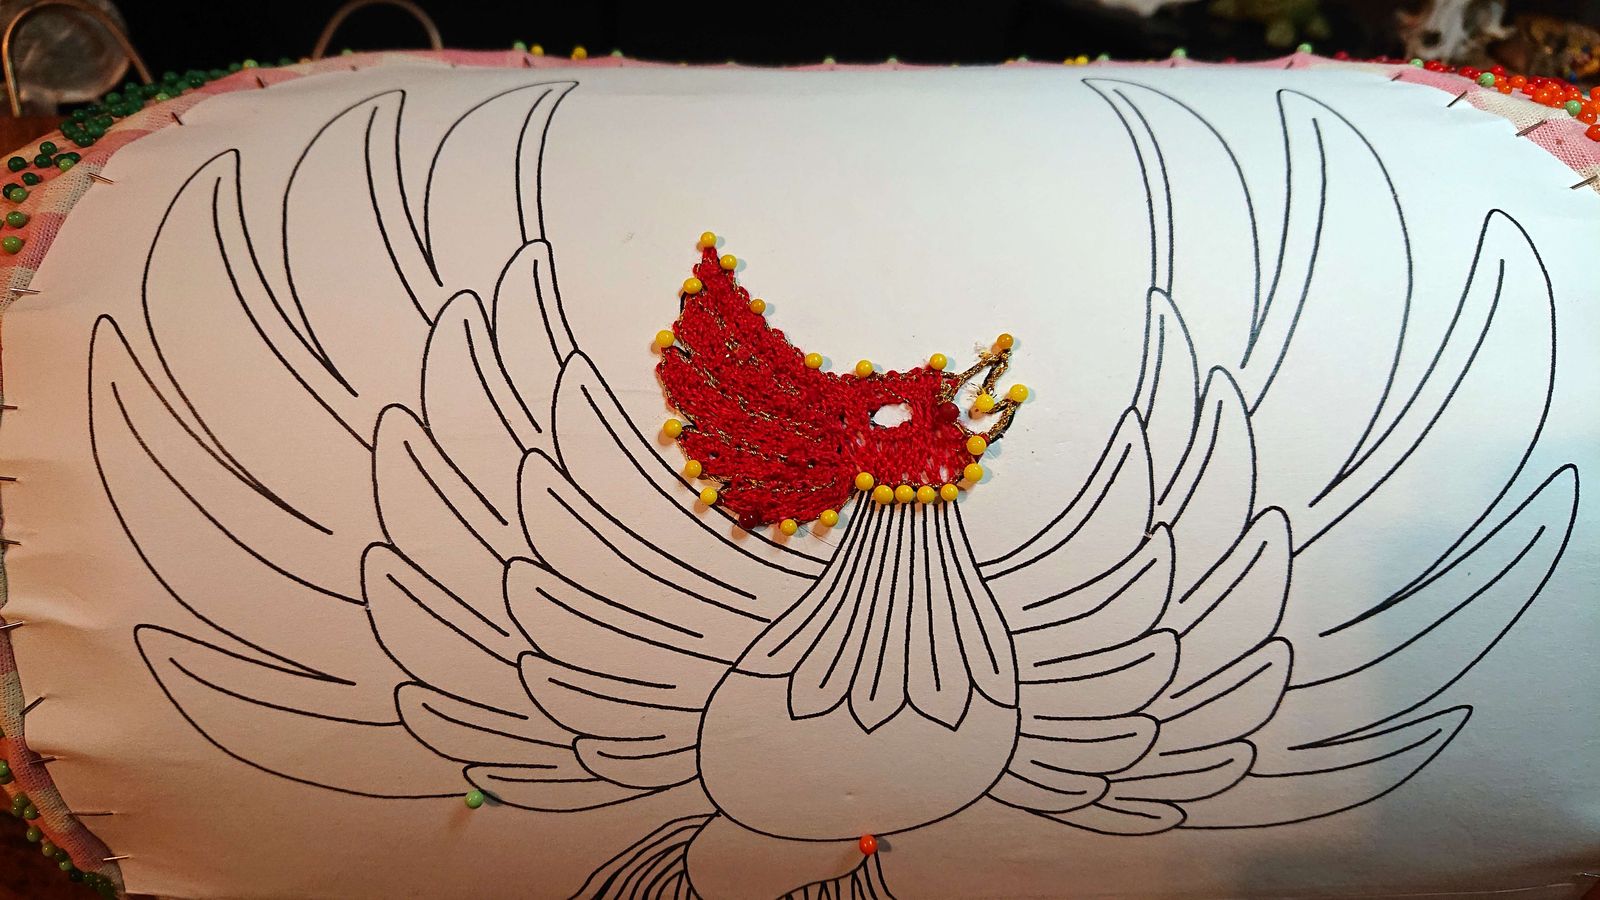
I started with the head and immediately made a mistake despite checking the sketch several times before starting. The head was supposed to be orange, not red. But it is red now, I am not starting all over – I only noticed the mistake today when the neck and body are finished too.

© Charly, all rights reserved. Click for full size

The body was fairly difficult to make. This is the first time that I have incorporated a golden thread – on the outlines of each segment. I think the golden sparkle should work perfectly with a firebird. However the golden thread is a bit fiddly – it is rougher than normal thread and more brittle, thus it is prone to breaking and difficult to pull through a hole with a crochet hook when attaching new bobbins to existing structures.

© Charly, all rights reserved. Click for full size

I will show you the progress next time too. I got a small commission to sharpen about twenty knives so I have spent two days in the Worskhop sharpening and today I have been mostly resting and thinking about how to make the tail feathers. I have made the torso with eight pairs of red-thread bobbins. That way when I transitioned over to the triangular-ish tail segment, I put aside two bobbins whenever I reached the base of a tail feather and I only added one more red pair at the end (there are 9 tail feathers). I want to make the tail feathers from several colors with red lines running through the center. There are several ways to do this and I am mulling over which one to use.

This Year’s Gingerbreads

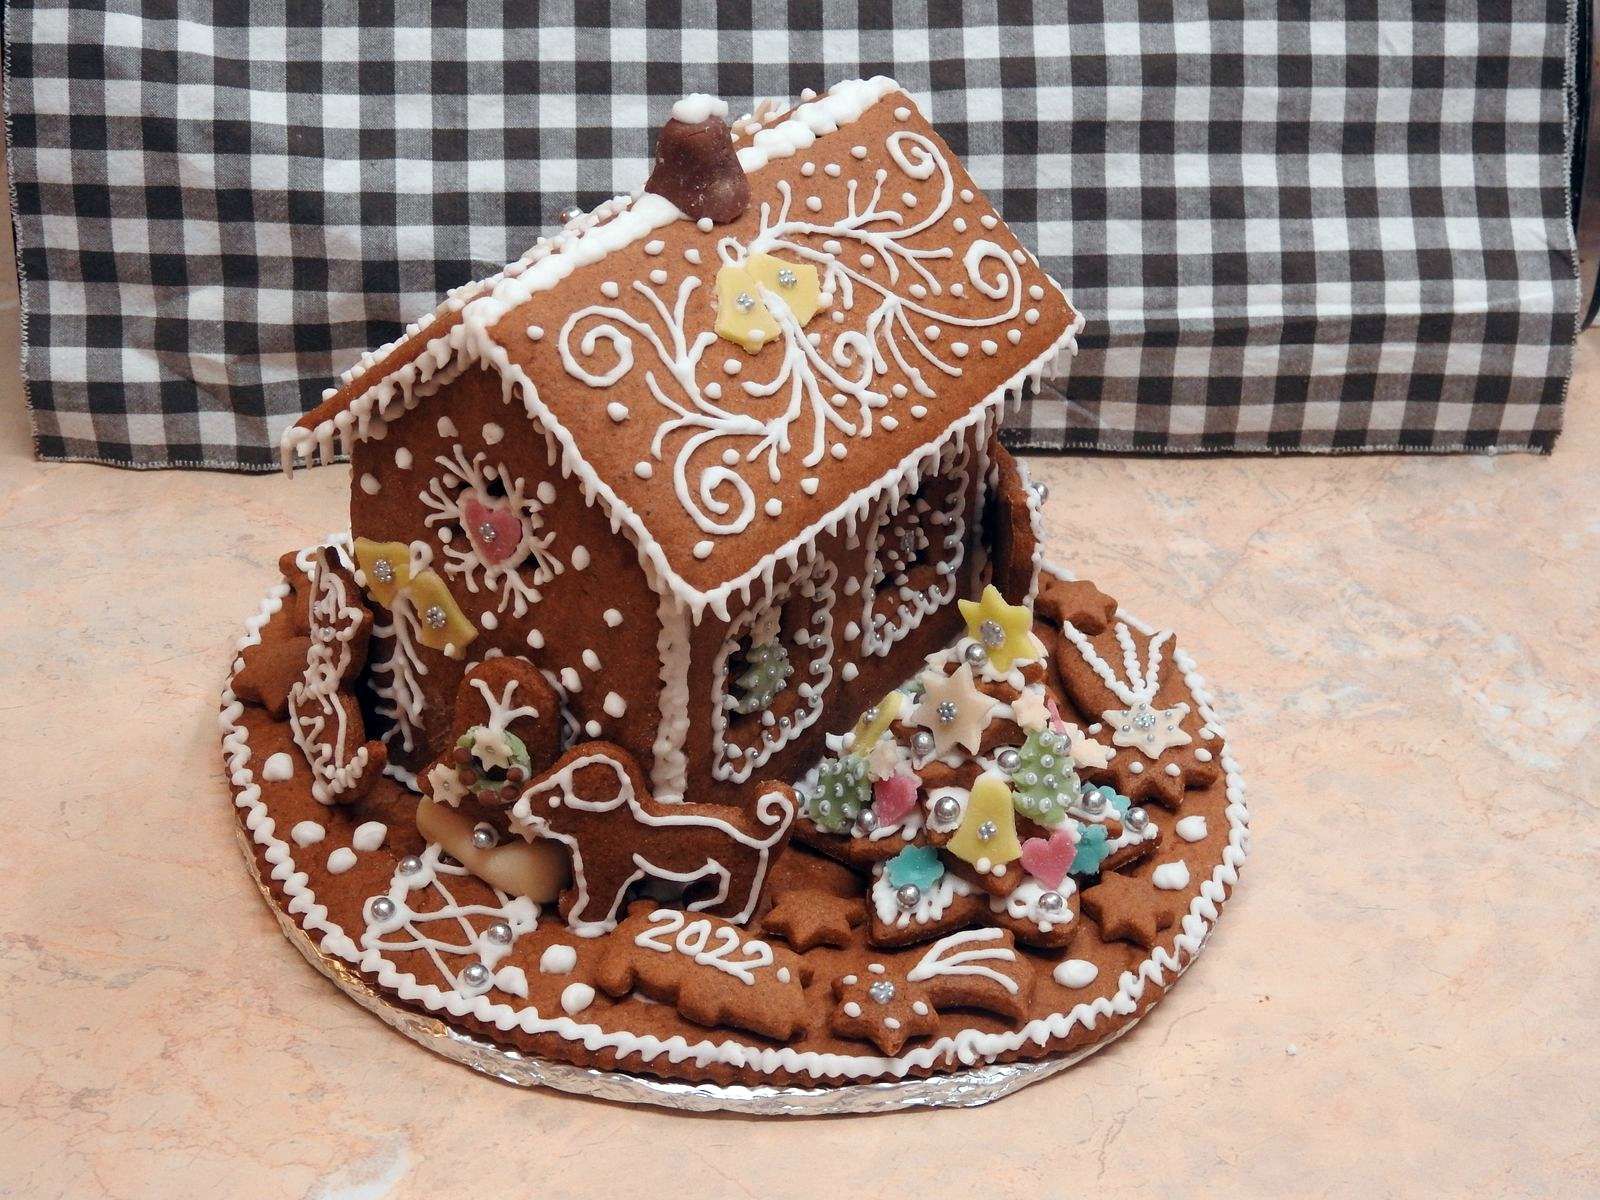
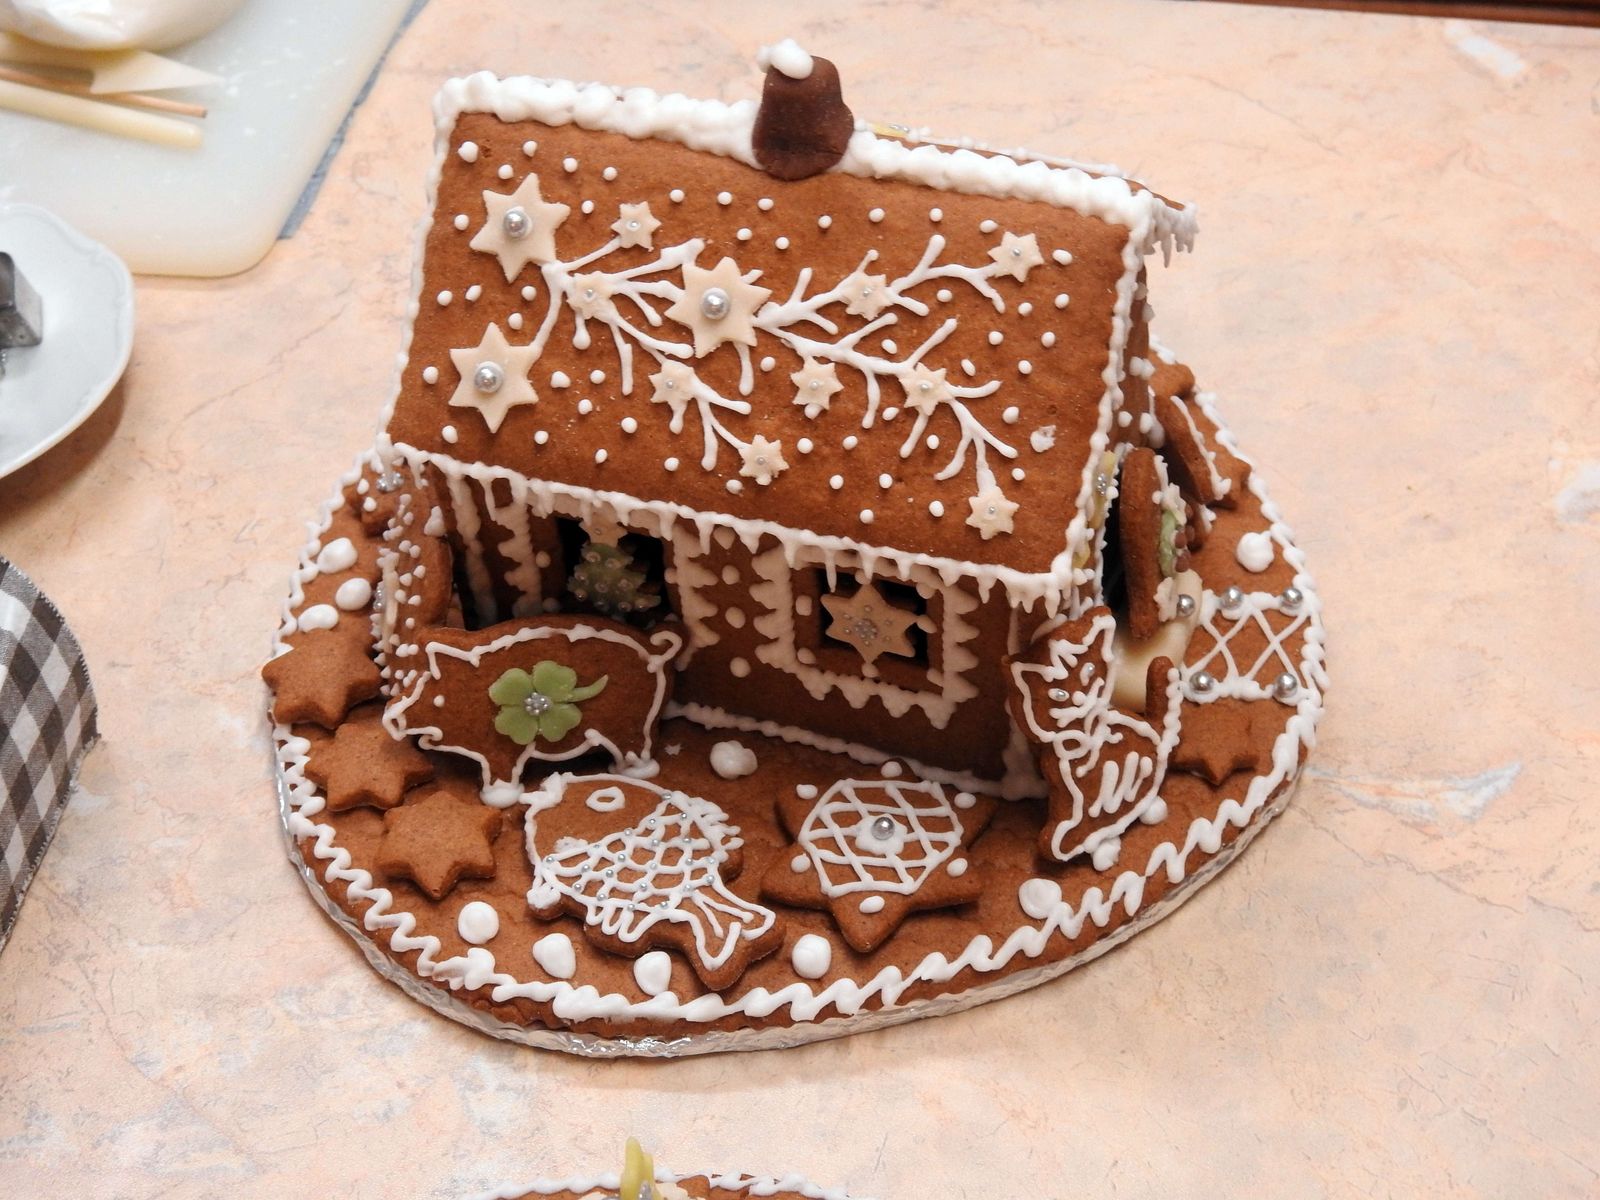
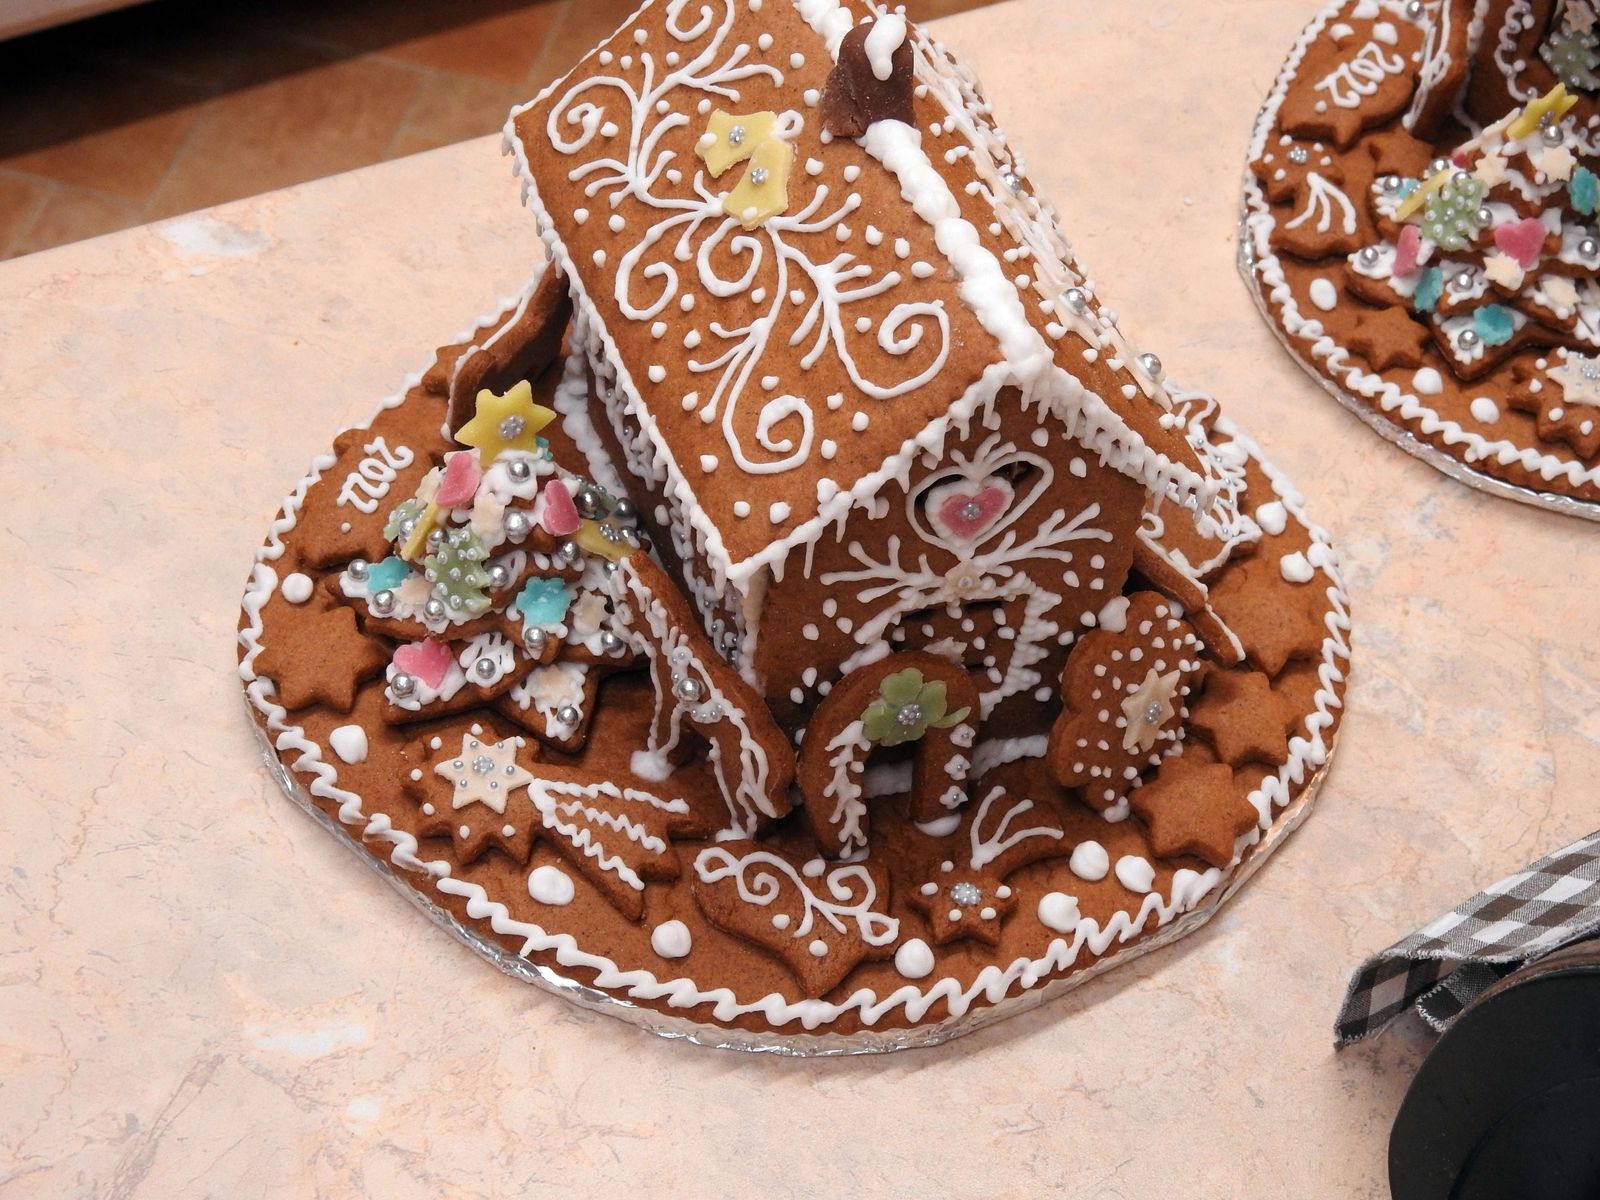
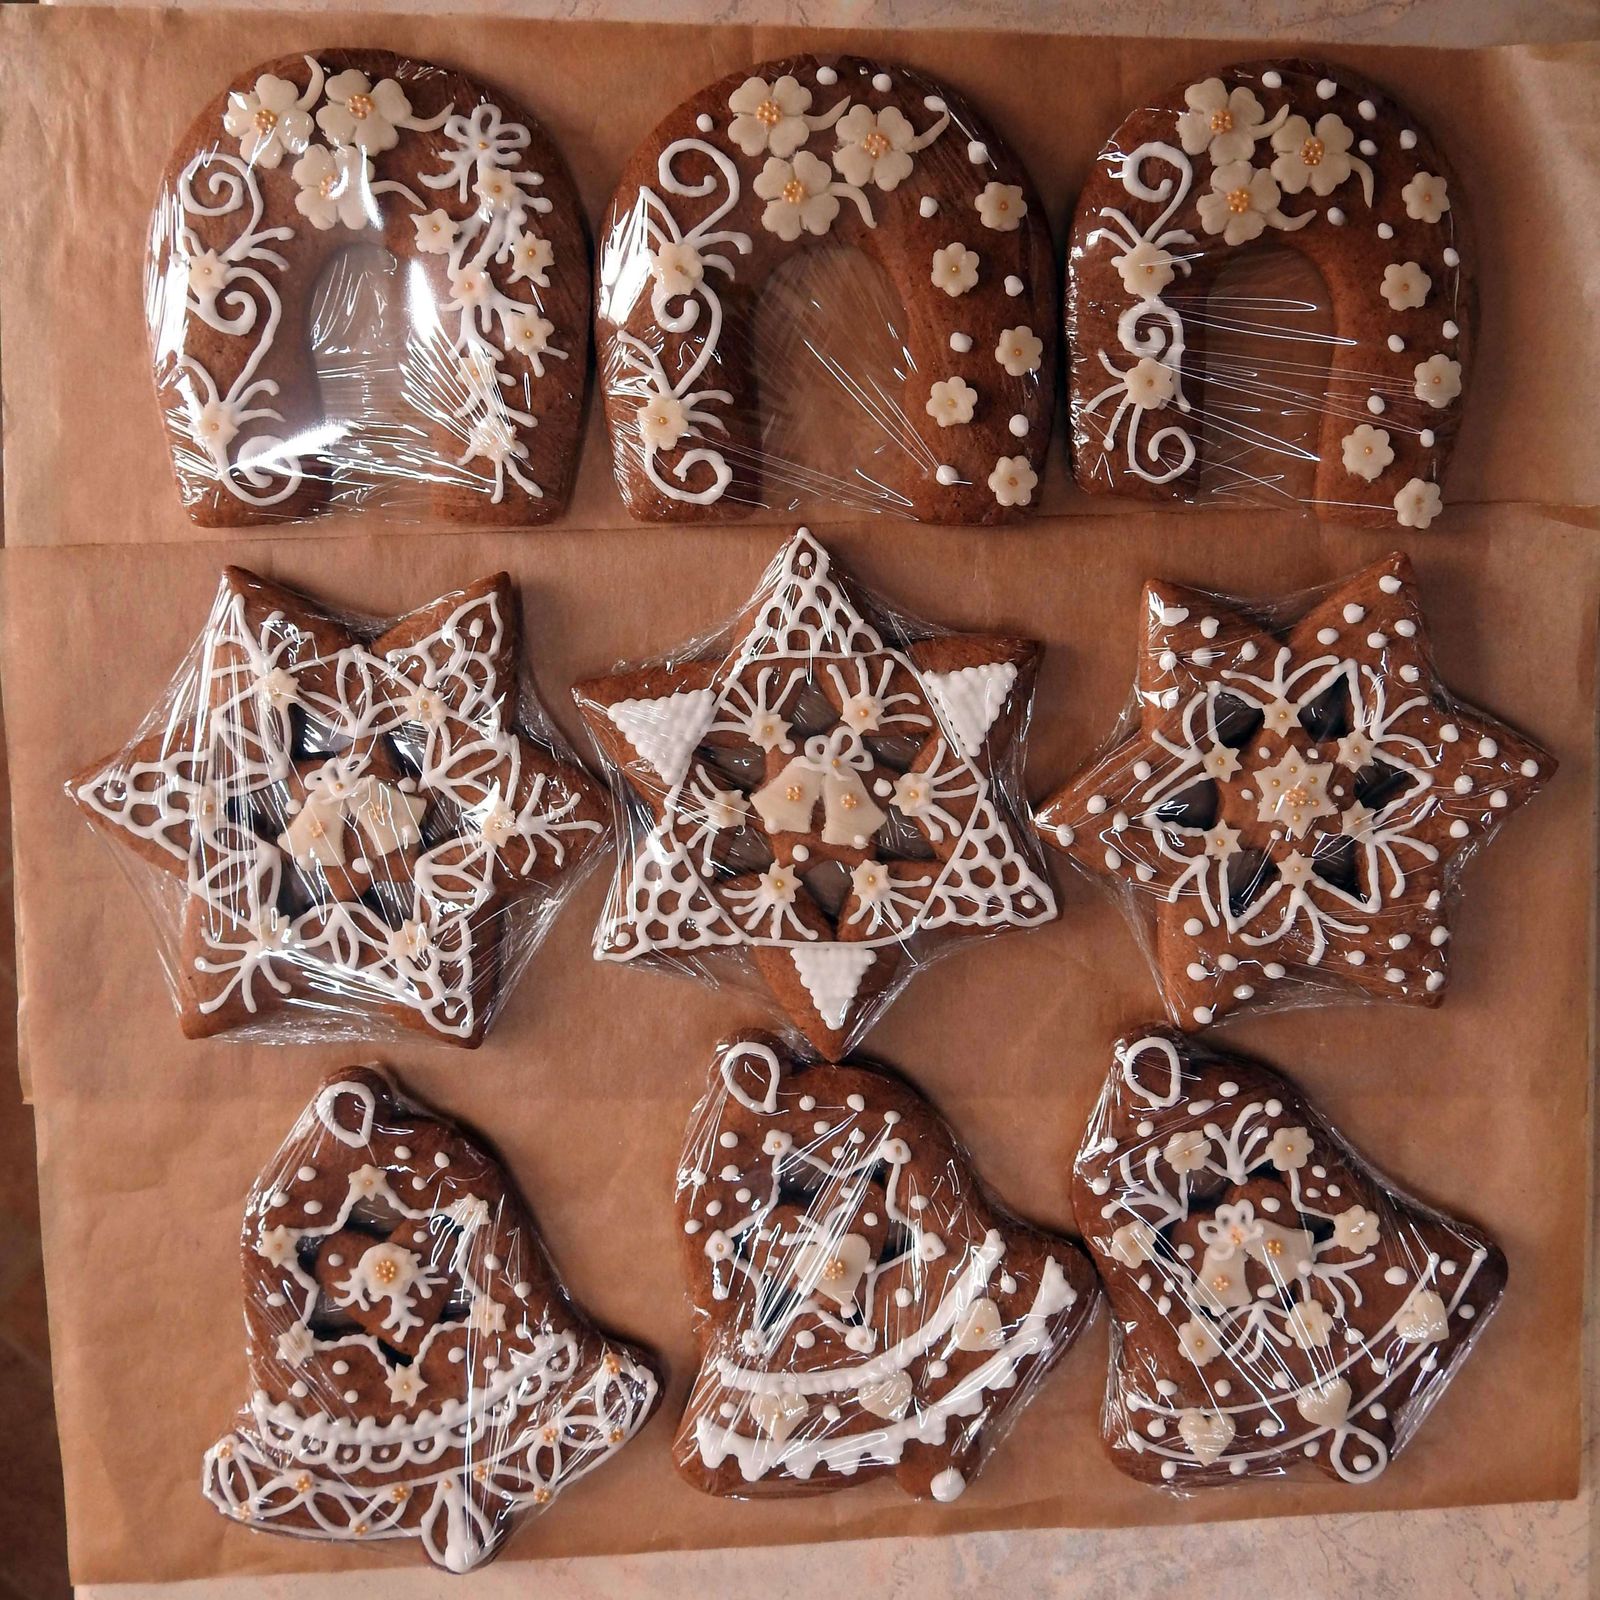
I almost forgot to publish my mother’s creations for this Christmas season.

© Charly, all rights reserved. Click for full size

© Charly, all rights reserved. Click for full size

© Charly, all rights reserved. Click for full size

© Charly, all rights reserved. Click for full size

© Charly, all rights reserved. Click for full size

© Charly, all rights reserved. Click for full size

© Charly, all rights reserved. Click for full size

© Charly, all rights reserved. Click for full size

Project Phoenix – Part 2 – Outline

Slowly (veeery slooowly) I have managed to draw the outlines in Photoshop, clean them up a bit, and arrive at something that I think is doable as a bobbin lace. I would probably mark even the positions for at least some pins in a symmetrical design, but since this design is not symmetrical anywhere, I won’t bother. My mother actually never marks the pin positions.

© Charly, all rights reserved. Click for full size

Now I will print it on two A4 sheets, and glue it onto thicker paper. However, I still need to do some work in Photoshop – to sketch some color schemes. For that I will also need to look into my thread drawer so I do not run out of some important color halfway through the work.

Project Phoenix – Part 1 – Beginning

It s fucking freezing outside and barely any daylight. When trying to work in the workshop, I spend more time heating it to a manageable temperature than actually working. And I am starting to feel mightily depressed.

So I am starting a new project to keep me somewhat occupied when indoors. I want to make a bobbin lace picture of a phoenix. It will probably progress very slowly and I will make short posts about the whole process. Today the very beginning – a rough sketch.

© Charly, all rights reserved. Click for full size

My mother would iterate and refine this sketch on paper until she would get one she is satisfied with and that one she would trace on thicker paper. I am going about the business a bit differently – I will now refine the outines in photoshop. We shall see what comes out of it (if).

An Experimentental Knife Set

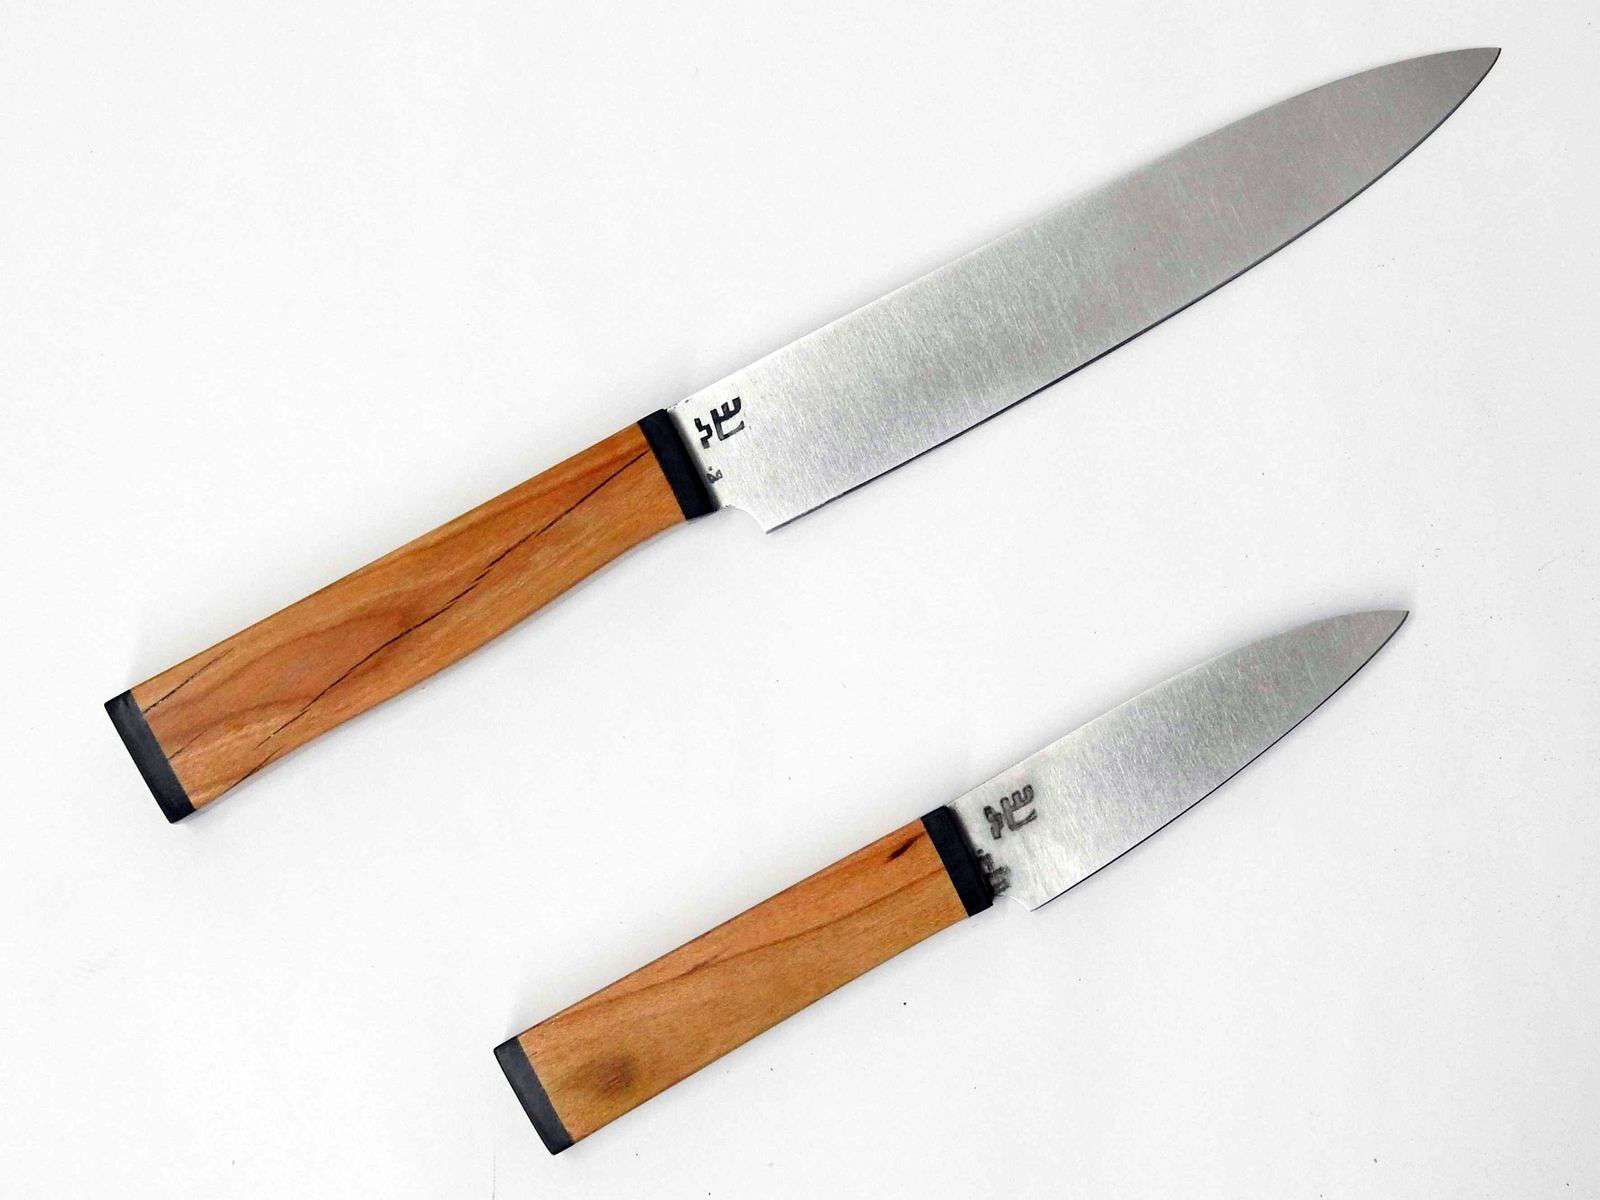
A friend gave me in the spring some cherry wood from a tree that died and dried standing up in their garden. That means the wood has many cracks, some fungus damage, and discolorations. And she asked for a kitchen knife for herself as her primary cooking knife. The type of blade that she requested would be more of a fish-gutting knife for me, but she has her own cutting style and I am not a knife snob to sneer at someone’s cutting technique. If one is not cutting their fingers off, the main thing is that they get the ingredients down to size and to each their own I say.

I got to work but I got distracted several times. Firstly, when I was cutting the steel, I got a small offcut that just lent itself to be made into a small peeling knife matching the one ordered. Secondly, when I was selecting the wood for the handles, I found one piece that was big enough for both handles and a bloc. And thirdly, when I was pondering making legs for the bloc I got an idea to try to make a foldable leg, so I tested it. Having a lot of problems to deal with makes me extremely prone to such distractions. It is a bad habit.

© Charly, all rights reserved. Click for full size

© Charly, all rights reserved. Click for full size

The knives have very simple rectangular handles that are nevertheless comfortable to hold. The blades are N690 steel,  without ricasso, tumbled. The numbering on the smaller knife is a bit unreadable, but such is life. Bolsters and end caps are from buffalo horn. I made them thin because she expressed a wish for the wood to be the dominant design feature.

© Charly, all rights reserved. Click for full size

© Charly, all rights reserved. Click for full size

© Charly, all rights reserved. Click for full size

© Charly, all rights reserved. Click for full size

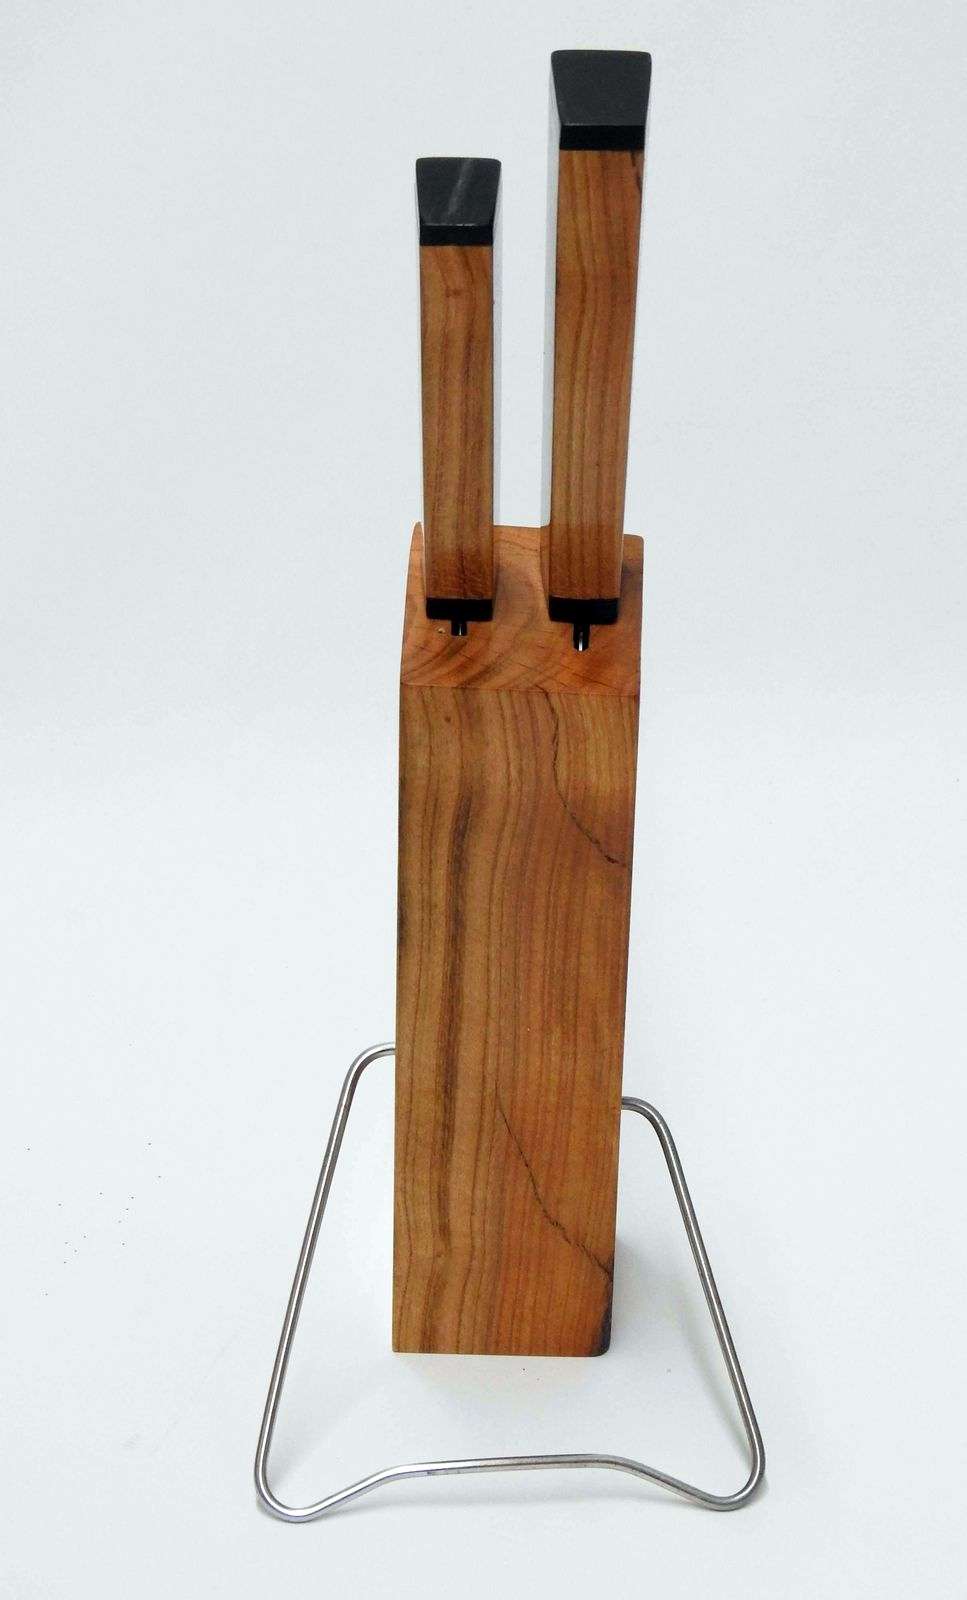
The wood grain and cracks in the handles match that in the bloc. This is exactly why I have used this particular piece of wood, it had just the right size for this. The wood has fairly small pores and is not overly decomposed so trying to infuse it with resin would be an exercise in futility, thus I only coated it with three layers of resin, sanded it with 800 grit, and then I buffed it with home-made silica-based buffing compound.

© Charly, all rights reserved. Click for full size

© Charly, all rights reserved. Click for full size

The foldable leg is bent from an old knitting needle. The holes in the sides of the bloc are offset so the leg has two stable-ish positions. It is just a gimmick that won’t probably see much use but it would make packing the knives for travel easier if one were inclined or in need of to take their cooking knives with them on travels. But mainly I wanted to try to make it.

If she accepts these, I will actually only charge for the bigger knife since that is all that was agreed upon. The small knife and the bloc she will get together with her husband as a belated wedding gift.