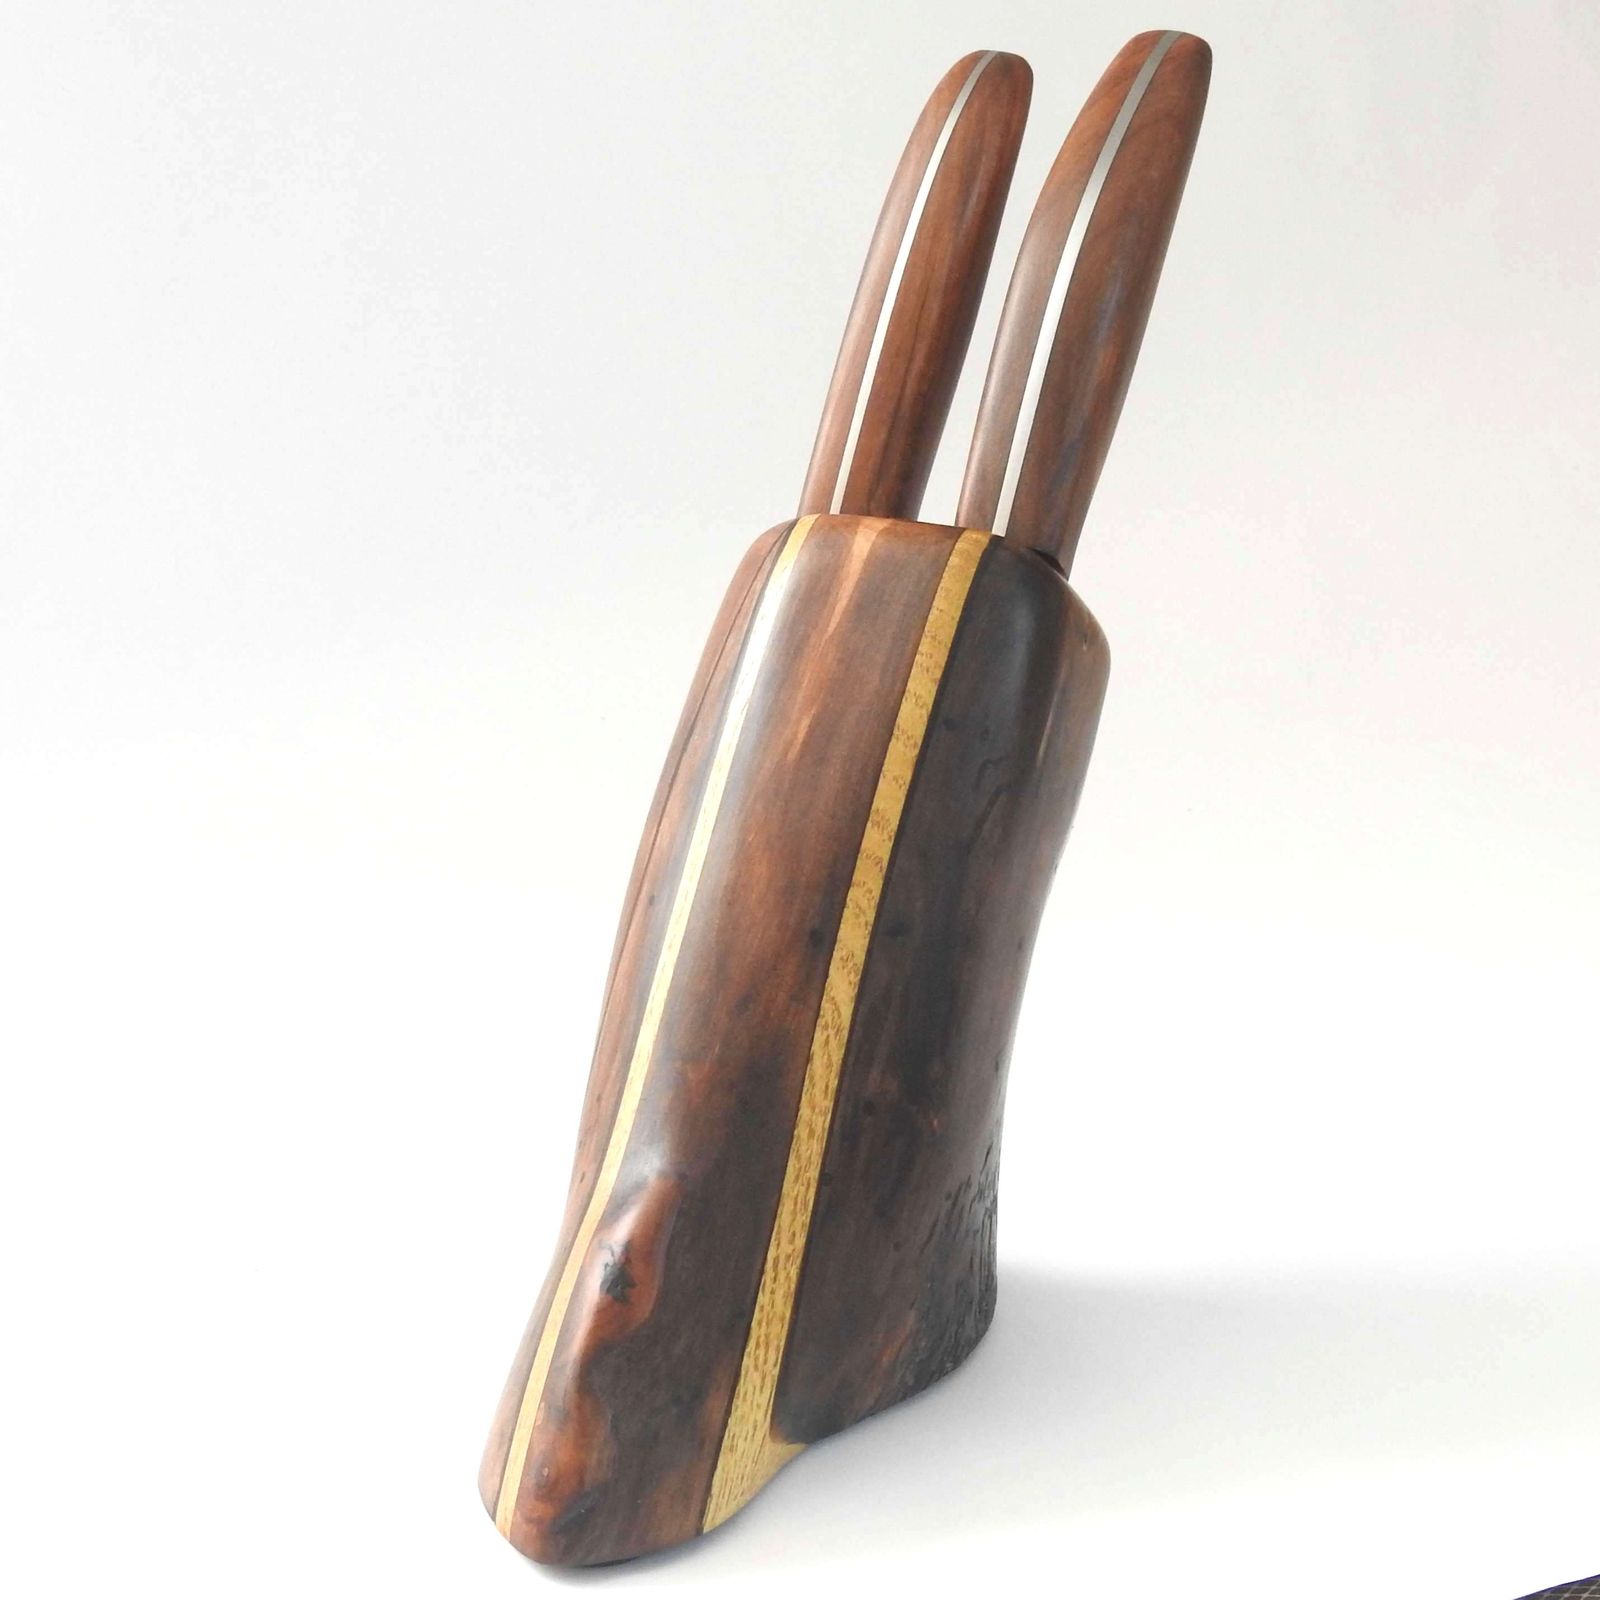
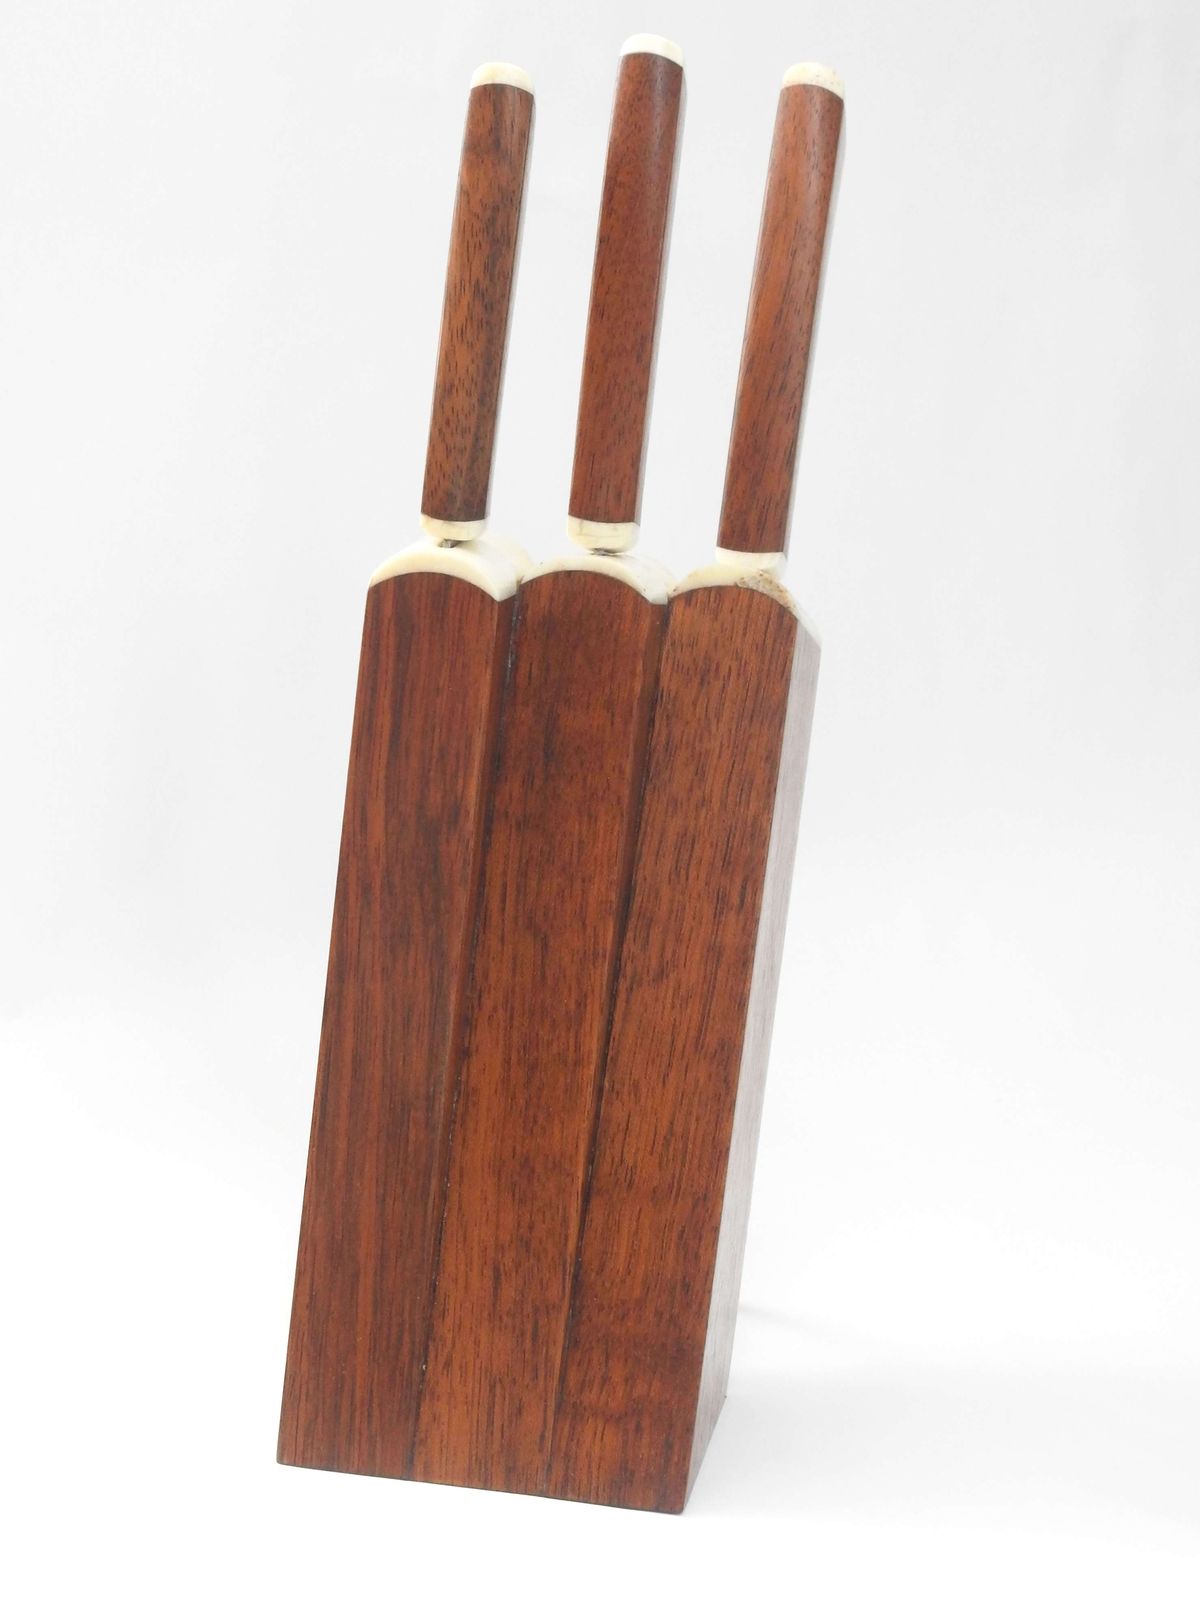
Crafting Perk Unlocked – Hamon

When making the commissioned machete in the summer, I had enuff steel left for one additional blade and two more blanks lying around made from the same steel, thus I decided to try my hand at making a blade with hamon again. So far, I have succeeded only once, with a “mystery” stainless steel, and I had to cheat by carbonitriding it for several hours at ca 500°C. The 54SiCr6 is 0,5% carbon steel, which is not ideal for hamon. 1-1,5% carbon would be better. But I decided to try it nevertheless because if I fail, I can (usually) always harden the whole thing.

Well, I did fail in multiple ways – from three quenched blades, one had to be tossed completely, one I damaged because of unforeseen circumstances, and one turned out OK. This is better than my previous attempts and I think I have a working process now for making blades with hamon. Here is how I did it.

© Charly, all rights reserved. Click for full size

First the used materials – three blade blanks ground with 40 grit. I went for three different geometries to see what happens. A sample size of 1 per geometry is of course not very indicative of anything, but it is better than nothing. On the left is a bottle of liquid glass, a water solution of sodium silicate, a chemical that is sold cheaply in CZ and is used to waterproof cement, make cement go harden faster, and as a binder for heat-resistant cement. Then there is a receptacle with perlite, which I have bought in huge amounts for use both in my gardening and knife-making endeavors. And the last ingredient is fine-sieved dirt from my garden taken from deep below the topsoil – I have a heap of this too from the building of my sewage cleaning facility.

© Charly, all rights reserved. Click for full size

The first step was to cover the blades with a thin layer of just the liquid glass mixed with some clay and sprinkle some more clay on top of that to soak up excess liquid glass and prevent cracking of the layer when drying it with a heat gun (a torch and charcoal fire work both too as I found out later).

© Charly, all rights reserved. Click for full size

Here you see the various phases of the second step, which consisted of adding several layers of perlite. For this, I have used the mixture of liquid glass and dirt again, but I have sprinkled it with perlite. The liquid glass serves as a binder, the clay as a filler to prevent cracking, and the perlite as an insulator. I dried the added layer with a heat gun again and I continued to add these layers until I had about 1 cm thick insulating layer on each blade. To finish it off I have added one more layer of liquid glass and dirt only to make a hard shell that holds it all together.

© Charly, all rights reserved. Click for full size

Initially, I went for three different hamon lines, but unfortunately, this did not work out. After I quenched the machete and one of these blades (I forgot which one) without problems, I had trouble reaching the required temperature again because the coals got smaller and the blown air did not reach under the uppermost layer anymore. So first quench was unsuccessful on two blades, I had to cover them again and try to quench them again. This time I was using the charcoal fire to quickly dry the successive layers and it worked well. Next time I am preparing blades for hardening this way, I will probably combine it with BBQ dinner, combining pleasant and useful.

As I already mentioned, two of these unfortunately failed.

The first fail was the blade with a fuller – it cracked near the ricasso. That is always a risk with hardening steel and it is higher with this method it happens even to masters of this craft because the blades must be quenched in water which is more stressful than oil. So while I am not happy about having to toss the blade, I do not beat myself over the head over it either.

The second fail is the drop-point blade. And I am beating myself over the head about it because this is completely my screw-up. I have read books, internet articles and watched videos about how blades with hamon are made, but I do not remember anyone ever mentioning that a peculiar thing can happen when the hamon line is parallel with the edge – the steel has developed lengthwise stripes that when polished, look under certain light conditions and from certain angles like lengthwise scratches made with low-grit sandpaper. I have ground the blade very thin trying to grind these phantom scratches out, I messed up the grind completely at the end near the ricasso and I had to remove the ricasso and shorten the blade to “save it”.

© Charly, all rights reserved. Click for full size

Here you can see it finished. It is still a blade suitable for small outdoor/hunting skinner knife. Maybe. I will think about it and maybe try to make a suitable handle for it. But I do not like blades without ricasso, not only for aesthetic reasons but also because that way the tang actually really is way too thin for comfort near the handle. But I have finished polishing it because I needed to find out the best finishing method on it before finishing the only successful blade. Btw. it still has those phantom scratches near the tang where the hamon is close to the cutting edge. They drive me crazy.

© Charly, all rights reserved. Click for full size

The best polishing process was pretty standard although very laborious. From 320 grit up I have inserted hand-polishing after each belt-grinder step, removing the angled belt-grinder scratches with lengthwise ones. This leads to very smooth and very flat surfaces and crisp lines and ridges. From 2500 grit upwards it was only hand polishing and only lengthwise. Here you can see the result at 5000 grit, which is the phase at which I left the workshop and went indoors. I have tried buffing the failed blade with buffing wheels and commercial buffing compound but this has led to an interesting effect – the hamon went completely invisible although it could be brought out by etching with oak bark for an hour or two. So for this blade, I have forgone the buffing altogether and went to 7000 grit sandpaper with walnut oil (it is runnier than other edible oils, and does not stink like WD40). 7000 grit is the finest abrasive paper that I can easily buy but it still did not bring out the hamon very well. I could just about see it but it was still nearly impossible to make a photograph of. I etched it with oak bark, but I did not like how it looks so I removed the oak patina again with 7000 grit and I tried another buffing method, one that I have used in my rondel dagger project – very fine hematite.

I put some paper towel cuts in a receptacle with finely ground and sieved hematite dust and shook it a bit so some dust gets caught in the paper towels. Then I dusted the paper towels off to remove the coarser particles that still might be there. I smeared some dubbin on the blades and I tried buffing them manually with these hematite-primed paper towels with lengthwise strokes, using the spine of the blade as a guide. And that has resulted in a nice mirror-polished hardened edge and slightly foggy yet still mirror-polished soft spine, making the hamon really pop out. That way it was not only easily visible but I was also finally able to make a picture.

© Charly, all rights reserved. Click for full size

Hamon is the white line between the darker hardened edge and the lighter soft back.

I am not planning on making very many of these but it is nice to have the knowledge and skill how to do it. I think this blade is deserving of nice fittings so after I etch the logo and serial number, I will start seriously thinking about what kind of handle and sheath to make for it. I am done making blades for a few months however, I still did not dress all of those from last year’s overabladeance and I have eleven kitchen-knife blades in the tumbler now. Unfortunately, I have longer pauses between knife-making days than I like.

Showing off My Wood – Part 5

I had a very busy October and only now it seems like I will be able to do some work in my workshoppe again. I was able to do some, but not much. Mostly I was working around the garden, harvesting nuts and fruit etceeraaaa. In the end, there was probably over 50 kg of walnuts and I had to spend a few days working with the nutkraken because my father was tired. Long lever or not, it was just too much.

I put 16 kg of shelled nuts aside for oil making and I will probably need to build a better solution for cracking the buggers in future years. We already have two more walnut trees in the garden, so there will only be more work. Although they are probably still quite a few years from fruiting. One is a seedling, now circa 10 years old, and another is a grafted red walnut, two years old.

Over three weeks I have spent two to three days a week taking my mother to and from rehabilitation. It seems to have been worth it. This Wednesday she was finally able to straighten her right leg at the knee to over 75%, which was a huge step up since it was barely 50% two weeks ago. That was indeed a happy moment.

So let’s take a break now and show you the last of my wood collection.


Sweet and Sour Cherry (Prunus avium & Prunus cerassus)

You may remember how I was forced to fell a huge cherry tree in my garden. That tree has warmed us in the winter for over a month and of course, I have also put a lot of wood aside for crafting. This is just the tip of the iceberg. It is highly improbable that more than 10% of this will ever be made into some kind of product. Maybe if I manage to get together some viable process for making cutting boards. And of course, to sell what I already have made, I am getting a bit cluttered.

© Charly, all rights reserved. Click for full size

Unfortunately, I did not put aside very many long pieces of this wood. There were not many opportunities. But when I was processing all the wood that I have set aside over the years, I have found several long logs of sour cherry and almost miraculously they did not develop very many cracks and neither got they invested with wood borers. So I have also several nice and long-ish prisms of sour cherry wood, two or three bundles like this one. I think those would make very pretty knife blocs and if used as veneer, I could make quite a lot of big ones at that.

© Charly, all rights reserved. Click for full size

And surprisingly, some of the logs shed the bark quite easily and it too was uninfested and undamaged by bugs in many cases. Thus I have put aside the bark too. I could make it into layered handles (I do not know anyone who has done that with cherry bark). If I do not use it in the end, my inheritors can always burn it for heat.

© Charly, all rights reserved. Click for full size


Willow (Salix sp.)

One of the pollarded willows in my garden looked kinda sickly so I have decided to fell it. And because the pollarded head was full of knots and twists, almost like burlwood, I put it aside and cut it into prisms. I have also “obtained” probably a willow rootball from the garden of a nearby abandoned former sanatorium, where several trees were cut/uprooted during conservation works and most of the wood was left there to rot. I hit a stone in the rootball blunting my table saw a bit but the wood is at least pretty. The upper and left wood in the picture is the pollarded willow head, and the lower right wood is from the rootball.

© Charly, all rights reserved. Click for full size

That is all as far as wood goes. I do have some other crafting materials that are intended for use in knives, I will possibly make posts about those later.

Making Walnut Oil

I spend several hours daily now picking walnuts and laying them out in a designated room to dry. Some days “just” one bucket, other days more. And since we did not eat all walnuts from last year yet, I have been thinking about how to process them in a useful way. And I have decided to try to make walnut oil. I have wasted two kg of low-grade walnuts and one kilo of moderately good ones trying to devise a process that works and I did come up with one in the end.

The first try cost me three hours of work, 700 ml of acetone, and resulted in barely 50 ml of oil from 1 kg of shelled walnuts. Not good.

The second try cost me five hours of work, 1400 ml of acetone, and resulted in roughly 150 ml of oil from 1 kg of shelled walnuts. Better, but still not good at all. This second try also resulted in me having a still now. I might make separate posts about that after I test its newest iteration – the first iteration was not very good at recovering the acetone from the solution (acetone is just too volatile) and after I modified it, I found out I don’t necessarily need it anymore.

Because the third try resulted in roughly 500 ml of oil from 1300 g of shelled walnuts after three hours of work and without the use of any chemicals and with minimum use of elektrimcity. And with walnut oil costing around 40€ per liter, that is financially viable since the next batch should be finished faster – I have a functioning process now and there won’t be any fumbling next time.

So, here goes the process:

  1. Drying the shelled walnuts at 45 °C in a fruit dehumidifier for 12 hours. This step is necessary now because the walnuts are freshly collected from the garden and when ground, they do not release oil but make a paste from which the oil is very difficult to extract. My first attempts at drying the nuts for a shorter time (2 h at 80°C or roasting 5 min at 190°C) did not work, thus me trying to extract the oil with acetone. I learned that the important thing is to get the walnuts completely dry, the shelled kernels should rustle when agitated.
  2. Running the dried walnuts through a meat grinder. This picture is from my first attempt but it is representative of how the shredded nuts looked after first grinding in my final attempt too. I am using an old hand-cranked meat grinder because I did not want to use my mom’s kitchen robot for experimentation. I probably won’t use it for this anyway, grinding the nuts is a bit harder than grinding meat and I fear the robot could get damaged. This old thing was made in times when tools were made to last and not break a month after the warranty expires.

    © Charly, all rights reserved. Click for full size.

  3. Running the dried walnuts through the meat grinder again. This time they started to expel some oil already.

    © Charly, all rights reserved. Click for full size.

  4. And finally, I run the thoroughly shredded kernels through another nearly antique kitchen appliance – a hand-cranked juicer. This resulted in 550 g of highly compressed dry matter with some oil residue, and the rest was oil mixed with some fine particles.

    © Charly, all rights reserved. Click for full size.

  5.  Leaving the oil to settle out the particles. It will probably take a few days. I will skim the oil from the top in the meantime and add water for the particulate matter to drop into. I may use the still again to refine the oil further, using some chemicals again, but it can wait for later. For now, I just wait for it to settle. Here you can see how it settled after 24 hours.

    © Charly, all rights reserved. Click for full size

I was not particularly careful about Hi Jean this time. The first 1000 ml of walnut oil (including oil from the first three experimental runs) will be refined and boiled for use as a food-safe wood finish and not for direct consumption. I do not have personal experience with walnut oil yet but allegedly it has advantages over linseed oil. It has a lower viscosity and thus seeps easier into the wood. It dries quicker. And it does not yellow with age as much as linseed oil does so it should not discolor the wood as much as linseed oil does, making it useful for lighter woods as well as dark ones. I intend to make several end-grain cutting boards at some point in the future.

However, I have cleaned all the appliances thoroughly now and next time I am making the oil, I will also make 1 l of cold-pressed oil – or maybe even more – for consumption. Walnut oil is a bit of a luxury foodstuff so we have no experience with its culinary use either but I am sure we will find some use for it in our kitchen should we have it. And an advantage of 1 l of oil is that it takes a lot less storage space than 5 kg of unshelled walnuts or 3 kg of shelled ones. Making it does not cost nearly as much as even cheap cooking oils do in financial terms, picking and drying the walnuts has to be done anyway, so there is only some work on top of that. And whilst it is not easy or quick work, I do have more time than money and I need the exercise anyway.


Showing off My Wood – Part 4

My mother continues to get better. I have harvested over 50 kg of plums and about 10 kg of apples this year and she has been removing the pits and making marmalade, compotes, and prunes for over a week. The freezer is full of de-pitted and halved plums, we have 2 kg of prunes in the cellar and a huge amount of canned fruit product, thus we are set up for years. This is good because a harvest like this is exceptional.

My father seems to be well after the reduction of antipsychotics. He is able to move and do something again whilst not getting any psychotic fits for a few weeks by now. Today we were at the psychiatrist for a check-up and his long-term memory is apparently in good shape for his age, but he has a short-term memory problem for which he was recommended to exercise a bit with games and puzzles. Alzheimer’s or any other type of severe dementia is, for now, not an issue. If he continues to do well, the antipsychotics may be reduced again at the next check-up at the beginning of next year. At least he genuinely enjoys cracking nuts with the Nutkraken and is positively eager to do it.

I have so much work in the garden and around the house right now that I have barely time for anything else. However I still have some pretty woods to write about, so lets go to it.


Tamarisk (Tamarix)

© Charly, all rights reserved. Click for full size

My favorite aunt used to have a big tamarisk tree in her garden but they felled it a few years ago. When I was visiting, she gave me some of the bigger pieces in case I can make something pretty out of them.

The wood has developed a lot of cracks during the drying, it will need a lot of filling with epoxy. But it has interesting color and texture – the sapwood is bright yellow and the heartwood is reddish-pink with orange-yellow streaks like flames. I think that if I will the cracks with red or orange resin, maybe with glitter, I could get genuinely interesting-looking pieces out of it.

It is one of the few kinds of wood that I can smell when I work it and it is not pleasant. It stinks to the high heavens, to be frank.


Thuja (Thuja sp.)

© Charly, all rights reserved. Click for full size

I only got two pieces of Thuja put aside. I could put aside more from a tree that was uprooted this spring in my neighbor’s garden, but I do not think I will. It is a plain-looking softwood. I will possibly use it for contrast pieces and spacers for darker woods of similar hardness if I ever work with one but I do not think it is worth using on its own.


Yew (Taxus baccata)

© Charly, all rights reserved. Click for full size

© Charly, all rights reserved. Click for full size

Interesting-looking and reasonably hard softwood. Heartwood is reddish-brown, and Sapwood is creamy-white. It is similar to juniper wood that I have shown you previously. I think it might be interesting for both kitchen and bushcraft knives, but since it is poisonous, I will have to be very careful whenever working with it, especially when sanding or filing it. A respirator is a must, people can get – and did get – poisoned from inhaling its sawdust. I have several pieces big enough to make knife bloc, especially if I economize them and use them as veneers. I did not have a piece big enough to make a longbow. Pity.

That’s it for now, but I still have some nice woods to brag about, so stay tuned.

Not a Masterpiece Sheathed

I have realized that I did not show this on Affinity, only on Instagram. With all that is going on, I haven’t done any actual work in my workshop for weeks now, but this one was finished months ago. In the end, I have decided to make a simple, unadorned sheath for my Not a Masterpiece knife. I decided to do that because I felt in the end that an overly decorated sheath would needlessly distract from the beautiful woodgrain in the handle. The striker and ferrocerium rod have simple stainless steel handles. The bronze caught patina, which was to be expected. It does require some maintenance to remain shiny.

© Charly, all rights reserved. Click for full size

© Charly, all rights reserved. Click for full size

The full set is for sale in the Knife Shoppe.

Greening the Balcony – Part 3

Avalus continues his balcony gardening adventures and he has shared some more thoughts and pictures. This is from somewhere mid-summer, I only got now to actually publishing it.


The Blooming Buzzing Balcony
Things are establishing, the tomato plants are continually exploding and I get a bowl of salad every day, although with late June, it gets so hot that the salads are racing to bloom. And they are not alone. So today we look at colorful hot plant sexy bits.
First, a quick overview of what changed in the meantime.

© avalus, all rights reserved. Click for full size.

Yes, more green, tomatoes racing up, and the added board gets really bent by all the pots. Time for a support beam. A yes, parts of an old alu camping bed will be perfect!

© avalus, all rights reserved. Click for full size.

On the other side, my usual chaos, more greens, a rescued kumquat bush hiding behind the table, on the table more plants waiting to be potted. The tomatoes on this side take their time. In previous years, these would grow much faster. Both pots got fresh earth so it is probably down to the variety.

© avalus, all rights reserved. Click for full size.

Enjoy!

© avalus, all rights reserved. Click for full size.

Nasturtium. The camera really struggles with their red shine. I really like putting these in salads or on just bread with cheese and butter. Yum-yum!

© avalus, all rights reserved. Click for full size.

Sweet potato with an extra earth bee. Sadly the other won’t bloom and all the flowers fall off. I really would have been interested in growing them from my own seeds next year.

© avalus, all rights reserved. Click for full size.

Ornamental Pea. I have them in a wide variety of colors but they grew down the outside of the balcony and I can’t get a good image (I am very afraid of dropping my camera).

© avalus, all rights reserved. Click for full size.

A very prickly aubergine, I think I will need to cut most of them off, as the plant is still pretty tiny and I don’t think it could support the many flowers it produces.

© avalus, all rights reserved. Click for full size.

Fiery red climbing bean, green leaves, blue sky. Contrast!

© avalus, all rights reserved. Click for full size.

Tomatoes. I can’t wait for tomato season, my sister is already drowning in fruits.

© avalus, all rights reserved. Click for full size.

Cucumber. They had a slow start and are not as sprawling as the years before. Maybe it is because of old seeds.

© avalus, all rights reserved. Click for full size.

Mystery capsicums, probably sweet peppers. This one I bought but the tag had fallen off.

© avalus, all rights reserved. Click for full size.

Tagetes, bumble bees really love them.

© avalus, all rights reserved. Click for full size.

Strawberries, a monthly variety that steadily produces new fruit and is nearly as expansive with its shoots as the non-blooming sweet potato.

© avalus, all rights reserved. Click for full size.

Stalked celery. Somehow, the wasps really love these flowers.

© avalus, all rights reserved. Click for full size.

Sage, this is a very small steppe variety. I bought this to attract more pollinators to the balcony. I think it worked and the smell is fantastic.

© avalus, all rights reserved. Click for full size.

Red cloves or small onions, leftover from last year.

© avalus, all rights reserved. Click for full size.

And more Beans to close it off.
Soon there will be more. The Echinacea paradoxa is still growing, as are the sunflowers and the calendula. Then there is the thyme and one of the salads I left standing.
Overall, I notice a distinct lack of honey bees on the balcony (and in general) this year, the bumble and earth bees are also few and far between. On the other hand, I get several types of wasps that crawl all over my balcony (and occasionally me, which is a bit unnerving). The climbing beans have had dozens of flowers but so far only three have started to fruit, all the others just fell off, which is disappointing. The tomatoes fared better, but a number were stung by stinking bugs and developed a rot. But these are acceptable losses, one should never expect to have 100% success while gardening.

Next time, I think I will take a closer look at my “exotics” – tropical and half-tropical plants and my experiences. Because I really just can’t throw out avocado and mango pits, or pass by sprouting ginger in a shop … .

Showing off My Wood – Part 3

My mother is slowly regaining the sensitivity and mobility in the knee of her leg, so she is recovering from some of the negative side effects of the hip replacement surgery and she seems to be on the right track. She has no pains and is much more mobile and cheerful than before the surgery. Had it not been for my father’s rapid turn down, things would be swell.

My father has slept well for several nights in a row now, his anti-coagulant medication was adjusted after blood tests and he also finally got his prescription meds from a urologist again. He stopped complaining and takes the antipsychotics regularly. He will probably be never fully OK again, but he seems stable, for now. He was also finally able to do something other than moping, so his obsessive persistent thoughts might be going away and we might be on the right track there as well.

Thus at least for now, I have some piece of mind and I would like to present to you some more of my crafting material collection.


Apricot (Prunus armeniaca)

I am not 100% sure about this wood. Some of it was given to me as apricot wood, and some of it I think is apricot wood based on its characteristics. Its looks are certainly consistent with the genus Prunus.

© Charly, all rights reserved. Click for full size

It is very twisted wood, with reddish-brown heartwood and yellow-orange sapwood. It looks very interesting, but like many woods of the Prunus genus, it tends to develop deep cracks that are often invisible on the outside and become apparent only after one cuts the wood to size. So it is certain that it will require the filling of those cracks with epoxy. I do have enough of it to make some splendid-looking knife sets.

I suspect that trying to treat it with ammonia would turn it brown, just as it does with ordinary cherry.


Lilac (Syringa vulgaris)

© Charly, all rights reserved. Click for full size

This one picture is only the tip of the iceberg. I have several large boxes and a few bundles of longer pieces. I will have to use it as a veneer for knife blocks though, mainly because of its peculiar properties.

Lilac wood has very nice colors – creamy white sapwood, and light brown heartwood with lilac-colored streaks. It is very hard and dense wood, probably the densest in my collection, although not the hardest. However, it has so small pores that it never really dries properly. When cut and formed to size, it tends to develop cracks (checking) on the end grain even when it was drying in the attic for years prior to that. That is an unfortunate property of many kinds of hardwood with small pores. Lilac is really not suitable for some big works because of this. Even big pieces – which are rare – have to be cut down significantly and the wood tends to crack, warp and twist for a looooooong time.

Ammonia turns the sapwood to brown and the heartwood to even darker brown. I do not think it is worth it, this wood is more beautiful in its original form. I will probably need to use some UV-stabilized finishes for it to preserve its color.


Staghorn sumach (Rhus typhina)

© Charly, all rights reserved. Click for full size

Not native species. Originally it was sparingly planted in parks and gardens as a decorative plant. It started to propagate beyond that and I am afraid it might become an invasive species soon.

I got a piece of this wood from my cousin about twenty years ago and I had some hopes for it. But now I am only including it here for the sake of completeness, I might just use it as firewood. The wood had a pleasant light-green tint when it was fresh, but not only did it develop an unholy amount of cracks during drying, the greenish ting has almost disappeared and the wood has now a dull greyish-yellow color. I certainly do not have high hopes for this small bundle and I am in no hurry to use it.


Plum (Prunus domestica)

© Charly, all rights reserved. Click for full size

© Charly, all rights reserved. Click for full size

Absolutely stunning wood, one of my all-time favorites. All woods of the Prunus genus are beautiful, but this is special to me. Not for any particular reason, I just really like how it looks.

The sapwood is yellowish and not very interesting, but the heartwood has a gorgeous reddish color. It is hard with small pores and barely visible growth rings. It works well. I do not have a lot and not very many big pieces. I might have enough to make a few blocks with a veneer but not many. I will have to combine it with other woods if I decide to use it for that.

It is a very beautiful wood and I do have big plans for some of the pieces. I really, really do hope those plans will go well. I already have one finished blade that I think is deserving of it. If only I had the time and strength to work on knives.

Eye ain’t done yet. There will be at least one more post of this. Possibly more.

Le Workshoppe Rearangeé

I think I did not show you the inside of my workshop, except for the pieces visible around the various pieces of knives and machinery that I have shown in my crafting posts. And since I have totally overhauled (and cleaned) the shop these last few days, I have decided to give you a quick tour of the new layout. The workshop is a bit ad-hoc and furniture is made from mostly scraps.

So let’s start with the north wall, right behind the door.

© Charly, all rights reserved. Click for full size

On the right, you can see where my lathe is stored. I do not use it very often. Right next to the circuit breaker hangs my woodcutting helmet and fire extinguisher.

In the middle of that wall is a huge shelf packed with various things. At the very top are old baking trays, then a plastic tray with some pieces of graphite. Neither of those things I need often, thus the upper shelves. Then come abrasive cloths and papers sorted by grit. Under them are some cleaning, flammable and corrosive chemicals, and a little basket with magnets inside to collect steel dust. Next comes the shelf with various fixtures and jaws for the vice, follows shelf with knives in progress and knife templates, and a shelf with big massive pieces of steel and aluminium. The second shelf from the bottom is now filled with various lubricants and the lowest one currently occupies interesting-looking stones for suiseki and bonsai. The various plastic bottles are mostly sunflower oil for quenching and one bottle for cutting oil.

To the left of the shelf hangs a board with various chisels, scrapers, planers, and knives.

Leaning against the shelf are various wooden dowels, staves, bow staves, pipes, and long wooden prisms.

To the very left, you see the beginnings of my first workbench, made yonks ago. It is three meters long and would not fit in one picture.

© Charly, all rights reserved. Click for full size

Above and below the workbench are cupboards repurposed from kitchen renovations. In the corner, you can see two racks for thin metal profiles and pipes and the motor belongs to my tumbler. I have put it on this part of the workbench because it is somewhat inaccessible to work on and I have nowhere else to put the tumbler where it would not be in the way. I think I will be able to run it from there too, which is a plus.

The red vice is right under a light and in a spot where all the chisels, hammers, saws, rasps, and files are no more than one step away. On the cupboard right above it is also a thermometer so I know how warm/cold it is. Inside the cupboard above the vice are empty plastic containers for when I need them during work (like for example to sort screws into when disassembling/assembling something). In the drawer below it are small files and brushes, in the next drawer various pliers and shears, next wrenches, and the bottom drawer is filled with clamps.

© Charly, all rights reserved. Click for full size

The forge in the middle is there because it needs repairs – work for tomorrow. Under it is a place for storing the table saw when its not in use, a small stool to help me to reach the upper shelves, a bucket for steel dust, and a shop vacuum cleaner.

Above the forge is a shelf with various writing instruments, gomtry tools like compasses, rulers, curves, the most-often used screwdrivers, and a roll of paper kitchen towels. The papers hanging on that shelf are laminated steel heat-treating charts. I will add in near future data sheets for the steels that I use. Inside the cupboard are nails and on the very top shelf accessories for the greenhouses. Again, the upper shelf is occupied with things that are not used often.

Next, you can see my unbender, now permanently fixed to the workbench. I have also spent one more day making it sturdier and improving the design a bit. Next to it, at the end of the bench, is now permanently fixed my drill press. It is lifted slightly above the bench so I can reach under it with a small broom to tease out the metal chips that collect there. I have also put there a piece of PVC flooring to protect the workbench from dripping cutting oil. The tables hanging on the cupboard above it are a drill-speed table for various materials and a conversion table between trizact and grit abrasive ranking.

Below the drill are various small brooms and seldom-used cutting instruments. In the drawers are some abrasives for my handheld belt sander and some ppe, like gloves.

Above the drill press, right at the end of the picture, you can see a small shelf packed with old cookware for when I need to cook something that is not fit to do in the kitchen. Behind it is a small shelf filled with various drill bits.

Now we come to the south wall.

© Charly, all rights reserved. Click for full size

You have already seen my abrasive belt rack and my small heating stove. The basket and plastic bucket are for wood off-cuts. Normally they are not this full, but I did not need to heat the workshop for quite a long time now, obviously. The grey plastic trumpet is a vacuum attachment for collecting wood dust from the belt sander. The black barrel beside it with a similar metal trumpet is for collecting sparks and metal dust.

The green shelf to the left has buckets with various chemicals and abrasives on the top, some drums for the tumbler on the top shelf, and various metal offcuts on the rest.

Now we are reaching the newest addition to my workshop, one that has spurred the complete reorganization – the east wall with a new workbench.

© Charly, all rights reserved. Click for full size

On the right is now permanently affixed my small bandsaw. I hope that fixing it to the bench will reduce its vibrations and improve the lifespan of the saw bands, they were snapping rather quickly.

Below the bandsaw is a small cupboard with bonsaist equipment and various attachments for the belt sander.

The small brown shelf between the windows contains various screws, glues, popsicle sticks, bbq skewers, strings, wooden wedges, metal foils, and a first aid kit. On the right side (out of view except the baseball cap) hang various ppe, like face shield, earmuffs, respirator, and goggles. On the left side hang various bits of wire. Below it is a cordless drill and my two angle-grinders.

And on the left side of the bench is the belt sander. Originally it stood where the unbender is now, and it was a pain in the nether regions. It got in the way of reaching the cupboards and working on the drill press and it ate a lot of the workbench so some manual works were awkward or even impossible. Here it should not be in the way and there is enough space to the right side of it to build various attachments – I plan a lathe, a drum sander, and a disc sander.

The drawers in the grey cupboard below contain various measuring instruments, ball bearings, cork, popsicle sticks, and some other various stuff.

In the cupboard itself are boxes with assorted screws, spacers, springs, locks, keys, handles, and similar small diverse things that do not fit anywhere else.

Between the cupboard and the new workbench is about 9 cm space. I have thought about what to do with it and I have decided that it would be an ideal storage space for all of my knife- and tool-making steels, so I have put them there.

And on the very left of the picture you see where my various electric cables and gas burners hang.

That was the grand tour through my small workshop. Writing it took a lot longer than I have expected, I hope I did not bore you to death.

A New Workbench

Today was lazying-around-doing-nothing-in-particular-day. I needed it, my back hurt as if I were shoveling gravel. Four days in a row I was working as much as I could on making the best of the bad weather and making a new work bench for my workshop, something that was desperately needed for a long time by now.

I have started by taking some ca 5 m long boards from their storage in my garden-shed half of the workshop building.

© Charly, all rights reserved. Click for full size

These super long spruce boards are reclaimed from attic renovations when a few years ago the old board flooring was replaced with OSB boards. They have some insect damage, but not excessive so they are still strong, and they are super dry. Thus whilst they are straight lengthwise, they are slightly bent across. They also have fitting tongues and groves.

I have cut 10 of 2300 mm long pieces and 17 of 700 mm long pieces and cleaned all the grooves and tongues first with a chisel (they were full of decades-worth of dust) and then with sandpaper. After that I have put five long boards next to each other with the concave side up and I flattened them with my handheld belt sander.

© Charly, all rights reserved. Click for full size

The concave side of the boards required less material removal than the convex side would have, therefore the belt sander was sufficient. And it has also removed the oil oil/wax finish on the boards.

Flaterooned boards could be glued side-by-side together, forming the base of the workbench. To keep them together I have lashed them with four Spanish windlasses.

© Charly, all rights reserved. Click for full size

I have used PU-based glue for his bench but I have used PVA for my first one and it worked too. The PVA only needs a longer time to cure and the PU has a further advantage in that it foams up, filling neatly small voids, etc.

I did not wait for the glue to set, however, and I started sanding the convex sides of the short boards straightaway.

© Charly, all rights reserved. Click for full size

When those vere sanded flat, I started gluing them to the base and attaching them with screws to hold them in place. That was my first workday finished.

© Charly, all rights reserved. Click for full size

So I have two layers of boards, perpendicular to each other, glued at flattened concave sides. The next day I removed all the screws and then came the hardest part of this whole ordeal – flattening the convex sides of the bords in the upper layer and of the five remaining long boards.

© Charly, all rights reserved. Click for full size

The convex sides needed to remove more material than the concave sides, thus belt sander alone was not sufficient. I had to take out the one tool that I actively hate – the electric hand planer. I never figured out how to use it properly. It hogs material away quite successfully, but it also makes gouges in the boards no matter what I do and the gyroscopic force makes its movement extremely difficult and tiring. And it is extremely dangerous on top of that. And it makes an unholy mess.

But I have managed to get the sides at least somewhat flat so I could glue on the long boards as the top layer. again using screws to hold them in place. That was the second day finished.

© Charly, all rights reserved. Click for full size

The next day I again removed all the screws and I filled all the holes and gaps with bbq skewers, popsicle sticks, and/or a mixture of PVA glue and sawdust as appropriate.

© Charly, all rights reserved. Click for full size

It has cured very quickly so in the afternoon I could flatten this side, using mostly the belt sander, but I had to use the dreaded planer too a few times. I made one unseemly gauge on the surface :-/

© Charly, all rights reserved. Click for full size

I had to fill in some voids again, but I was able to give it the first coat with strongly diluted acrylic paint that very same evening.

© Charly, all rights reserved. Click for full size

At this point, I was so physically tired that I could not even sleep properly. Fighting the electric hand planer made my back and neck ache something awful. But at least the 2300x720x70 mm workbench board was mostly finished at this point. It is not tutti flatti perfetti, but it is flaterooni enough.

© Charly, all rights reserved. Click for full size

The third day was thus finished, the first coat of paint dried overnight.

The next day I have again filled some cracks with sawdust and acrylic paint mixture, gave the whole thing a coat of undiluted paint and I weighed it. It weighs approximately 42 kg. It did take some work to get it through the workshop door and into the workshop, but I have managed it and I managed it solo. I was afraid to ask my father for help because he could easily hurt himself. I was more comfortable with banging the board about and eventually breaking something than with him getting some serious injury. Luckily I did not break anything, nor did I injure myself, I was just very, very tired at the end of that endeavor and I have not made any pictures of what I have done inside the workshop. I just remembered to make this one picture at the end.

© Charly, all rights reserved. Click for full size

The board is fixed to the wall on the rear edge and supported by two legs on the front two corners. Under it are some reclaimed furniture cupboards that were there even before, just without a nice continuous workbench above them. Because it is fixed to the wall, it is very sturdy and It can take my whole body weight in the middle without bending.

That was the fourth day finished. I was still too tired to even sleep properly, so I did not.

Now that it is in place, it will get two more coats of paint (one is drying right now) and then I will put on it the machinery. Either tomorrow or the day after that, depending on how fast the paint cures and how I feel.

I intend for this workbench to be a permanent home for my belt sander and band saw and also, in the future, a lathe. That should free my first workbench significantly, allowing me to do manual work more comfortably and have more than one vice.

A Big Commission – Part 9 – Da Pictures

Today the customer has picked up his brand new machete. He was apparently delighted, at least he said so. His exact words were “This is much better quality than I have expected, especially the leatherwork.” So today I did not feel like a total waste of space. Here are some nice pictures for you to look at. I did not have to do too much post-processing after all.

© Charly, all rights reserved. Click for full size

© Charly, all rights reserved. Click for full size

© Charly, all rights reserved. Click for full size

© Charly, all rights reserved. Click for full size

© Charly, all rights reserved. Click for full size

© Charly, all rights reserved. Click for full size

Spatzenbaden

We do not feed the birds in the summer but there is an old baking tray among the bonsai trees that we fill with clean water once every few days, especially in this heat. Today I managed to take a few pictures of sparrows frolicking in the water.

© Charly, all rights reserved. Click for full size

© Charly, all rights reserved. Click for full size

© Charly, all rights reserved. Click for full size

© Charly, all rights reserved. Click for full size

© Charly, all rights reserved. Click for full size

A Big Commission – Part 8 – Photographing

I do not need to make nice pictures for the webshop for this one – unless the customer rejects it, which I hope he does not – but I do want to have nice pictures for myself, for Instagram and, of course, for Affinity. And since it was a nice sunny day today, I took my photography session outdoors. One advantage of that is the sunlight, one disadvantage of that is way too focused light. Shade has, of course, diffuse light, and whilst it is very bright on a cloudless sunny day, it is alas also of the wrong color for this thing and I did not want to spend too much time with corrections in either the camera or on the PC.

So I have rigged up a small thingamajig to make pictures in diffuse light whilst getting the benefit of direct sunlight’s color whilst getting it a bit diffuse. I will have to edit out an occasional ant or piece of debris though, so I am not entirely sure I have saved time in the post-production at all. Well…

© Charly, all rights reserved. Click for full size

A slightly overcast sky would be best but despite my valiant efforts, the weather still refuses to obey my commands. Mind you, if I could command the weather, I would not command a slight overcast right now, I would command a week of slow, drizzling rains and make the pictures indoors.

Pictures will be posted here and on Instagram after the customer picks up the item. I hope it will be tomorrow, but it might take a few weeks too, depending on circumstances.

A Big Commission – Part 7 – Missed Opportunity

AAAARGHHH! Amidiotextrordinaarggh!

Today I have sharpened the machete, thus de-facto finishing the commission. I have decided to test it in a way that poses minimal risks to the nice surface finish and still tests its cutting capabilities. By cutting milk boxes filled with water standing on a pole. That is a good way of testing an edge because a blunt blade just bats the box away from the pole, a sharp-ish one cuts partly through, tears the rest, and throws both pieces away, and a really sharp one sails through the box, the top falls off and the bottoms stays on the pole. A bad cutting technique may lead to a bad cut, but not even a perfect technique can lead to a good cut with a blunt blade. It does not test an edge’s durability – a well-sharpened bronze sword would perform well too.

I considered filming it and then I thought to myself “Nah, nothing interesting ever happens, waste of time”. Then I cut the first box and I immediately cursed my laziness and stupidity.

© Charly, all rights reserved. Click for full size

I cut the top of the box cleanly off, and it stayed on! I have cut dozens of these boxes when I was testing my own machete and this has never happened. And since there was enough of the box left for a second cut, I went on and cut it a second time.

© Charly, all rights reserved. Click for full size

And the blade sailed through like there was nothing there and both cut pieces stayed atop the bottom part. If my hair was long enough to grab and tear out, that is what I would be doing. A rare thing happens and I did not film it because I was lazy to go upstairs and set up my tripod.

Of course, I went upstairs for the tripod in a hope that I will be able to replicate it or at least get some interesting footage from the remaining three boxes that I had at hand. On two I got useless footage because I messed up my cutting technique. Probably nerves. Definitively nerves. On the third attempt, I did manage to get three clean cuts through the box, but the first two stayed on only because they remained connected on a minuscule (~1 mm) strip of paper – I was standing a tiny bit too far from it. After the third cut the top fell off but the bottom stayed on the pole so at least there’s that.

It is a wicked sharp blade, it cuts like a lightsaber. It will be a good tool. But I missed an opportunity for getting good advertising footage. Bigly.