I do not have much time to goof around with my camera, but today my mom insisted on taking a picure of this small orchid.


©Charly, all rights reserved. Click for full size.
I do not have much time to goof around with my camera, but today my mom insisted on taking a picure of this small orchid.
©Charly, all rights reserved. Click for full size.

Nomenclature of human bones in Sòng Cí: Xǐ-yuān lù jí-zhèng, edited by Ruǎn Qíxīn (1843).
Song Ci (Sung Tz’u) is considered to be the founder of forensic science. In 1247, Song Ci wrote Collected Cases of Injustice Rectified or The Washing Away of Wrongs.
Different versions of the book exist, but the earliest existing version was published during the Yuan Dynasty, containing fifty-three chapters in five volumes. The first volume describes the imperial decree issued by Song Dynasty on the inspection of bodies and injuries. The second volume contains notes and methods on post-mortem examinations. The third, fourth, and fifth volumes detail the appearances of corpses from various causes of death and methods of treatments to certain injuries of a wounded person.
Song Ci ruled regulation about autopsy report for court, how to protect the evidence in the examining process, the reason why workers must show examination to public impartiality;how to wash dead body for examining the different reasons of death. At that time, the book had given methods to distinguish suicide or pretending suicide.
The particulars of each case must be recorded in the doctor’s own handwriting. No one else is allowed to write his autopsy report. A coroner must not avoid performing an autopsy just because he detests the stench of corpses. A coroner must refrain from sitting comfortably behind a curtain of incense that masks the stench, letting his subordinates do the autopsy unsupervised, or allowing a petty official to write his autopsy report, otherwise any potential inaccuracy is unchecked and uncorrected.”
He also said:
“Should there be any inaccuracy in an autopsy report, injustice would remain with the deceased as well as the living. A wrongful death sentence without justice may claim one or more additional lives, which would in turn result in feuds and revenges, prolonging the tragedy. In order to avoid any miscarriage of justice, the coroner must immediately examine the case personally.” [Source]
Medievalists has a list of ten observations Song Ci made when it came to discerning murder, and different types of murder.
Last year, photographer Robert Shults did a photographic series called The Washing Away of Wrongs, all taken at a forensic research facility in Texas.

Robert Shults, photograph from The Washing Away of Wrongs, with flowers from a nearby tree fallen across a donor’s body (courtesy the artist).
You can read all about that, and see more too, at Hyperallergic. There are some graphic photos, so have a care.
Click for full size. Text translation in comments.

Click for full size.

Die honigbitter truncken weis…, Gerard Bouttats, Engraving. Subject: Gluttony, Devils & Demons, Alcohol, Lust, Greed, Poverty, Temperance, Politics.
Click for full size. Text translations in comments.

Click for full size.

The Anatomist Overtaken by the Watch in Carring Off Miss W- in a Hamper. William Austin, Etching, 1773. Subject: Graverobbing, William Hunter.
Click for full size, text translations in comments.

Click for full size.
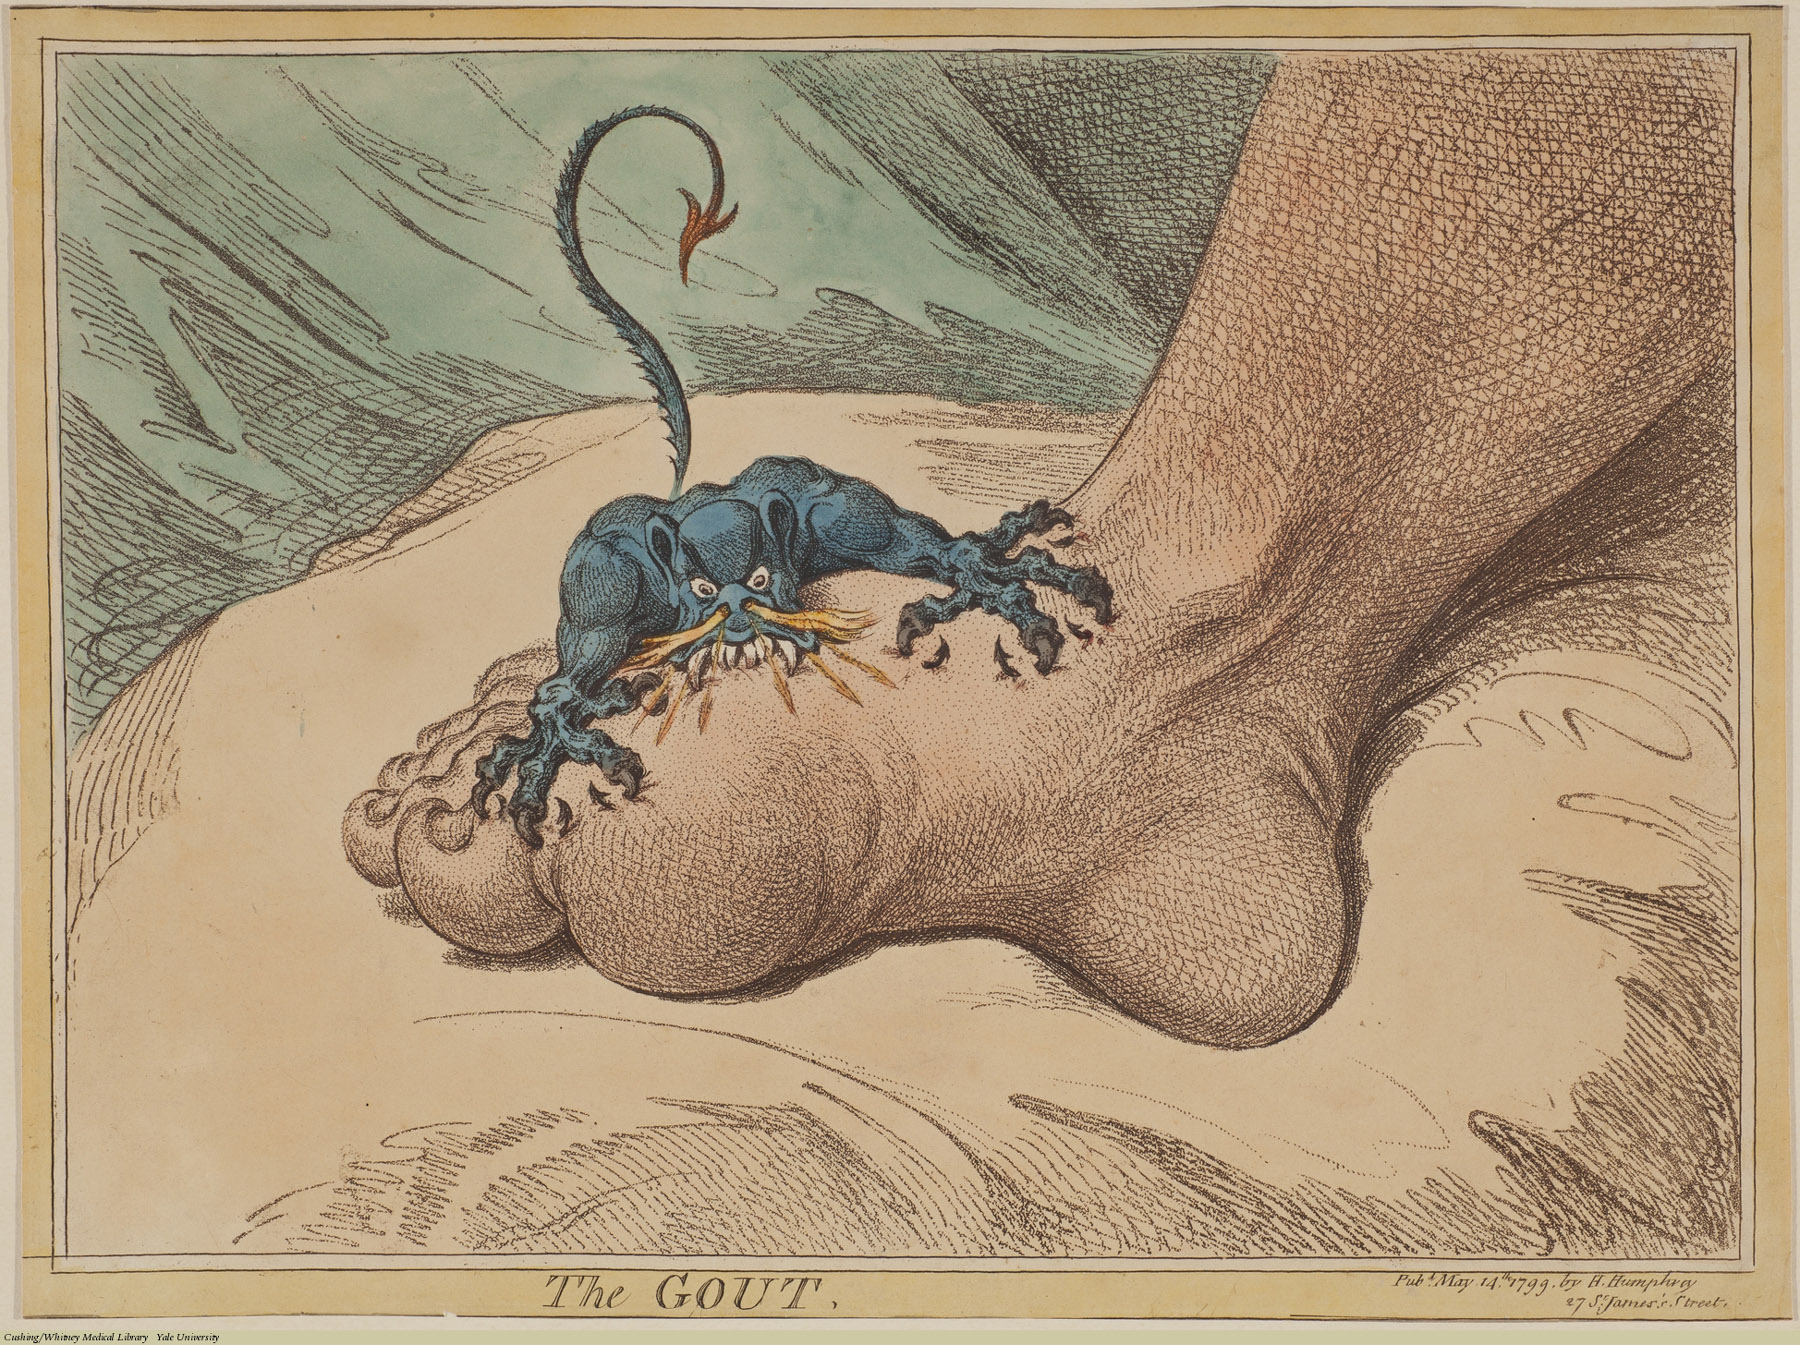
The Gout. James Gillray, Etching coloured, 1799. Subject: Gout, Pain, Demons & Devils.
The dagger of Ciri in The game Witcher 3 has handle turned from some yellow wood. Looks almost canary yellow in the game, but orange in the extracted 3D file without the in-game lighting. There is only one wood that I know that has such color – Osage orange – and only when freshly worked at that, it ages to dark brown. There is another wood that has very nice yellow (vanilla) color both fresh and aged, and that is Black elder. I would love to make the handle from black elder, because it is beautiful hard wood and it is a pleasure to work with. Alas, I do not have a piece big enough. So I had to go with Sycamore maple which is pale yellow and ages to slightly darker yellow.
 I begun by cutting an approximately 50×50 mm rectangular block on my circular saw. Dried maple wood is unfortunately not only very hard, but also has very small pores, so it tends to burn on circular saw. There is nothing that can be done about it except to work slowly. Unfortunately I only had this one piece of big enough maple wood at hand and it had a very deep split at exactly the wrong place, so I had to shorten it to 120 mm, 6 mm shorter than I wanted to based on the proportions from the 3D game file. But since I am not aiming for exact replica and I will make slight changes to the design of the dagger anyway that should not bother me. But it does, go figure. I can gain a few mm on the bolster and on the rondel later on if I decide it needs to be done.
Next step was to turn the handle. This is where I can show off with my Poor Man’s Lathe that I have built twenty years ago. Unfortunately I did not have too many opportunities to work on it yet, so my experience with wood-turning is extremely limited.
 First came fixing the piece of wood between the points of the lathe. On the left the drill holds not a drill bit, but a special piece with a central point and three screwdriver like flattened teeth to hold onto the workpiece. Normally I would hammer it into the wood, but sycamore wood is very hard. I had to pre-drill the holes. On the right there is a round tip that goes into a depression in the wood. It helps to put a bit of grease or a few drops of oil on this point, otherwise the friction can and will burn the wood and it will smoke.
 Second comes turning the wood down to a cylinder of the maximum diameter the final piece is supposed to have. On this part it is important to work with slow rotations because the workpiece is not yet symmetrical and on high rotations it would vibrate and it could potentially fly out of the lathe and smash window in best case, or throat in worst case. Neither of these lessons have I learned first hand, and do not intend to. Better safe than sorry.
So easy does it, no rushing, slowly chipping on the edges until there is a symmetrical cylinder rotating on the lathe. Then the speed can be increased and final shape can be formed. Since this is hard wood, the angle of the chisel blade to the piece is held at close to 90 degrees and I was more scratching than cutting the wood. Trying to get a continuous cut on completely dried hardwood like this is asking for trouble unless one is very, very good and experienced at it – in best case the chisel bites in deep and no matter how sharp it is, it tears of a splinter instead of cutting, ruining the piece. Worst case the leverage could damage the chisel or tear it from one’s hands and… I shudder to think about it. I learned the first lesson here, but fortunately not the second one. For the same reason also the chisel support should be kept as close to the workpiece as possible the whole time.
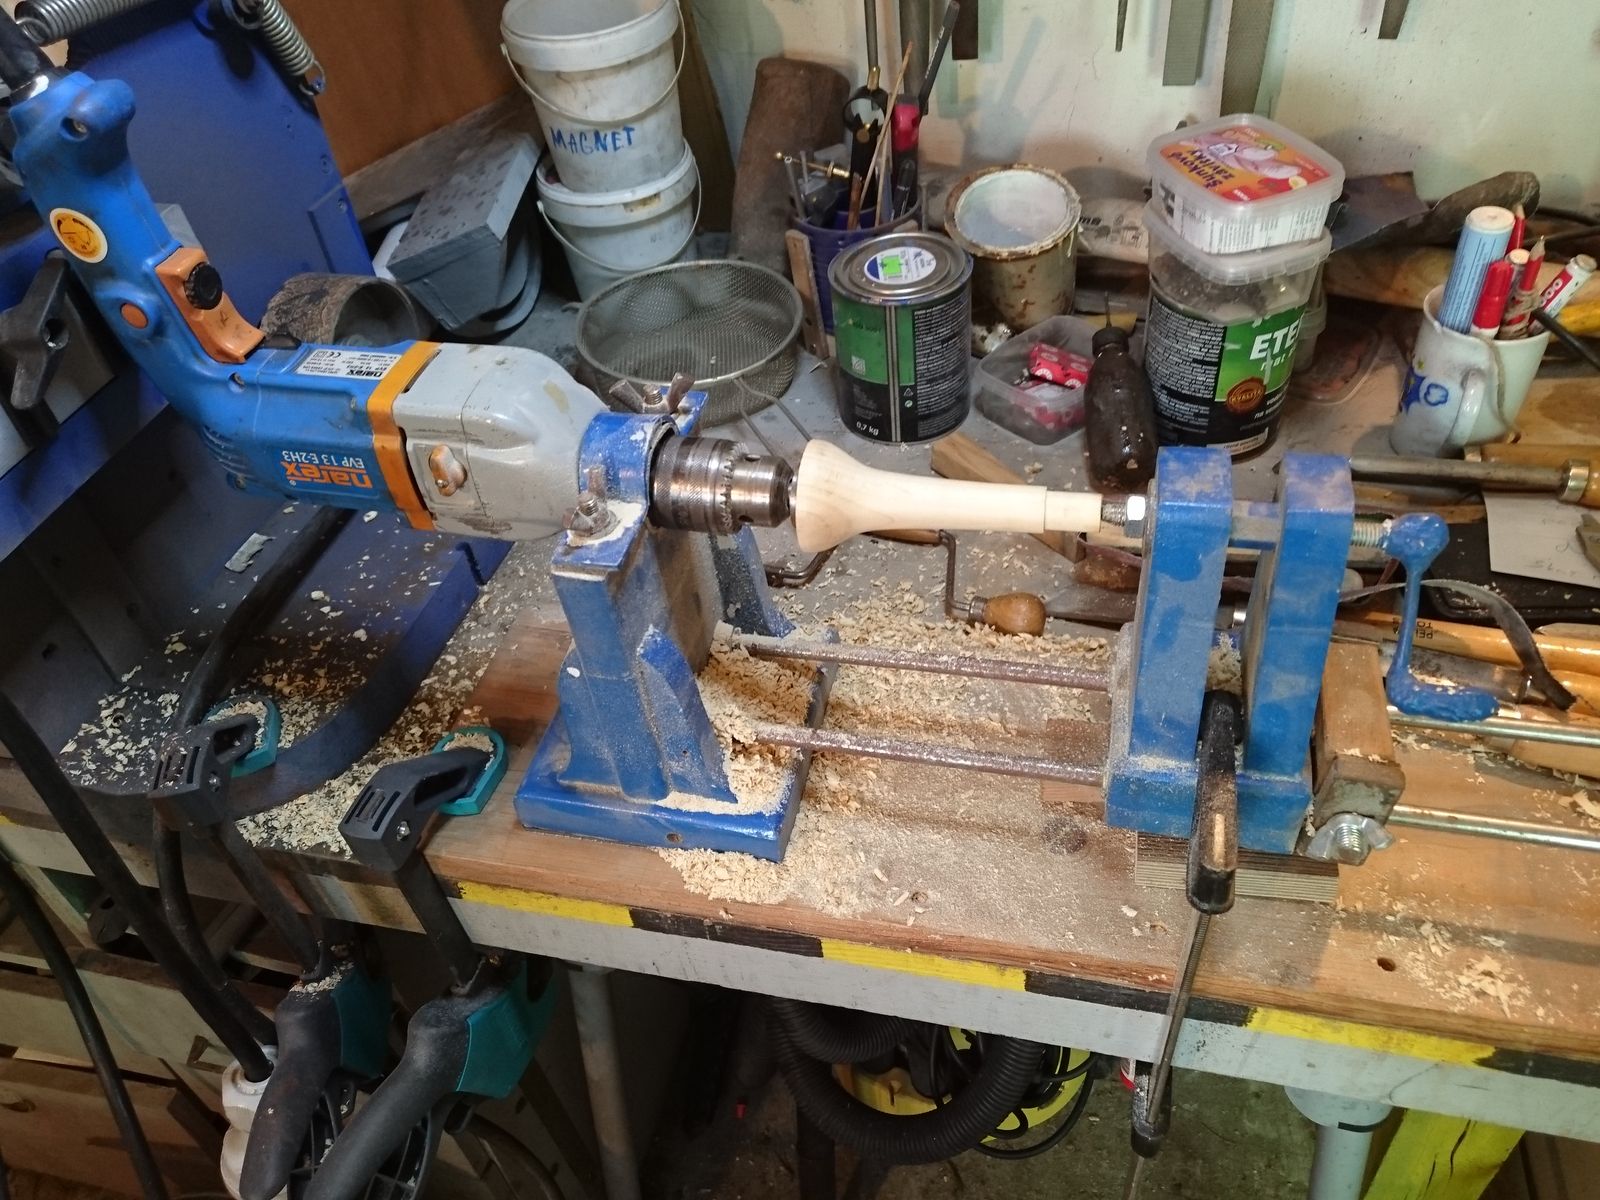 When turning the shape I first turned town the part for bolster as precisely as I could under the circumstances (the circumstances being that I have no bolster prepared yet). then I turned a piece of handle down to the final width and lastly I turned the middle. Apart from the overall width on both ends I did not do any measurements and I turned the handle down to a shape that simply “looked” right to me.
After that I could remove the chisel support and could polish the piece with 80, 120, 180 and 320 grit sandpaper. This I have done partly on lathe by turning the piece and partly in hand sanding lengthwise in order to remove all visible scratches. Sycamore wood is very hard and can take very good polish, but this piece will get dirty yet no matter what I do, so there is no point fussing about that too much yet.
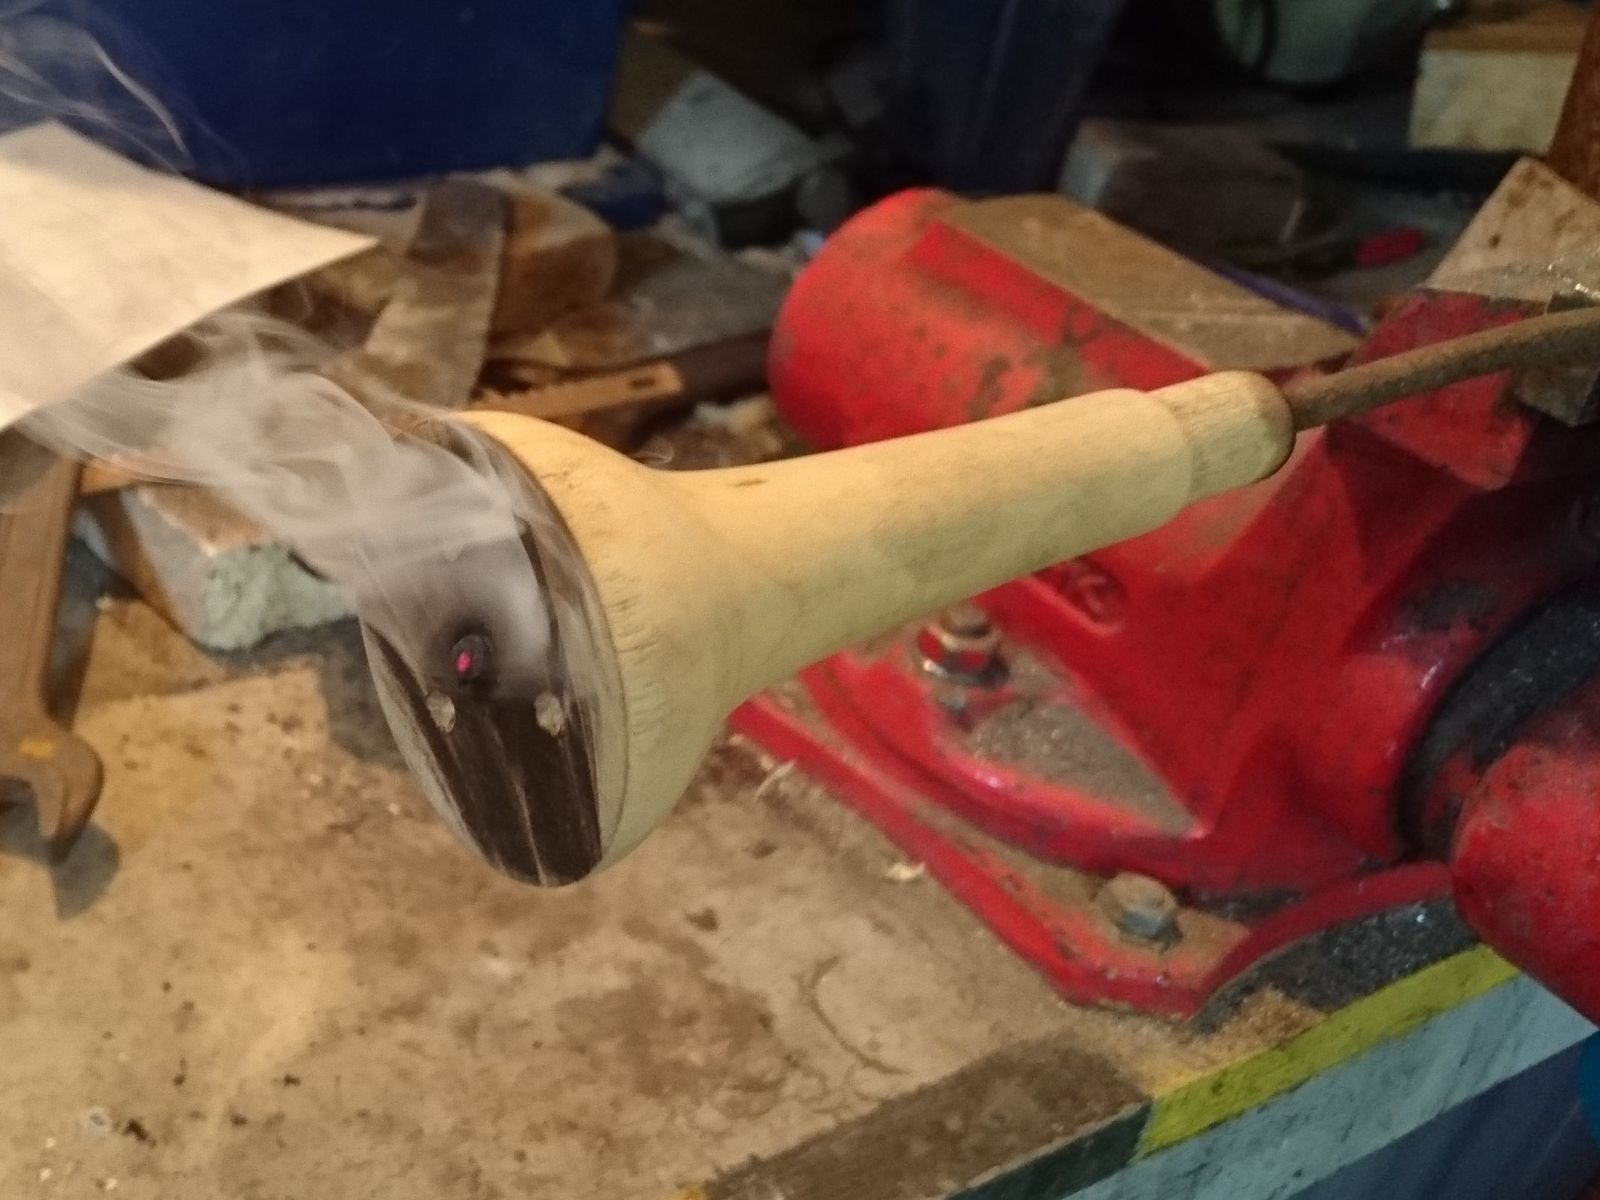 Last step is making the hole for the tang. I do not have a drill bit long and thin enough for this, so I drilled as far as I could and I burned the rest through with a piece of steel of approximately the right shape held in a vice and heated up with torch to red heat. This has produced an awful lot of smoke and took a lot longer than I hoped for. Not an enjoyable work, if you ask me. Not particularly safe one either. Even with the door open wide the whole room has filled with smoke hat stung the eyes even through protective welding goggles.
 Towards the end, when the burnings from both ends met in the middle and actually made a hole throughout the whole handle, the smoke spouting out of the end could be ignited for a short time. That was fun to watch and a bugger to make a picture of, with burning torch in one hand and the phone in the other. I have managed only this one picture, where the flame almost goes out already. After I made hole through, I have closed the gas valve on the bomb and put the hot torch on granite stone on the table. Thus I was finished for the day with nearly thre hours of work done. Two hours later I went back to to check nothing burns and on finding my shop smoke-free I could go to bed.
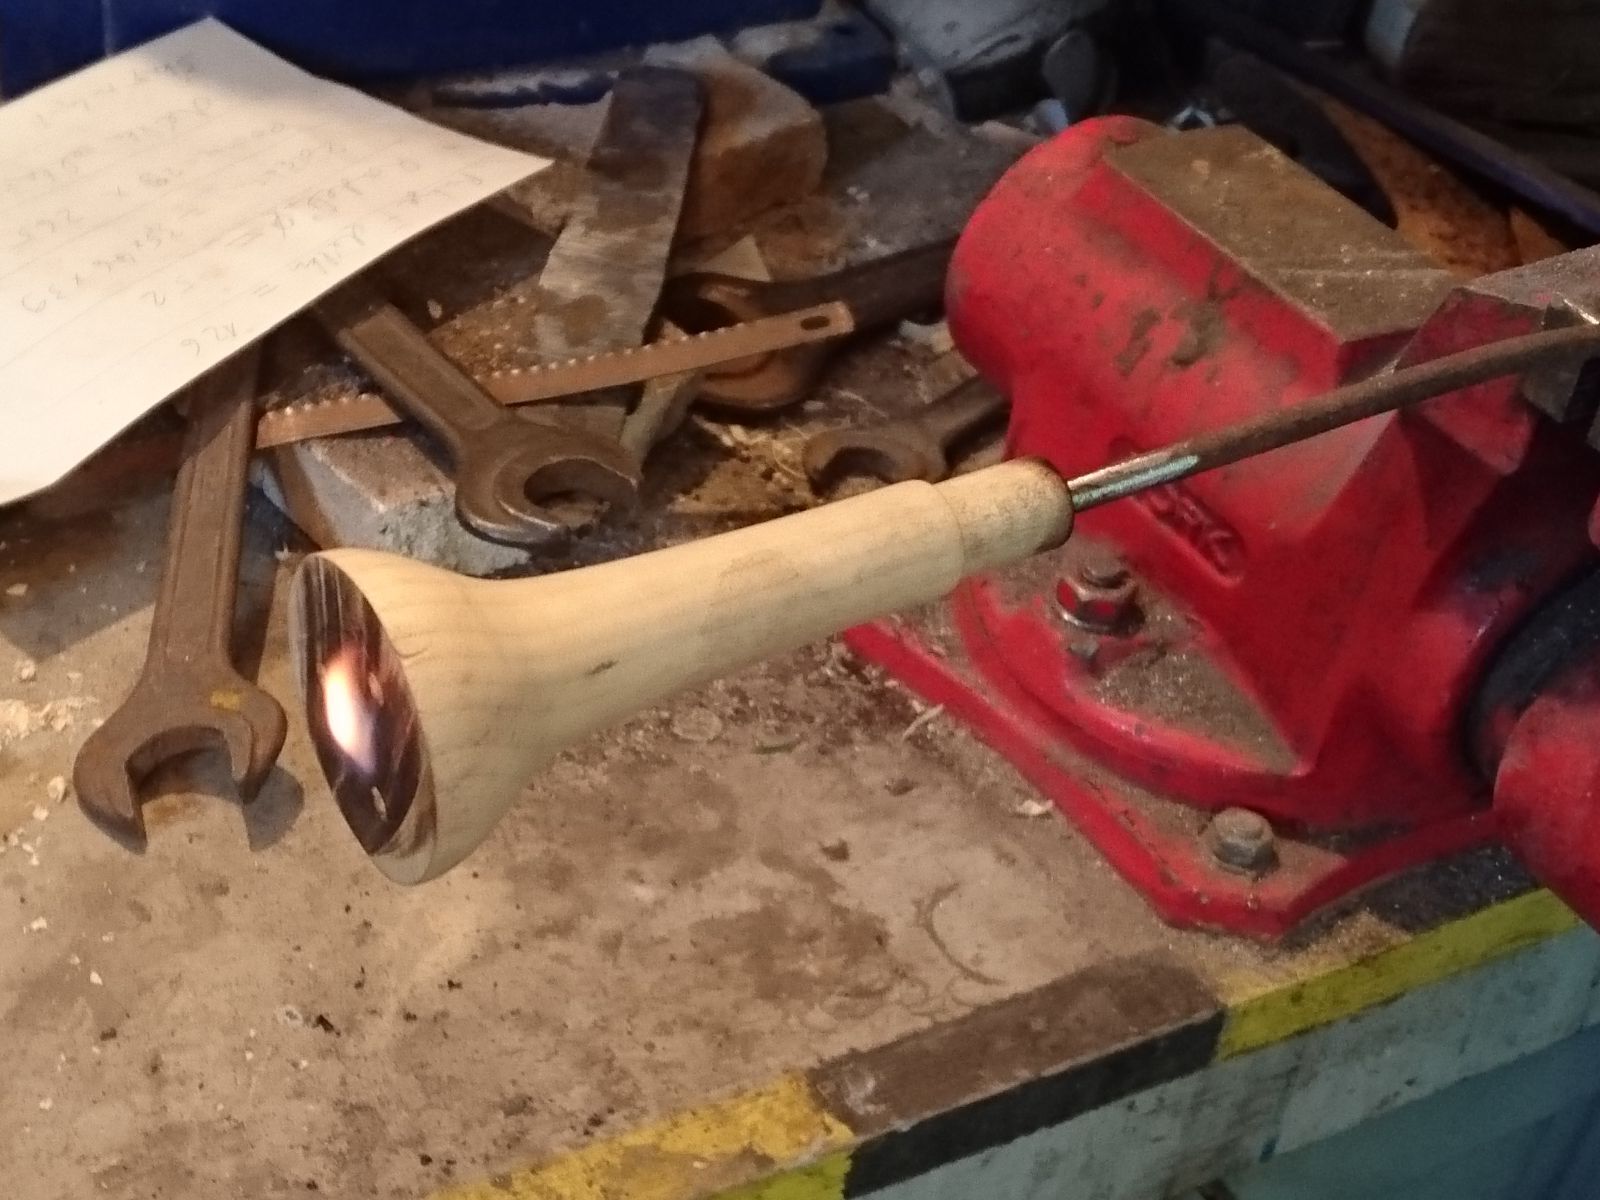
Next step will be to find suitable pieces of steel for the bolster and the guard, and shaping them together with the hanlde – and the tang – so everything fits together.
Click for full size. Text translations in comments.

Click for full size.
![[Bloodletting Calendar] So man zalt nach der geburt Christ M.CCCCC.XIX. Anonymous, German, 1519. Subject: Phlebotomy, Almanacs & Calenders, Astrology, Saints, Uroscopy, Saint Cosmas, Saint Damian.](https://i1.wp.com/freethoughtblogs.com/affinity/files/2018/06/BloodC.jpg?ssl=1)
[Bloodletting Calendar] So man zalt nach der geburt Christ M.CCCCC.XIX. Anonymous, German, 1519. Subject: Phlebotomy, Almanacs & Calenders, Astrology, Saints, Uroscopy, Saint Cosmas, Saint Damian.
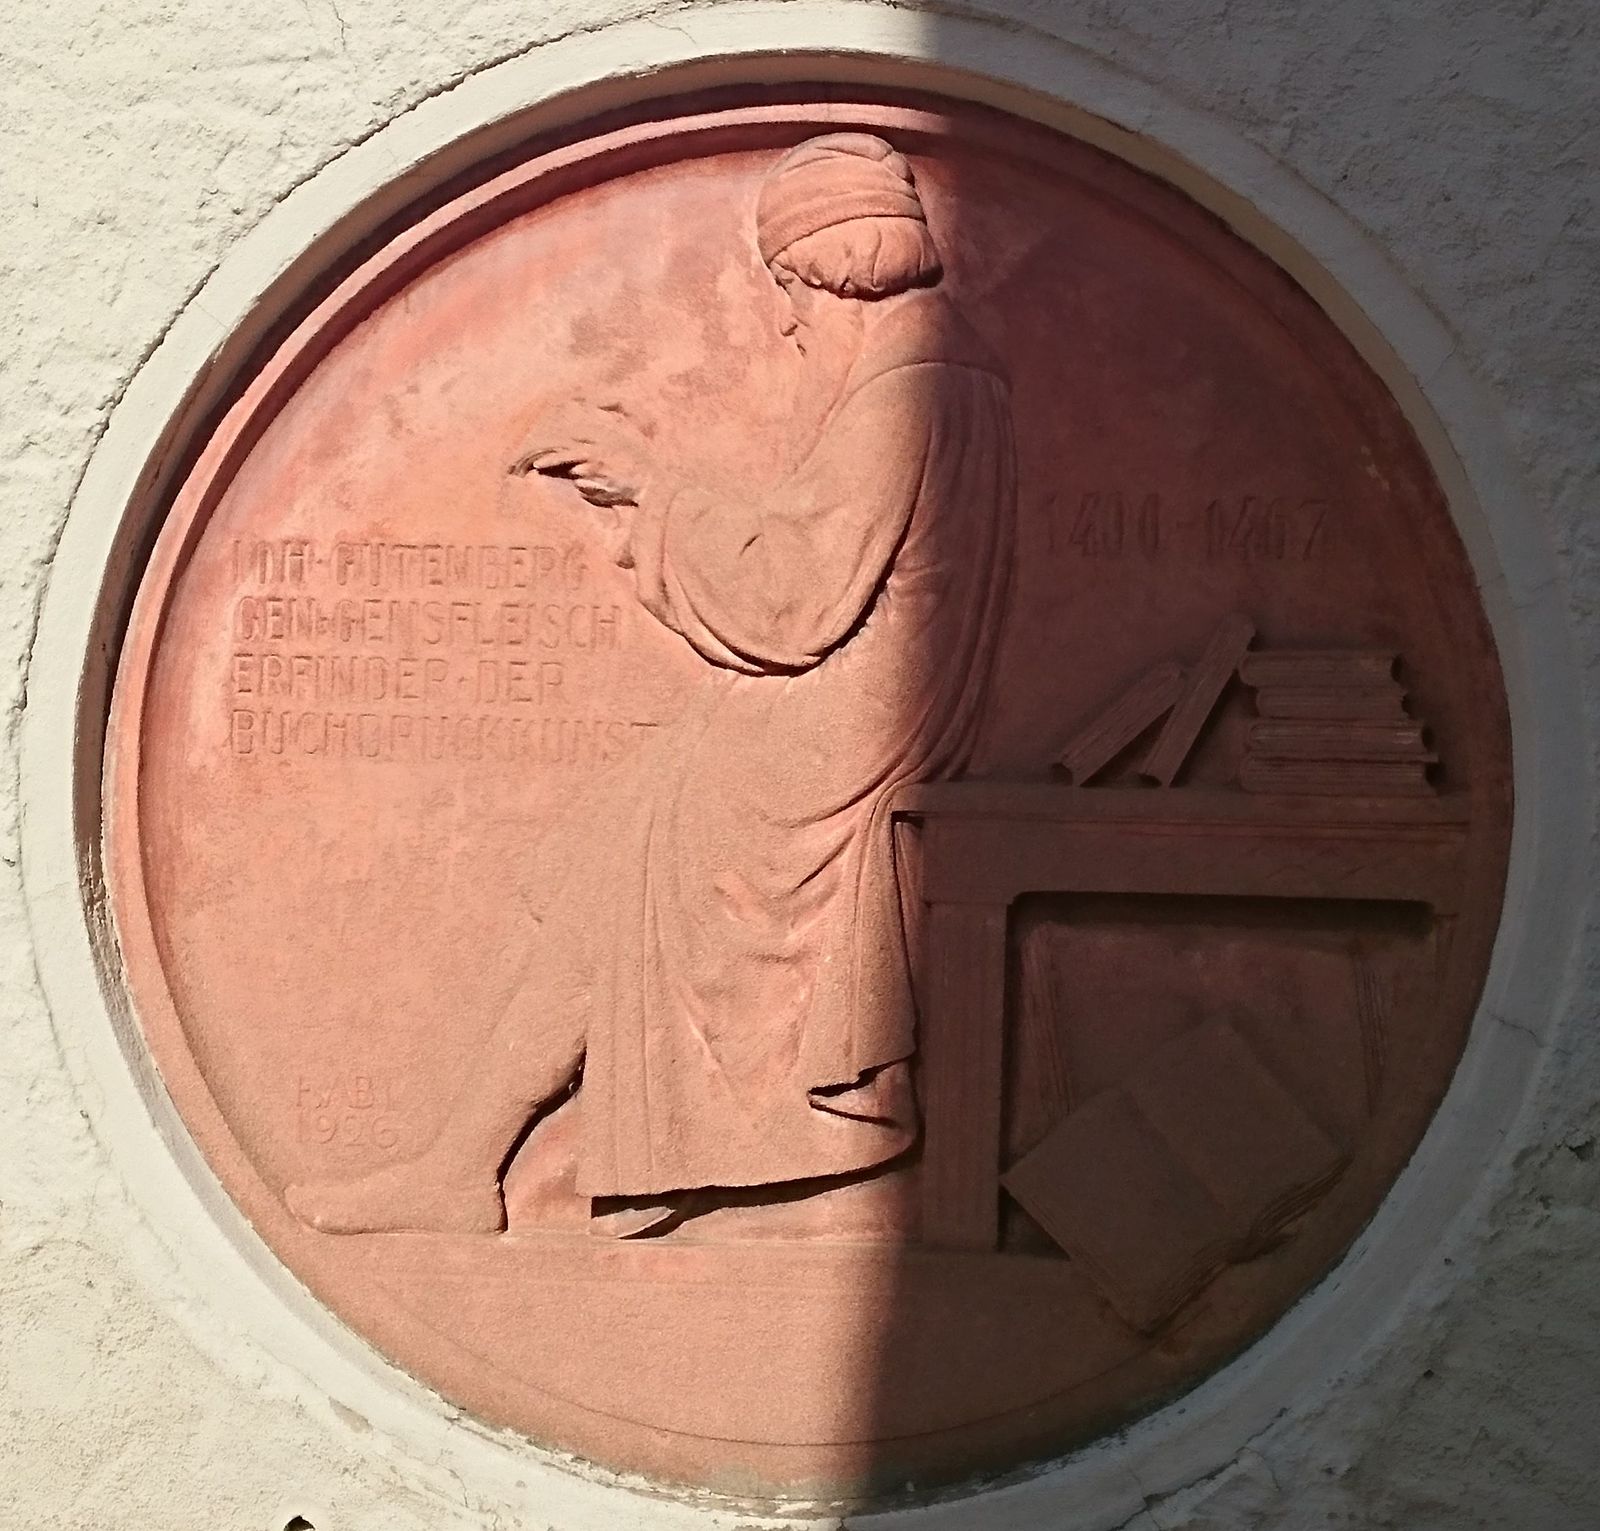
One house had these three reliefs in plaster. The first one and the third one are depictions of Johannes Gutenberg, inventor of the printing press. I do not know why, I have found no association between him and Idstein.


Some houses had some sort of coat of arms (more like coat of tools) carved into the woodwork. And one house had a cat climbing the wall which was unfortunately too high up for my puny phone camera to take a good look at.


The last atypical ornament was this faun, looking mournfully over a garden fence. I have no idea whether it is a modern addition or genuine antique, but it fitted the town nicely and did not stand out as inappropriate. Which does not prove anything.

©Charly, all rights reserved. Click for full size.
Given how all these organs are important and vital, it really makes one wonder why they are only protected by a soft abdominal wall. From these only liver has meaningful ability to repair itself.

©Charly, all rights reserved. Click for full size.
Liver is, as you surely know, the main chemical factory of the body. Any chemical that gets absorbed into the bloodstream in your gut will go through it – thus the huge Vena cava inferior in which this nutrient rich but oxygen depleted blood is subsequently drained via hepatic veins. These veins are allegedly the reason for abdominal pain when exercising right after a big meal – there is a competition between blood flow through the liver and through the muscles and that leads to the veins having spasms. It is also the reason why I am sleepy about half an hour after a big meal – the liver stops most of the blood by expanding its veins, the blood pressure drops, I gets dizzzzzz…..
However that means not only food, but also every toxin you ingest, has an effect on your liver. That is the reason why liver has such an ability to recuperate or even regrow. It is an organ under huge pressure and essential for life.
We were told during our courses on toxicology that it was selective pressure that is possibly responsible for people of european descent having higher tolerance of alcohol than people of oriental descent – ever since the alcohol was discovered in the Mediterranean and Middle East regions, people of those and neighbouring regions were indulging in drinking a lot of wine and beer. Those who did not have the right types and ammounts of alcohol dehydrogenase enzymes in their liver to deal with it with least adverse effects died sooner, thus exerting selective pressure on the population.
I do not know whether it is true, but there is similar correlation in lactose intolerance. It does sound plausible.