There are a lot of woodturners on youtube that mix wood and resin, then turn it on the lathe.
It seems pretty easy but it turns out, it’s not. There are subtleties and I’m trying to navigate them, just for the heck of it. I have a bunch of other stuff on my bench that I should be working on but I’m distracting myself and blaming the coronavirus and the Trump administration.
This is an early experiment: I had a piece of wood that was heavily cracked and I worried that it might fly apart under the chisel. So I put it in a ziploc bag with some resin and vacuum cycled it a couple times to drive the resin into the cracks. Then, I made a sort of cup-oid from it.
As you can see, it kind of looks like poo where the resin didn’t go. It appears to me that there just are not enough big areas of resin – larger regions of different material would be more dramatic.
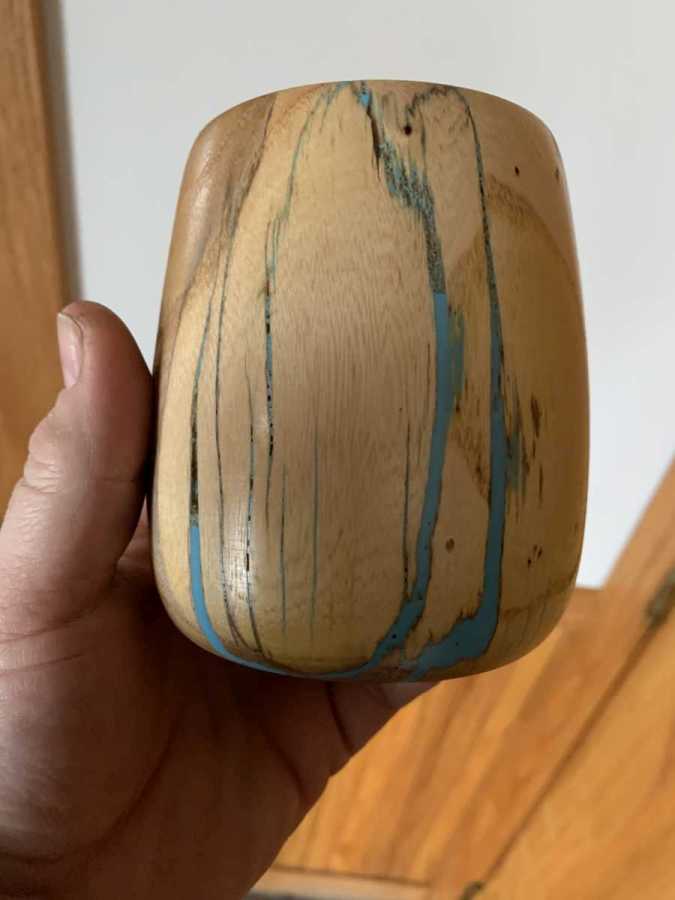
So, back in December, I took some bog oak and arranged it in a bucket by gluing it to the bottom, then poured resin over it. It was too big to put in the vacuum chamber to I just let it take its chances. It came out looking promising so I finally got around to attaching a chuck ring to it and giving it a go.
[source]

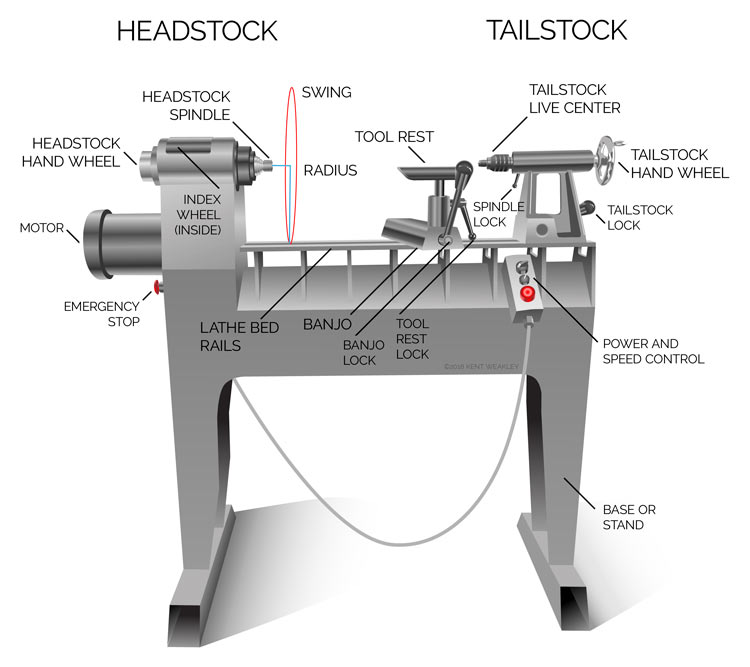
It’s going 1200rpm there but you can see the center on the tailstock pretty clearly. The ring is on the other side. The really great thing about the ring is that it’s mounted very positively, so you can take the work off the chuck, bring it home and mess with it, then it’ll go back on and still be balanced correctly. This is not precision machining. It’s really convenient and the use of the chuck has greatly changed how woodturning is done; it’s safer and more reliable and accurate.
The screws are going into the part of the wood that is going to be the open end of the bowl, so that’s all going to get removed. What you do is do most of the shaping with the ring screwed in, then remove the ring, flip the bowl around, and attach it to the chuck from the other side of the gonna-be-a-bowl-eventually-thing. That is done by using a chisel to make a large clear round area with a lip, and you grab it with the chuck by putting the chuck’s teeth inside the lip and opening the jaws to grab it. It’s also a very positive grip assuming your work piece is not going to splinter completely to pieces.
You can see that lip in this picture:
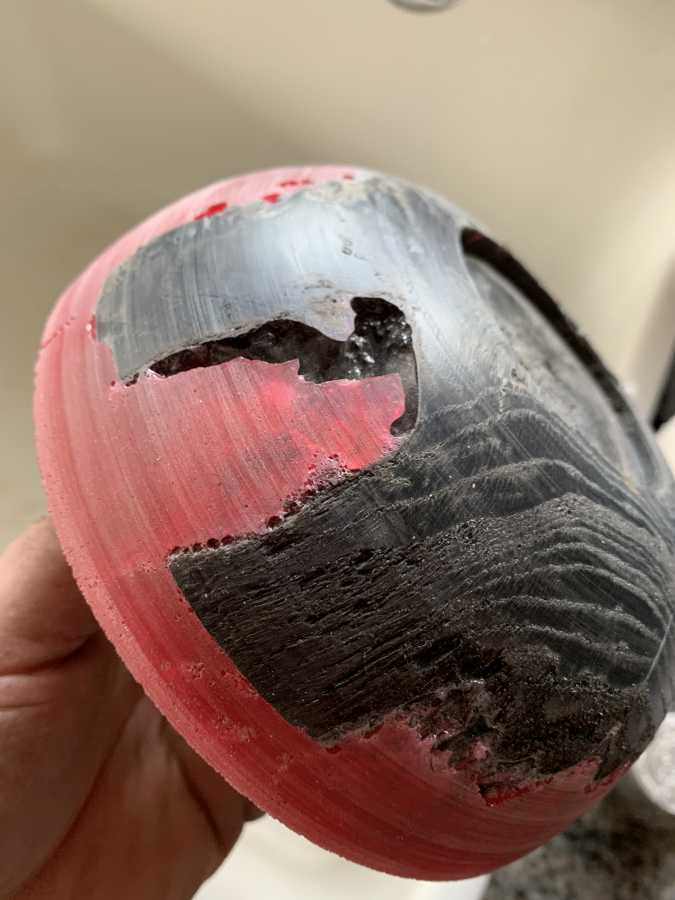
You can also see the problem: there are big voids in the resin. The chisel catches in them and chops great big pieces of resin off and they go shooting all over the room and the Marcus. Resin is really tough and so is bog oak and I had to keep resharpening my chisel every few minutes.
The thing was clearly heading toward disaster so I decided to take it home and try to flow some more resin into the voids. Right when I was deciding that, the chisel caught the chuck and the whole thing came off and flew right at me at 1200rpm, hitting my left hand and bouncing past my shoulder. And that’s why I use long-handled chisels – I like to work at a distance with my body offset from the line of fire. The resin, by the way, was completely unbothered by the bouncing; that’s some tough stuff. The back of my thumb did some bleeding and looks like it’s been chewed on by something but it’s very minor in woodworker/knife-maker’s terms so I more or less declare it as “does not count.”
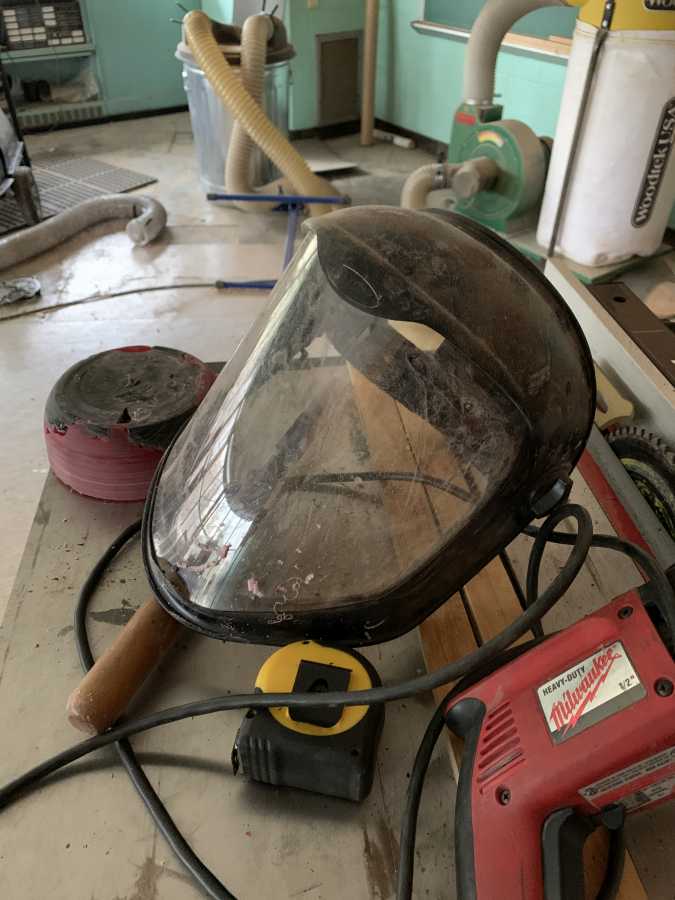
I wear one of those face-shields that covers your chin and neck, which is a good idea when you are working on things below the level of your shoulders. There are stories of people who wind up with a skew chisel in the neck, but I assume that’s a fairly rare outcome involving lots of bad luck or foolhardy practices.
Last night I made a small batch of clear resin and poured it into a heavy duty ziploc bag, then added the work-piece, squeezed the air out, and wrapped it with tape to keep the bag in contact with the wood.
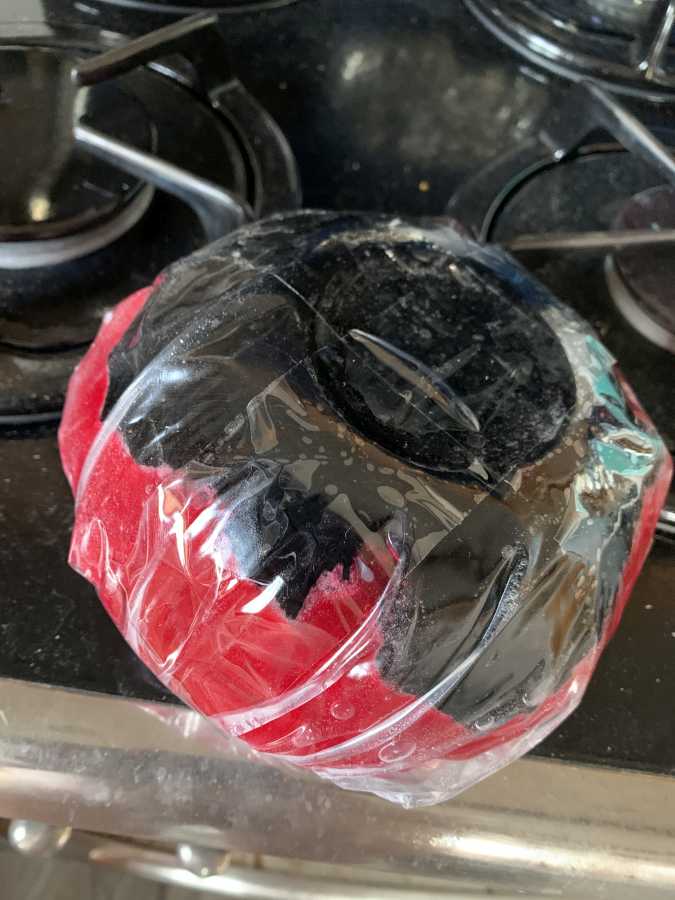
This morning when it was cured I pulled the bag off and it looks like I filled those pesky holes.

I’m going to have to clean the resin off the chuck ring but that’ll be easy work with a scraper. Another thing I notice is that the resin is not rock hard; maybe it’ll cut better. Now, I am wondering if part of the trick of the youtubers is that they start turning the next day and maybe the resin has not fully hardened. That would make quite a difference.
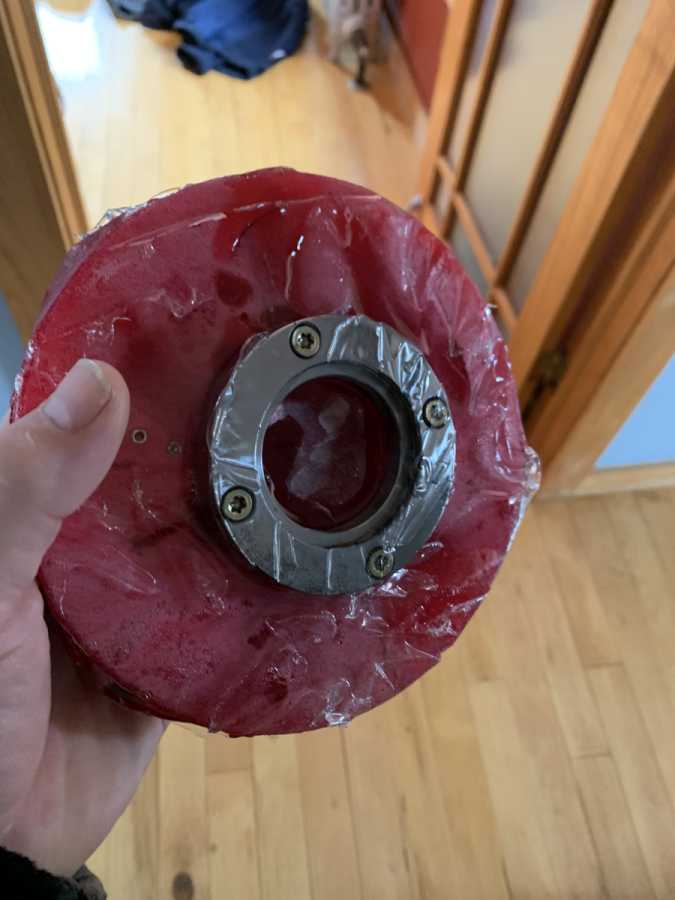
This is what self-isolating looks like at Badger Forge; it looks like someone was lathing on a muppet:
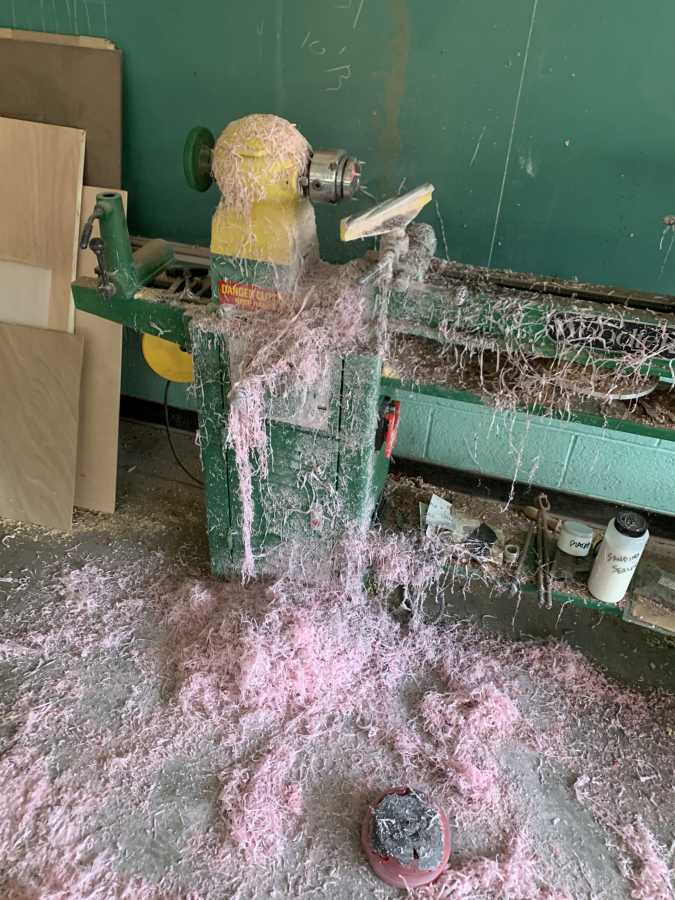
You can see the work piece on the floor, and the screws and ring sticking from the chuck. That photo was taken right after the darned thing hit my hand.
I may see if I can get over to the shop tonight and give it another turn. But I have a bunch of stuff I have to do today and I seem to be sitting in front of the computer, writing, instead.

Yes, I also wear a breath filter. Because that strandy stuff is pure coronavirus. Well, I don’t want to breathe it.
When you chisel resin it peels off in long streamers that shoot like silly string. So when you’re chiseling something like resin/bog oak, it alternates quickly between resin/oak/resin/oak/resin/oak which means you have something like a silly string machine gun that fires little strings. It’s pretty darned cool, really. Way too much fun.
That looks like a hellacious mess but it’s really not bad. I have little hand sweepers, a big shop broom, and a shop vac and it takes less than a minute to round all that stuff up and throw it away. The tough part is the bags of sawdust; the dumpster service does not like those. Traditionally, around here, I’d set up a burn can, but I’m trying to be thoughtful of the environment.
that was my second thought! (“My first was, oooh! wood turning + resin! I wonder how it turned out?” but I suppose I have to wait.)
Excellent. I’m happy for you that it turned out not to be so bad in cleaning up. Selfishly, that means less delay in continuing your work, which means less delay in me getting to see finished project photos!
It looks as if it will be lovely in the same way the Japanese repaired pottery is lovely, but more useable. I too am glad clean up is quick and you were not badly hurt.
There is something very satisfying about tasks that produce those squiggles, I’m not sure why that should be so, but while it is decades since I shaped the foot of a part-dried clay pot on a wheel I still recall the satsfaction.
This technique looks like it has amazing potential. The top one is pretty neat; is that a type of elm wood?
Glad you were not hurt badly; I would have been terrified.
Is there some way of soaking the wood in something first, to get it to accept the resin more readily? Or some way to paint it on the wood before putting the wood in a form to pour the rest of the resin? That’s an interesting puzzle to solve.
West System recommends heating your wood up to reduce the viscosity of the resin. This makes the epoxy set up (much, someimes) faster, so you have to work more quickly and in a more organized fashion.
It looks like we are watching many of the same youtube channels. To me, it seems that they do not use vacuum at all and rely purely on pressure, but I might be wrong since I have zero experience with this.
Charly@#5:
To me, it seems that they do not use vacuum at all and rely purely on pressure, but I might be wrong since I have zero experience with this.
Yes, pressure’s cheaper and easier than vacuum.* The pressure makes the bubbles smaller but they do not go away. The vacuum makes the bubbles outgas. I actually did one where I went from vacuum to pressure and that came out very clear.
The main thing I am hating is the realization that the youtubers don’t let their resin piece sit around the shop for 6 months so it gets hard as a capitalist’s heart.
(* It seems to be easier to modify a paint pressure container and hook it to a compressor, than to find a good vacuum pump and build a suitable chamber. It doesn’t make sense to me but vacuum pumps cost about twice what a compressor costs.)
I like the idea of the cup, i think it just needs more resin jammed into the cracks so they’re all full. Maybe try doing another application to get the voids filled?
I just got a wood lathe the other day, they are so much fun! i’ve only done a couple of small things so far
dangerousbeans@#7:
I just got a wood lathe the other day, they are so much fun! i’ve only done a couple of small things so far
Super!
If you’d like a genuine Badger Forge carbide holder, I can whip you up one but you’ll have to do your own handle for it. Just lemme know.
Do you have a Nova chuck and rings for it? Those are a game-changer.
The cup does need more resin and I could probably do another load, but it’s just not a very good cup.
I have neither a vacuum pot nor a pressure pot nor a lathe, but I do have lots of envy.
I’m glad you didn’t seriously hurt yourself. I can still feel the hole at the base of my thumb where I got it stuck in the belt sander.
Gilliell@#9:
I have neither a vacuum pot nor a pressure pot nor a lathe, but I do have lots of envy.
This project is turning into a death-march. There are so many things going wrong. Here’s a bit of a spoiler: I added more resin and wound up with the bowl epoxied to the granite counter-top in my kitchen. That’s OK, I was able to knock it off but a few chunks of granite came along with. “Oops, there goes my ex-wife’s precious granite counter-top that I paid thousands of dollars for!”
I’m glad you didn’t seriously hurt yourself. I can still feel the hole at the base of my thumb where I got it stuck in the belt sander.
Owwwww!!
Another knife-maker I know lost half his thumb doing that with a belt sander running a 2hp motor. I have no idea what a belt sander would need a 2hp motor and, now, neither does he. It took his thumb right down through the workpiece rest and halfway around the pulley and it was abrading it the whole way. He was nice and didn’t send pictures because he says I would have fainted.
@ Marcus
Oooh, if you want to send me one that would be great :) i have a few that came with the lathe, but one i can use for a square tool would be useful
@dangerousbeans:
I have to make another wad of suminigashi to shape the bar from but I’ll do it. I think mine takes an M8 hex screw. I’ll check or you can tell me the specs of what you use.
You’ll need a 3x3x24″ piece of stock for the handle. I drill mine with a series of drills up to 1/2″ in a #2 morse taper chuck in the tailstock.
use whatever metric hex screw you have, i have a full set of hex and torx sockets and you don’t need to change inserts that offen. I need to get a chuck for the tailstock, annoyingly the lathe i have is a #2 morse taper and my mill is a #3
Thanks