Making a Rondel Dagger – Part 9 – Turning the Handle

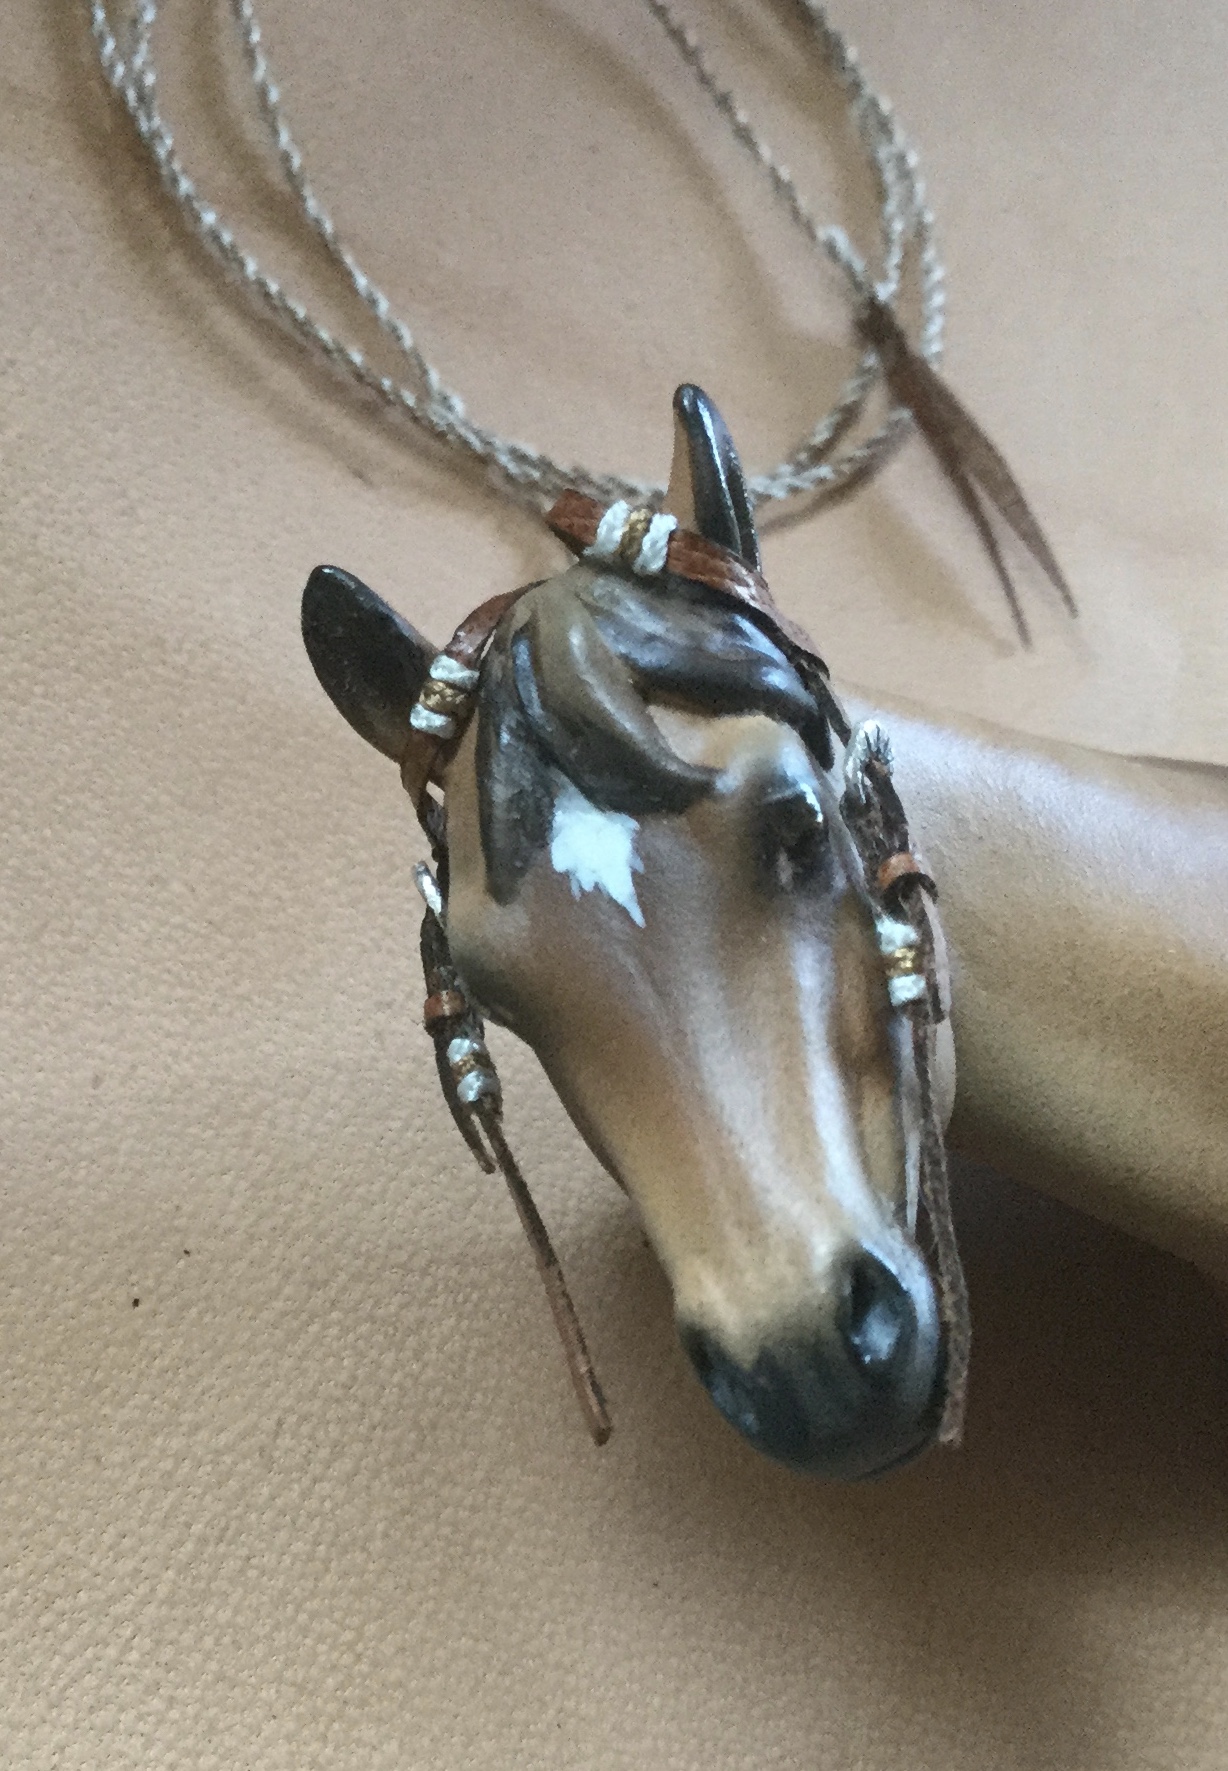
The dagger of Ciri in The game Witcher 3 has handle turned from some yellow wood. Looks almost canary yellow in the game, but orange in the extracted 3D file without the in-game lighting. There is only one wood that I know that has such color – Osage orange – and only when freshly worked at that, it ages to dark brown. There is another wood that has very nice yellow (vanilla) color both fresh and aged, and that is Black elder. I would love to make the handle from black elder, because it is beautiful hard wood and it is a pleasure to work with. Alas, I do not have a piece big enough. So I had to go with Sycamore maple which is pale yellow and ages to slightly darker yellow.

I begun by cutting an approximately 50×50 mm rectangular block on my circular saw. Dried maple wood is unfortunately not only very hard, but also has very small pores, so it tends to burn on circular saw. There is nothing that can be done about it except to work slowly. Unfortunately I only had this one piece of big enough maple wood at hand and it had a very deep split at exactly the wrong place, so I had to shorten it to 120 mm, 6 mm shorter than I wanted to based on the proportions from the 3D game file. But since I am not aiming for exact replica and I will make slight changes to the design of the dagger anyway that should not bother me. But it does, go figure. I can gain a few mm on the bolster and on the rondel later on if I decide it needs to be done.


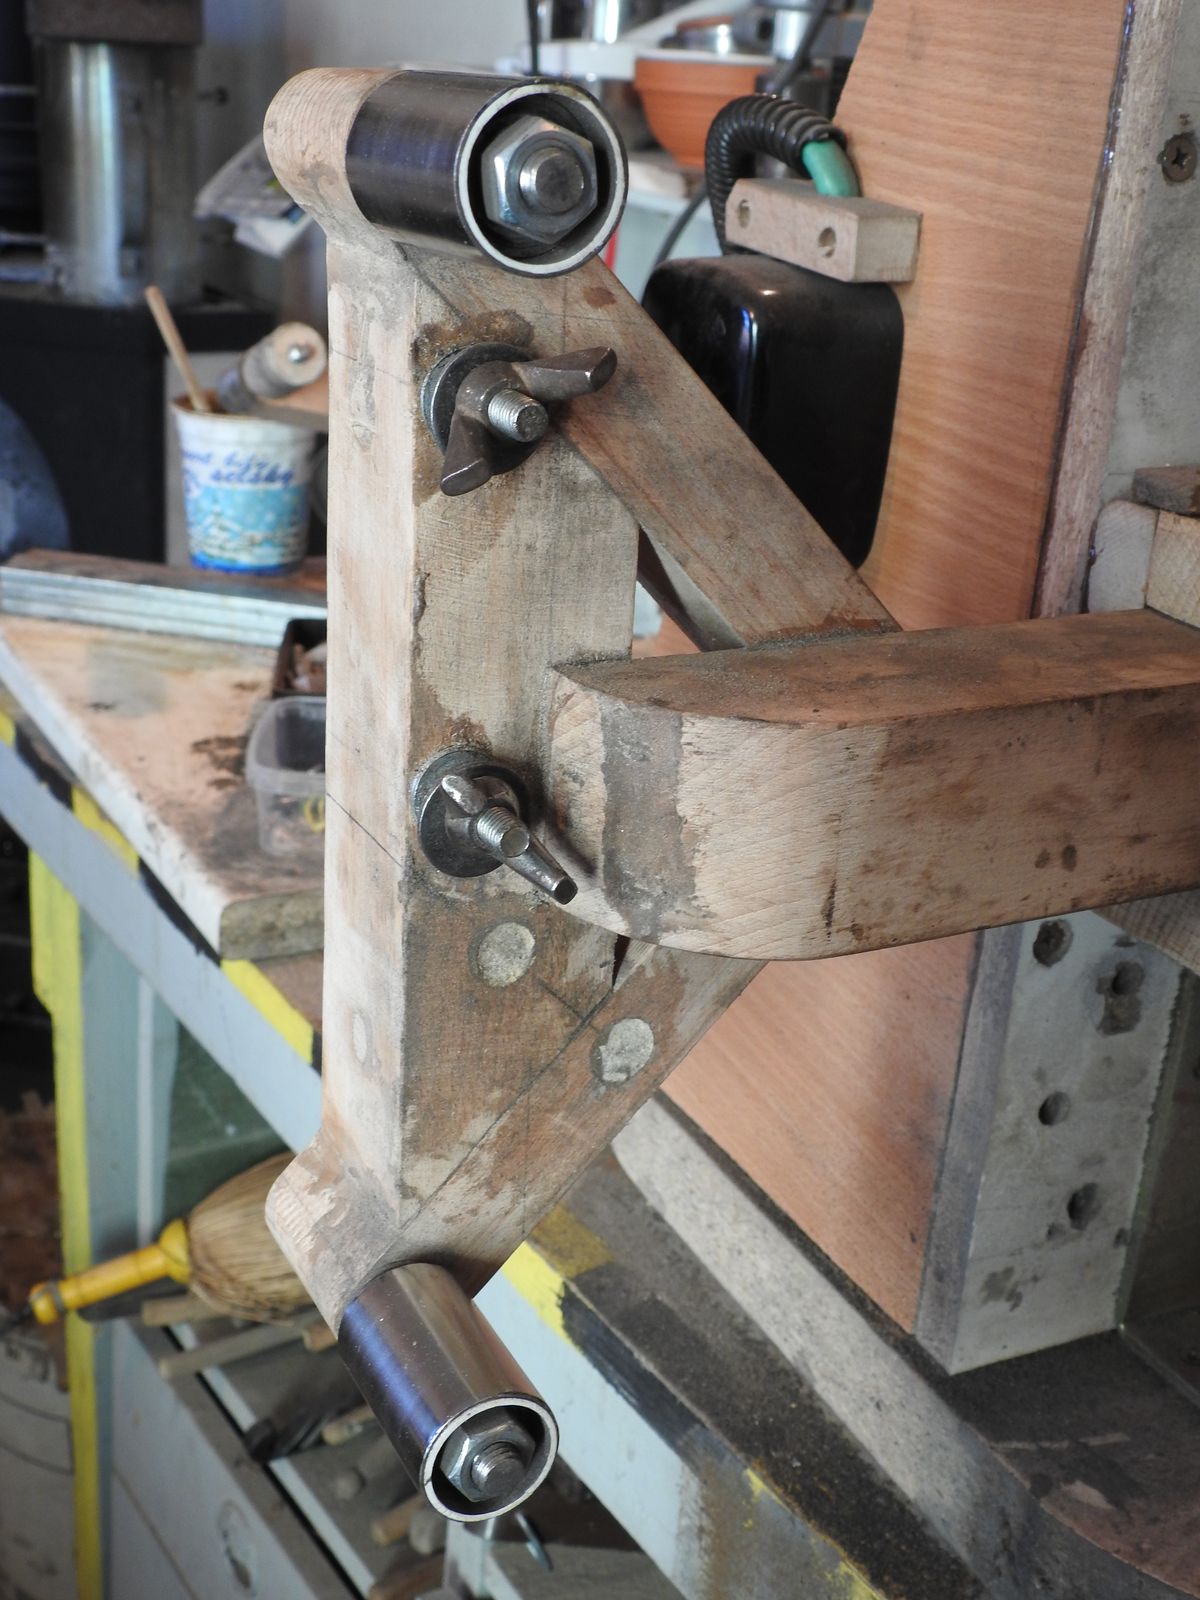
Next step was to turn the handle. This is where I can show off with my Poor Man’s Lathe that I have built twenty years ago. Unfortunately I did not have too many opportunities to work on it yet, so my experience with wood-turning is extremely limited.

First came fixing the piece of wood between the points of the lathe. On the left the drill holds not a drill bit, but a special piece with a central point and three screwdriver like flattened teeth to hold onto the workpiece. Normally I would hammer it into the wood, but sycamore wood is very hard. I had to pre-drill the holes. On the right there is a round tip that goes into a depression in the wood. It helps to put a bit of grease or a few drops of oil on this point, otherwise the friction can and will burn the wood and it will smoke.

Second comes turning the wood down to a cylinder of the maximum diameter the final piece is supposed to have. On this part it is important to work with slow rotations because the workpiece is not yet symmetrical and on high rotations it would vibrate and it could potentially fly out of the lathe and smash window in best case, or throat in worst case. Neither of these lessons have I learned first hand, and do not intend to. Better safe than sorry.

So easy does it, no rushing, slowly chipping on the edges until there is a symmetrical cylinder rotating on the lathe. Then the speed can be increased and final shape can be formed. Since this is hard wood, the angle of the chisel blade to the piece is held at close to 90 degrees and I was more scratching than cutting the wood. Trying to get a continuous cut on completely dried hardwood like this is asking for trouble unless one is very, very good and experienced at it – in best case the chisel bites in deep and no matter how sharp it is, it tears of a splinter instead of cutting, ruining the piece. Worst case the leverage could damage the chisel or tear it from one’s hands and… I shudder to think about it. I learned the first lesson here, but fortunately not the second one. For the same reason also the chisel support should be kept as close to the workpiece as possible the whole time.

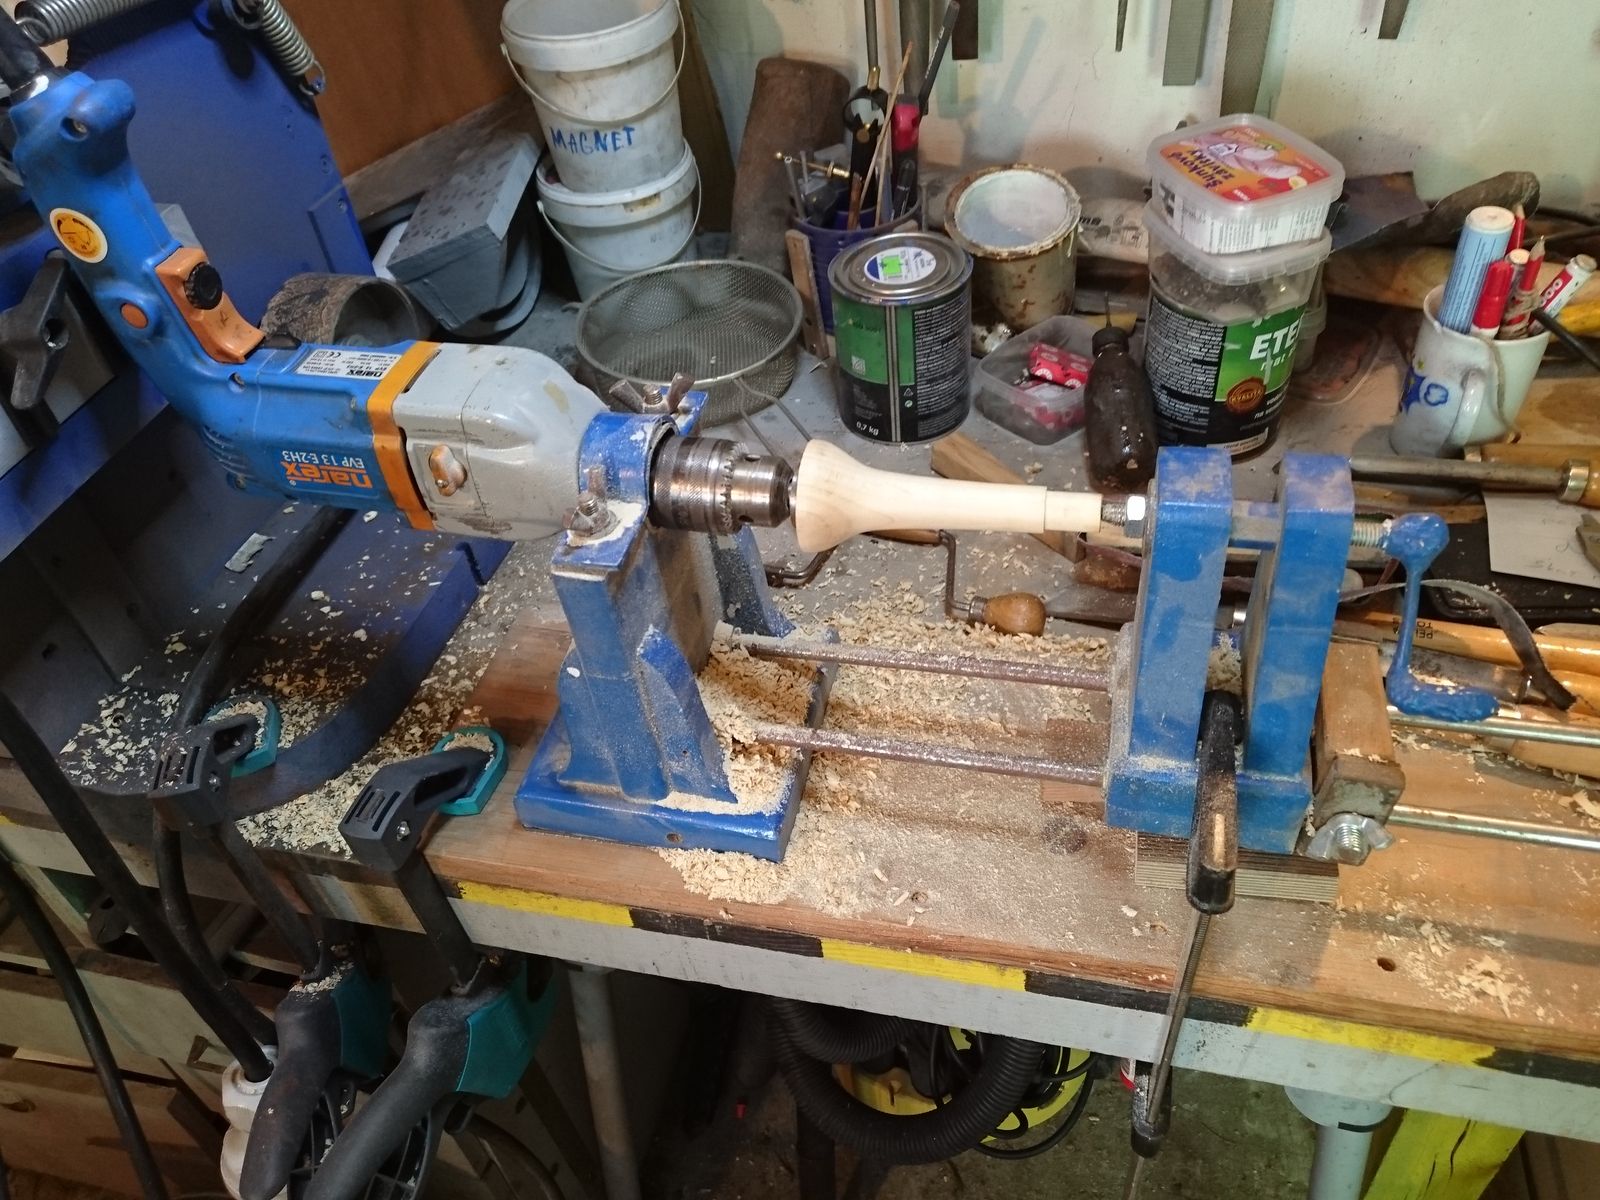
When turning the shape I first turned town the part for bolster as precisely as I could under the circumstances (the circumstances being that I have no bolster prepared yet). then I turned a piece of handle down to the final width and lastly I turned the middle. Apart from the overall width on both ends I did not do any measurements and I turned the handle down to a shape that simply “looked” right to me.

After that I could remove the chisel support and could polish the piece with 80, 120, 180 and 320 grit sandpaper. This I have done partly on lathe by turning the piece and partly in hand sanding lengthwise in order to remove all visible scratches. Sycamore wood is very hard and can take very good polish, but this piece will get dirty yet no matter what I do, so there is no point fussing about that too much yet.

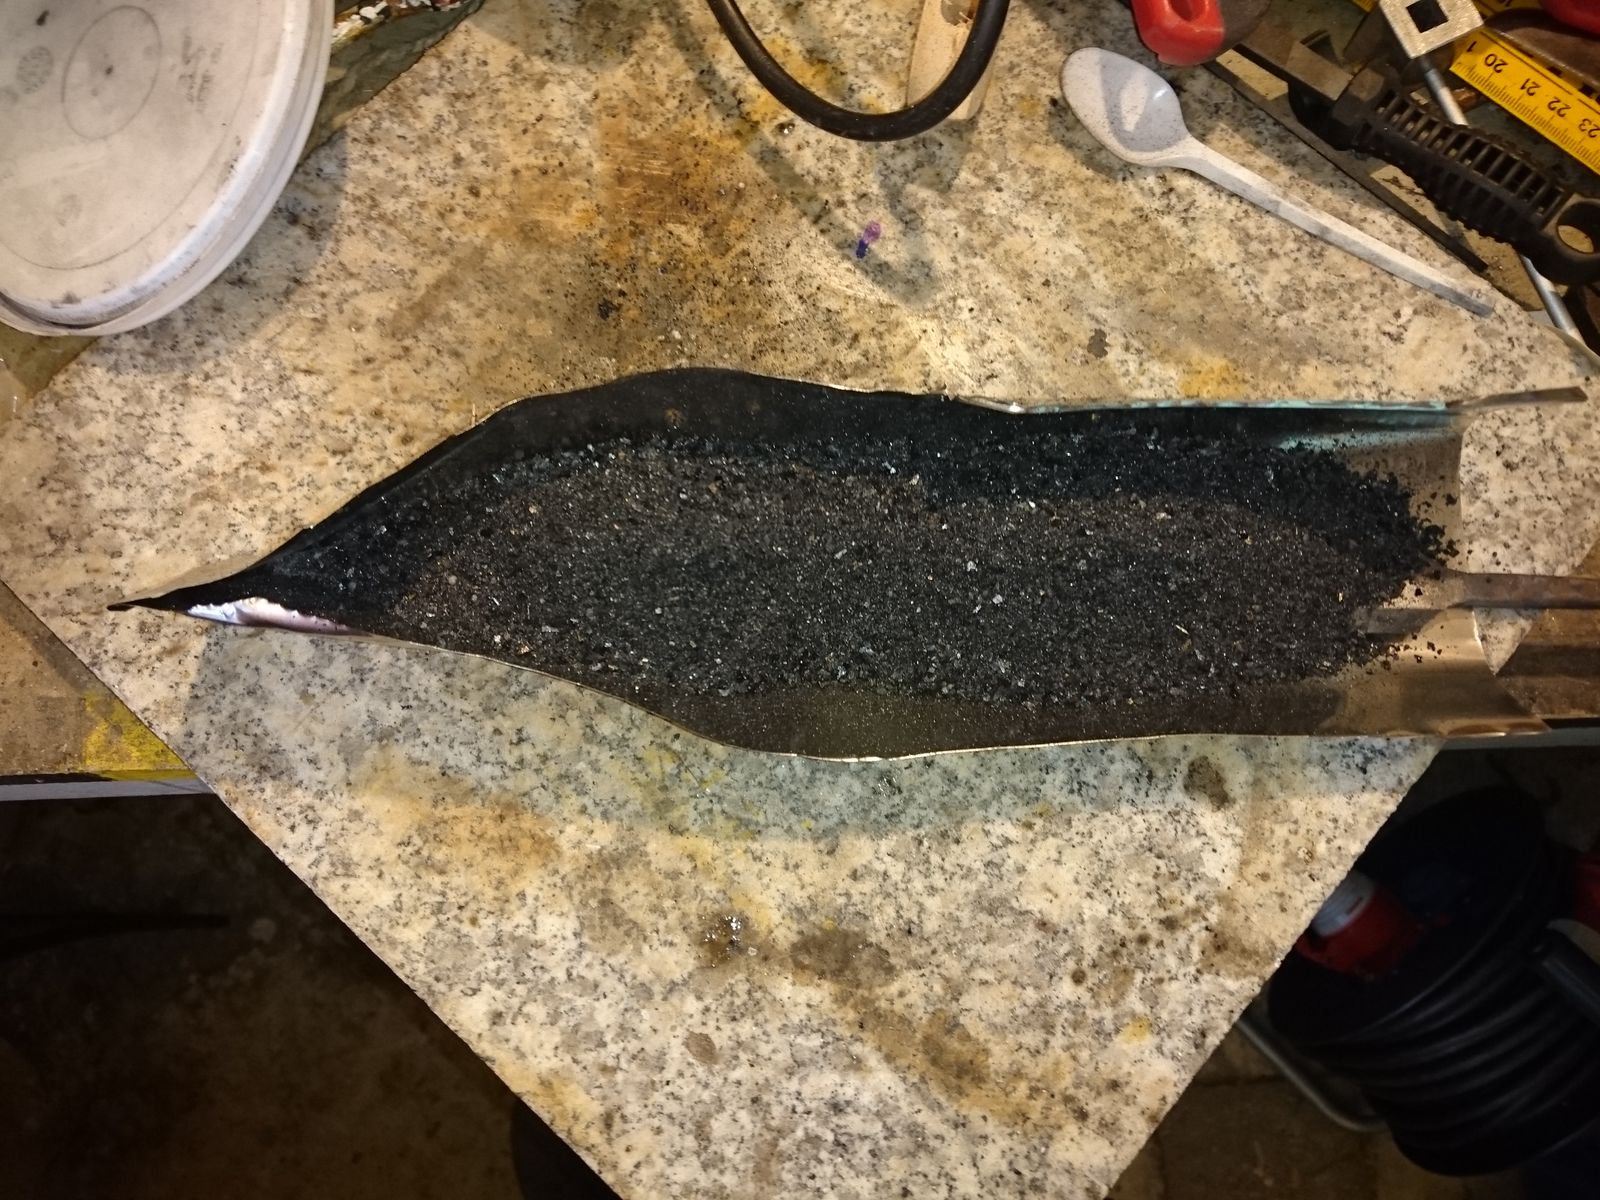
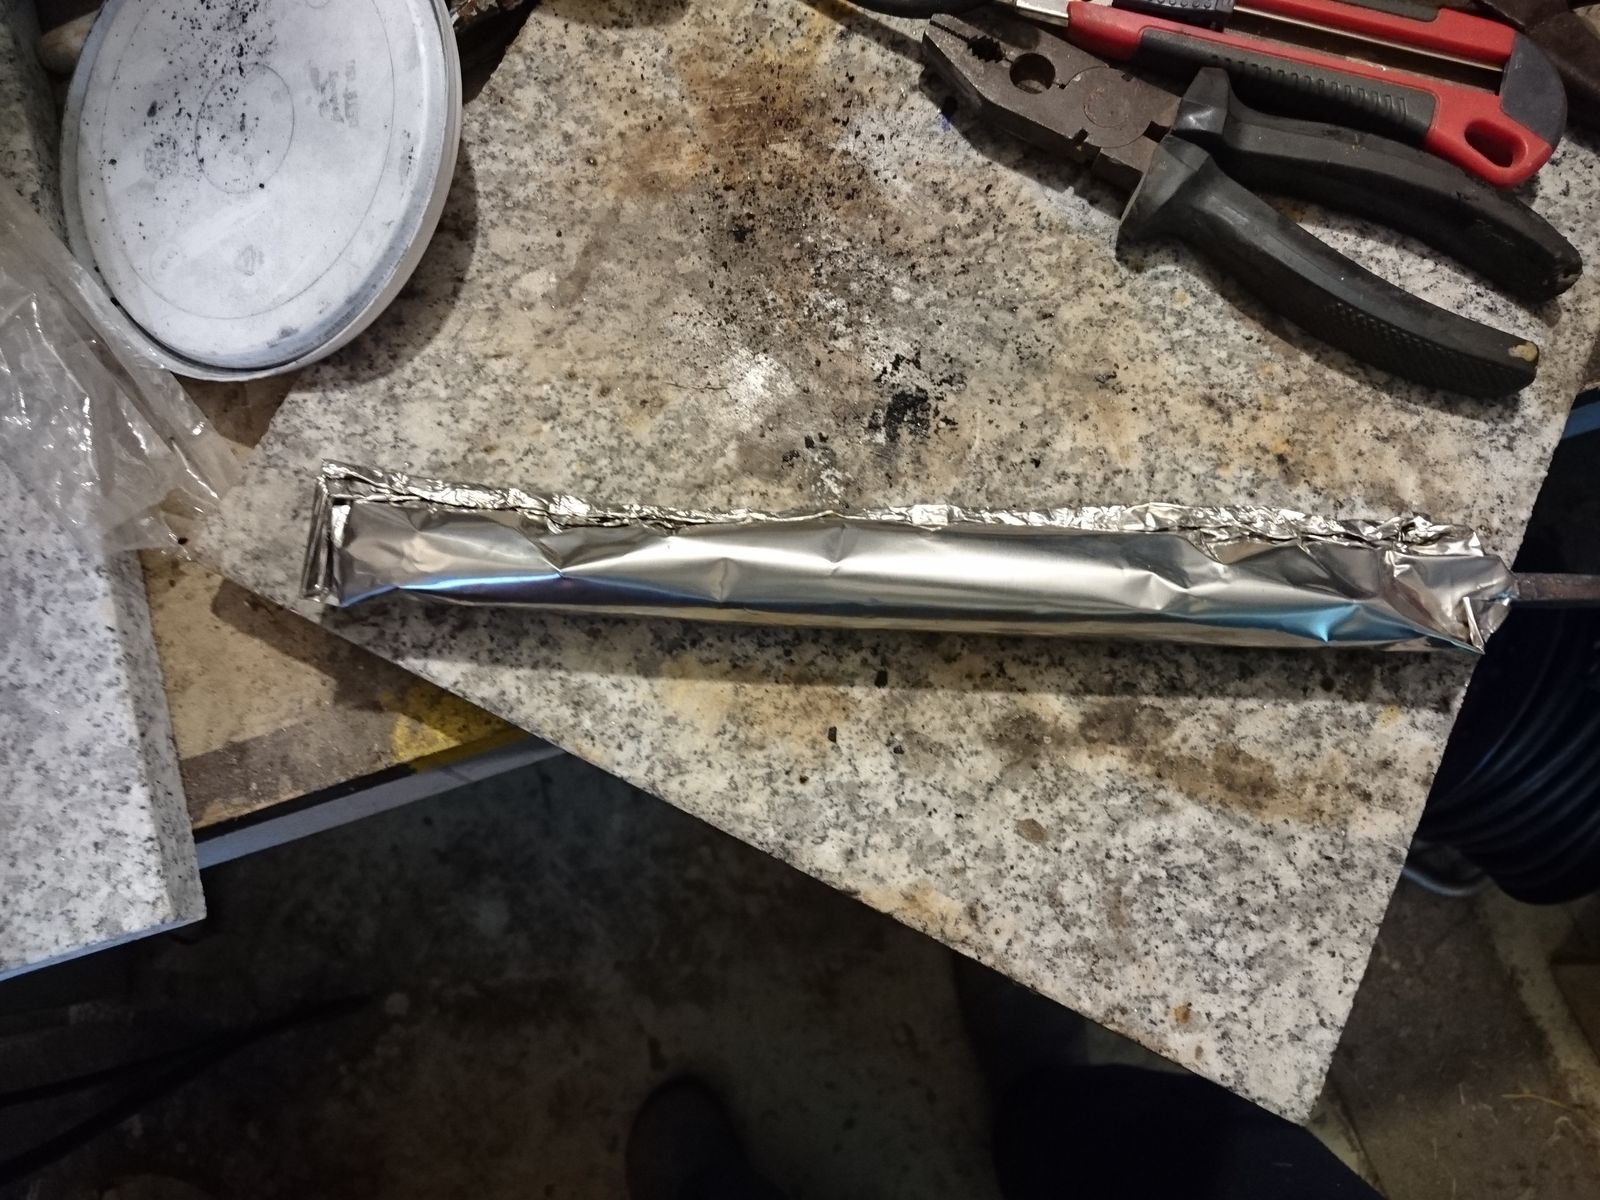
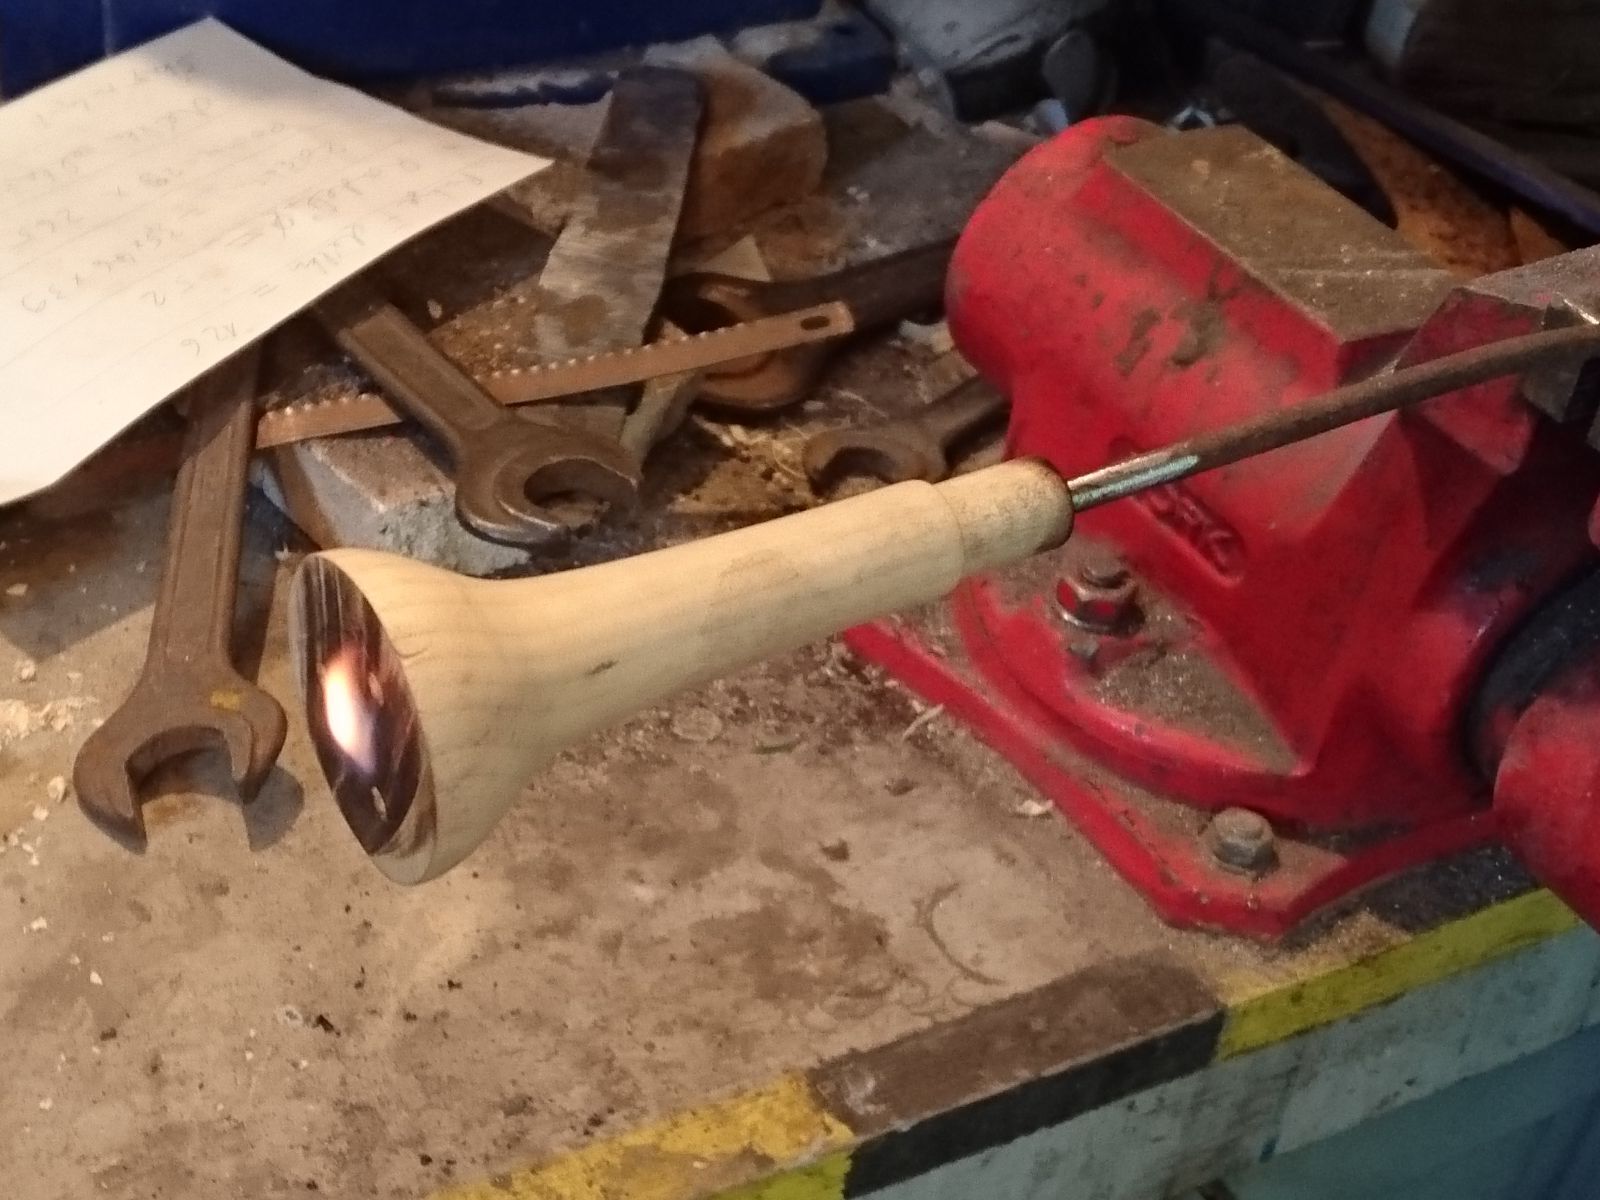
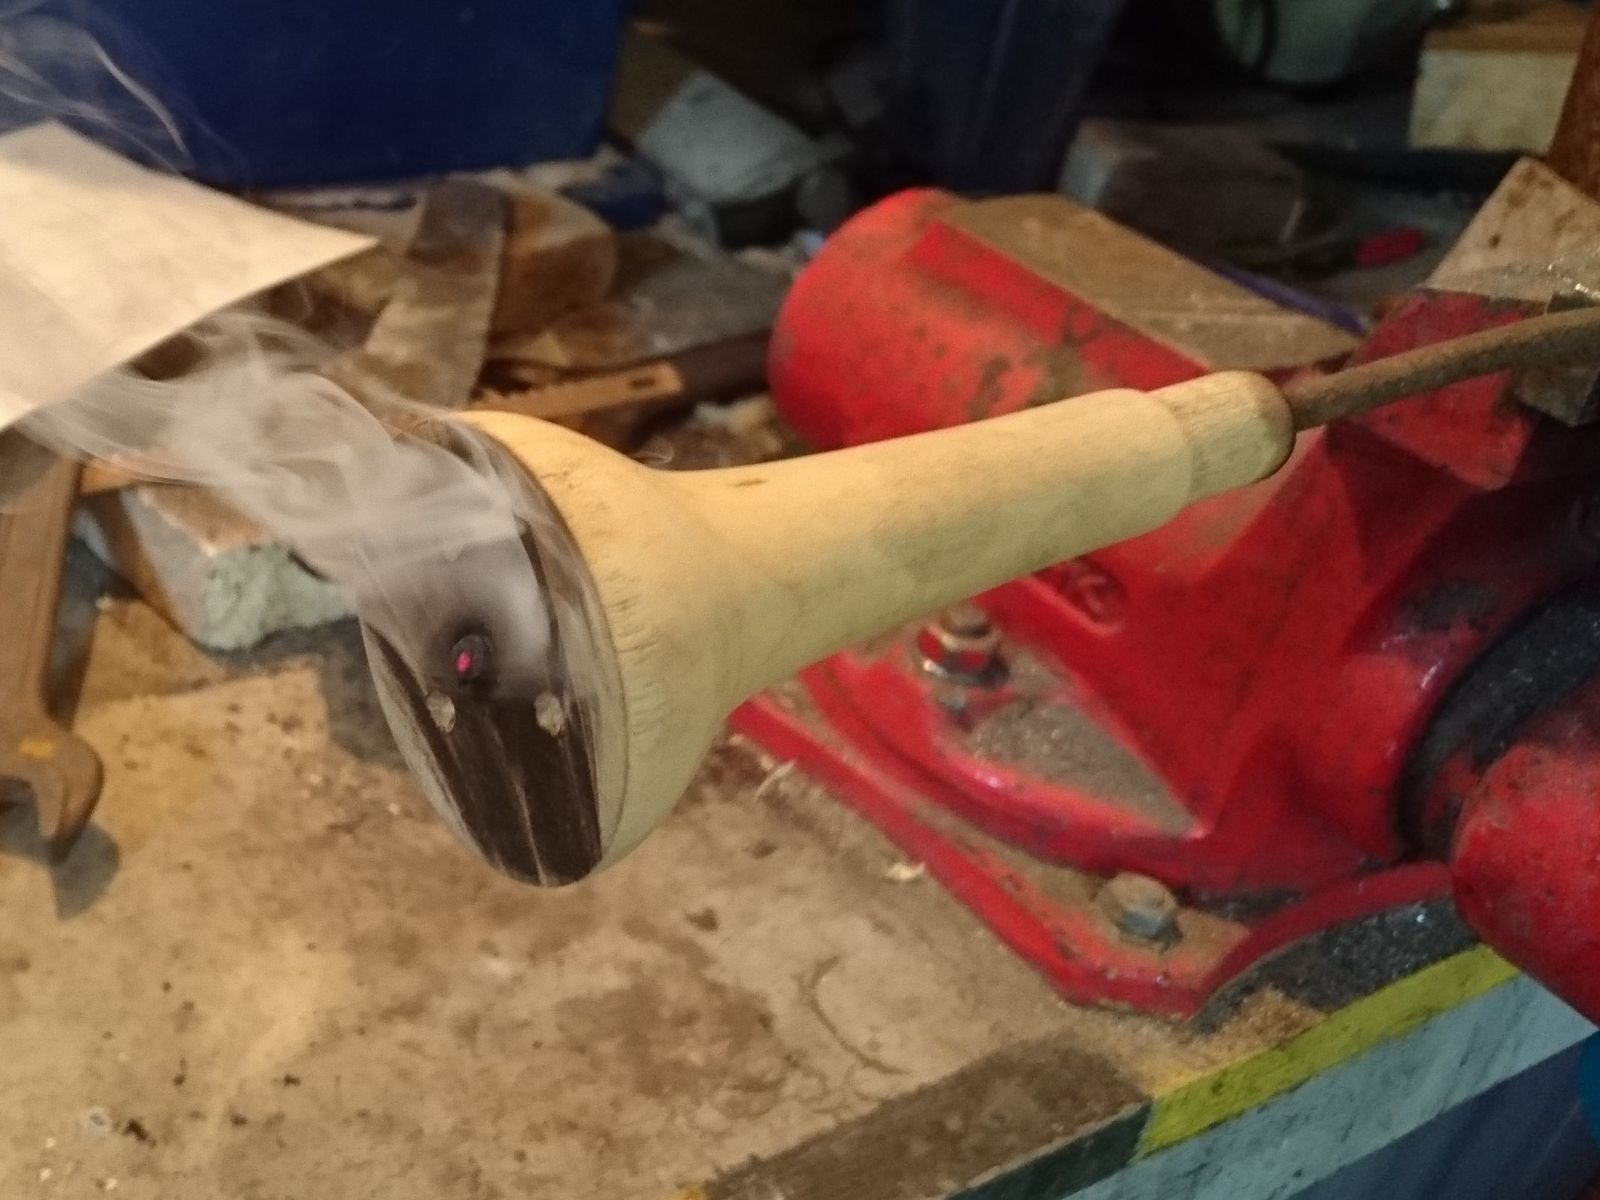
Last step is making the hole for the tang. I do not have a drill bit long and thin enough for this, so I drilled as far as I could and I burned the rest through with a piece of steel of approximately the right shape held in a vice and heated up with torch to red heat. This has produced an awful lot of smoke and took a lot longer than I hoped for. Not an enjoyable work, if you ask me. Not particularly safe one either. Even with the door open wide the whole room has filled with smoke hat stung the eyes even through protective welding goggles.

Towards the end, when the burnings from both ends met in the middle and actually made a hole throughout the whole handle, the smoke spouting out of the end could be ignited for a short time. That was fun to watch and a bugger to make a picture of, with burning torch in one hand and the phone in the other. I have managed only this one picture, where the flame almost goes out already. After I made hole through, I have closed the gas valve on the bomb and put the hot torch on granite stone on the table. Thus I was finished for the day with nearly thre hours of work done. Two hours later I went back to to check nothing burns and on finding my shop smoke-free I could go to bed.

Next step will be to find suitable pieces of steel for the bolster and the guard, and shaping them together with the hanlde – and the tang – so everything fits together.

Sure, Macramé Your Hair, Why Not?

I got distracted. Again. Seems my brain has been having a bit of a vacation too, I’ve been quite the space case lately. Anyroad, came upon these um, attachments? Extensions? Falls? (Does anyone else remember falls?) I’d love to have some of these done with my hair, if it ever achieves thickness again. These are from 1840. Click for full size!

Making a Rondel Dagger – Interlude

The now finished blade came out really nicely, so I will not be ashamed to be associated with it. So I will definitively sign it. However I mentioned already that I do not currently have my own maker’s mark, since the one I used from 10 years age is now used as bluetooth logo. I am not sure whether continuing to use it could lead to legal trouble, but I guess it would lead to confusion. “That knife has a bluetooth? What does it do?”.

I tried to design a new logo, but all designs I came up with either do not appeal to me, or they require quite precise etching process to be made on a blade. And that would definitively not fit this blade, where I aim for as authentic medieval look as I can achieve.

An idea came to me to use my initials, but not in Latin script, but in Glagolitic. At least for this particular dagger. It has the advantage that not only is it a very simple design, it is also thematic – Glagolitic script is the official script of the Witcher 3 game from which the inspiration for the dagger originated. And I am not appropriating other people’s culture.

So today I set out to try how it looks and also to refine/remember my etching process, since I did not do it for quite a long time. For that I yesterday polished a piece of steel from my failed broken machete.

In the past I tried different materials as masking for etching and the best results I have got with material that does not look appealing in the least. But do not worry, it does not smell like what it looks like. It smells actually very nice when worked, because it has been made from equal parts of beeswax, bitumen and spruce resin, all boiled together and poured into water to solidify. I formed it in sticks and for last ten years it collected dust. But it does not spoil and it is just as usable as it was when new.

When heated with heat gun or even with hair dryer or a candle it quickly gets very sticky and adheres to the de-greased steel quite well. So I heat gently both the steel and the stick and rub them together to transfer some of the sticky material onto the blade. Then I use the air flow from the hot air gun to make an even thin layer. It is important for the layer not to be too thick, because it would be difficult to draw the design in it, but also not too thin because then it could delaminate during etching around the edges (delamination was a huge problem when I was trying to use paraffine btw.).

Next step is to draw the design. The layer remains fairly soft and plastic for long time and can be easily scratched through. For this I am using an old compass needle, but for finer design a razor blade or very sharp wood carving knife tip can also be used. It is important to keep the needle clean after every scratch, since the stuff adheres to it too. It is also necessary not only to scratch through, but more like scratch/chisel away. Minor mistakes can be repaired by pressing a piece of the mass on desired place and pressing it gently against the spot until it connects again. After just a few minutes of work under a magnifying glass I was ready to try etching.

For just a small logo I did not want to prepare whole big etching bath, so I used the masking mass to glue a bottle cap with cut-out top as a barrier for the etching fluid to remain in place. As a source of electrical current I have used a DC power supply from an external hard drive that has died on me a few years ago – it has an on/off switch which comes in handy. Anode (+) is connected on the steel and cathode (-) on a piece of graphite (a pencil core works too and I used it for very fine etchings in the past). As etching fluid I have used ordinary kitchen salt solution in the past, but today I have tried ferric chloride because I reasoned (correctly) that it will work better. It is solution for etching printed circuit boards diluted approximately 1:10.

It is important to not use too concentrated solution for two main reasons:

  1. The current that can go through the solution depends on concentration. Too high concentration can mean too high current and that can burn the DC power supply (lesson learned in the past).
  2. Too concentrated solution also etches too quickly and that is not desirable because it makes uneven “burned” looking and spotty etch.

After that I turned the switch on and waited for ten minutes. It was not complete success because towards the end the bath evaporated too much, it got warm and the masking layer delaminated around the whole logo. So I repeated the process once more with only five minutes etching time. I am satisfied with the result, the etching is clear and has nice black color that I know I would not get with table salt. Now I will play with the letters a bit in Photoshop to get the proportions right.

©Charly, all rights reserved. Click for full size.

Bad American Blood.

Hervé Garnier poses with a bottle of wine from Beaumont. Courtesy of Hervé Garnier.

Hervé Garnier poses with a bottle of wine from Beaumont. Courtesy of Hervé Garnier.

A story of an illicit wine, one with a history of a hysterical hunt to destroy these vines with bad blood in them. This wine is still illegal, and I have to say after reading the story, that I’d love to get my hands on a bottle, it sounds delicious.

“This cuvée hails from the tiny, remote village of Beaumont, where it’s been perfected by five generations of local winemakers,” whispers Borel. For the past 84 years, the French government and, most recently, the European Union, has sought to eradicate Beaumont’s grapevines due to their American “blood.” Although the vines are French-American hybrids, they are more than 140 years old. Beaumont’s Association Mémoire de la Vigne makes just 7,000 bottles a year.

[…]

“This wine should be celebrated as others are,” says Hervé Garnier, the 66-year-old Association Mémoire de la Vigne president and founder. Garnier loves Beaumont, which is situated in Cévennes National Park along France’s highest mountain range, and is home to groves of chestnut trees, wild boar, and high rocky cliffs. Its centuries-old stone buildings have terracotta roofs and rocky terraces, and are etched into the hillsides overlooking the Beaume River. Since its founding in the 11th century, sheepherders have practiced transhumance—moving herds to summer in alpine meadows—by way of traditional paths. They are some of the last in the world to do so.

“What wine do you think they carry when they go?” fumes Garnier. “For 150 years, the Cuvée des Vignes d’Antan is the taste of this land. And yet, a ridiculous archaic law tries to destroy it!”

Indeed. If it wasn’t for Garnier and a group of unruly older winemakers, Beaumont’s wine would be lost to history.

The village of Beaumont; it’s location in a national park makes its wine a nationally protected folkway. Courtesy of Hervé Garnier.

The village of Beaumont; it’s location in a national park makes its wine a nationally protected folkway. Courtesy of Hervé Garnier.

You can see and read much more at Atlas Obscura.

Making a Rondel Dagger – Part 8 – Buffing

After many hours and a few more due to setbacks (scratches, aaaargh) I finally got to the point where the blade was polished with the 7.000 grit paper. This is very fine mirror polish, but it looks a bit, well, strange, unnatural and artificial. There are different options for how to deal with this and I decided to go for buffing.

Buffing is an abrasive process that uses some very fine polishing compounds on some soft carrier (cloth, felt, paper, leather – all are usable and all have their advantages and disadvantages). In this case I have first used very fine commercial polishing compound applied to a felt wheel. Since I do not have space for a set of specialized buffers in my workshop, I have to do with a drill held firmly in a vice.

Buffing a blade on a wheel can be dangerous process, I think more dangerous than grinding. The main thing to keep in mind in this regard  is that the cutting edge orientation must be opposite to how it is held during sharpening – that is, the edge should point in the direction of the movement, not against it. Forgetting this is very, very dangerous, since the blade can bite in the soft wheel in an instant and be hurled in random direction with great force. A care has also to be taken near any and all edges.

Buffing with the commercial compound has produced very fine finish very quickly, but I was still not satisfied with it. It looked too artificial, machine-made. Luckily enough there is an even finer abrasive at hand – jeweler’s rouge. Nowadays I could buy half a kilo of ferrous oxide for mere 2,-€ (with 4,-€ shipment, ha!), but since I have no shortage of steel dust and rusting iron, I am making my own with a process that I devised when buying stuff online was not yet a thing. Not to save money (it is actually the exact opposite), but for fun. I have used all I had yonks ago, but I have just finished making a small batch from the steel dust ground from my previous dagger and it came handy this time.

I do not have a separate buffing wheel for jewelers rouge yet. So I lightly dusted a piece of cloth from an old t-shirt soaked in WD-40. Emphasis on the word “lightly”. Jewelers rouge is very mild abrasive and if it is clean enough, it will not scratch the blade too badly even if not too precisely ground and sieved. But it is good to use the cloth as a sort of final sieve and work the abrasive slowly through the cloth to the blade, and not apply it directly on it.

Theoretically this buffing can be done at home while watching a movie, because it takes a looong time and is boring as hell, but if you do that, you have to be careful. Do not be tempted to scratch your nose or touch anything, that stuff is vicious. It is not dangerous, but the very fine red dust is very strong and vivid pigment and unless you are extremely careful, it gets everywhere and you will have pink fingerprints on everything you touch. Pink switches, pink door handles and definitively pink soap bar. Oh, and if you forget to wear respirator whilst grinding the stuff and sifting, pink bogeys.

I have spent approximately two hours running the oil soaked red rug along the blade and the blade is finally and definitively done to my satisfaction. Next step is to find materials for the guard, bolster and rondel. And a fitting piece of wood for the handle.

Exquisite Rot: The Lost Art of Intarsia.

Much like people still use fungus riddled Diamond Willow to make walking sticks and other items, spalted wood was also a part of the art of Intarsia, a specific type of wood inlay. Here are a few stunning examples, and you can see and read much more about the history of this art at the Public Domain Review.

The technique of Intarsia — the fitting together of pieces of intricately cut wood to make often complex images — has produced some of the most awe-inspiring pieces of Renaissance craftsmanship.

Note: if you click over to the Met Museum, the way to see the images full size is to click on ‘download’. All the images here, click for full size!

Detail from an intarsia piece by Fra Damiano da Bergamo, early 16th century. Note the subtle dots of greenish-blue in the covered archway — Source.

Detail from an intarsia piece by Fra Damiano da Bergamo, early 16th century. Note the subtle dots of greenish-blue in the covered archway — Source.

Those “cupboards” are trompe l’oeil! Part of the Studiolo Gubbio as installed in the Metropolitan Museum — Source.

cipio Africanus (ca. 1425–30), intarsia by Mattia di Nanni di Stefano using poplar, bog oak and other wood inlay, rosewood, tin, bone, traces of green colouring — Source.

Scipio Africanus (ca. 1425–30), intarsia by Mattia di Nanni di Stefano using poplar, bog oak and other wood inlay, rosewood, tin, bone, traces of green colouring — Source.

Making a Rondel Dagger – Part 6 – Polishing

The long pause was no pause at all. I worked on the blade every evening and but I could not give it more than half an hour to one hour a day, so the progress at this stage was very, very slow.

After the hardening came tempering, which is rather easy and dull process. I wanted the blade to be primarily tough, not overtly hard, so I gave it two half hour courses at 200 °C in the baking oven. This has removed a lot of the hardness and almost all of the brittleness. It should be easy to sharpen and maintain sharp but it should not snap when hitting something hard. With a kitchen knife I would lower the temperature to 150 °C or perhaps perform differential tempering.

Abrasive beltsNext step is polishing. This is by far the most time-consuming and dull part of making a knife. Here are all the belts on my belt hanger. Before hardening I went all the way from left where the  pink ceramics belts are (P40-P120) through middle blue-green zircon-corund (P120-P320). After hardening I gave it one more pass with zircon-corund P320. Very thorough pass, because the blade was slightly pitted from the failed hardening attempts. After that came the last third of the belts, which are Trizact belts (A65-A6, which is equivalent of P300 to P2500). There are six Trizact belts, and each took approximately one hour. Had I more experience I could perhaps speed it up by 30-40%, but it would still be a lot of time – I want the blade to be as near perfect as I am able to make it. So at each stage it is important to remove absolutely all scratches made by previous belt.

Dagger blade polishingOf course thick blue marker helps here as well, because otherwise I could get easily confused about which facet I am working on. As I learned when doing my previous dagger. To be able to see the marks from previous grind, one does alternate the angle – that is for this facet for example I was grinding diagonally with the point down, so next step will be with point up. Were the facets perfectly straight and not wobbly at all from the beginning, the process would be fast. Alas they were wobbly and I made them wobbly in the process in decreasing degree of wobbliness untill I reached nearly straight towards the end. What I learned here is that I really, really need speed control for my belt grinder, because during polishing slower speed of the belt would speed up the work – I would get better control of the blade and most importantly, the edges of the belt would not make divets and scratches so fast as they do. However even as it is it is working well, but requires a lot of skill that I do not yet have. A lot of eyeballing was involved.

Holder for sandpaperToday I finished on the grinder but I am still not done. For a mirror-finish more work is needed. Kitchen knife would get a few passes on a buffing wheel at this point and that would be it. That would give it nice mirror finish but the scratches from the trizact belts would still be somewhat visible. For this one though now comes  excessive use of elbow grease. I will work my way through a series of wet polishing papers P2500 all the way to P7000. For this I use my trusted gizmo that has seen me through multiple blades already. A piece of hardwood board held in a vice, with leather strap glued on it. On the leather I can lay a strip of sandpaper. Sometimes I rely on the adhesion between the wet leather and the sandpaper to hold it in place, sometimes I hold the paper in place with the help of two springs and something made from fence wire I cannot put a name to.

After that I will be done with this phase and I will be able to perform the last step in making a blade – signing it.

I still have not resolved how to do that. I used to have my own maker’s mark consisting of my stylized initials. It was very easy to etch or engrave and I would love to continue to use it. But by purest of coincidences that very same mark was a few years later independently designed as Bluetooth logo. We’ll see what I come up with.

The House of Dreams.

Stephen Wright in the front room of the House of Dreams. Vice.

Feelings. This text in this picture describes how I feel about the House of Dreams, my work, and my artistic life journey. I sometimes don't have a clue what I am doing and why. I only know it's the right thing for me to do.

Feelings. This text in this picture describes how I feel about the House of Dreams, my work, and my artistic life journey. I sometimes don’t have a clue what I am doing and why. I only know it’s the right thing for me to do.

Take some time today to meet an extraordinary artist, Stephen Wright. His House of Dreams is amazing, to say the very least, and the story of his journey is both wondrous and terribly poignant. Vice has an in depth interview with Mr. Wright, and you can take a virtual tour of the House of Dreams, or book an actual visit.

Vice Story. The House of Dreams.

Knifesharpenophobia

When working in US some twenty years ago I borrowed from the local library in Ketchum (ID) the Ed Fowler’s book Knife Talk: The Art & Science Of Knifemaking. Unfortunately I did not have time to read the whole book so I basically just skimmed most of it and therefore I do not remember all. I can recommend the book with good conscience though, because I did read one chapter in full and remember its title and contents well – “Knifesharpenophobia”. I consider that a sign of good and persuasive writing.

I have remembered about this book and this particular chapter recently when I was obsessing over properly hardening a blade for a knife that in all likelihood will never be used to cut anything harder than a mushroom or perhaps some soft wood during a walk in the forests. And maybe not even that.

In the past I have made knives from improperly hardened steel. Not that I wanted to, I did not have much choice. I did not have high-quality knife steel available just a few mouse clicks away, and even if I had I was so poor I could not afford it. And I lacked a lot of the knowledge I have now so I could not improve the steel I had.

Two of those knives are occasionally still in use (by me) whenever I go to the forest.

A knife

©Charly, all rights reserved. Click for full size

A knife

©Charly, all rights reserved. Click for full size

I let you in on a little secret: They cut perfectly well. With the second one, made from low-carbon structural steel, I was able to do even quite a lot of wood carvings and heavy cutting/chopping when I was camping in the past.The first one is made from some unknown martensitic stainless steel that I was not able to harden for unknown reasons.

However the softer than normal blade did not impede work in the slightest. All that was needed to do was to sharpen the blade a bit more often than is perhaps usual and it was much quicker to sharpen than other blades. Just like Ed Fowler says in his book:

…Granted, edge holding is a fine attribute for a knife. The problem is, knives that seldom need sharpening generally are usually too hard to sharpen when the time comes to sharpen them…

I could not agree more.

I think that for anyone who starts to learn the knife making trade it is vitally important to keep in mind the fact that for thousands of years people were perfectly capable of hunting, cooking and fighting with blades made from soft metals like copper, bronze and wrought iron. Sure, steel was the ideal material of choice once discovered, but untill the invention of blast furnaces it was hard to come by in larger amounts and it rarely had consistent properties.

I hate it when I come across some smug knife maker who berates some young beginner for forging or making knives out of the steel they can get their hands on. Some people even feel the need to hurl derogatory epithets at knives made from rail spikes or structural steel. I wish they stopped doing that, because it accomplishes nothing except maybe discouraging a future master from pursuing further the hobby they enjoy. Obsessing about the frequency of sharpening and edge retention is not necessary for a beginner, I would even argue the opposite. And why the aversion to knives that need sharpening? Well, I let Ed Fowler have a say again:

…What is knifesharpenophobia? …I define it as an irrational, excessive and unnecessary fear of sharpening knives. This is a malady that strikes fear in the hearts of all too many knife lovers and users.

And to make the point even finer you can watch this video where it is demonstrated that properly sharpened flat bar from 5,-€ low-carbon structural steel can cut just as well as 100,-€ katana:


Hackamore Miniature.

An astonishing work, from Kestrel: There is a group that issues a fun challenge to model horse tack makers: push your skill set and see if you can make a nice piece of tack in one month. For the project I chose to make a hackamore in 1:32 scale (normally I work at 1:9) and the goal is to make it look as much like a piece of tack for a living horse while being in scale and as detailed as possible. This was hard… it really was a challenge for me to go this small.

Click for full size!

It all started with a single white horsehair. I braided 8 strands of very fine silk over the hair, to create the base of the noseband (bosal) for the hackamore. I have to check to see if it will look in scale:

Then I tie a series of braided knots in the silk, to create the finished bosal, a very complicated little device:

We need some buckles for the headstall to hold the bosal on the horse’s head:

Next I have to make the headstall of leather, and why not tie a few more braided knots on it to make it decorative. Also I need to braid a long rope with a tassel at one end and a leather popper on the other (mecate) which is the traditional way of rigging reins and a lead rope:

The finished piece, which hopefully looks like it could be full-sized on a live horse:

Making a Rondel Dagger – Part 5 – Bounce

I lied to myself when I said that I will continue even though the blade might not be hardened properly. I just could not do it. Even though the knife will in the end be just ornamental thing, a wall hanger that will never be used, I could not bring myself to making a knife with improperly hardened blade. So I had another go at it. Fail again, the steel was still soft and it was not only surface – I tried to break of the tip and it bent and straightened as if it were copper. So I had another go at it, using water as quenchant – a big risk because in high carbon steel this can lead to the blade cracking or even exploding into bits. Fail again, it remained soft.

At this point I had to reconsider. I was convinced that I did everything correctly, testing with magnet for the austenite transformation etc. and I am already relatively good at assessing the temperature by the glow color, so I did not think the failed quench was due to wrong temperature. The quenchant also could not be the problem, since I hardened three blades in it without problems and one at the same time as this one failed.

So I surmised the problem lies in the steel. Perhaps it was surface hardened file and when I did the test with ferric chloride I had all the hardened steel ground off already, so it could not show in color. Or perhaps I burned off the carbon due to the not-so-well functioning protective coating. I consider the first option to be more likely. Anyway, I could throw this blade away and start anew, or I could do what I mentioned before – surface harden it.

Theoretically this makes for a very good dagger, because under the hard and brittle surface remains soft and tough steel, which means the dagger would not break easily when hitting something hard – like an armor. But it is a long process that burns through a lot of charcoal with results unsure. And the layer might be too thin and get ground off during polishing.

I succumbed, knowingly, to the sunk cost fallacy and decided to go for it in an attempt to save the blade. This is what I have done:

Cleaned dagger blade

©Charly, all rights reserved. Click for full size.

First I have cleaned the whole blade thoroughly with angle grinder and a twisted knot wire brush wheel. After that I also scrubbed the whole blade with abrasive pad (similar to Scotch-Brite, only different manufacturer). Whilst doing this I noticed that the blade got slightly blotchy and pitted, so there was definitively more material burned off than I am happy with. Inevitable after three failed quenches. Theoretically quench could be attempted infinite amount of times – but practically the blade would burn away pretty soon.


Blade packed in charcoal

©Charly, all rights reserved. Click for full size.

Secondly I took my limited supply of stainless steel foil and wrapped it around the blade forming a little trough. Not wanting to perform more than one experiment in one project I did not experiment with the hardening material and I used powdered charcoal. Any organic material would do, really (sugar works extremely well I might add, and in the future I intend to experiment with bone dust and various mixtures from easy to get chemicals), but they give blotchy, coloured surfaces, and with charcoal I had a best shot to get evenly hardened and evenly coloured surface.


Package enclosed

©Charly, all rights reserved. Click for full size.

After filling the trough about halfway with the powder I crimped very tightly the edges, folding them twice and pressing the folds together in a vice. It is important to get the package as air tight as possible. But the tang was not packed in, because that was supposed to remain soft. Thus prepared package was now ready for heating. For this I have used my improvised setup build from fireclay bricks, but without forced air supply (a fancy way of saying I left the vacuum cleaner in the workshop). I filled the fireplace with charcoal, buried the package in it, lit it and left it to its own devices over night. Under an impromptu cover because it was raining.


The next day the package was burned through near the tip, a bad sign. But the charcoal dust was still all in there and it did cling to the blade very nicely – I had to scrape it off. A good sign. But I decided to repeat the process once more just to be sure.

Today, after I returned from work, the weather was again good so I could have another shot at quenching this cursed thing.

And it is a success. The blade is hard as glass on the surface and there are no cracks that I see after cleaning it with wire brush. I hope no hair thin cracks shows later on.

Tomorrow the blade goes into the baking oven for heat treatment 150°C half an hour. Maybe two courses.

Poor Man’s Belt Grinder – Mark 2

As I was saying last time, I have given my belt grinder a complete overhaul.

Since now I knew that I can do it and it will work, I was not so stingy about spending money so I bought for about 50€ a few beech wood profiles 50×50 and 50×30 mm, some new ball bearings and a few other thing.

First thing I have done after that was to remove the belt support and compeltely dismantle the idler wheels. I have rebuild them. Instead of using threaded rods throughout I used about 100 mm length of a 10 mm rod on which I cut thread on the ends – on one side just about 1 cm each side . This has provided better fit with the inner opening of the ball bearings. I also shortened the inner spacer between the  ball bearings so that I can sink in the nuts inside so it and the rod are flush with the wheel edge.

This has allowed me to to fix the wheels on the future idler on only one side, so I fixed them perpendicular to 50×30 profile and after that I got distracted.

Latch

©Charly, all rights reserved. Click for full size.

The distraction was the spanning wheel, which I did not intend to rebuild. But changing belts was a bit awkward – I had to pull on the lever with left hand and change the belt with the right hand. And I got an idea on how to improve that. So I have built out of plywood a gravity latch that falls into position when the lever is pulled beyond certain point. That frees both hands to put on the belt comfortably and without hassle. When the belt is on I lift the latch, the spring spans the arm and after I let go the latch end lays on the top of the spanning arm without restraining it.

Idler

©Charly, all rights reserved. Click for full size.

With that done I returned to the idler. Whilst I did spend some money on good materials, I did not spend too much time with planning except in my head. So I was still working by mostly piling stuff on other stuff making it up as I go along. I did not bother with precision too much and relied heavily on epoxy to fill any gaps and I added dovels and sometimes screws for strength

The only thing that I actually have spent some time to make precise was the parallelity of the wheels.

On the idler I prepared two screws with wing nuts for fixing the platen, and on the other side are two screws for fixing the support table (not seen here, but the positions are the pale circles in the lower half).

With that done I have cut two platens out of an old U profile that was rusting in my garden for years. Here is the final setup with all threee options visible. Left is setting for 20 cm hardbelt, middle 12 cm hardbelt, 10 cm slackbelt and right is 24 cm slackbelt.

Belt support options

©Charly, all rights reserved. Click for full size.

After this was done and tested – which I have done by truing the platens by alternating them as support/workpiece against each other on the grinder – I gave the whole thing a new coat of paint. The machine blue and the detacheable idler arm pale grey.

Belt grinder

©Charly, all rights reserved. Click for full size.

Belt grinder

©Charly, all rights reserved. Click for full size.

It is Amazing how a simple paint can improve the looks of things, isn’t it? I am glad to say that it all works as intended.

Next step is to make second detacheable arm with changeable wheels of different diameters, for hollow grind an fullers.