Making Kitchen Knives – Part 2 – Draw, Drill, Cut

©Charly, all rights reserved. Click for full size.

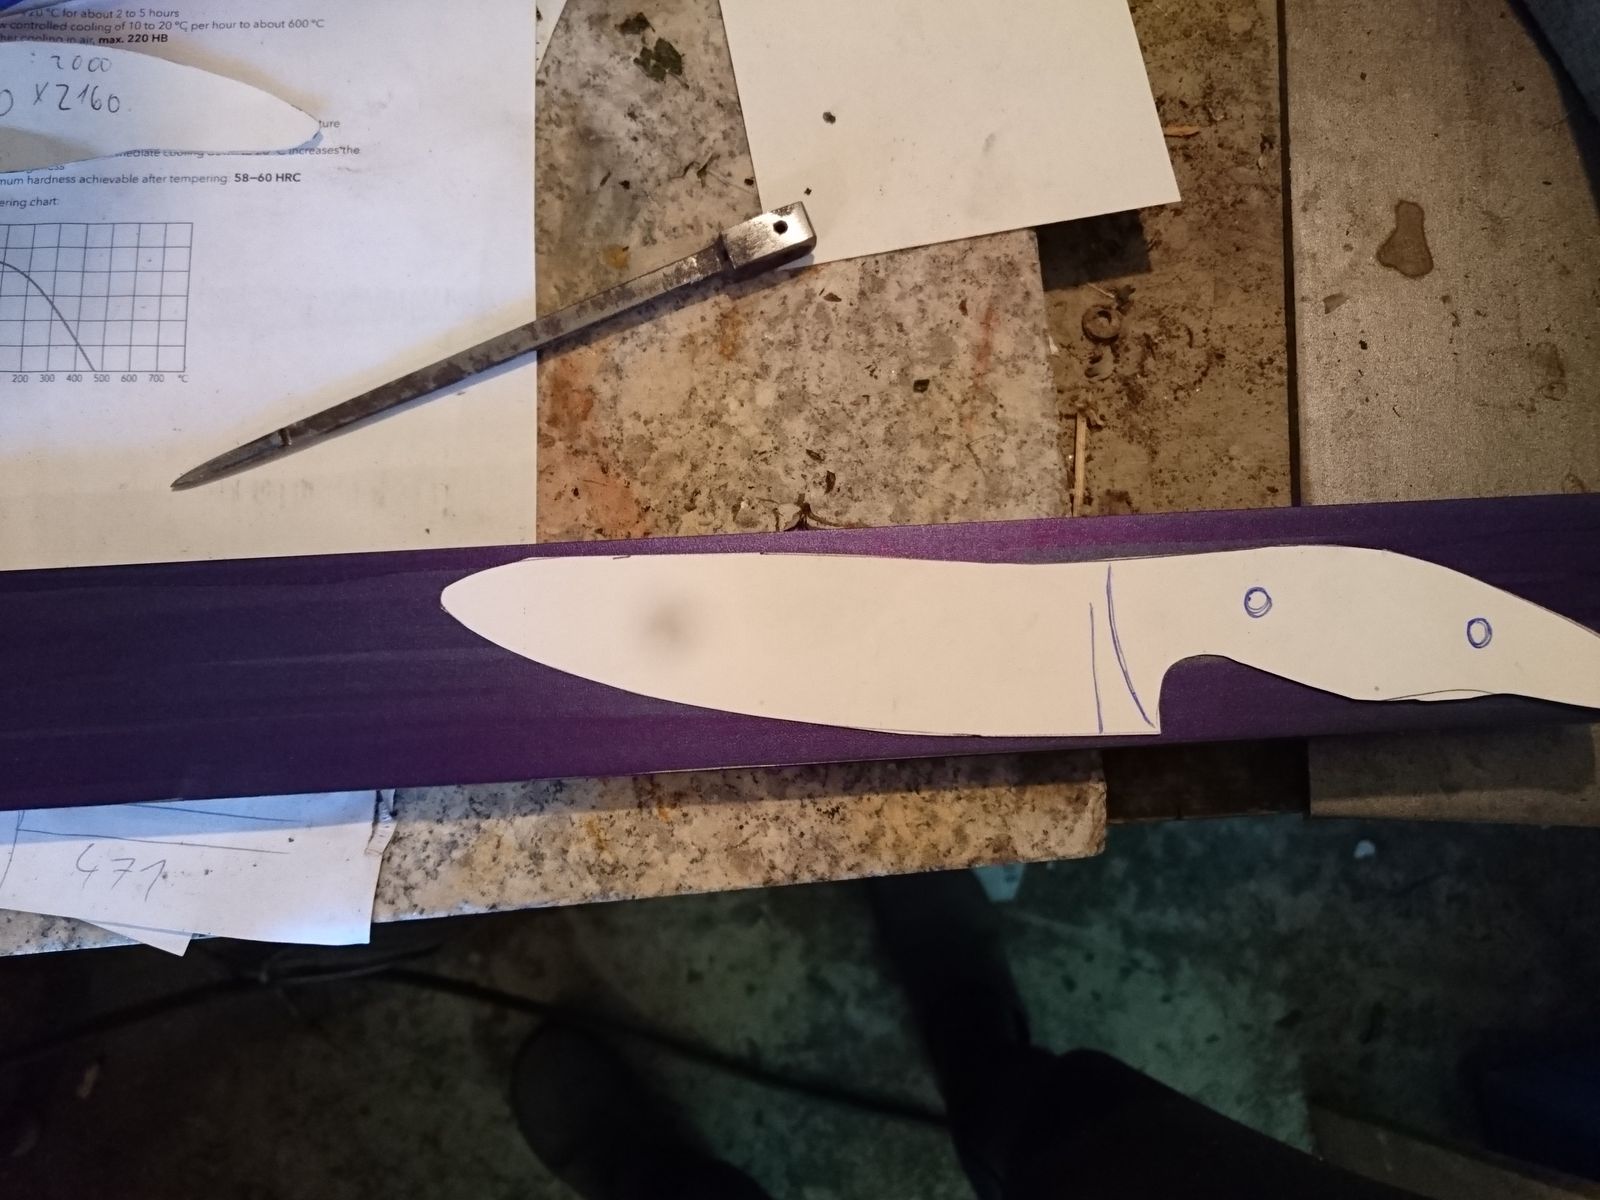
Each bar I have is big enough for two knives, but I cannot simply halve them – there is nearly 10 cm overlap towards the tips. That way I get longer knives whilst wasting less material. I have made a new paper template and here you can see how I laid it on the bar. To draw the outline I covered the whole bar in blue color using very thick (1 cm) marker. A much cheaper and more readily available option to machinist’s blue. You can also see that  I have lost my drawing needle somewhere in the 10 square meters of my shop so I have made a new one from an old shuttle bobbin. I hope I won’t lose it too.

When doing this I have wanted to test an idea how to improve my process already, so I have made another template which allowed me to mark not only the two holes for pins, but also a hole at the center of the finger groove. Unfortunately I did not make a picture of that.

©Charly, all rights reserved. Click for full size.

But here you can perhaps see why the third hole. After marking the hole positions with a center punch, I proceeded to the drill. But instead of a normal drill bit, I have spanned in it a step drill which allows me to drill holes from 4 to 22 mm. So I drilled 6 mm holes for pins and an 18 mm hole where the finger groove is. That way I do not need to mess around with some improvised way to grind a nice tight radius that I need. This is a big time and hassle saving in itself.

This is also first significant change in design to the prototype that I have given to my mother. She did not exactly complain, but she commented that a deeper finger groove would be more comfortable. So I am making the groove deeper and therefore the handle inevitably skinnier in this part.

©Charly, all rights reserved. Click for full size.

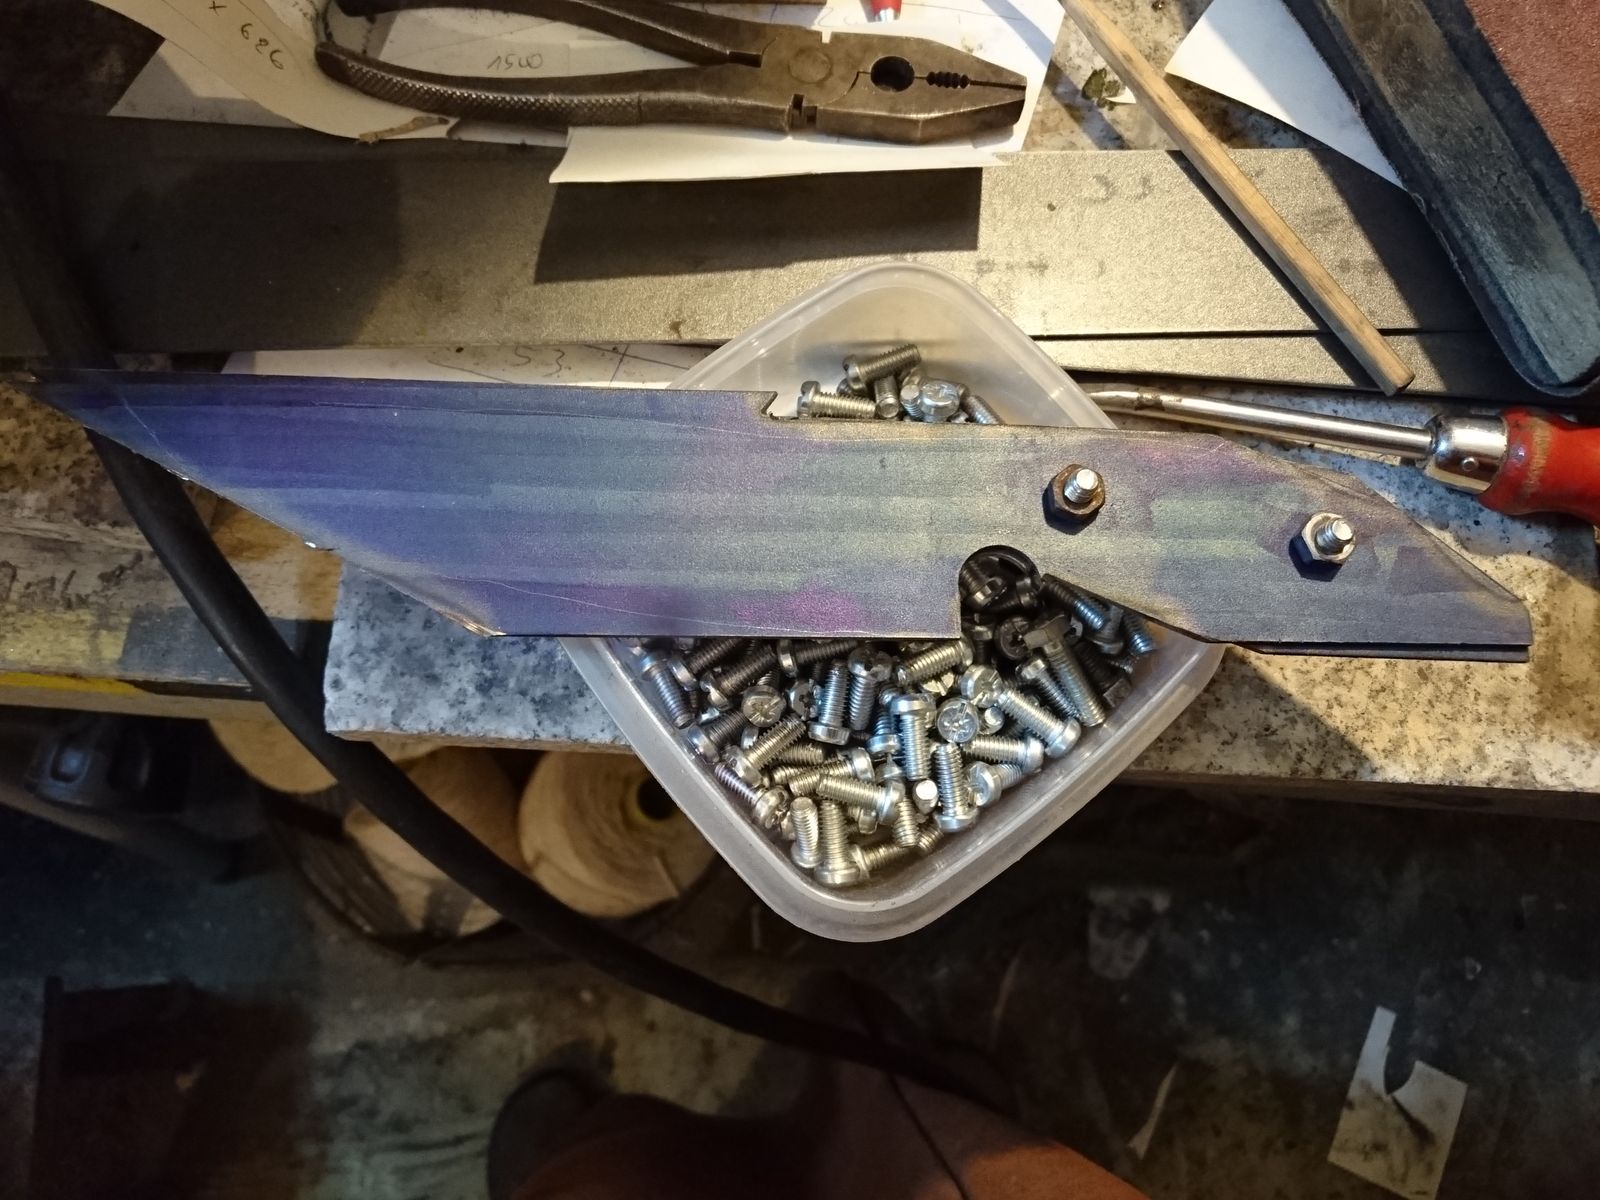
I have marked and drilled both halves, then I cut the bar diagonally with an angle grinder. Using an angle grinder I have also cut excess metal on both knives since I live by the rule – if you can cut it, do not grind it.  After that I have tried another time-saving measure that I have thought up in my idle time – I have connected both knives with screws through the pin holes. With that I proceeded to the belt grinder to grind the outline of the blades.

It worked very well and I had outlined two knives very quickly, in fact these three steps took a lot less time than I expected – just one hour overall. And I even see big time-saving potentials here:

  1. For drilling I could make a template for guiding 6 mm drill bit instead of punching the holes for each blade separately. So for next run I will first fish around in my scrap pile if I find a scrap piece of the right shape and size. Then I can stack and drill more pieces in one go. I will lose some time by stacking, but save time drawing and punching. Also next time I will first drill all stacked pieces with a 6 mm drill bit for the finger groove as well. That means changing the bit once, but I think it will be more than made up by the time saved from drawing and punching.
  2. I can probably stack at least two, maybe even five, pieces before cutting all the excess with the angle grinder.  Five pieces would be 9 mm thick, and an angle grinder should be able to grind through that without big trouble and without too much reduction in speed. And I will waste less time per blade by repositioning the piece in the vice for each cut.
  3. Ditto for the belt grinder. A new 40 grit belt should be able to grind five pieces at once with only marginal reduction in speed. That would also improve reproducibility.

So I am putting this in the “low hanging fruit” basket, since the 30 minutes per blade is significant 10% of my goal time and I estimate I can cut that easily down to half or maybe even less.

Making Kitchen Knives – Part 1 – In the Beginning…

… there was a bar of steel.


After a short break due to harvest I have started two knife making projects and I will share the progress on them as I go along.

The first one is about developing a viable process for making small-batches of kitchen knives.

The knife that I have given my mother for Christmas has proven itself to be an excellent cutter. It held an edge for half a year and still shaved hair when my mother requested honing the edge because it had a few blunt-ish spots. The handle does not show any sign of deterioration too. And it is used daily, by at least two people, on everything from fine chopping veggies to de-boning chicken. So I think that with some adjustments (mostly making it look prettier) it might be a saleable product.

I reckon (I will not bother you with the math and reasoning, some of it has solid rational basis, some of it I pulled out of my nether regions) that in order to be able to eventually barely survive whilst making knives, I would have to be able to make a passable kitchen knife in under five hours spending with the fun work, i.e. manual labor. The lower the better. Rest of the working day would in such a case be eaten by the unfunny part of the job, the actual business of business.

But developing a viable production process is something I have a professional experience with and so I want to have a go at it, even though right now making knives is just a hobby. And I will be sharing with you all the failures as well as the improvements in trying to achieve my time goal.

The first step is straightening the steel. For this project I am using N690 steel 1,8x50x500 mm and all the steel bars had a slight bend to them that had to be corrected. Currently the only way for me to do this is to use a vice and three thick screws. Had the plates had a kink, I would place the middle screw straight on that kink and bend it with ever-increasing pressure until after taking the steel out of the vice it would be straight-ish. However these did not have a kink, they were nearly universally bent in a very slight regular arc.  To straighten that, I first tried to bend the bars slightly at multiple points. It worked, but it was time-consuming and unreliable. Later I have tried to close the vice only slightly on the steel bar and then pulling it through the screws – essentially using it as an improvised roll bender. That worked much faster and reasonably well.

Even soo, all in all it took me less than 1 hour to straighten 12 knives worth of steel. That is less than 5 minutes per knife. I think that building a small roll bender specifically for straightening these thin long bars should not be difficult and it could potentially shave off quite a reasonable chunk off of that too. But right now, I am putting this into the “high hanging fruit” basket, since despite the clearly impromptu setting it takes only about 2% of my time goal. That means, I will ignore this step in the process for now and not bother about improving it.

For the first knife made let’s write down 5 minutes for this step and move on to the next.

Youtube Video: Nurgle Plague Sword Build

Michael Cthulu is not a smith, he is a welder. And he does not make historically accurate replicas, he makes ridiculous, humongous swords from computer games that have no chance whatsoever to being actually functional in the real world.

But he is entertaining to watch and he has shown some tricks in his videos that are valuable to me in my workshop – like his unique working goggles with replaceable glasses.

He also seems to be a genuinely nice person, at least judging by the ammount of his products he auctions for charity ever since he makes enough money for comfortable living.

Mild content warning – the video takes almost an hour and contains half-naked and very hairy dude in his fifties doing dangerous things with fire, electricity and fast spinning machinery.

Making a Rondel Dagger – Part 16 – Chape

I had a very busy Sunday. My vacation is nearing its end and I have been hell-bent on finishing this project already, but things got in the way all the time.

The biggest problem with the chape was that I could not find any information about how to do it properly. There are some pictures of finished products  and some info about casting them from bronze, silver etc. but not about how to form one out of steel. So I had to start from scratch.

My first two attempts were completely unsuccessful. I do not even have anything to show you  – you are free to imagine some vaguely rectangular and bent piece of metal. What I am going to show you is my third – and final – attempt. I do not call it a success either, but it is at least big enough part of a success to yield a usable product. But I am not satisfied with it and I had to repress the urge to hurl it out of the window with great force.

In retrospect I think my biggest mistake overall was using too thick steel. The shovel that I was recycling was ca 1,5 mm thick and for this purpose probably half that thickness would be appropriate. Unfortunately I did not find any suitable piece of steel in my scrap pile.

Should anyone wish to avoid some of the mistakes I have made, here is the most important thing I learned: do not try to do it without dies and templates. It is a complete waste of time. Chape is a very complex piece of metal, bent and formed in multiple directions at once.

I wanted only the front face to be pretty, but even that has proved to be beyond being doable without a template, definitively without  a skill that I lack. And since I  also lack screw press, I had to do with my vice. So I have built a set of jaws – one formed approximately as the tip of the scabbard, and one with a matching hole about 2 mm bigger on all sides. After this I have heated a piece of steel, put it between the jaws and pressed it as quick as possible. After a few repeating and some repairs/adjustment of the jaws I have finally got a  shape that at leat partly fitted the tip of the scabbard. I might be on the right track here.

However, after a few presses the metal had nowhere to move – so I have cut it into stripes that I have intended to bend around the scabbard. I have again made the mistake of trying it first without a template. Again, complete waste of time.  I have only managed to bend them so they point straight to the back of the chape. I could not achieve the second bend to close the flaps around the backside.

So I had to fish around in my scrap pile some more. Two cuts that were left over from making the jaws have proved to be useful here – when put back to back, they were the same thickness as the wooden scabbard, therefore I reasoned I could make a template out of them.

So I took an angle grinder to them and made two nearly identical halves that mimicked the wooden scabbard. A few touches with a file were also needed in order to round the edges etc. I am not going to toss these, I am going to keep them as well as the jaws in case I need to do similarly shaped chape again.

I have deliberately made this template so most hammer blows will be perpendicular to the vice jaws. No matter how strongly you close the vice jaws on anything, hammering or filing/sawing it will eventually loosen it or break it. That is actually a reason why specially formed jaws with a groove have to be used for holding round stock.

With this I was finally able to bend and hammer the steel flaps all around so the fit more or less snugly around the tip of the scabbard. I did not want to close it all the way around and I intended to leave the stitching visible, because it was more or less clear that I will have to hammer and ever so slightly bend the finished chape onto the tip so it holds and does not fall of. However, I wanted to at least braze the gaps on the sides. I failed to do that, because I run out of silver solder and I will be damned if I spend another 10 € on this. At this point, I was starting to hate the thing. So I brazed as much as I could and sod the rest. Here you can see it all black, covered in solder and slag and scale. I have again carefully ground the excess solder with fine file and collected the silver dust, but I still did not feel like experimenting with making solder out of that dust.

This is when It I have got the only idea during this whole process that I consider valuable – I have found out that old, nearly worn angle grinder wheels are excellent for scraping of the scale and the slag – both of those are harder than files and they tend to smear abrasive papers. So a bit of water now and then to wash of the dust and a bit of scrubbing with an old wheel and I could proceed to polishing without covering my belts with grime. Polishing I have performed the same way I did with the throat. During this I have found out that the chape is much more asymmetrical than I was hoping for and that there are two poorly brazed spots on the sides. leaving unseemly spots, but as I said, sod it, I am not going to do this thing again.

When the chape was finished, I have put it and the throat on the scabbard and gave both parts a few wallops with a wooden mallet on a wooden board so they hold in place (for the throat I had to put a piece of leather on one side between the backside of the scabbard and the throat for better fit). And then I walloped it all some more so it holds.

So now the project is almost finished. All that is left to do is to sharpen and sign the blade, tie a leather strap around the scabbard and treat it with dubbin and make pictures. Neither of those things should pose any big problems and except the signing they cannot destroy anything. I hope.

Despite being a non-believer, I do understand the desire to be able to pray – a desire to have some control.

Blade Braider

Earlier this summer Marcus Ranum and Kestrel gifted Caine with a very special knife. Marcus custom made the blade and then sent it on to Kestrel who hand wove a beautiful braided leather handle for it. It was a gift that Caine treasured. Today Kestrel is sharing with us the story of how the handle was created. I’ll let Kestrel take it from here:

Marcus made Caine a knife as a gift, but first he sent it to me so I could cover the handle. I chose to use black and red kangaroo leather. Kangaroo leather is incredibly strong and durable, and I knew that Caine would like that color combo.

©Kestrel, all rights reserved

[Read more…]

Making a Rondel Dagger – Part 14 – Covering the Scabbard

So whilst I am coating the dagger handle, scratching it with 600 grit paper and giving it each day a slight buff with acetone diluted linseed oil, I can continue to work on the scabbard. It will take a few weeks for the linseed oil to harden really properly, so there is no rush. However some of the works shown here were done in parallel with works already shown.

First thing to do is to properly shape the scabbard, leaving only about 1 mm thickness. Because the poplar wood that I have used is extremely soft, I was afraid to cut it for fear of taking away too much material. The most important rule in woodwork is – you can always cut, but you cannot ad. So I did not use chisels or a rasp, just an 80 grit sandpaper on a padded sanding block. My sanding block is a piece of wood with old carpet glued on the faces, and I am spanning on it endless belts that I used for my now dead small belt grinder. A wine cork is an excellent spanning device, allowing for quick change of belts and giving me the option of slack belt as well. When sanding around the throat of the scabbard I took care for the throat always face downward, so no loose grains fall into the scabbard and ruin the blade.

Next thing that I have done was to soak the whole surface with hot hide glue, priming it so other materials can be glued on. After the hide glue has dried, I have covered the scabbard with linen, which I have again thoroughly soaked in hot hide glue. I do not know whether this was actually done for scabbards (although from some of the images that Caine has posted it seems plausible), but I know for sure that the technique was known from early medieval times through to the modern times. Covering wood in fabric soaked in hide glue is very effective way to prevent the wood from splitting and twisting. Firstly it adds fibers that are perpendicular to those of the wood, secondly hide glue shrinks significantly as it dries, effectively pressing everything tightly together. This is one area where real hide glue has an irrefutable advantage over any modern glue. After the hide glue has dried up, I have again sanded the whole thing with 180 grit sandpaper to smoothen all knots and irregularities in the fabric.

To remain true to the game, I should use plain vegetable tanned leather, but this is one of the instances where I deliberately choose to stray away from my template and do something differently. For years I have a piece of dashing red leather that I wished to use for this project from the very beginning. It was of very irregular shape, but I was able to cut a piece big enough to cover the whole wooden scabbard from tip to throat. First I have cut a rough rectangle and then I continued to cut away tiny strips here and there until I had a piece that could be wrapped tightly around the scabbard with just about 1 mm space between the edges.
Then I had to make holes for stitching. This is fairly thin leather, so I had to make the holes very close to each other for fine stitching. I have made leather sheaths before, but I have never done this, so I did not know how exactly spaced the holes should be. I reasoned that about two-three times the thickness of the leather space between the holes and from the edge should be about right in order to be able to sew the edges together tightly without the leather ripping.

I could not find my awl, it seems that I have lost it. Luckily I had this super old knife whose blade was almost completely eaten away that could be quickly modified for the task of pokey-holey. About 200 holes. Oh boy.

For sewing I was going to use thick thread that is used for sewing jeans. For thicker leather I would have used thick linen thread, but that was a bit too thick for this job. Other threads we had at home on the other hand were too thin.

Before sewing, I have soaked the leather in lukewarm water (about 37 °C) for an hour so it becomes more stretchy and pliable. And I prepared the thread with the use of the unseemly mixture you see on the picture to the right. That mixture was made by boiling pine resin and beeswax and it was used by medieval shoemakers and saddlers to coat the thread before sewing. What are the advantages of that, you ask? Well it makes the thread bugger to work with as it becomes all sticky and latches onto everything – hair, pants, fingers, itself… Oh sorry, you asked about advantages. The thread does not split or fray during work, it is firmer and sleeker, despite the stickiness. If I coated the thread in advance and let it dry for some time It would not even be tacky, but I forgot about that. And I did not know how much thread I will need – it transpired that about ten times the length of the scabbard is about right.

When the leather was all soaked, I have prepared a small batch of hide glue again and started covering the scabbard. First I have sewn together the tip and about 1 cm of the length. Then I painted that part and the whole face of the scabbard with hide glue and inserted it in the leather pocket and started sewing and adding hide glue all round for each sewn piece. I have used a two-needle technique that I have found on the internet. It has the advantage of pulling the edges together very regularly and equally on both sides, so it does not warp and zig-zag as it could had I used just one thread. I must be honest with you – my needle work leaves a lot to be desired. I was doing my best, but I was losing the holes in this very thin leather and I skipped a few here and there without wanting to. It took me two hours to sew the whole scabbard – about 100 stitches on 27 cm length. My back ached and I was happy when it was over.

Last step was to poke and wrap holes for the straps. For these I have simply cut holes with a scalpel and inserted in the wet leather three skewers. The thread wrapped around will make visible grooves when it all dries up. If I wanted to, at this point I would also stamp and press the leather to decorate it. But I did not want to bite more than I can chew, for this project plain leather will have to do. I also formed the leather around the throat a bit, although I will have to get back at it once more – when it dries, I will have to cut all excess, wet it again with hot hide glue and form it better.

The scabbard is now nearly done, but the most challenging part is yet to come – I want to make metal chape and throating. And that is something I have never done and I will have to be really, really careful to not botch that up. And also think hard about how to do it, before I go cutting, bending, banging and soldering metal pieces together.

More about that next time. In the meantime you can admire my irregular stitches.

Absolute Perfection.

An amazing gift, from Marcus & Kestrel, who collaborated on this little slice of perfection. It wouldn’t be perfection to some one else, but it is to me – absolutely gorgeous, fantastically sharp, my favourite colours in that magnificent braiding, giving a wonderful grip, and the beauty of the blade. Fits my hand perfectly, and is properly sharp and lethal. Honestly, I was speechless when I opened this up, and I still just babble about it. I will cherish this, always. I couldn’t possibly come up with enough of a thank you to you both for your work, especially such finely done and thoughtful work. Thank you, thank you, thank you.  She definitely needs to be named, but I have to spend more time with her to find what’s right.

Clickety for full size.

© C. Ford, all rights reserved.

Making a Rondel Dagger – Part 13 – Assembly

Let me tel you one thing upfront – this was the most nerve-wracking part of the whole job. For a moment there I thought that I have destroyed the whole thing and I will have to start all over again, which I am not completely sure I would be able to.

First setback was the guard – look on the picture, do you see it? I did not notice it when I have made it, and it escaped my notice for quite a few days, but when trying the assembly I noticed a sizable gap between the guard and the tang. It is only about 0,3 mm, but the mirroring of the blade and the guard make it visually double that size. I thought that I will use it anyway, but it pissed me off and in the end I reckoned that having a botched project on which I have already spent probably about 50 or more working hours due to a part that takes about 3 hours to make is not worth it, so on Friday I have made a new guard. The fit was still not perfect, but this time it was good enough for me to live with it.

As I said, the wooden handle was a bit shorter than intended. Original intent was to have the bowl-shaped rondel fit snugly onto the end of the handle. But since I had to make the end of the handle flat, I had to do something to prevent the rondel from collapsing. So I needed not only the knob/nut into which the tang will be peened, but also a washer between the handle and the rondel. Both of these I have made from an old window hinge. which I first have polished with angle grinder and soft abrasive pads and then cut off a piece with hack saw. I drilled a 5 mm hole in the middle (badly) and cut the piece into two parts – the washer flat on both sides, and the nut flat on one side, and rounded on the other. I have also chamfered the outer edges on the hole in the nut, for the peening to hold on to.

Then came the fitting of all the parts together. You might think that since I have burned the hole with the tang, there would be a perfect fit, but you would be wrong. It had quite a lot of radial wobble and charcoal dust kept falling out of it. So I have taken a rat-tail rasp and filed the burned wood away, which of course made the wobble even worse.

But I had a solution to that in mind. I remember that in Ivanhoe it is mentioned that tangs were fitted into handles by a mixture of glue (resin) and crushed brick. That makes sense – crushed brick is chemically stable, compression-strong material that is nevertheless porous enough to be effectively glued. Crushing brick was no brainer, just wrap it in a rag and let a 2 kg hammer fall on it a few times, letting the gravity do the job, and then sieve it to get fine dust. However since I run out of resin and have not yet managed to get to the forest to get some new, I have decided to use hide glue instead.¹ It did not work out as intended.

To be fair, I think the idea was sound, it is my execution of it that was wrong. I have used paper masking tape to protect the blade against scratches during this work, but the guard and the bolster were completely unprotected. Further I knew that this paper tape does not protect against moisture and rust, so I had to do the whole assembly in a few hours so I can remove the tape afterwards and oil everything. Had I used molten resin, that would be possible (probably – we will see next time), but hide glue needs of course time to dry, and I did not dare to let it wait for fear of rust getting on the polished surfaces.

Here you can see that I had a lot of tang before my first attempt. Until this point everything went smoothly and I did not expect any trouble. Oh was I wrong, yes I was. In addition to the glue not being hardened I have made a few bloopers.

First was that I have not secured the rondel with tape – it fits properly only one way around and could not be rotated willy-nilly without unseemly gaps appearing. The side that is supposed to point towards the cutting edge of the blade was marked, but only on the inside, not on the outside.

Second was that I have not hammered the nut sufficiently on the whole thing and it remained hanging on the tang a few tenth of a mm above the rondel without me noticing it.

Third was to not shorten the tang sufficiently.As a result the tang was too long and its end has bent during peening.

The result was a handle that wobbled and was out of center and a rondel that did not fit and was askew like drunkard’s hat. I did not take a picture of that shameful display. Nor did I make pictures of following works, because I was too stressed out to think about that.

Because his was the point where I thought that I have botched the job and that I will have to at the very least try to weld on a tang extension. I ground off most of the badly peened end and after a few minutes of work with a vice I managed to rip the nut off. Luckily it seemed there is enough tang left when I make the nut a bit thinner. So I have filed the nut about 1 mm down and tried again. The trouble was the centering of the grip. The mixture of glue and brick was just not strong enough in such a short time to get the grip center and hold it there. In the end I had to hammer and file three small (circa 0,5 mm thick) steel wedges that I have positioned around the tang before hammering the handle onto it until the bolster met the guard. I had to pull it of and monkey around with the wedges three times, filing them and hammering them thin, before I was satisfied.

For second attempt at peening I have not only made a mark on the outside of the rondel with a sharpie, I have also fixed it with tape before peening. And before peening I have put aluminium tube on the nut and hammered it down so it lies tightly on the rondel. This time peening the end of the tang with ball peen hammer went smoothly and without problems. There was a teensy bit too little tang for  the peen to completely hide during polishing, but I can live with that. Here you can see the peen before polishing.

The dagger is now nearly complete. Now I have to re-polish and re-buff the rondel, because I have scratched it, and to soak the handle with linseed oil. That will take a few days to polymerize properly, and in the meantime I will continue work on the scabbard.


1 – I could of course use epoxy and save myself a lot of trouble, but from the start I wanted to do this project using only materials and methods that are appropriate for medieval-ish dagger. I have only used modern things where that saves time, but does not have an effect on the composition and aesthetics of the result.

Making a Rondel Dagger – Part 12 – Rondel

For second attempt I have decided that the tools that are at my disposal are not sufficient to do what I want to do. So I have made a tool.

I took a piece of wood from my late cherry tree that had about the right diameter and I rounded one end with an axe and a rasp to desired shape – a cylinder with the outer diameter just slightly smaller than the actual dagger handle has. I have put it in a bucket of water so it does not burn too quickly and I proceeded with the forging.

First I made the same shallow bowl shape that I have done previously, but when making it deeper I did not use the ball peen hammer anymore, instead I have inserted the prepared cherry tree block and whacked it with 1 kg forging hammer (also courtesy of my late uncle).

It has worked rather well. Not as well as a metal die would of course, but reasonably well. After only a few whacks I got a shape with which I was content.

That was not the end of the usefulness of this highly sophimasticated tool. After drilling the hole for the tang and rounding the edges on belt sander I nailed the bowl on the cherry wood for polishing.

To avoid too excessive material removal I did not do it on belt sander this time, but I have used my angle grinder with lamellar soft abrasive wheels. It has worked very well and in mere minutes I had sufficiently polished surface. Some pitting remained, but I have decided against removing it completely to avoid one of the mistakes from previous day (making the steel too thin in places).

Now for the grooves. I could not forge them hot, because for that I would need a special die. I could make one of course, but that would be extremely time-consuming and my anvil cannot hold dies yet. I had to hammer them into cold steel and from previous day I knew that I need support and space for the bend at the same time.

So I took a rasp again and I filed grooves in the end of the very useful cherry log. They are intentionally asymmetrical, because that is the look I was aiming for.

On thus prepared support I have fixed the bowl, this time not with a nail, but with a fairly long and thick screw.

A lot of banging has followed, first with masonry chisel to mark the groove, then with the smith’s hammer and old file used as a flat surface, and with small cross peen hammer. The steel was a lot tougher than I thought it will be so the cherry wood collapsed a bit. The result is that some grooves are better looking than others and some are nearly symmetrical, but that is actually correct as far as the 3D model from the game goes – the grooves there are notably different and one even looks like botched. And whilst I am not aiming for exact replica, I am aiming for the general look of the thing.

The rondel has circa 50 mm in diameter and is circa 10 mm tall. Grinding that out of solid block of steel would take an inordinate amount of time, eat a lot of abrasives and definitively weigh way too much. So I think this is mission accomplished.

Next time I will be doing something like this I will most definitively do a better job at it, but I do not think this is all that bad and I will use it. Now it will be polished and buffed together with the bolster and the guard as long as it takes for all three components to have the same look to them. That will probably take a few evenings. However I will not remove all pitting from the rondel, because I fear that it might destroy it.

And then comes the assembly. I literally cannot wait…