Branding Stamp

I am finishing the kitchen-knives sets, and one of the tools that I was still missing in my toolbox was a branding stamp that could be used for wood and leather. For leather, I have used an impromptu one made from wood stabilized with epoxy, but that cannot be used to brand wood of course. But when making that I have figured out a process that could be also applied to making one out of steel, so after a lot of procrastinating the task, today I have finally bitten the bullet and took the two hours it needed.

© Charly, all rights reserved. Click for full size

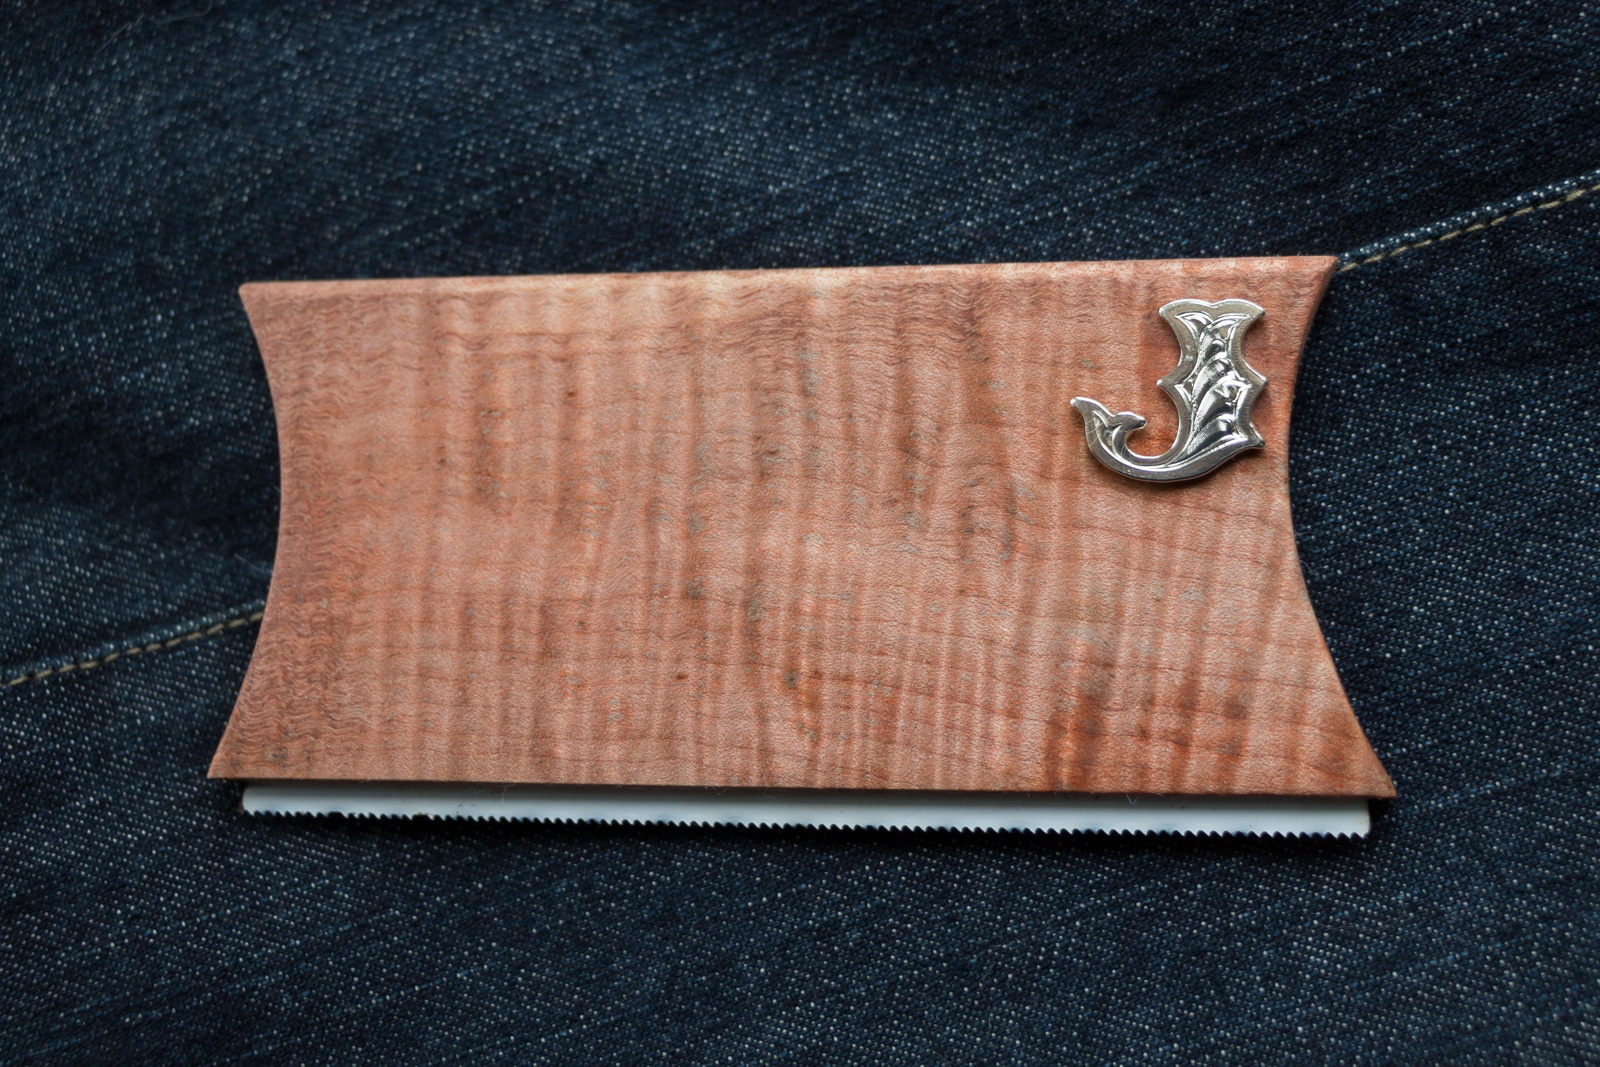
The handle is from an extremely old and out-of-shape potato peeler. Maybe even antique, but I know of no museum that would take it of my hands so I have recycled it. The screw is recycled from old furniture. The stamp itself is from tool steel, although I will not be hardening it.

I could not tap the hole in the stamp very deep and well without re-grinding and thus destroying the taps, because standard taps need to go through.  Thus I could not cut very good threads in there, just two turns of half-assed ones. But that should not be a problem, a few dents for the thread to latch on to should suffice, friction should take care of the rest. It is not supposed to come apart, and if it comes apart, I will braze it.

© Charly, all rights reserved. Click for full size

The one advantage of having a logo consisting of only straight lines is that it made the job relatively easy. A bit of filing, a bit of grinding with an angle-grinder, and here we go. Up close there are some flaws and the width to height ratio is a tiny bit off, but that is just life. I have tossed one attempt due to flaws, but I think this one will do.

© Charly, all rights reserved. Click for full size

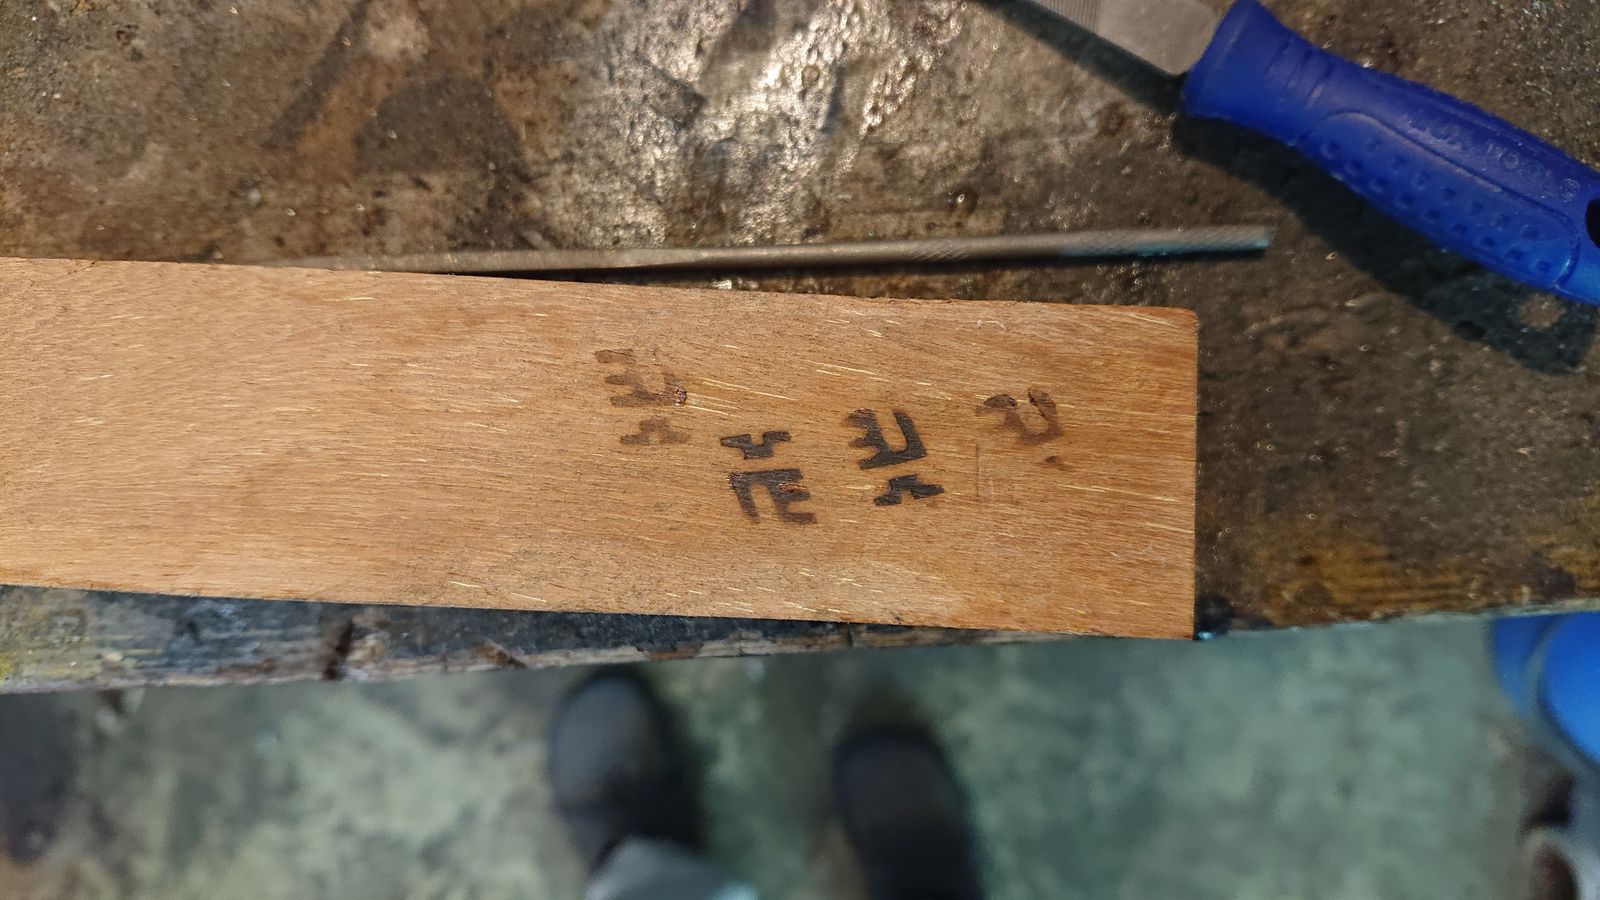
Wood branding is not an exact science, there will always be some irregularities. But with some practice, I should get crisp and nice logos that can be placed even in visible areas. Which is my intention.

© Charly, all rights reserved. Click for full size

And there is absolutely no doubt that on leather, the results are way, way better than those I got with my wood-carved impromptu stamp.

I may give it a go one more time to get the proportions better, but in the meantime, I am going to use this one. I doubt anyone will complain about it.


Brass Chisel

I made a new tool. I do not know whether someone else is already using it in a knife-making context, I would not be surprised if it were so. But I never heard anyone talk about it – a small chisel made from brass. I think it is a very good addition to my toolbox, well worth the ten minutes or so that I have spent making it. The inspiration were tools that I was using in my previous job to clean burnt plastic off of various testing devices.

© Charly, all rights reserved. Click for full size.

This may sound like a joke tool, akin to the inflatable dartboard, chocolate kettle, or ceramic rivets, but it is not. But why would anyone make a chisel out of a soft material like brass, that will not hold an edge?

I am glad you asked.

When making knives with the use of epoxy glues and resin, an inevitable problem arises – epoxy stuck to places it should not be stuck to. I am always doing my best to clean any rogue epoxy from the bolster/blade boundary etc before it hardens with a towel soaked in denatured alcohol, but the epoxy tends to flow and bleed over during curing too, plus there is often some contamination on the blade where I fail to spot it in time. That needs to be scraped off, very carefully, without damaging the blade surface.

With my last batch of knives, I have used with great success a square piece of brass, so for the last few pieces, I ground it roughly into a chisel shape and fixed it to a handle. And it works great, exactly as it is supposed to work.

There are several reasons for using brass and not other materials like alluminium or mild steel:

  1. Brass is harder than epoxy, resin or wood, but softer than even unhardened steel. So it can be used to scrape the glue off steel not only on the blade but also on the tang, without damaging the polished surfaces.
  2. Unlike alluminium, Brass does not come with a hard-oxide layer from the shop, neither does it form one over time. It forms a patina, but that patina is not hard enough to scratch steel. Alluminium does scratch steel, partly due to the oxide layer, partly due to galling. Ditto mild steel.
  3. Brass is one of several so-called non-galling alloys, but alluminium is a strongly galling metal. That means that brass does not lead to wear and tear when it slides on a steel surface, whereas alluminium will tend to contaminate, even if not necessarily scratch (if you remove the oxide layer beforehand thoroughly), steel on contact.

And thats all, folks. If you need to scrape glue off of polished surfaces, a brass chisel might be just the tool for you.


Project Degus: Houses

As I mentioned on TNET, we’re getting pets. More specifically, we’re getting degus. We did all our learning and deciding whether degus will make good pet for the little one, and then we went into the planning phase. Degus are day active and very active, so they need space, but holy fuck, those cages are expensive. Luckily, my grandma’s old kitchen was still up so we took that.

First of all: WORKSPACE!!!

©Giliell, all rights reserved

Look at it. A counter and cupboards and drawers. I still need to put up a shelf or two, power outlets that are not just extension cords and light. I also need to think about ventilation, because the window you can see is only about 20cm high. I basically grew up in that kitchen and I never noticed that all the drawers have different widths. Matching that kitchen is a high cupboard that we’ll turn into the degu home, but before that transformation can start, we’ll prepare some other things that they need, mostly huts.

Degus are rodents, which means they’ll gnaw everything, which is why the German word for rodents in “gnaw animals”, so stuff has to either withstand their teeth or be constantly replaced. For the huts I decided to do both: light plywood houses that will need replacement and terracotta pot houses that will last a while, so the little one and I went to the DIY store. While I was pushing 75 bucks worth of material she happily chattered how making your own things isn’t just so much more fun, but also so much cheaper… Now, she is right in general, but I had to explain that it doesn’t exactly come cheap.

OK, back to the houses… For the wood ones the standard house is an ugly box, and like most commercially available pet supplies way too small, so I designed them to be a more like hobbit houses and of course large enough, so I first cut out all my pieces on my brand new bandsaw. I didn’t know how much I needed a bandsaw before I had one. Sure, I thought, it would be nice to have one, and a small one is only around 100 bucks, so I treated myself when my contract got renewed. Holy shit, I’m in love. It’s so easy to saw things. Not just the plywood, which is to be expected, but also resin pieces that usually are such a pain in the ass. So I cut out all the pieces for two hoses and then the little one got to sand the edges.

©Giliell, all rights reserved

Next I glued pieces of a square bar to the front and back, let it dry and then glued on the sides.

©Giliell, all rights reserved

This is actually the backside. You can see there’s a second exit in the back, which is something many commercial rodent houses are also missing. This is an absolute must because two degus might get into the same house and one may decide it doesn’t want to share. And while degus do fight, they mostly prefer just to leave. Having just one exit means that a degu may be trapped with another one. Having two means that the second one can just leave.

Next step we carefully glued strips to to the roof, which was a bit fiddly, but not too hard. Ta-daaa, degu/rodent house version 1:

©Giliell, all rights reserved

Loot

I think I mentioned before that one of my BFFs is looking for a house and we’d all like it very much if that house was close to us. Now, the “estate” we’re living in was mostly built in the 60s and 70s, which also means that now lots of those houses are changing their owners as the original owners are too old to live alone, the houses are too big, or they die, and the children have long since moved into their own homes, wherever those are. Which is exactly how we bought ours. Another house has turned up on the market after the owner died and on Saturday the heirs had a combined garage sale and house visiting day.

While the house certainly has potential, it is too big and too expensive for my friend who is single, but the garage sale was a very nice thing for another friend and me. Old people tend to have a lot of near indestructible tools .

©Giliell, all rights reserved

Several chisels, a wire brush, two plumber wrenches, several files, tin pliers, a small planer and two hammers. Not shown: a 2m spirit level and an electrical meat carving knife. All together for 35 bucks, the plumber wrenches alone would cost me more.

My friend’s wife and my husband knew what would happen as soon as they saw the tools and they resigned in their fates.

Packs of Goodies

I have decided to buy some new thingies for the ole workshope, and they arrived this week.

The thing that I was most looking forward to was a new respirator. The one I use these last few years has some serious issues – the strap that goes around the head is just one strip of elastic and it really hurts when worn for a longer time. I also have problems with sealing – but not around the beard as the manufacturers of these things like to warn, but around the nose, where it is too wide and soft. The new one seems to fit well, but I did not get around to test it in action yet. The load on the head is spread on two solid strips so that should be better too. Here you can see my staring into the void wearing that thing. It does feel quite comfortable, today I shall see how it feels when worn longer and doing actual work.

Another safety-related thingie that I bought is a stand for my angle grinder. I have been mulling this over for about a year but decided finally to buy it because by coincidence I have seen it at my friends’ garage and he confirmed that it does in fact work as advertised and is compatible with my tool. It is assembled now, but it probably won’t get into any real action before the next batch of knives.

When at it, I also bought a mini-vice with a swivel ball joint at the base. I hope it makes manufacturing and finishing of fiddly little things easier. It came right with plastic soft jaws and at a glance seems to be exactly the thing I have needed for a long time by now.

There were other small things in the packet not worth extra mention, but one other thing is. Unexpectedly I have also received a nice big package from Marcus, who was so very kind and has sent me two pieces of steel rope damascus and a piece of stabilized maple to play with. That is simply grand, because it will take some time before I can make my own damascus (if ever) and stabilized wood (on that one I am more confident). So big thanks to Marcus, after my currently running projects are done, I already know what will come next.

I am realizing that instead of pretty pictures I am serving you mostly things from my workshop but as you can imagine that is where I concentrate most of my effort these days and I did not have time to play ft with my camera for quite a long time by now.

A Marcus Solution for Ronja and Other Hairy Beasts


The Marcus Tactical Dog Brush

A few weeks back, Jack and I received a very special gift from Marcus. It’s a dog brush, but not just any dog brush. This little gizmo is the most practical dog grooming tool that we’ve ever used and it has a few little secrets that I hope Marcus won’t mind my sharing. I suppose the best part is the actual grooming surface which is very simply a hacksaw blade. It’s amazing. It pulls out hairs that are still only thinking about coming out and it never clogs. The hair just flies out in a big cloud and I don’t have to stop and de-clog the thing which means that I can keep going as long as my arm holds out and Jack doesn’t have a chance to get restless and wander away. It works so well that it’s an outdoor tool only at our house. I used it inside the first time we tried it and it took days to vacuum up all the hair it set loose. The hacksaw blade also makes the tool useful for lots of other situations such as an unexpected need to escape or sever an artery (hopefully not your own) and I think it’s accurate to call it a “tactical dog brush.”

It’s also a damned good scratcher for an itchy dog. Jack has seasonal allergies and some days his tablets don’t control the itch as well as others. If I see Jack scratching a lot we grab the Marcus tool and out we go for a few passes that send Jack into fits of pleasure. He leans into it, dances from one back foot to the other and gets this sweet, goofy grin that makes me happy, too.

The other good bits of the tool might be harder to replicate. Marcus has taken a beautiful piece of maple shaped it and cut a slot with his bandsaw for the blade. Then he carved a perfect hand-hold groove on the backside. The wood was then smoothed to perfection by the artist and resin impregnated for durability. It’s a joy to hold and sometimes I find myself just stroking the thing because I’m tactile and I like the way it feels. It was then fitted with a perfect silver ‘J’ and sent to Jack.

I’m pretty sure there are easier ways to make a hacksaw into a dog grooming tool, but there are certainly no better ways to do it. Thanks again, Marcus.

Metal Magic – part 5

Kestrel finally reveals her finished piece of jewelery and it’s drop dead gorgeous. Before the unveiling, though, there’s still more work to do.

I’ve come a long way with this piece of metal and now it is finally even and thin enough that I can make a piece of jewelry out of it. So let’s get started. 

I’m going to use a nylon mallet for shaping. Here’s the beginning: 

©kestrel, all rights reserved

[Read more…]

Metal Magic – part 3

The next installment of kestrel’s magic making is here and there are tools to ogle.


It’s time to meet some of my favorite tools, the raising hammer and the planishing hammer. The faces on them are different shapes and that helps to shape the metal in different ways. The first one I’m going to use is the one on the left, the raising hammer. 

©kestrel, all rights reserved

[Read more…]