The title says what this will be about and in my opinion, it is not much different from what one normally sees when making soup. However, some people might find the pictures disgusting so be warned.
For handle scales from bone, I am using pieces of cow bone that are leftovers from making bone marrow soup. The bones can be bought raw at any butcher shop around here, but they are generally cut to relatively small pieces, so I rarely get pieces big enough to actually make handle scales and usually must be content with just inlays or bolsters, etc. But I want to make some bigger knives with handles from bone, so a few years ago I have bought some freeze-dried cow and pig bones that were sold as chew toys for big dogs.
Well, I would not want to meet a dog that sees this as a chew toy, even though my name is not Baskerville.

© Charly, all rights reserved. Click for full size.
When the bones arrived, I have decided that they are way too big for me to deal with them right away so I have put them in a box and told myself I will do it in a few weeks. Those weeks kept piling up and suddenly it was a few years. But now I have decided to finally deal with them, so I have opened the box, with trepidation and dread what I will find.
And it was nothing terrible at first glance. The bones got a bit of moldy on the surface, but I have seen worse on an orange or old bread. There are also a few insect larvae here and there, but the amount of creepy-crawlies is no bigger than about anywhere in the garden.
It was when I took the first bone and started hacking the end off that a sense of real dread overcame me. I have completely forgotten about bone marrow and I only remembered about it when melted fat started to pour around the blade. I have braced myself for the smell of rancid fat and… nothing. It did not smell bad at all, apart from the usual smell of bone being sawn with a hacksaw, and even that was not too bad because the fat was lubricating and cooling the saw blade.
When I have sawn off both ends of the bone and lengthwise the tubular middle, I have realized that the bone marrow is not spoiled at all and would probably be still fit for consumption, if not by humans, then certainly by dogs. However I do not have a dog and I do not intend to consume it, but I have adjusted my plans a little from that point forward.
Initially, I have only planned to clean the bones and toss the rest, but now I have decided to get two, maybe even three resources from them – bone, tallow, and possibly glue.

© Charly, all rights reserved. Click for full size.
So I have scooped out as much of the marrow as I could and put the bones in pots filled with water. I have then heated the pots on the stove and I did my best to hold the temperature between 70-80°C for hours on end. If I were making soup from human-consumption-fit bones, I would simply boil them. But to get good glue, the temperature must not exceed 80°C because that would hydrolyze the collagen too much, and it also must not get below 70°C because that would not hydrolyze it enough. Also, I do not want to boil it to not destroy the protein content inside the bones too much, because fully boiled bones are harder and more brittle. I am used to work with them, but I hope that this gives me better result in that regard.

© Charly, all rights reserved. Click for full size.
After a bit of try and error, I have melted the scooped-out bone marrow on a frying pan, squished it with a fork, and poured it through a strainer into water. The left-over was then put into the water with the bones to extract a tad bit more fat out of it. Waste not, want not.

© Charly, all rights reserved. Click for full size.
There was still a lot of fat left in the bone ends, so after a while, they were submerged under a thick layer of fat. I have scooped that up with a ladle and poured as much as possible into the pot with the rest. After that, I have topped the pots with water and left them to simmer, whilst I have put the pot with fat into the refrigerator to cool down as much as possible.

© Charly, all rights reserved. Click for full size.
Unfortunately, it did not harden nearly enough in the time I had available, so it was a bit difficult to handle, but you can still see the purpose of this cooling – the fat floated to the surface, and all the congealed blood, bits of sinew, cartilage, and other impurities have gathered at the boundary between the fat and water. So I could cut the fat, scrape off the impurities of the bottom, and put it aside as almost pure. The water went back to the bones.
There were still many impurities in the fat, so I have lined my strainer with gauze and strained it through that. I had to repeat this three times.
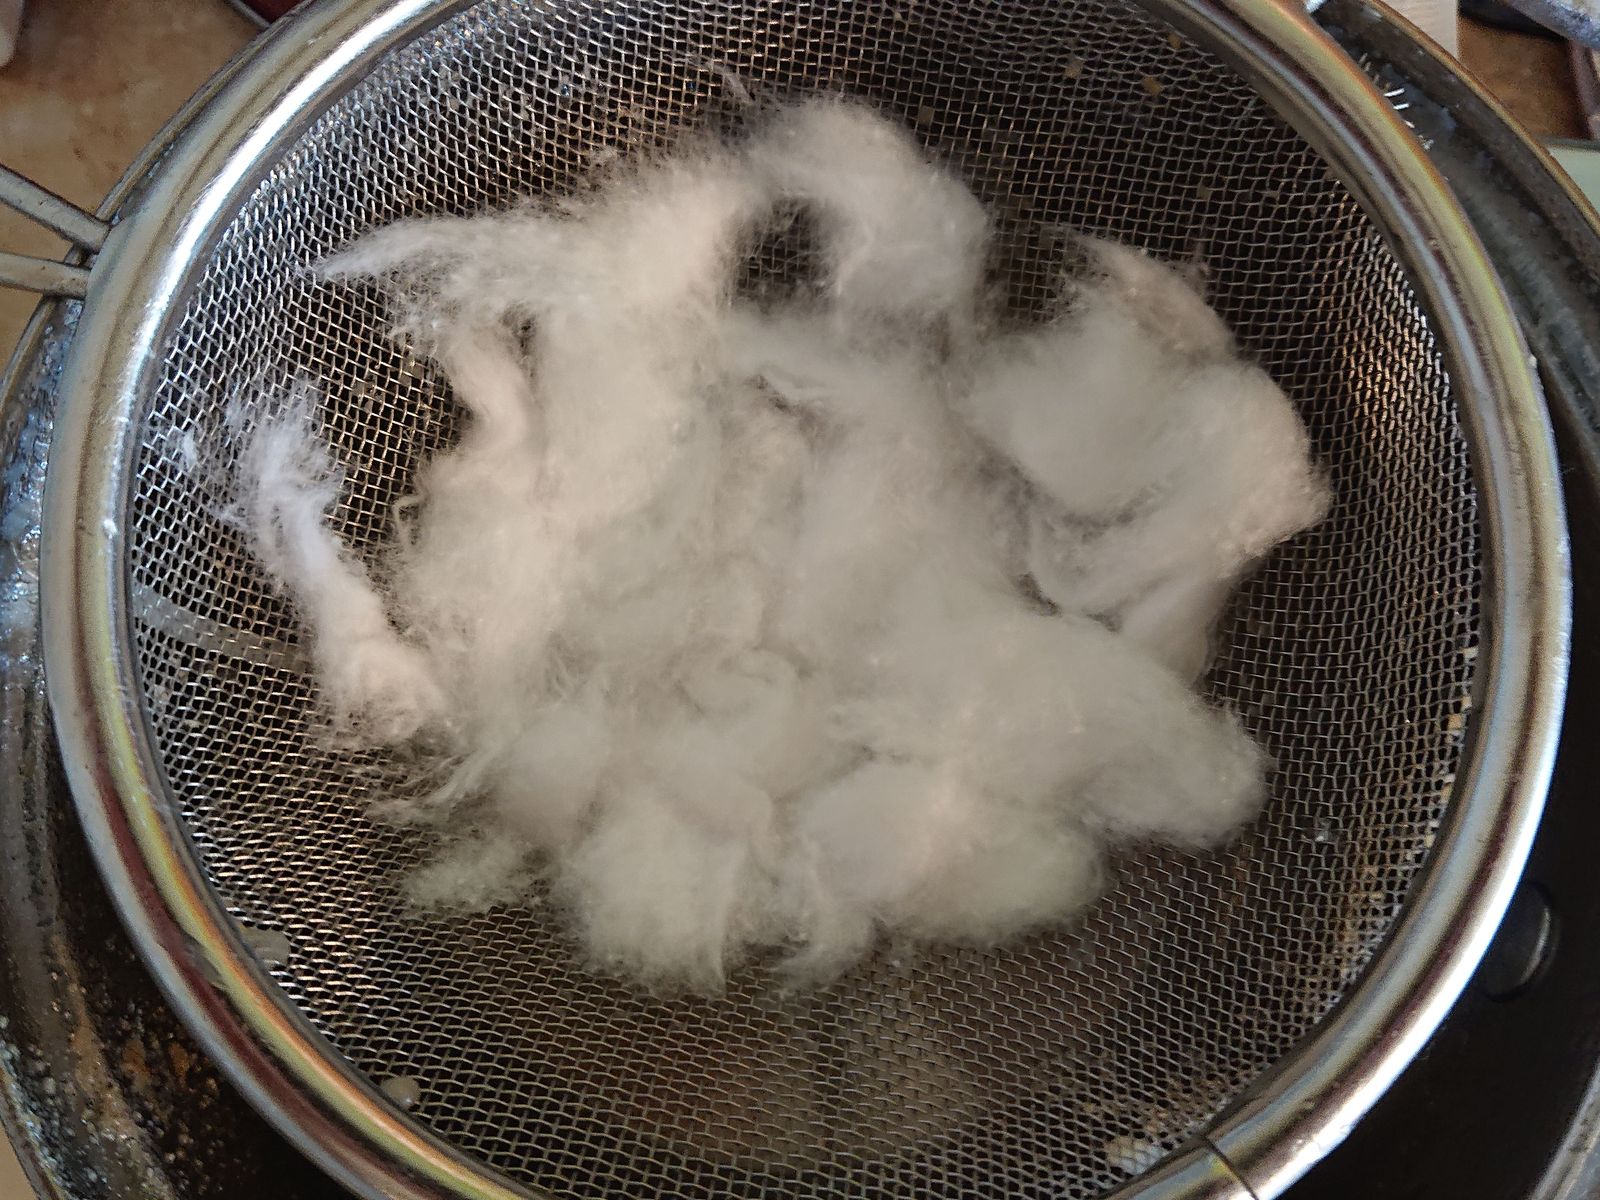
© Charly, all rights reserved. Click for full size.
The fat then went into the pot again, this time with clean water, and I boiled it for a bit before leaving it cool overnight. In the meantime, I have taken the bones out of the water and cleaned them off as much sinew and cartilage as I could. Then the water went into one pot, and the bones into another. I have left the water to simmer and evaporate at 70°C, straining it through cloth after a while to remove impurities. And as far as the bones go, I have put some laundry detergent and let it simmer for a few hours again to de-grease them as much as possible. I might have to repeat that step again once they are cut and ground to size.

© Charly, all rights reserved. Click for full size.
That was all the work for one day and I went to sleep fairly late. The next day in the morning I could nearly finish this first batch.
As far as glue goes, the solution was a bit tacky but still not nearly concentrated enough to count as glue. I might get some glue out of this, but it won’t be much. I will gather more and more of this solution as I process more bones, but it just might be that I will have to toss it in the end because there just were not enough sinews and ligaments left on the bones.
To finalize the fat I have melted it in a pot to 120-130°C and I held that temperature for a bit until stopped bubbling. I had to use a lid because I have made a mistake and put all the fat in at once. The correct way to do this is to render a small chunk and add more fat later bit by bit. Otherwise, big bubbles will form and pop, splashing hot fat everywhere. But I have managed to deal with the situation in time and no accident happened, I only have lost a few grams of fat that splashed on the lid.

© Charly, all rights reserved. Click for full size.
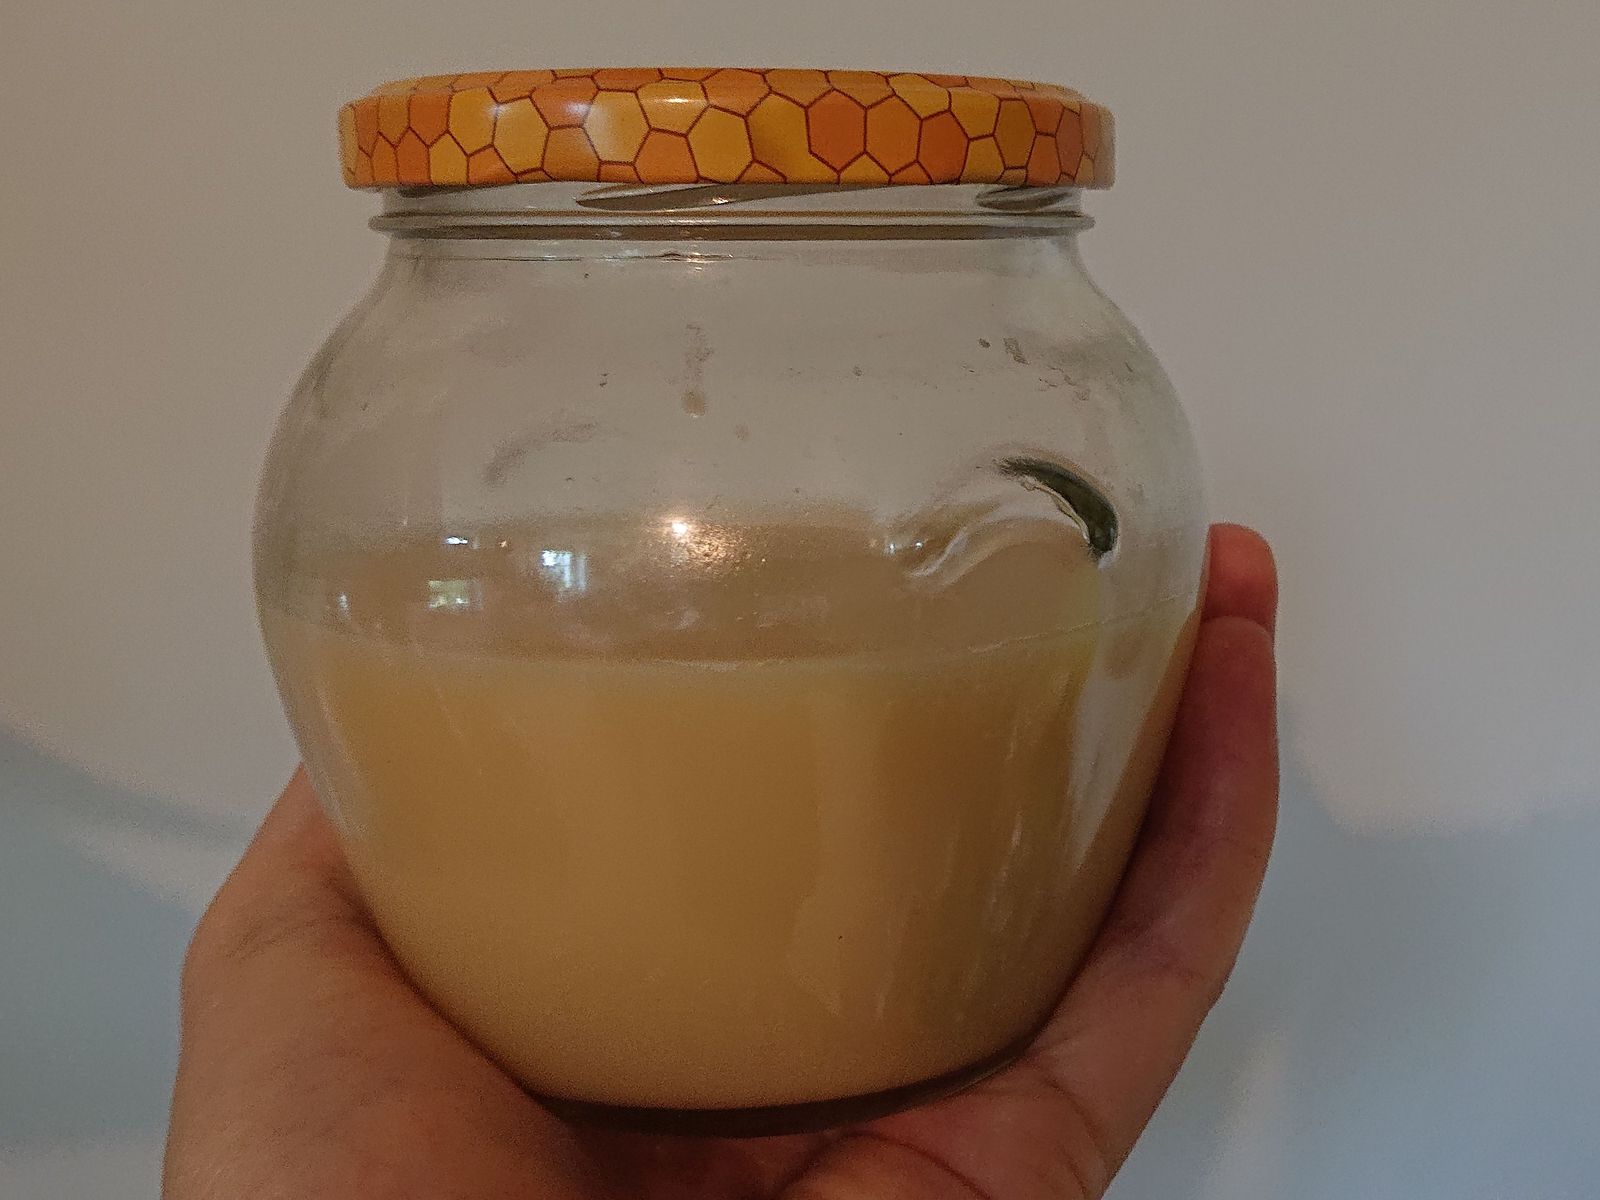
I have poured that fat into a carefully and slowly pre-heated jar whilst it was still in hot water in a large pot with plenty of room to spare. This has reduced the thermal shock to the glass so it reduces the risk of it breaking, and also should the glass break, all the shards and hot fat would be in the pot and not on my crotch, which is a definitive plus in my book. I was impatient so I have weighed the jar whilst it was still warm.

© Charly, all rights reserved. Click for full size.
The empty jar weighs 370 g, with the fat it weighs 637 g, so I have 267 g (0,58 pounds in silly units) of rendered tallow. That is a lot more than I have expected from two bones.
So in the end I have got some clean-ish big pieces of bone and a jar with tallow.
© Charly, all rights reserved. Click for full size.

© Charly, all rights reserved. Click for full size.
And since I have begun, I will now continue until all bones are processed. It will take me about a week and if none are spoiled, I could end up with more bone and tallow than I think I will ever need.
And what shall I use the tallow for? I have already devised some recipes for dubbin and stropping/polishing compounds that work well with lard. But I always felt bad using consumption grade lard for these things. Now I have tallow to use instead and I won’t be wasting food.
As far as costs go, the bone pieces are the main product here. Those cannot be bought, and would not be cheap if they could. To undergo this much work for the tallow alone would not be cost-effective at all. The main used resource is water, of which I have overabundance this year, and electricity, which still should not be a too big peak compared to our normal consumption.
What a project! Your bone looks great, very usable. The idea of also getting tallow is really a good one. Nice to have that on hand.
If you sawed all that bone with a hacksaw, you have a very steady hand indeed!
I suppose that with no blood flowing the marrow cavity is sealed and likely to be sterile in a healthy individual, I’m very glad for your sake that this is so, that amount of rancid fat would be foul. Fine work.
.
.
.
.
.
A pendantic note, you strained the fat through cotton wool, not gauze, gauze is woven.
Bugs.
You need bugs.
Jam the bones in the nearest ant hill.
when I was a kid/teen, there was a local farm field with cow bones scattered about.
despite living in a very rural area at the time, I didn’t (and still don’t…) know much about how farming operations were conducted, but this particular stretch of pasture had a cow or two die off every year or so, and was just left to rot.
So, once I “discovered” this field, I would frequently make scavenging trips out there, and drag back cow femurs (made neat clubs), cow vertebra (made neat bola), cow skulls (made… uh… not much, but looked cool?), cow horns (made not a lot, but was kinda fun to work with, despite the smell when cutting/sanding them…), and assorted other skeletal pieces of cow. I did cut up and carve up and sand some of the bones in addition to the horns, but they were long-dead pieces that had pretty much naturally decayed and been sun bleached to not much more than their mineral components.
Not much to add, but I think it contributed to me learning a bit about biology and anatomy at a slightly earlier age than most, and it was kinda a cool experience working with bone and horn as a crafting material. Horn is quite pretty when polished up, but you wouldn’t tell from how it looks on the cow or the skull…
@kestrel, I do hope the tallow really comes in handy. I already have over 700 g and at this rate, I could have over 1,5 kilo (over 3 pounds). Sawing the bone was not that difficult, really. Once the ends were off, I could put it in the vise and saw it lengthwise. And since the bone was raw, it really was easier to cut than boiled one.
@Jazzlet, pedant away, I do not mind. I could not remember the proper English terminus technicus and I was too lazy to look it up.
@chigau, that is the next step, I do have several anthills in my garden, although they are very small. I do hope they clean up the remaining pieces of sinew and cartilage. I will possibly even bury some of the bone into the ground, it gets nice creamy color that way and looks quite interesting and nice in my opinion.
@lochaber, I would love to have an opportunity to get my bones on naturally cleaned bones and cow horns like that for free. I am quite envious, for I have to pay for both bones and horns and they are difficult to get and not cheap. Especially the horns, because here most cows have them cauterized (which is barbaric and should be banned) or are hornless breeds. I have yet to find someone who sells unprocessed horns. And beeswax. Everyone seems to be selling finished products made from these only. At least with beeswax I got lucky so I have some for now, but once that is gone I am buggered.
I. Am. Impressed.
.
.
.
.
(Can you get dermestid beetles in the EU? We used them all the time in grad school to deflesh skeletons. I _do_ understand that you are doing this on the cheap.)
fusilier
James 2:24
@fusilier, I might be able to get the beetles via my science contacts at my former alma mater or in the local museum, but I am not equipped to care for them and I do not even want to. They are excellent for preparing skeletons, but they do require a lot of care, they can wreck your home if they escape and they do take their time too. But using them would have the undeniable advantage of not exposing the bones to elevated temperatures at all.
Don’t forget that the bone itself is valuable.
Bone handles on tools are subtly grippy. The bone as a material is like a fine-grain hardwood but significantly more porous so it doesn’t get as slippery. Unlike wood, that can swell and rot, bone is resistant to direct damage from water. Bone, on the other hand, is more likely crack and splinter.
Bone meal is a fine soil amendment that adds calcium. Bone chips and powder can be used for sandblasting, manual polishing and as a filler if you use the right glue.
Some early warriors favored bone points and blades because they are light and quick, and their porous nature more reliably carries poison or bacteria into the wound. A bone point that breaks off in the flesh, even without poison or intentional contamination, is highly likely to cause a major infection.
@lorn, I think you missed the last paragraph in the article :-)