I wasn’t sure about how and when I would come round to doing this, and then suddenly I was finished. So instead of a series of posts documenting the making process, I decided to present you with a fait accompli.

© Charly, all rights reserved. Click for full size.
The walnut tree is so covered with nuts that the twigs and branches bend down so low that I have to bow down to mow the grass under it. I think I can safely expect several tens of kg of nuts. That will be a lot of work to collect, dry, crack, and store. The Nutkraken works perfectly still, but it is a little slow – it takes about two hours to crack one bucket of nuts. My father can no longer do it, and I have a lot of other things to do. So after a few years of thinking about it, I decided to build a device to make cracking the nuts faster and easier.
The first thing I did was hammer.

© Charly, all rights reserved. Click for full size.
I was thinking for a long time about how to do this, and I considered to perhaps turning a cylinder from hardwood or welding/soldering something from scraps. A few days ago, I realized that I have an old pump that could provide me with an almost finished part. I disassembled the pump, took out the rotor from the motor, and ground grooves in it using an angle grinder. This has saved me a lot of work and a headache, since it came conveniently with fitted ball bearings and a keyed axle.
With the hammer, I made a sketch for the base and the whole machine.

© Charly, all rights reserved. Click for full size.
After that, of course, I built the base. It is made mostly from scraps of plywood and particle boards. Here you can see it after it got one coat of blue paint.

© Charly, all rights reserved. Click for full size.

© Charly, all rights reserved. Click for full size.

© Charly, all rights reserved. Click for full size.
The base columns have grooves for the ball bearings and the axle of the hammer. And four M8 screws to fix the ball bearings.
The ball bearings are held in place with two wooden colars, reinforced with 5 mm flat mild steel bars.

© Charly, all rights reserved. Click for full size.
A hammer must work against something, in this case, a small anvil.
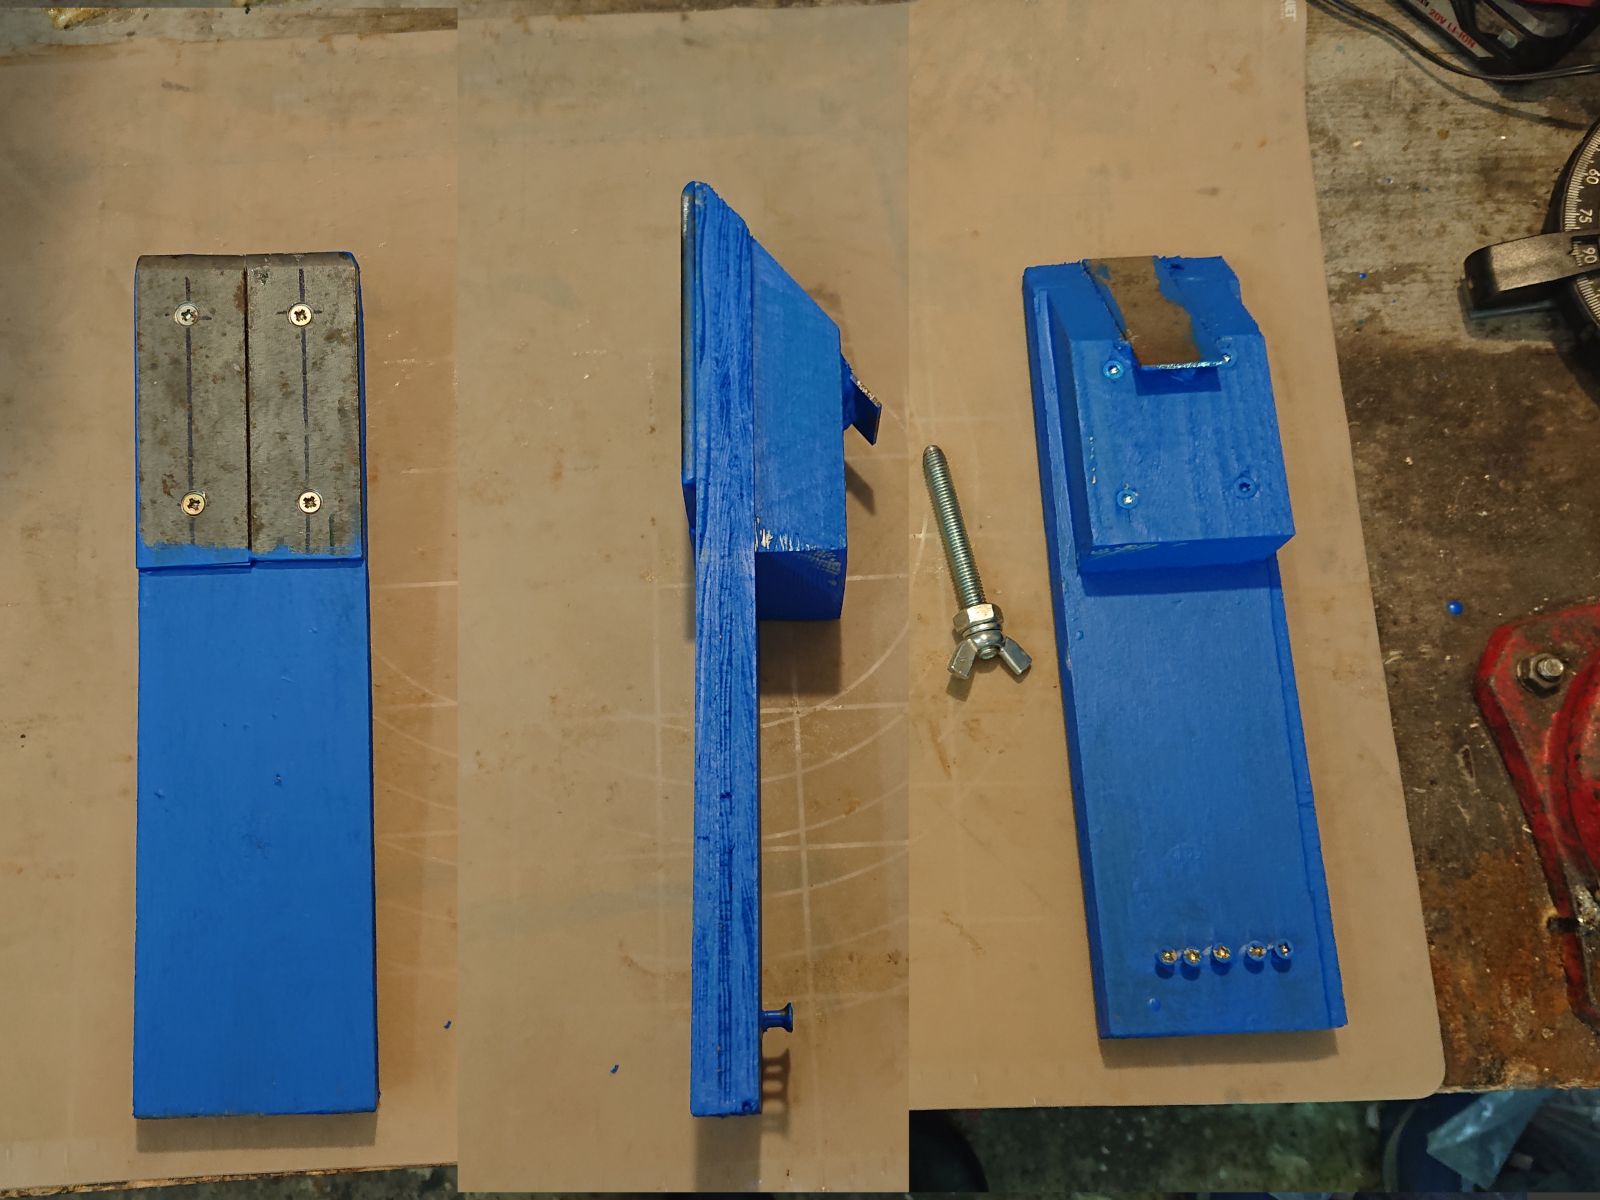
© Charly, all rights reserved. Click for full size.
Again, it is made from scraps of plywood and some steel offcuts. The face of the anvil consists of two mild-steel plates that are screwed-on for durability. On the back is glued a small hardened steel plate against which pushes an M10 fly screw to regulate the distance between the hammer and the anvil. The screws at the bottom lean against an 8 mm steel rod, so the anvil is very loose and can rotate freely. It can also be easily removed if needed.
Edit a few hours after publishing: I forgot to post pictures of these.

© Charly, all rights reserved. Click for full size.
These are inserts that keep the anvil centered against the hammer cylinder and the nuts from drifting sideways and going where they are not supposed to.
Once the base was finished, I had to make a funnel for the nuts. It would not be much saving in labor if I had to feed the nuts in individually, which is the reason I decided to not buy the commercial nut-cracking attachment for our kitchen robot.

© Charly, all rights reserved. Click for full size.

© Charly, all rights reserved. Click for full size.
The funnel took me longer than the base because of all the funky angles. With it done, I had to make the last component – the hand crank. And this is where a stroke of luck came for the second time – I found an old key with a hand crank that fitted onto the axle of the rotor. All I had to do was to drill a hole in the key and thread it for an M6 screw to lock it onto the axle, and voila, I was done. I gave the whole thing a coat of blue paint.
Here goes the assembly step-by step.

© Charly, all rights reserved. Click for full size.
First, the screw goes into the back of the base, and the anvil in the front. Two slotted inserts center the anvil, and the hammer axle with the crank can be inserted.

© Charly, all rights reserved. Click for full size.
The collars are then firmly screwd on top of the ball bearings together with the steel reinforcements to hold them firmly down.

© Charly, all rights reserved. Click for full size.
The funnel is simply slotted into the top of the machine. It is not held in place by screws, so it can be quickly removed when needed.
I only had a small handful of nuts to test it, but it worked really well with those, so I have reason to be optimistic. I could not find any commercially available product for my needs. I found electrically powered nut crackers, but they were either prohibitively expensive or useless – they had to be fed with individual nuts, which would be very time-consuming.
You still need to separate the shells by hand?
@chigau, yes, this only breaks the shells; they need to be separated from the meal manually.
I took a nap and had a dream about an “improvement” to your device.
Attach a squirrel-wheel to the crank handle and make them work for their nuts.
sorry