After lots of frustration and some success, the right blanks finally arrived. That vendor will sure see some more business from me. So, while still not being able to use my lathe, I started to work on my first resin and opal inlay ring. What can I say, after all the building up to this moment, the process was so damn quick and easy that it was almost and anticlimactic letdown. Don’t get me wrong, I absolutely love, love, love the result and will sure make more of them, but it somehow feels a bit like cheating, like ordering one of those teddy bear kits where you just stuff the already sewed animal and then close the opening.
I was actually pretty anxious about this beforehand as the materials don’t come exactly cheap. While you don’t need much opal for a ring (I suspect I used about 0.3 grams for the ring), a gram is 10-15 bucks plus shipping and it looks like nobody in Germany has yet thought of selling it so I had to order from the UK and the US*. I’m thankfully not anywhere near poor, but the thought of possibly having a starting cost of 100 bucks without any results was not appealing.
Anyway, here’s some pics from the making of and the final result.
When watching videos on youtube, the people making these rings usually use either UV resin or CA glue, so naturally I decided to do both. I was worried that the opal would vanish under the midnight blue resin, so I first put on a thin layer of coloured resin and then tried to glue on the opal splinters. Only that apparently the resin prevents the CA from curing. Don’t ask me. It stayed completely fluid even after about an hour while on the ring, but occasionally it would drip down, taking my carefully set opal splinters with it and then instantly harden on my workbench. In the end I just slathered everything with a generous serving of UV resin. Because the pigment is quite dark, curing it took some time. Another bonus of finally having a workbench in the cellar is that I could just go and fold the laundry while turning the ring and restating the UV lamp every other minute. After that I put the mandrel into the drill and started to sand down the excess.

©Giliell, all rights reserved
Yes, you can see me “how to attach the mandrel to the drill” contraption here, which would make my miner grandfather proud and give my machinist dad hives.

©Giliell, all rights reserved
At 100 grit that is maybe 10 minutes of time, with breaks to let the abrasive paper cool down. At this point I filled in all gaps in the resin, cured it again and then sanded some more until moving to the polishing going 240/400/600/800/1200/1500/2000/2500/3000, which would be pure horror by hand. Here it’s just “hold the wet paper to the ring and make sure you don’t burn your hand. For the final polish I usually use a “scratch ex” kit for cars. Dunno if they are available where you are, here Aldi usually has them twice a year or so. They contain a mildly abrasive paste meant to smooth out small scratches from your car paint and polishing paste and they work a treat**.
Now I hope I built up some tension for the end result. Sadly no sunshine, but with a heat wave and a drought I’m really happy about the rain this morning.

©Giliell, all rights reserved
Yes, that ring goes on my “stinky finger”.

©Giliell, all rights reserved
I photographed a bad position on the ring, but I only saw that afterwards.
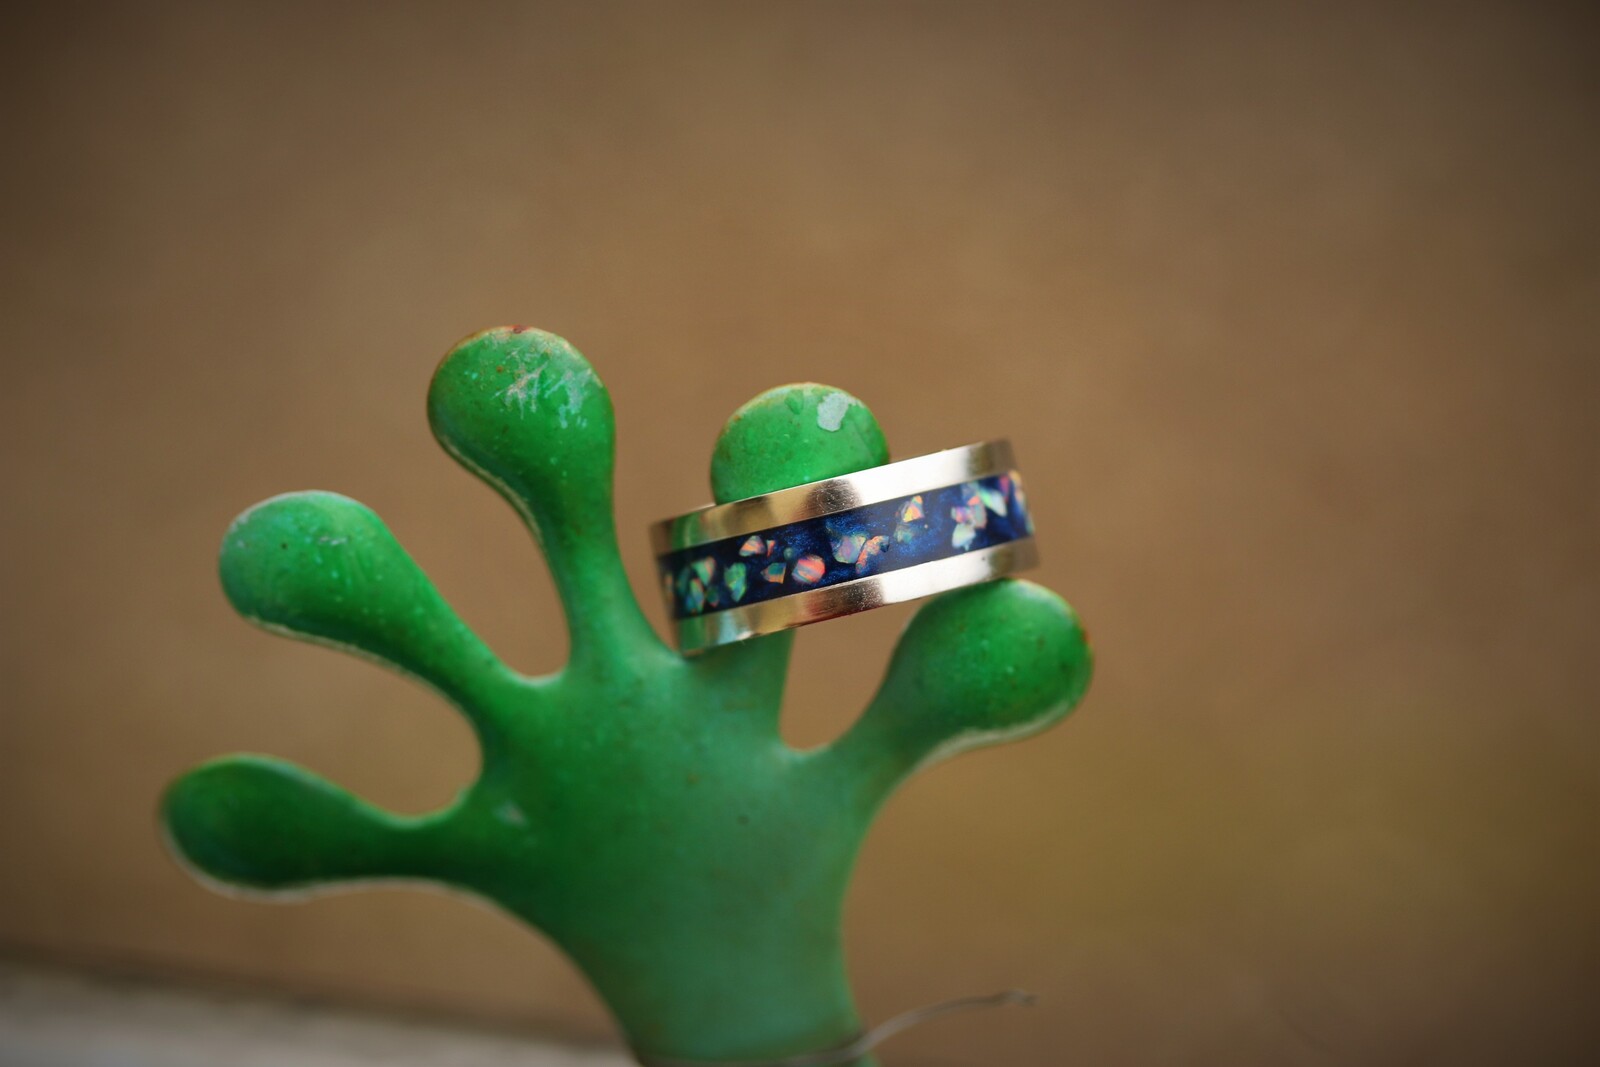
©Giliell, all rights reserved
Today I was assisted by a friendly gecko.
*Apparently by now international mail from the USA is faster than national mail within the USA.
**Do you also have those expressions that you find yourself using in excess for a while? Seems like “works a treat” is currently my favourite expression…
Wow! Just beautiful!
That is beautiful!
It does look beautiful!
If “CA glue” is cyanoacrylate, there are several reasons why it might not cure on resin, especially in the dry hot weather we had recently. Cyanoacrylate is de facto two components glue, where the hardener is water. When gluing wood, leather, or some similar organic material, there is usually enough residual moisture present in it to start the polymerization. That is why this glue hardens a lot faster on your fingers than it does on dry wood or paper -- and thus is more likely to glue something to your fingers than to the surface you intend to actually glue it to :).
I normally avoid using cyanoacrylic glues, because they are not very durable -- moisture does start the reaction, but it also degrades the glue over time -- but when I do need to use them, I have found out that breathing on the surfaces or wetting and leaving the surface dry before gluing helps. But that might not be an option for completely non -- porous material like resin.
I am using quick curing epoxy for these tasks. I use cyanoacrylate glue only fo tasks where its low viscosity is needed in order for it to seep into some gap -- like locking screws or fixing cracks in wood,
Charly
Yeah, I thought about that, but here the weather is rather hot and humid, so much v that I worry about getting “kawaii sheen” on resin castings.
Anyway, since my concerns about the resin were baseless, I’ll just use UV resin. It has the great advantage of not curing at all in a room with basically no daylight. I could still have used yesterday’s leftovers this morning if I’d wanted to.
I was thinking you can probably turn a ring on the lathe without a chuck -- just put the resin on a faceplate (epoxy the resin to a piece of plywood and mount that on the faceplate with screws) then cut the ring and polish all of it except for the face that is still attached to the plywood. Use a parting tool to part if off and then sandpaper the remaining edge.
I saw this and meant to comment but got distracted. Very nice work, and isn’t it exciting when you can make something that beautiful yourself? It really turned out great. You should be so proud!