I have never seen one of these near my home, but I was lucky enough to take this picture during my vacation in Krkonoše this spring. Looks like they were just shopping for some furniture.

©Charly, all rights reserved. Click for full size.
I have never seen one of these near my home, but I was lucky enough to take this picture during my vacation in Krkonoše this spring. Looks like they were just shopping for some furniture.
©Charly, all rights reserved. Click for full size.
These are my recollections of a life behind the iron curtain. I do not aim to give perfect and objective evaluation of anything, but to share my personal experiences and memories. It will explain why I just cannot get misty eyed over some ideas on the political left and why I loathe many ideas on the right.
This is another one of the issues where the current US divide between left and right amuses me greatly. If you ever saw the movie “Red Heat” you will probably remember Arnold Schwarzenegger in his role as a Soviet agent turning on TV in a cheap American hotel and upon seeing porn uttering the word “Capitalism!” with utmost sneer in his voice. That scene rings so true to me.
The regime’s attitude to sex and sex education was abysmal. You see, sex is pleasurable to the individual, and as such informing the populace about how it is supposed to work could not be easily spun into a way to advance the greater good. Pornography was illegal and erotica very strictly regulated. And sex education almost non-existent.
Well, that is not entirely true. Sex ed was compulsory. But non-existent at the same time.
In the seventh class of elementary school, the biology classes were focused on human anatomy. Towards the end of the year part of the curriculum was about sexual and reproductive organs and some sex education thrown in.
The sex education part was gender segregated. Girls were shown some educational video whose details I do not know. Some boys tried to listen at the windows and from them I know that it probably consisted mostly of information about expected changes in body chemistry and shape during puberty, and nothing more.
Boys had even less informative session, which I missed completely due to illness. All I know from highly bemused accounts from my schoolmates is that instead of the rather good diagrams in books the whole issue was explained on a picture of a tulip. Really. Bees and flowers. At school. In 1980s.
At no point whatsoever were the “technicalities” of sex mentioned. No mention of consent and how it is supposed to work, no mention about how condoms are used and what other options of contraception there are, no mention of how the body parts actually fit into each other. So all of this info had to be learned from surroundings, either from family members or from peers. Which has of course led to great variation between individuals.
Info about consent came mostly from media and from peers, with all the masculine garbage that is the stupid “yes means yes, no means try harder”.
Use of condoms had everybody to gleam from rare articles that might be written in some magazine for adults or to figure out for themselves. Oh, and the stupid “it’s woman’s responsibility to not get pregnant” was part of the package too.
How the sex itself is supposed to work everybody learned from pornographic magazines smuggled in from west. People who did not get lucky to see porn or grow up in the country might end up completely unable to actually perform sexual act properly, as was attested in the book Lidská sexualita (Human sexuality) by sexuologist Ivo Pondělíček and his wife Jaroslava Pondělíčková-Mašlová, who bemoaned that in the 1970’s multiple adult pairs came through his office who were unable to conceive child and during the courses he learned that they did not even know that for a woman to conceive the penis must enter the vagina. At least one such pair were people with university diplomas.
All in all it is no wonder that in my relatively small social circle I knew two girls who became pregnant shortly after the age of consent (15 years) and that it was all too common that girls got pregnant and married quite young. There are no precise statistics, because the regime did not keep tabs on things that reflected on it unfavourably, but I would not be suprised if today’s Texas came out better in this regard.
Some of the buildings had inscriptions either in the woodwork or in the plaster. Some of the older ones represent possibly medieval equivalent of twitter – quips and deepities.

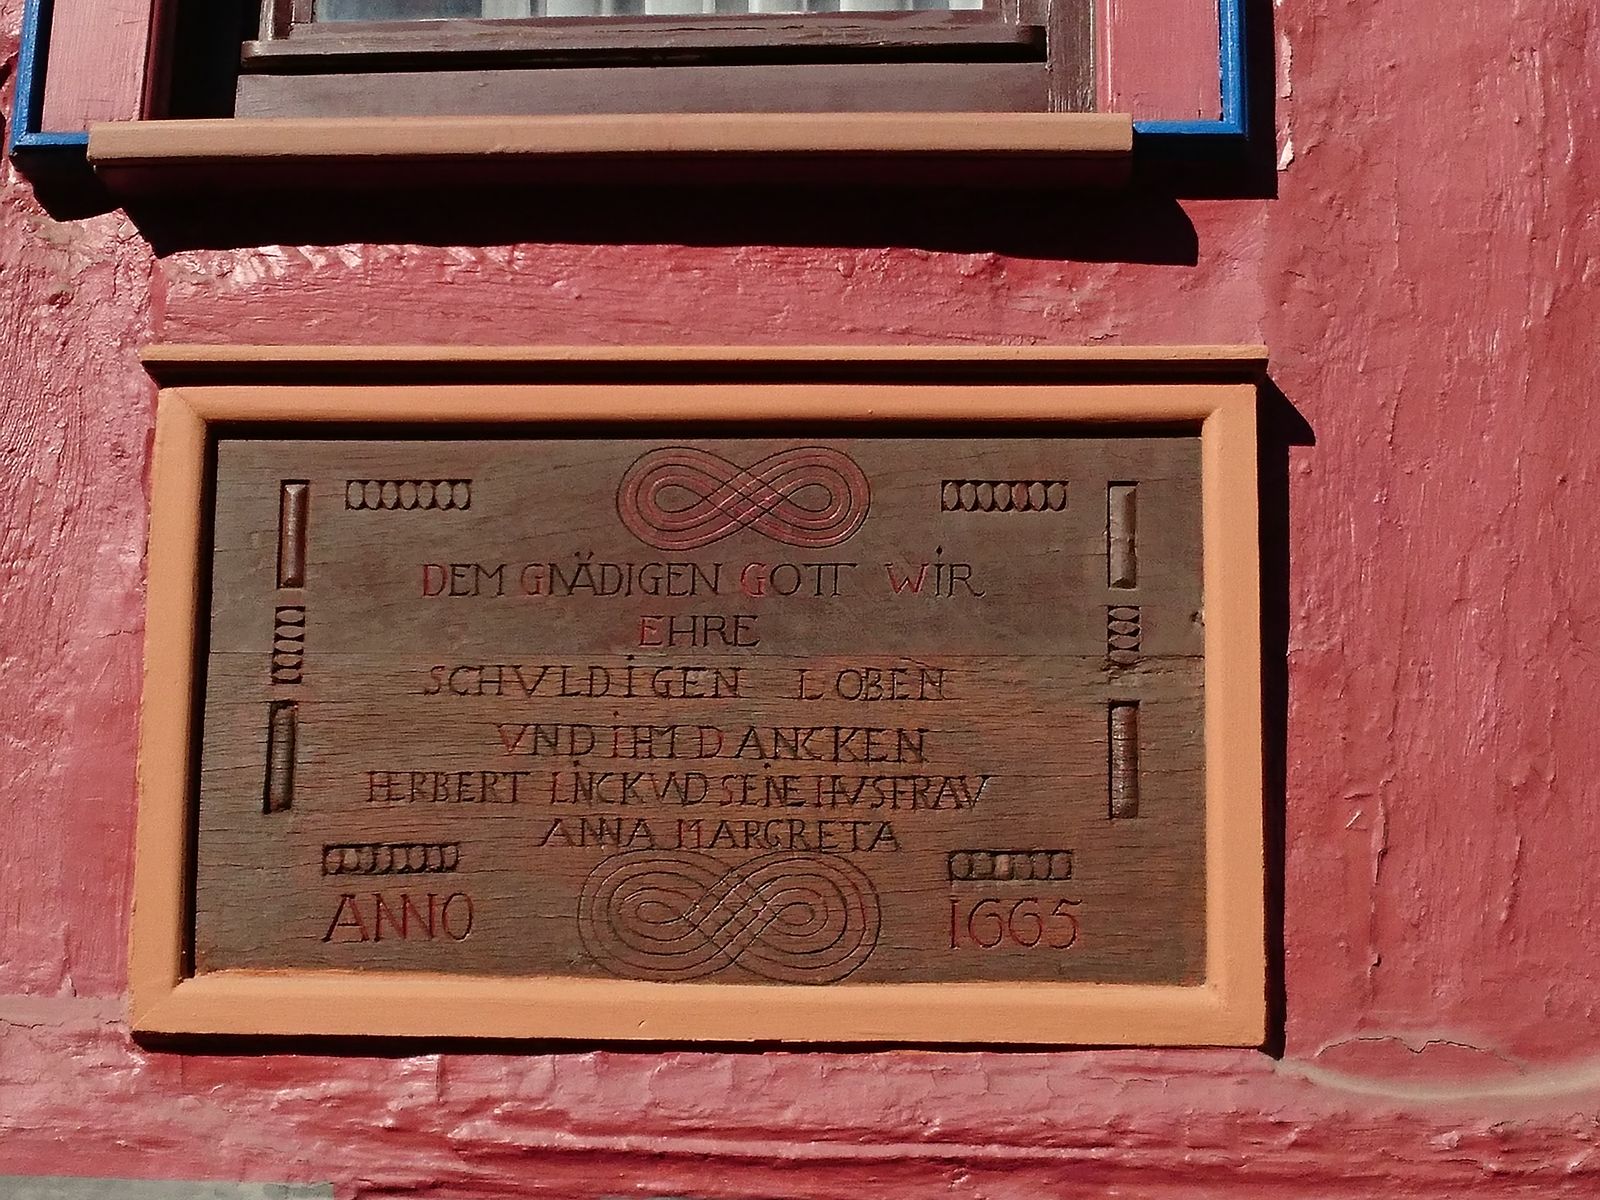


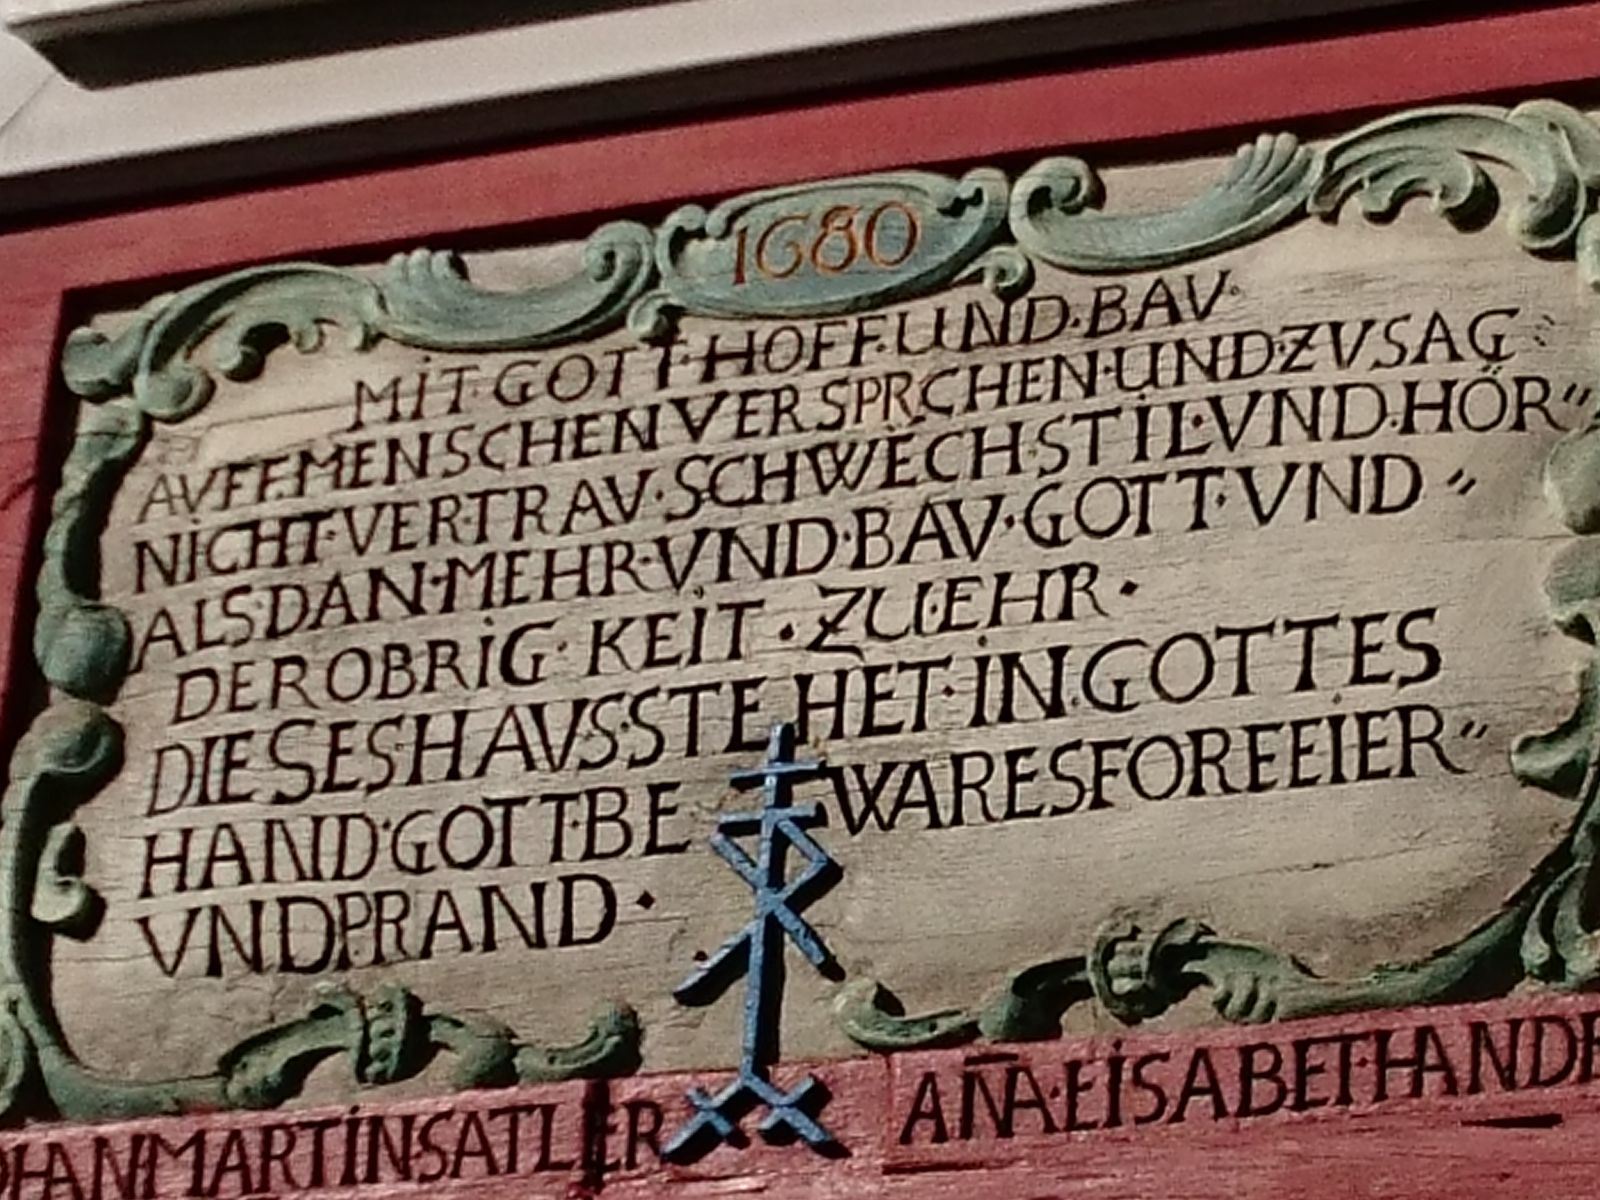
©Charly, all rights reserved. Click for full size.
One of our cacti has blossomed this year, one whose blossoms open only for one night. So I had to take the picture in late evening sun.
And as I was walking from the glasshouse, I took a shot of the elderberry too.

©Charly, all rights reserved. Click for full size.
Matt Easton in his capacity as an antique swords collector tells the fascinating story behind one of his swords – who its original owner was and why he (probably) requested this non-standard issue blade later in life. To me personally is this one of his best videos.
The nasal and paranasal cavities. The source of joy for so many people around the world, and yet another proof of the intelligent design ad hoc nature of evolution.

©Charly, all rights reserved. Click for full size.
I always have had hayfever throughout the year. Once when my GP asked my at what time of year I have the most problems my reply was “Well, it usually is the worst from January til December.”. That was a rare occasion, because he does not laugh often.
But despite constantly runny nose alternately either due to cold or due to allergy, I never had serious problems with sinuses. Until last two years. Maybe the subtle changes in bone structures due to aging came over some tipping point.
What I remember from school about this predicament is that our upright posture is responsible for most of it. The sinuses evolved in quadrupeds and they use gravity for draining the phlegm. Evolution has tried to keep up with our evolving of upright posture and flat face, but did not manage it well enough. Thus our species is blessed with the ability to flip from just annoyingly runy nose to headsplitting ache overnight.
As I said at the beginning. Oh the joy.
After many hours and a few more due to setbacks (scratches, aaaargh) I finally got to the point where the blade was polished with the 7.000 grit paper. This is very fine mirror polish, but it looks a bit, well, strange, unnatural and artificial. There are different options for how to deal with this and I decided to go for buffing.
 Buffing is an abrasive process that uses some very fine polishing compounds on some soft carrier (cloth, felt, paper, leather – all are usable and all have their advantages and disadvantages). In this case I have first used very fine commercial polishing compound applied to a felt wheel. Since I do not have space for a set of specialized buffers in my workshop, I have to do with a drill held firmly in a vice.
Buffing a blade on a wheel can be dangerous process, I think more dangerous than grinding. The main thing to keep in mind in this regard is that the cutting edge orientation must be opposite to how it is held during sharpening – that is, the edge should point in the direction of the movement, not against it. Forgetting this is very, very dangerous, since the blade can bite in the soft wheel in an instant and be hurled in random direction with great force. A care has also to be taken near any and all edges.
 Buffing with the commercial compound has produced very fine finish very quickly, but I was still not satisfied with it. It looked too artificial, machine-made. Luckily enough there is an even finer abrasive at hand – jeweler’s rouge. Nowadays I could buy half a kilo of ferrous oxide for mere 2,-€ (with 4,-€ shipment, ha!), but since I have no shortage of steel dust and rusting iron, I am making my own with a process that I devised when buying stuff online was not yet a thing. Not to save money (it is actually the exact opposite), but for fun. I have used all I had yonks ago, but I have just finished making a small batch from the steel dust ground from my previous dagger and it came handy this time.
I do not have a separate buffing wheel for jewelers rouge yet. So I lightly dusted a piece of cloth from an old t-shirt soaked in WD-40. Emphasis on the word “lightly”. Jewelers rouge is very mild abrasive and if it is clean enough, it will not scratch the blade too badly even if not too precisely ground and sieved. But it is good to use the cloth as a sort of final sieve and work the abrasive slowly through the cloth to the blade, and not apply it directly on it.
Theoretically this buffing can be done at home while watching a movie, because it takes a looong time and is boring as hell, but if you do that, you have to be careful. Do not be tempted to scratch your nose or touch anything, that stuff is vicious. It is not dangerous, but the very fine red dust is very strong and vivid pigment and unless you are extremely careful, it gets everywhere and you will have pink fingerprints on everything you touch. Pink switches, pink door handles and definitively pink soap bar. Oh, and if you forget to wear respirator whilst grinding the stuff and sifting, pink bogeys.
I have spent approximately two hours running the oil soaked red rug along the blade and the blade is finally and definitively done to my satisfaction. Next step is to find materials for the guard, bolster and rondel. And a fitting piece of wood for the handle.
These are my recollections of a life behind the iron curtain. I do not aim to give perfect and objective evaluation of anything, but to share my personal experiences and memories. It will explain why I just cannot get misty eyed over some ideas on the political left and why I loathe many ideas on the right.
After the WW2 the regime, under the lead of Stalin, had no thought of anything other than preparing for WW3. So after communists took power in a de-facto putsch in 1948, they invested all effort into re-building heavy industries and nothing else. And, at direct order from Stalin, the Czechoslovak Socialist Republic refused any offers of help from USA and their western allies.
This was, as many other things, idiocy of first water. The economy as a whole was doing relatively well, with people being employed in the heavy industries. The main support of the communist party, the labourers, were making good money. The problem was they had nothing to spend it on. There was barely enough food to buy and nearly no luxury or comfort items, because light industries were deemed secondary and therefore not important and no effort was made to restore them after the war. And the iron curtain prevented importing goods in any meaningful amounts.
But people do not work like that, they want not only to barely survive on bread and water, they want savoury things, shiny things and pretty things too. Just feeding them enough so they do not starve is not enough. Hard work has to be rewarded with something more tangible than a pat on the shoulder and a word about how you contribute to the common good.
The regimes way to deal with the situation was to artificially devaluate the currency and thus effectively steal people’s money in 1953. It was touted as a final blow to the exploiters, the last remaining self-employed artisans and land owners, but the hardest hit was on the labourers. Before they had money but nothing to spend them on, but they had a hope of spending it someday. Now they had nothing.
Riots ensued that were drowned in blood. The propaganda tried to spin those riots as a work of infiltrators and foreign agents provocateurs, but it did not work. The regime has lost the trust of its main supporting class – the labourers. And it never regained it.
In reaction to this, some effort was made to provide people with things they want. It was succesful enough to prevent further riots, but not enough to regain the trust of people.
At the time of my life the situation was not as dire as it was in the fifties, but it was still pretty glum. Buying something was very difficult, even if you had the money for it. Not only luxury items like colour TVs were difficult to obtain, but even many ordinary items, like materials to do house repairs. For cars there were waiting lists.
This has led to a few main things.
One day when I was visiting my aunt in Pilsen we went shopping in a big shopping center. A huge shopping mall with half-empty shelves that nevertheless to me seemed full because I knew nothing better. My aunt saw the shopkeeper to sell a lipstick to a woman who was apparently her acquaintance and she wanted to buy the lipstick too. The retailer told her there aren’t any, to which my aunt replied, rather angrily, “Do not lie to me, I saw you to put the whole box under the counter”. This was my first meeting the concept of “under the counter goods”. Those were items that were so rare, that shopkeepers actually kept them hidden from the general public in order to either keep them for themselves or for their closest friends. If one wanted bananas or oranges, without a relative in the shop it was difficult to get either.
At another time and place I was talking with a friend of mine from school about a little experiment I wanted to do and I sighed, “I need magnets, but no shop around here sells them.” to which his incredulous reply was “Why don’t you steal them simply from school?”. To which I, equally incredulously, replied “I do not need them as much as to steal them!”. This was my first encounter of the concept “who does not steal from the state, steals from their own family”. For honest people it was nigh impossible to obtain some even quite ordinary goods, because they either never reached the public counters or were quickly sold out when they did. So it was quite common thing to steal for example building materials from public spaces. Who did not steal, did not prosper. Part of the reason why our house fell in such serious disrepair was that my parents did not steal.∗
But not only goods were hard to come by. Labour was difficult to get too. Need a house repaired or built? You better had a friend who is a builder. Not only would he be able to steal the materials you need, but he might also be able to make a lot of the work at the time when he is supposed to work for his employer. This in combination with previously mentioned slacking has exacerbated the labour shortage that was an ever-present theme. “There is not enough people” was the commonest explanation for why nothing works as it should be and work does not get done on time. You need some minor house repairs? You better do them yourself. If you cannot do them yourself, you are in bad luck, because “There is not enough people”.
For those who had occasionally got their hands on foreign currency, like German Marks, or US Dollars, or special secondary currency called “Bony”, there were specialised shops called “Tuzex” where imported western goods could be bought. These were highly sought after and a sign of social status. Jeans and Lego for example could not be bought anywhere else. But the regime did its best to prevent ordinary people from getting their hands on these currencies, they were reserved for the elite. So of course black market emerged. The proprietors were called “Vekslák” (probably from german “wechseln” – exchange) and were the official villains for the regime, by encouraging people in the following their base instinct to follow their own good instead of sacrificing it on the altar of the common good.
The iron curtain in this regard demonstrated where extreme isolationism, protectionism and one-sided economy leads – corruption and criminality. A lesson worthy of remembering, yet nobody seems to remember it.
∗ Since my mother was a head of local food shop and my father was a factory foreman, people had difficulty to believe that they did not use their positions to enrich herself. There were rumours about us only pretending to be poor and how we have a car hidden i the garden shed and loads of money stashed away. After the fall of the iron curtain my parents were frequently asked why they do not start their own business or invest money. Nobody believed them for years when they said that they are not rich.
But they did use their positions to get some advantage. We always had some of the scarce goods. One of such goods were canned tangerines, those were so rare that actual fights broke out when they got into the shop. So when we wanted to buy color TV, my mother bought a whole box of canned tangerines in order to sell them to the electronics shop keeper in the district main town who in turn held the TV under the counter for a few weeks until my parents could organize transport.
I succumbed to the peer pressure and I stole a piece of steel from school when I first wanted to make a knife. The knife was never made, because I have hidden the steel bar in a drawer and never used it. It gnawed at my conscience. I failed to internalize the imperative “who does not steal from the state, steals from their own family”.
On a short mown lawn, boringly green, you do not get to see these. The orange flowers are Hieracium aurantiacum, which is to my mind the most handsome dandelion relative growing here. It is also an endangered plant in CZ so we are mowing the lawn in a way as to allow them to flourish. There are only a few patches around where it prospers.


©Charly, all rights reserved. Click for full size.
I have no idea which exact species it is. We have it as a pot plant for years and this year it has blossomed for the first time.

©Charly, all rights reserved. Click for full size.
Matt Easton and Tod Todeschini got together to make a really interesting video that also pertains to my current project in work.
The breadth of Tod’s skill and knowledge is incredible. When I grow up I want to be just like him.
Many of the buildings had the beams carved. Some had decorated just one or two beams on the edges, some went completely nuts. There is not much more to say, really. Enjoy.
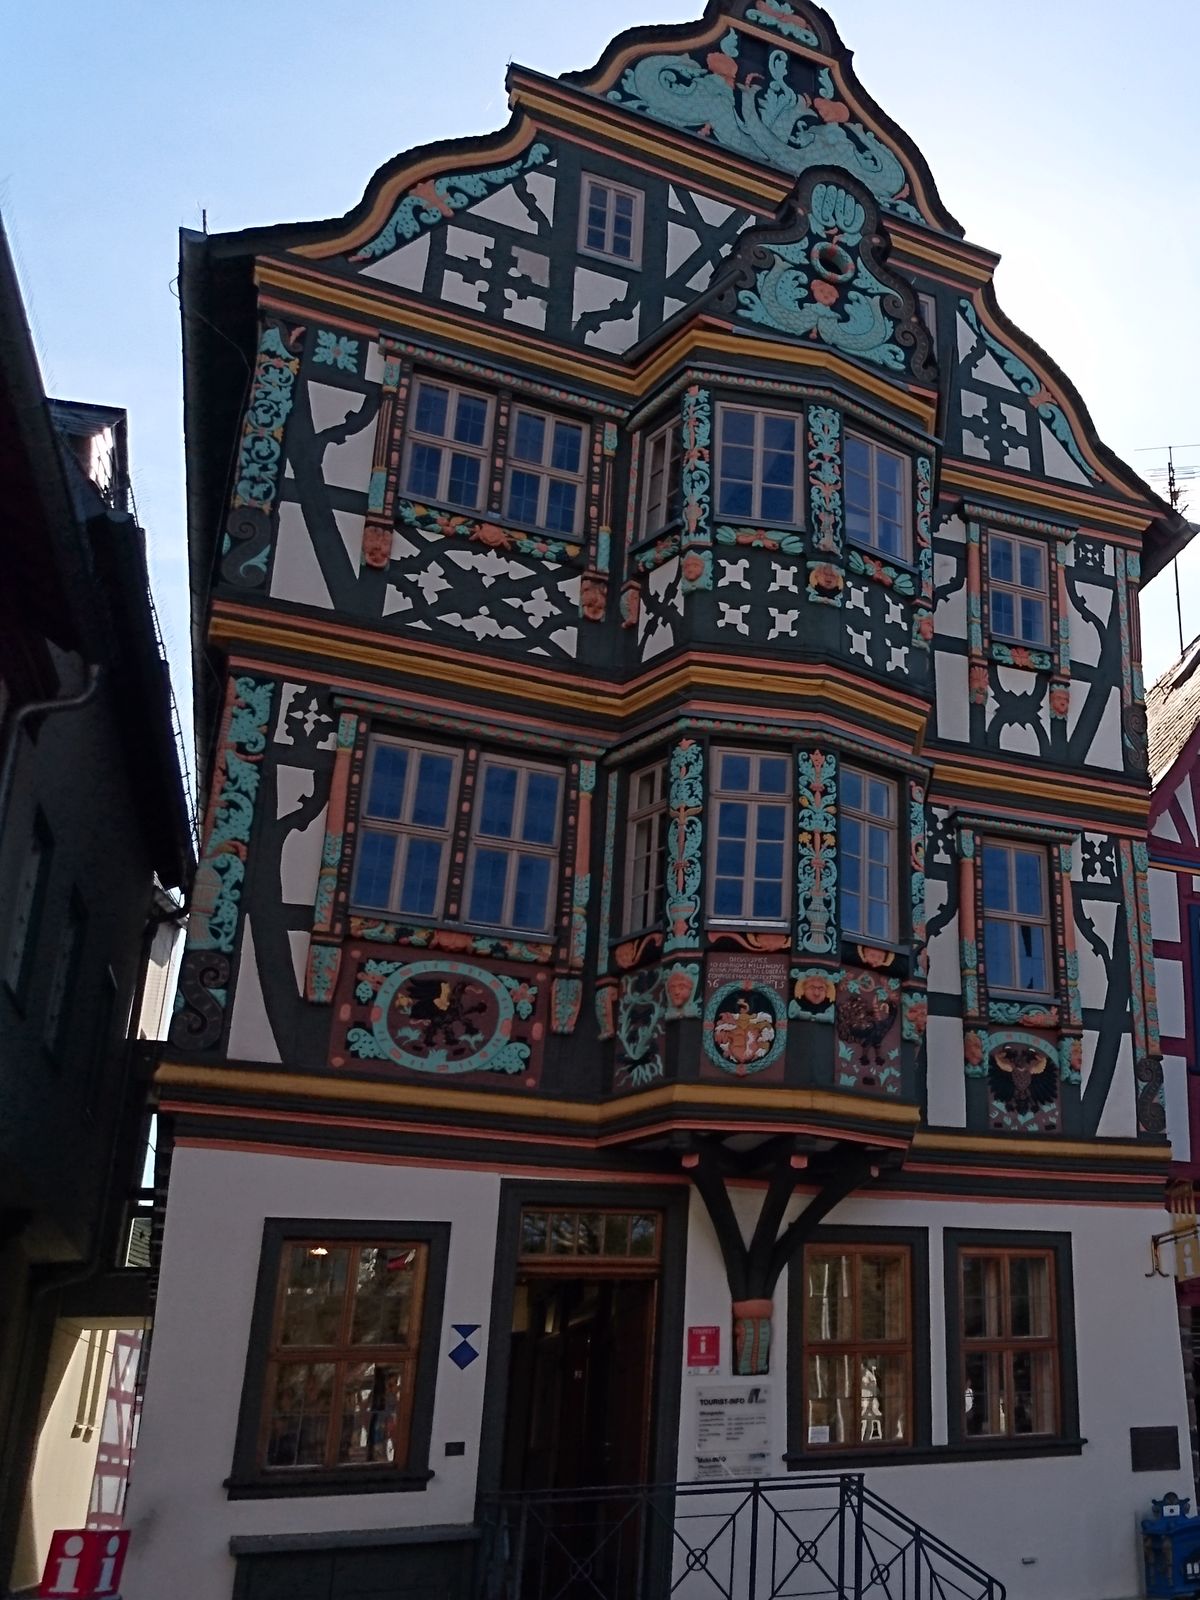


©Charly, all rights reserved. Click for full size.

I hate having to have teeth. Intelligent design my ass – two sets for the whole life and even with modern technology nigh impossible to keep clean and free of cavities. And I am one of the few lucky people who at the age of 40 years has all 32 teeth and only four fillings despite indulging in sweets a lot. I dread the day when I will have to have one of my teeth to be pulled out. Two of the four filings are in one tooth, the likely candidate for this lovely process.
Content warning – description of a bungled medical procedure.

©Charly, all rights reserved. Click for full size.
When it came to mouth Professor Kos had a very sad story to tell. It involved his brother, who had the misfortune of having impacted wisdom tooth that had to be removed. And the doctor who did that task was not a dentist, but a surgeon, who approached the thing in a surgeon-like way – he cut through he left cheek and removed the tooth from there.
However he made a mistake – he did not manage to avoid parotid gland and he cut into it. The constantly flowing saliva prevented the healing of the cut having to have drainage in his left cheek constantly. Then the surgeon decided to remove the gland on this side of the face completely, thus his brother ended up disfigured for life.
Professor Kos was very angry and agitated when he told this. He concluded that a surgeon as incompetent as this has no business operating on people and should have his licence revoked. I agree.