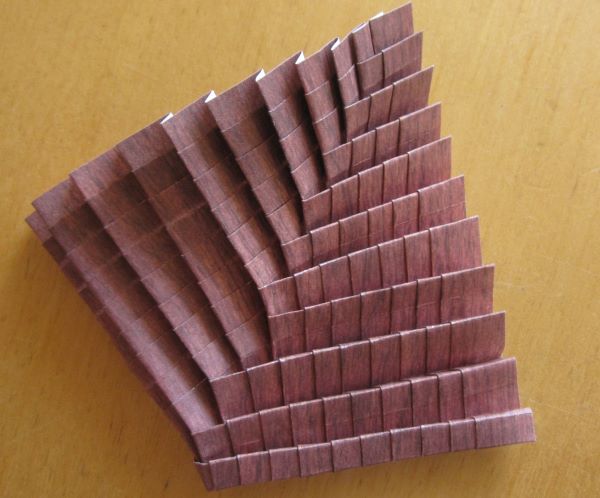
Pleated leaf, designed by me, but likely a common design
At some point, I discovered the area of pleat tessellations, a technique popularized by origamist Goran Konjevod. There are a bunch of things you can do with this technique, but I thought I’d show the simplest example I have. This is something that you can fold at home, and experiment with your own variations.
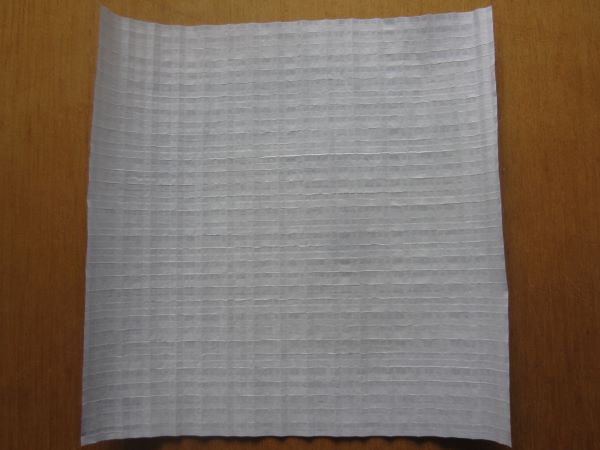
To make this model, we start by folding the paper into 16 divisions both horizontally and vertically. This is a common first step in many origami tessellations, so forgive me for just throwing it out there like it’s nothing. For once, I’ll go into more depth about how to do that.
I presume that the reader knows how to fold a paper into halves, and then into fourths. The first non-obvious step is how to fold into 8ths. Suppose you want to make the fold at 3/8ths. One method is to fold the bottom edge up to the 3/4 mark, but in my experience it’s slightly more precise to fold the 1/4 mark to the 1/2 mark.
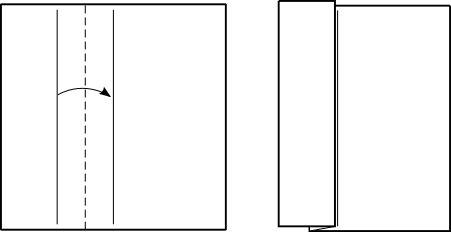
Initially I believed it was better to fold from 0 to 3/4, but the issue is that there may be a lot of creases between 0 and 3/4s, and those creases slightly change the shape and length of the paper. It may not seem like much, but these errors accumulate and become significant once you’re folding down to 64×64. So in order to make these folds, I always try to take two nearby creases, and fold one to meet the other.
Note that in the diagram above, I’m specifically folding 1/4 to 1/2, and not 1/2 to 1/4. I have a reason for that as well. When I fold it this way, I’m not just making a crease at 3/8, I’m also reinforcing the crease at 1/4. I prefer to fold the paper in a way such that each of the creases is reinforced roughly equally. If you’re not careful about which creases you’re reinforcing, you can easily end up with a very strong crease at 1/2, and much weaker creases at 1/4 or 3/8. In weaker paper, this can even cause tears.
Here’s the sequence of creases I use get to 32 divisions:
- 0 to 1
- turn over (i.e. flip from colored side to white side or vice versa)
- 0 to 1/2
- 1 to 1/2
- turn over
- 0 to 1/4
- 1/4 to 1/2
- 3/4 to 1/2
- 1 to 3/4
- turn over
- 0 to 1/8
- 1/8 to 1/4
- 3/8 to 1/4
- 3/8 to 1/2
- 5/8 to 1/2
- 5/8 to 3/4
- 7/8 to 3/4
- 1 to 7/8
- turn over
- 0 to 1/16
- 1/16 to 1/8
- 3/16 to 1/8
- 3/16 to 1/4
- 5/16 to 1/4
- 5/16 to 3/8
- 7/16 to 3/8
- 7/16 to 1/2
- 9/16 to 1/2
- 9/16 to 5/8
- 11/16 to 5/8
- 11/16 to 3/4
- 13/16 to 3/4
- 13/16 to 7/8
- 15/16 to 7/8
- 1 to 15/16
And of course, you have to do this both horizontally and vertically. Generally I like to alternate between horizontal and vertical. Fold into quarters horizontally, fold into quarters vertically, fold into eighths horizontally, fold into eighths vertically, etc.
But this is just my personal method, and I can’t really prove it’s the best way to do it.
A 64×64 grid
Once you have a square grid, you can fold the pleated leaf. All you need to do is fold each of the following pleats in sequence, from 1 to 10. Each pleat is folded on top of all the previous pleats, causing the pleats to layer upon each other, locking them into place.
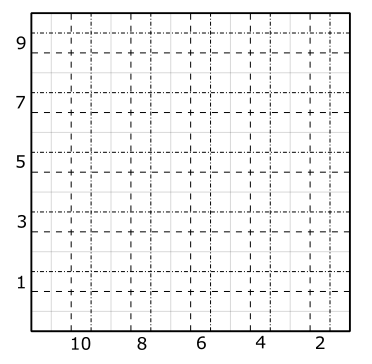
Recall that in standard origami notation, dashed lines indicate valleys, while dot-dashed lines indicate mountains
I recommend going up to 32×32 divisions if you can, but 16×16 will work as well. You can also experiment by folding the pleats in a different order, producing entirely different shapes.
Leave a Reply