Sheath-making is a fascinating sub-genre of leatherwork. If you have leather carving skills, btw, the recent interest in knives has made teaming up with a knife-maker a very attractive opportunity.
This is some pictures and notes about making the sheath for Hanna’s puukko. She wanted an everyday camp knife, and the resulting knife is an exceedingly wicked piece of work. It’s strong, thin, and has a point designed to penetrate; it’s just the thing I want next to the arteries in my groin. I do not want someone carrying one of my knives to slip on a hiking trail and bleed out from the result. So, leather alone is disqualified as a material, but it sure is beautiful.
Usually I put gaffer tape on the pieces of material I’m using, so I can scribe on that with a sharpie. And, I have to say: sometimes I feel bad about all the gear I have, but all these tools are special purpose. My bandsaw took maybe 30 seconds to do these cuts and they came out perfect, square, and clean. I am properly terrified of Mr Happy Dancing Bandsaw, but it’s a loyal friend.
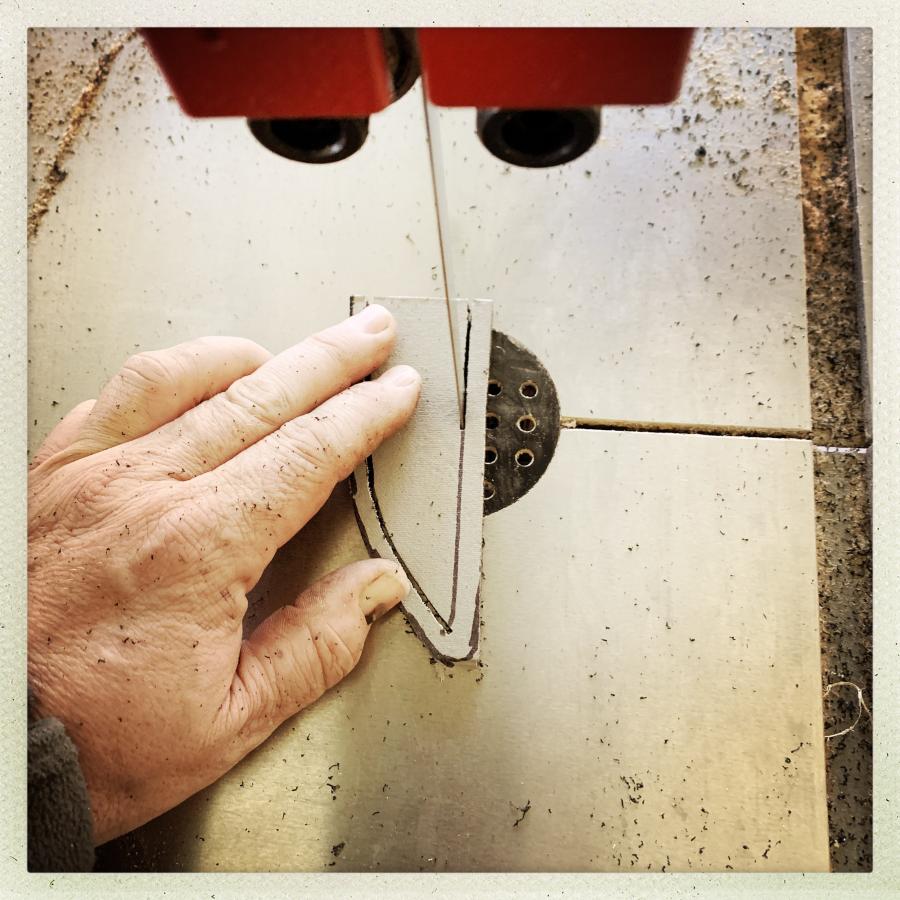
The material is ABS plastic. I have 4×8 foot sheets of ABS in a variety of thicknesses; I bought a giant load of ABS and polypropylene back in 2013 and I’m still working my way through it. Those two materials are used for tons of stuff. The material is valuable, not expensive (but not cheap) so I have 2 big boxes in the wood shop for scraps of each. It’s great to be able to walk over and pull the right dimensions of scrap out of the box – way easier than wrangling a 4×8′ sheet.
ABS is, if you recall, the original miracle plastic from the 80s. It is impact-resistant, light, tough, burns grudgingly, and most importantly it’s pretty much impossible to cut with a knife – unlike leather. It solvent welds beautifully; PVC pipe cement makes the surface of the ABS sticky and you just stick them together, put a brick on them and 10 minutes later they are one piece of material. So most of the scabbards and sheathes I make are ABS.
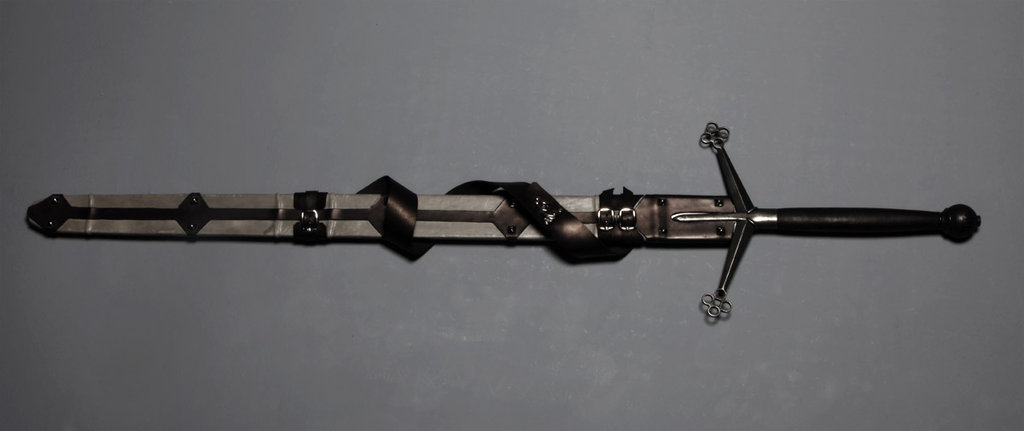 [Jacki’s claymore. Sword by Paul Chen forge, scabbard and carry strap by mjr. Jacki is short, and looks absolutely like a storm a’comin with that thing on her shoulder]
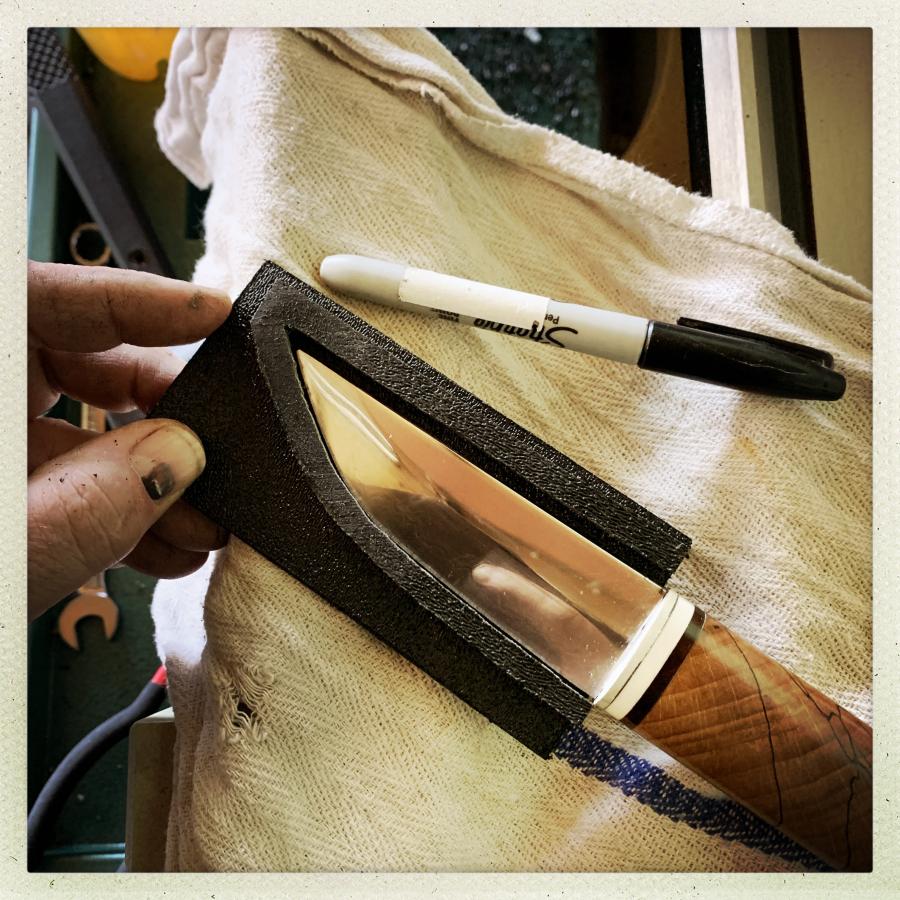
So, it’s a standard welted architecture: 3 layers. The middle layer defines the shape of the thing. I sanded the welt a bit to give the sheath some angle so the blade wouldn’t rattle around in it. That’s another beautiful thing about this architecture – you can fart around with it on a sander and it is very easy to work with. Once the welt is right, weld two thinner pieces of ABS on both sides and step over to Mr Happy Dancing bandsaw to clean it up. Then, over to the belt sander to shape it a bit. ABS works like wood (except it stinks when you grind it) so it’s easy to put a bit of shape on the sheath. Most classical sheathes are made of wood pretty much the same way (Japanese sheathes don’t use a welt because, dang the Japanese get stubborn about things) but usually they are chiselled laboriously out, instead of assembled around a welt.
In spite of my confidence in the ABS welds, the next step is to add some useful texturing to the sheath. In Jacki’s claymore scabbard, you can see raised areas that serve to keep the frogs in position. They also provide some visual interest.

Those are safety wires. I will bear on my left thumb, forever, the scar from when the scabbard of my first katana came unglued and my thumb ran along the blade. The koiguchi was cracked and the whole thing popped apart. That was darn skippy messy and my parents had questions about what had happened in my bedroom. A Japanese scabbard (saya) has a buffalo horn ring at the throat (koiguchi) to prevent this sort of thing. It is – as always – meticulously fitted. I know sensei spends days on the koiguchi; it is a minor art-work in its own right. I came up with my own lazy alternative, which is steel wire. Jacki’s claymore scabbard is wrapped in several places with 16ga mild steel wire. Hannah’s puuko scabbard is wrapped with .3mm stainless mig wire. I do not know how they temper that stuff but it is, basically, cheese-cutter or piano wire. I bet you could put all your weight on it except you’d bleed where you were holding it. Anyhow. The safety wires add visual interest and make it even less likely that there will be a catastrophic sheath failure. This is a serious thing. Picture Hannah slipping on some mud and coming down on a 4″ razor blade that I made. Nope. Or Jacki, having a scabbard failure and suddenly she has 4 feet of hateful razor sharp claymore up above and behind her calves. Nope, nope, nope lotta nope. All the nope.
The wires are wrapped, then tied and pulled tight with pliers. On Jacki’s scabbard, I actually used a small drill bit and sewed the ABS with the wire for a little distance. Remember: any pressure on the wires is going to come from the direction of the wire, so it’s easy to make it lock very strongly.
You can see the rough patches on the ABS left from my sander. That’s also great because rubber cement loves that surface.
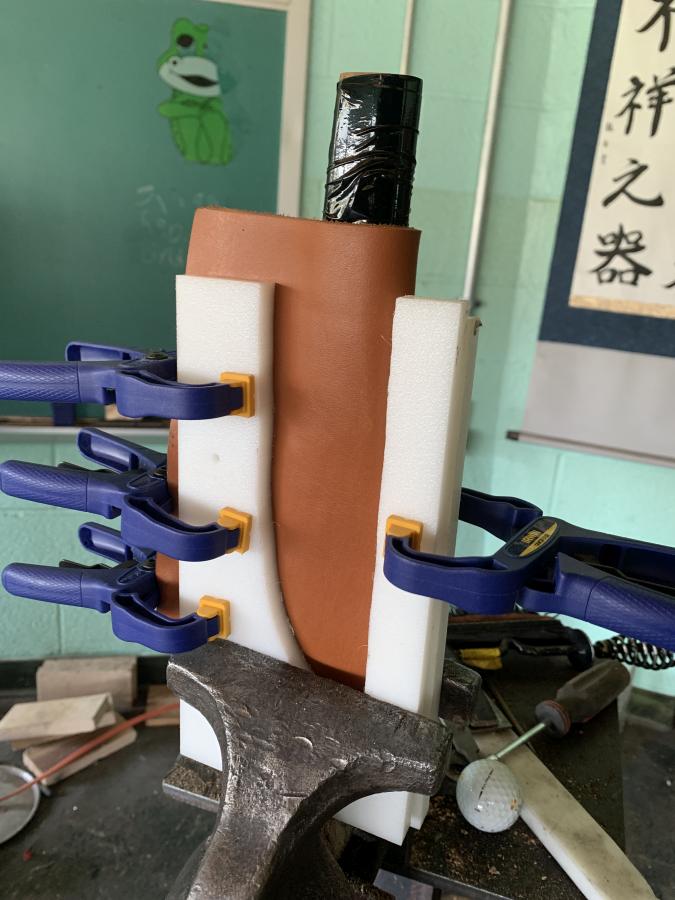
This is a technique from Al Stohlman, who wrote some really amazing leather-crafting books back in the 50s. Stohlman’s wife, Ann, did illustration and carving design, so she did the illustrations for the books and they are seriously beautiful in their own right. If you are interested in leather work, go find them. Stohlman’s method heavily relied on wet-forming around molds. What you see above is a typical Stohlman-stle mold: you cut the outline of where you want the stitch-lines to go, wet wrap the leather around the object being shaped, and clamp it in a vise. Since the form is custom fit (thanks to Mr Happy Dancing Bandsaw!) it basically pulls the leather to tighten it around the object. Let it dry a day or two.
I hate designing belt hangers but when you gotta do it you gotta do it. This time (I didn’t take pictures) I did a large flat piece that is stitched at the top and bottom. Do that stitching before you stitch up the side of the sheath. With leather-work, and just about any other crafting project “assembly order” is really really important. You can get things wrong and blow the whole project because you now have to stitch something you can’t reach. I was looking at various viking things and I thought that for visual interest – no real purpose – I’d bring something around and expose some stitching. I had to order some artificial sinew and wait for that to come. Then, I couldn’t find my saddle-makers’ needles and I had to order some and wait for them to come. Etc. I have a great big leather sewing machine but it’s too destructive of the leather for this sort of detailed project. So, to do the stitching, it’s back to Stohlman-style: you use these little forks that you can hammer 1, 2, 4, or 8 holes with. Then you walk the stitches and the holes along in correct spacing.

Assembly order: it is much easier to dye the leather when it’s not all assembled. Here it’s held with clamps so I can decide if I like it. I dyed the whole thing. You can see where the poly/vise press made that stitching area a perfect flat plane. Now you dye it, wax it, and as you work on it, your hands will continue to press the leather into shape. You can see the safety wires starting to become visible. I rubbed them with my thumb while thinking and kept emphasizing them. The dye will even out as it dries. Oh, yeah, another nice thing about ABS: it does not absorb water. So it’s going to do less releasing moisture around the blade. You can see that I still have the blade far from all this; it does not need to be involved.
Wet-formed leather is amazing stuff. You can rub it with your little chimp-paws and it will grudgingly move, and stay there. So, literally, I sat there thinking and rubbing the leather to make the safety wires exactly as visible as I wanted them to be.
Then, I got the forks out, and a hammer, and my sinew and needles, and saddle-stitched up the side (after a good coat of rubber cement down the contact area between the ABS and where I was going to stitch). Now, somewhere around there was when I had my TIA. I did not totally fuck up the stitching-line but I have to say that I have done better. I realized I had a problem when I tried to do the fancy box-stitch I designed for the loop-straps. That’s a dumb-shit easy bit of stitching, but look what I did:

That was when I went upstairs to take a break, check my email, and my computer made no sense to me. So, I think I was running on partial brain when I did that stitching.
I actually went back and got it right, but forgot to get pictures. Before I box anything and send it off, I always take it to the photo room where I can put it in front of the big soft box. So this is the official photo of Hanna’s puukko:
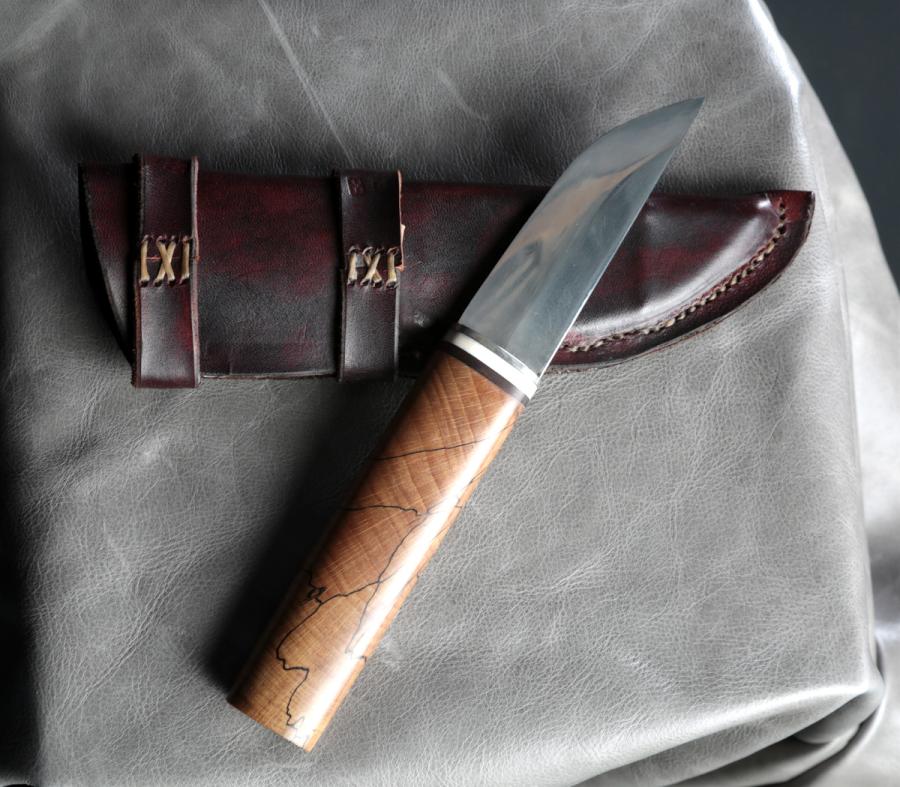
As always, there are flaws, that I see, which drive me nuts. But, as you can see, I went back and fixed the cross-stitches and they look OK. The stitches along the side could be better but they aren’t bad for someone whose brain was going on the blink.
This project was really problematic. I wanted to overreach myself on the handle, with some bronze casting-work. But I don’t have “sculpting” on my list of skills. Or, more like, I didn’t roll a natural 16 on my sculpting skills, and I can’t find a wizard who can boost my stat (I guess I might have to, you know, practice) Anyhow, I overreached, did the blade – which was also a lot of technical overreach that I succeeded in – and then let the blade sit on my bench for 2 years. Hannah had said she wanted baltic birch (check! and resin soak it) silver, bone and amber. Silver, I got. Great synthetic ivory, I got. Amber? I made some. I made a little silicone disc mold by cutting some jeweler’s wax into the disc, and making a silicone mold from it. Then I experimented for a couple days with resin and colors. Eventually I came up with this, which is texturized inside using glass fiber (also strengthens!) to manipulate the light. And a bug from my window sill. I think the amber came out remarkably well. If any of you want a resin amber something or other, talk to me.

Look how beefy that tang is where it goes through the amber! This was a terrifyingly close grind – I had to drill the birch, pack it with epoxy (I used PC-7) and assemble the components into a block, then freehand the shape, remembering what the tang looks like and trying not to hit it. Because it you penetrate the capsule where the tang is, you get to hammer the whole handle off and start over – a process I call “ctrl-Z”. The shape of the handle somehow migrated toward the shape of a tanto handle, with a sort of squared-off look but it’s thin side to side. Hannah’s going to have her own experience with it, but my hand loves it.
Thanks to Hannah for throwing me this huge challenge, but mostly for being patient. 3 years is a bit of an F-35esque schedule slip.

Notice I referenced koiguchi before introducing the concept? Now think back: have you ever seen me do that before? I am normally hyper careful not to use words before introducing them (assembly order, right?) that is some part of my language-assembler engine that is not working 100% yet.
Relevant: my s/o is a hobbyist leatherworker who lives in PA. If you are interested in collaboration or want feedback/ideas, or something like that, I can ask her.
I gave her a bog oak dog groomer that you auctioned a while back.
You may be interested to know that English sheath is a cognate of Dutch schede which for obvious reasons is used for both a scabbard and the female receptive organ.
It is all beautiful, the ‘amber’ is very effective.
It’s a gorgeous blade and sheath. I hope Hannah is delighted with it. That last photo of the finished set manages to convey the razor sharpness of the blade. Those cross stitches are only simple if you start it correctly, and then follow a detailed sequence in the correct order.
Our brains do many complex calculations that seem simple, but in reality they are parallel processing. It’s not something you are conscious of, until a TIA or such demonstrates that various functions (memory, speech, order of operations) are compartmentalized in your brain.
No, I did not notice. I just assumed it was a knife blade from context, though I may have heard the word elsewhere?
René
Yes
No.
The OE root of sheath is the verb skæd, which is what you do to a log to create the long boards necessary to sheath boats and build stuff. It means to divide/split/chop/shave. In German, the surname Schöttmueller incorporates the root as a noun, with mueller = builder. There is also a Jotun turned Aesir goddess named Skadi, whose name means damage/skathe.
The Germanic term for female genitalia is Fuatha. There is no way for that to turn into sheath or scabbard by the various rules of consonant or vowel shift. There is an etymologically related slang term which is still used in English. I will avoid tripping spam filters by writing it, but it starts with a T and has the correct long vowel ua.
I am sorry I can’t spell the various Germanic root words correctly.
Thorn and the crossed d are missing from this keyboard, and some of the vowels are an approximation of the original diphthongs.
Tethys: Schade, schijden, schede (All Dutch). I just wanted to point out that once in Dutch a (sword, knife, …) scabbard became the word schede, it naturally became the polite word for vagina.
Yes, there is also the middle German surname Schied , which means scabbard maker. The ship/split/sheathing lumber meaning is what you find in the earliest written records, circa 750.
I don’t know if split is the polite term, or if it traces back to AngloSaxon/ Low German dialects, but they have multiple slang terms for genitals just like modern idiom.
Most of the male words refer to horses, such as Hengst. Volsung ( of the Volsunga saga) is a cognate of the word phallus. Migration period Germanic tribes were not shy about sex and body parts.
Yes, more people should get into making knife sheaths so I don’t have to :P
Looks like a lovely knife
It is a lovely knife and the spalted birch looks stunning.
I intend to dress my puukko in sheaths with wooden liners. Traditionally, according to lumipuna, those wooden liners were also made from birch but I will use poplar and willow wood. wrapping it with wire both for support and for decoration is an interesting idea, I will try to incorporate that.
I do not think the danger of a knife stabbing through a thick 4 mm leather is that big tbh. That kind of leather is difficult to stab though with a dagger at a right angle from the outside, let alone from the inside of a snugly fit sheath. But a wooden (or in your case plastic) allows for the use of thinner leather that is easier to form and to work with in general.
Would Kevlar work to line a sheath?
You need special cutting tools and of course it cannot be sewn. It is glued together.
It seems easier than this process, but I’ve never done any leather working, much less wet leatherwork. I do have a nice set of curved needles I inherited from my grandfather. I’m assuming that he used them for sewing leather upholstery in restoring old vehicles.
@Tethys: Kevlar has crazy tensile strength but not much shear strength. It cuts easily with ceramic scissors. Mig wire, on the other hand…
I think the problem would be giving it shape. You could mix it with resin and form a composite shell. That would be ridiculously tough.
@Marcus
I am now imagining the possibilities of making fancy wire work designs on a resin soaked Kevlar sheath liner, which then gets covered with wet leather.
I also want to point out a tiny detail in your story that might be related to the TIA.
Breathing Heptane fumes for any length of time is not a good idea, and you should avoid getting it on your skin.