I’ve fallen into a habit of randomly switching from project to project, as my interests hit me. That results in a pretty random output, but I’m having a lot of fun.
This happened because I was thinking “I wonder how precisely I can freehand a square bar?” I had an old bar of twist 1095/15N20 that I made for dangerousbeans’ carbide bar (I made 2, in case) so I started noodling around with it and the angle grinder and a flap disc and eventually put it on the belt sander’s platen. Basically, I used the traditional Japanese ™ way of shaping something: keep correcting it against itself and eyeballing it a lot.

My calipers read that variously as .501″, .504″, .5009″ and one spot was a bit high at .54″ – I did the initial grind without measuring, just eyeball. I swear! This answers a question that has bothered me, which is “who needs a surface grinder?” I’m not machining it for precision and, if I was, the machining process would perforce true everything up even more.
To shape the end, I thought I’d just take it over to the bridgeport and cut the tip down with an end-mill. 30 seconds later, I had ruined a pretty nice 1/2″ end mill. The tip of the bar is tough stuff. It’s not full of carbides like the satan’s scrotum(tm) suminigashi, but it’s highly evil material. Just keep that in mind, if you’re ever thinking “I’ll just make a damascus ${whatever}” you’re probably crazy. I’m talking to myself.

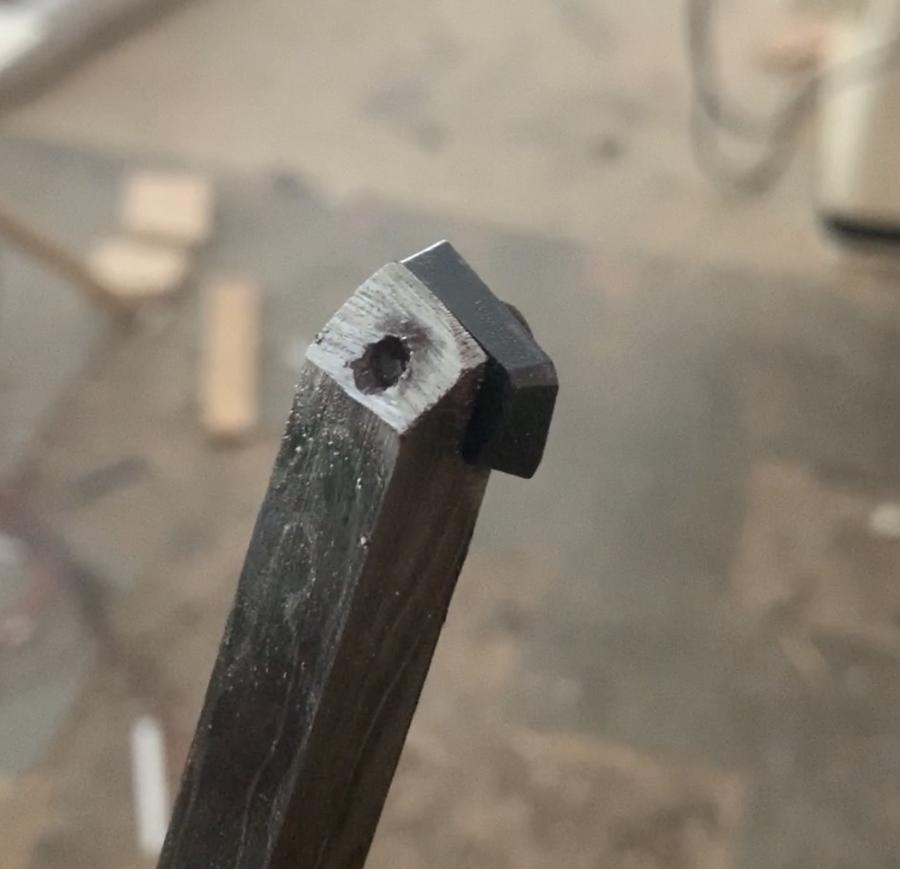
So that’s the end-game, here: it’s a carbide insert for a face-mill. Because people go through them pretty fast, they’re really cheap: $10 for a set of 8. That made me think maybe if I mounted one of those at an angle on a chisel, I could make a carbide skew-chisel and be a legend among woodturners. I needed an angular cut and some shaping on the end of the bar, which was pretty easy, then came the nightmare of drilling a hole through the end and running a tap through it. Since the bar is not made of Satan’s Scrotum(tm) I was able to drill a hole without ruining a single carbide drill (though I still destroyed that beautiful 1/2″ end mill).
To cut the angle, I just put the bar in a vise, grabbed my angle grinder with the diamond cutoff wheel, and carved the darned thing by hand. I’m not trying to brag, but it came out flat and clean and it only took a few strokes with a diamond hone-stone to dress it up. Then, I fiddled around trying to guess what the right angle would be. Unlike with a metal lathe, you adjust the angle of your chisel by feel on a wood lathe, so there’s some leeway here.
None of that is machined, it’s all eyeballed. If this works, I’ll be worshipped as a god, i.e.: mostly ignored or widely copied. If the face mill insert works, this will drop the cost of carbide turning chisels to basically “free” and that’s not a bad thing at all. One thing that occurred to me is that if I wanted to, I could make a scarf jointed and replaceable tip, so I could use a variety of insert carriers instead of throwing a great big bar of custom damasteel at each chisel I use but, eh, damasteel is cheap for me.
Great, so now it needs a handle. I still have a big chunk of lovely ash, that I obtained for making rolling pins, so into the lathe it goes!
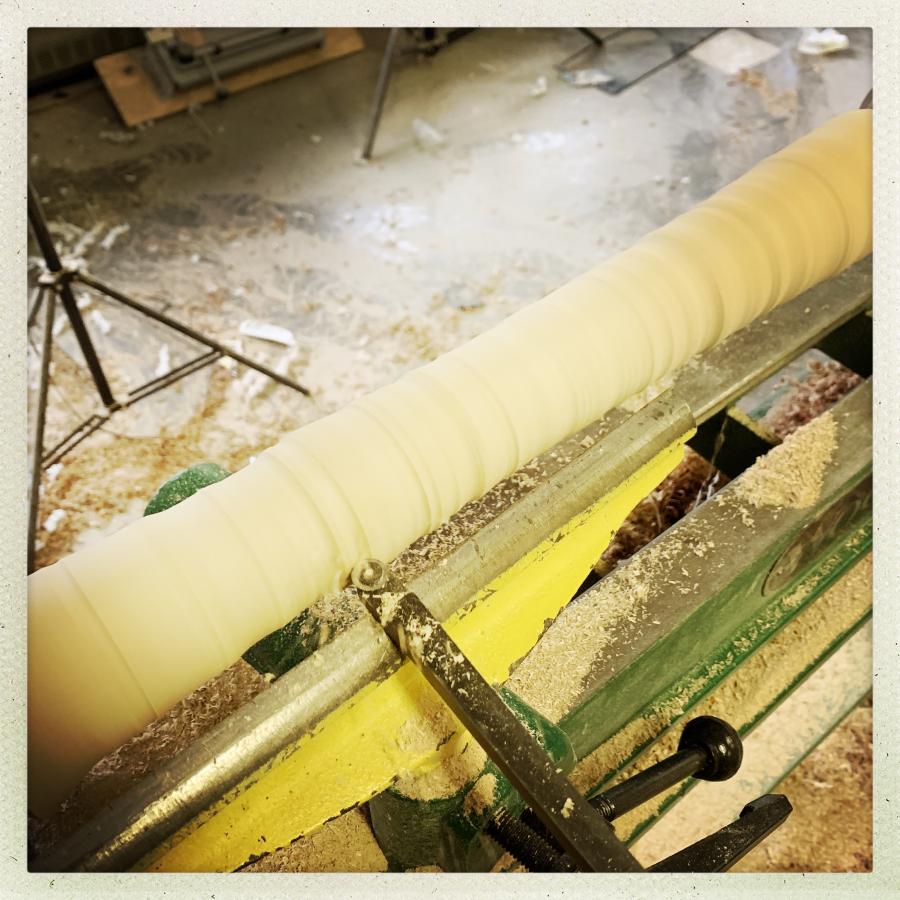
That’s my round carbide cutter chewing great grooves in the ash, spinning around 600rpm. It’s smallish, as a cutter, but because it’s small and razor sharp, it’s ferocious. I can set it at an angle and slowly walk it along the piece, removing about 1/4″ in depth across the entire length in a single pass. It’s still time-work, which is cool: you have plenty of opportunity to look at what you’re making and go “a little more there” or “add some wood here, oh, crap, can’t.” etc. Someone who is used to using conventional lathe chisels would be using a skew chisel for this, but a skew chisel is the whole point of this exercise, so I had to use a round cutter to produce a planar surface. How do you do that? Easy! You eyeball it, then pick up a scraper and refine the planes when you’re close.

You can see a bit of the set-up here. I have one end of the block cut to fit in a driver-chuck, and the other end is pinned on a live center. That’s important because, eventually, I need to replace the center with a drill so I can make the mounting-hole for the bar:

There’s a moment when you decide it’s time to start sanding, and I find that feels quite special. As soon as you hit the wood with sandpaper (at that speed!) it immediately turns butter-smooth and you can really work on refining the shape and surface. An open grained wood like ash takes a lot of sanding, but that’s OK – the work-piece just gets smaller, er, more “elegant.”
The shape of the handle is approximately like the handles of my other chisels for no reason other than that I want them to visually reference eachother. Why not? It’s distinctive.

Wood lathes use a morse taper, like a metal lathe does, which is sort of convenient because it lets me stay on the same mental space without having to shift gears. It also means that I can use the old machine-chuck from my Bridgeport as a drill holder in a wood lathe. That lets me step carefully up drill sizes until I have a 1/2″ hole about 8″ into the handle. I probably won’t sink the bar that far; my plan is to pour it full of West System G-flex epoxy, which is really evil, unforgiving, stuff.
When you’re drilling like this you need to go slowly because with wood heat is also a problem. If you just brutally sink the drill, you wind up with hot high-pressure air in the hole and it’s not impossible that’ll just blow a hole out through the side of your work-piece. I take my time and back the tailstock out every so often to let it cool. Once that’s done I put the live center back (now in the enlarged hole) and fine-sand and polish the wood.

That’s unfinished wood; the polish is just 400 grit sandpaper, steel wool, and a paper towel. At speed, paper towels are a good polishing abrasive as long as your work-piece is dead smooth. Any little pocket or chip will catch the paper and whip it out of your hand.
With all this done I was ready to assemble the thing, but realized that I was out of the brass PEX couplers that I use for ferrules. They don’t stock them in 1″ at the local plumbing store, either, so I’m going to have to wait until the post office and some over-managed amazon.com warehouse workers are able to get a couple to me.
This is all a test. I still don’t know if the face-mill cutter will carve, or if I have it at the right angle, or anything. The problem is, I couldn’t just grab the bar (or the insert!) and try it – it’d be dangerous if it’s not mounted in a good solid handle. There’s a non-zero chance that I’m going to wind up with something pretty, but useless. Science: the only way to know is to try.
It’s absolutely beautiful wood, with a lovely heft, I hope the chisel works as planed :-)
“An end-mill walked into a bar…”
Well, if it does not work as intended, you still have a very nice ash-wood baton…
Unrelated, but since you are a knife expert I thought I could just ask you: I have a japanese kitchen knife that is getting dull. I had someone who would sharpen it, but they moved away, so I need to do it myself. Should I buy a honing steel or whetstones or both? Any useful tips? Thanks in advance.
@kurt1, I am not an expert on Japanese knives, I am not an expert on anything, but I do know a bit about Japanese knives and about knives in general so if you do not mind my answer, here it is:
Japanese knives are usually hardened to the maximum the steel allows and they are not tempered back at the cutting edge. That makes ordinary honing steels (i.e. steel rod with patina) pretty much useless on them except maybe for getting them occasionally from “very sharp” to “shaving sharp” and even that is questionable. Ceramic rods, which are sometimes sold as “honing steels” do have the better abrasive capability but usually are of very high grit so they too are more suited for edge maintenance, not for sharpening of a dulled edge. Diamond-coated “honing steels” can destroy a knife and should be avoided. They are essentially cheapo-option for amateurs for keeping cheapo-knives sharp-ish.
Japanese knives also usually have specially ground profiles, so the method of proper sharpening is dependent on the knife you have. For that reason, I would not recommend any sharpening gizmo, although there are some good ones on the market. Those are generally suited for western knives with symmetrical grinds and flat secondary bevels.
I would recommend to you the YouTube channel “Burrfection” for sharpening tips and tricks. I would also recommend to you to simply buy a cheap 10$ two-layer whetstone and start with that. If you have more money to spend, a set of diamond plates will work a bit better, but their price and availability depend on your location. I also recommend checking the exact type of knife you have and looking up how to sharpen that specific type. There are some types of Japanese knives where some of their specific properties (like the shedding of vegetable slices) depend on the blade profile and geometry and inexpert sharpening can have a negative impact on their function. If you have one of the more all-purpose Japanese knives, then the sharpening is pretty straightforward and a proper edge can be put on the knife with a brick and a towel.
Thank you very much Charly, that was really helpful.
That is very pretty
If it doesn’t work it looks like you still have plenty of material to cut down to make other attachments. Or just forge weld a lump of 1095 on the end for a cutting surface. Though the face mill looks like it has a reasonable geometry for a scraper.