Making boxes is one of the fundamental techniques of woodworking, and it’s also kind of a pain in the ass.
Recently I completed a project that came out really well. So well, in fact, that I thought “this needs a presentation box” – whereupon I embarked on a quest that took way more time than it had any right to. But, now that I’ve geared up and practiced the technique, I can whip up boxes like nobody’s business.

upcut end mill
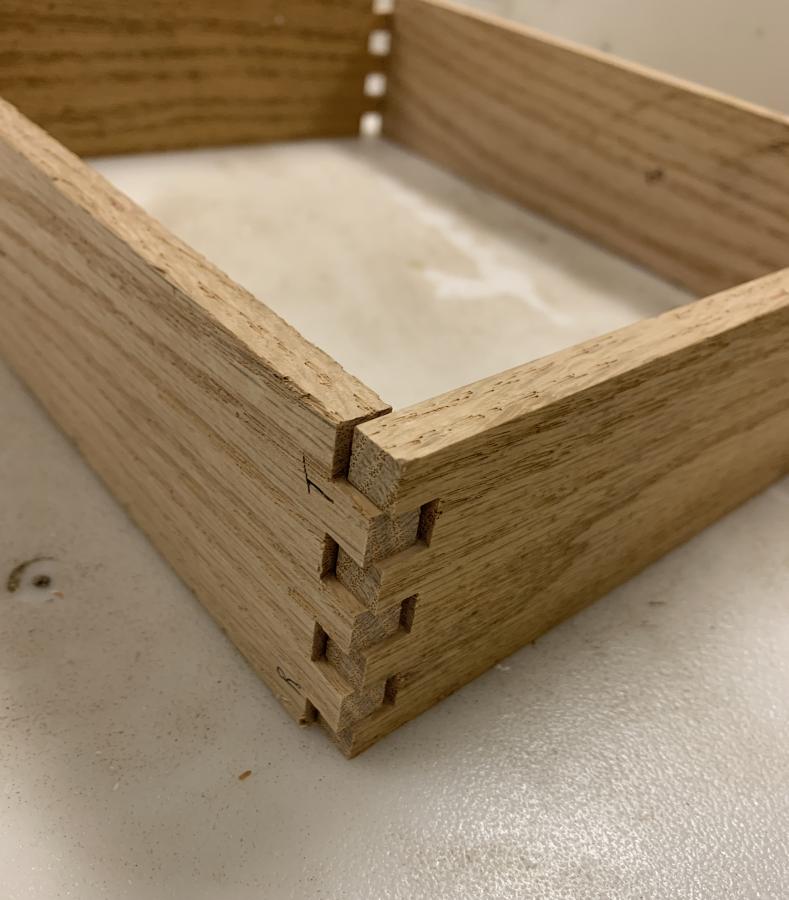
To cut the wood, I used a little sled that I bolted to the top of my router table, and calibrated with a gauge block against a 1/4″ upward cut end mill. The upward cut mill gently pulls the stock down against the router sled, helping make the cut nice and clean. Also, I used a carbide end-mill that is ridiculously sharp – it’s designed for steel and it peels oak like it’s a potato. The only downside of the end-mill is that the end of that instrument is terrifying. Getting a finger into a router bit is bad, but getting a finger into an end-mill is unthinkable. A table-saw is objectively more terrifying than a router, but there’s something about the hyper-manic scream of the router that makes my body try to retract into itself.
There is still some work to do. Boxes need bottoms and sometimes tops. The way to make those is a gigantic pain in the patoot until you gear up properly to do it, then it’s like falling off a log. What you need is a router bit with a ball bearing standoff, that can cut a groove around the bottom/top of the box (enclosed in the wood, or basically rabbeted into the bottom) When you’ve got that, you frame the box up, slap it down on the router table, and run the slot cutting router bit along the bottom to make a slot that will hold the bottom. The corners that are cut will be round (but will not be visible from the outside) so when the bottom is cut, you need to sand the corners round so that they fit.
When that’s all done, you take it apart and glue it all together.
I made this clamping rig:
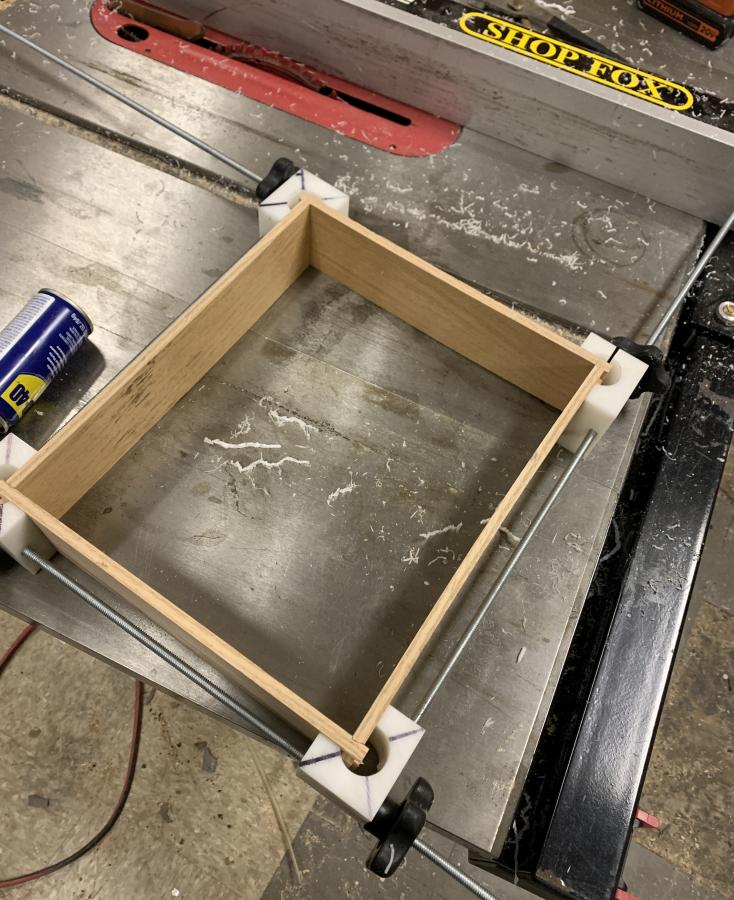
It’s 4 scraps of delrin that I cut on the table-saw, then drilled through with a forstner bit to make a region where the box joint can exist without pressure on it or the glue. I table-sawed the blocks to meet the holes through them, then drilled 3/8″ holes and holes that were slightly under 1/4″ that I could thread the rods into. The sides of the box frame shown above are about 3″ tall, and the clamping blocks are about the same size; they provide a nice, even, strong pressure.
ooh, i need to make one of those clamping jigs. i just finished making a bunch of drawer boxes and that would have been very useful
Your clamping jig is really clever. Cool boxes!
Are you supposed to leave the bottom floating in the slots to allow for expansion? Or is that just dresser drawers?
kestrel@#2:
Your clamping jig is really clever. Cool boxes!
Thanks! I don’t claim the design of the clamp; smaller versions are available for sale commercially. I’ve also seen them made out of stacked and cut plywood. It’s a super easy and very effective clamp.
Just an Organic Regular Expression@#3:
Are you supposed to leave the bottom floating in the slots to allow for expansion? Or is that just dresser drawers?
I think that’s up to the builder. There are a bunch of considerations. For something like a small box with box-joined corners, I’d glue the bottom in, in order to add strength and stiffness to the box. I also generally use plywood for box bottoms, and plywood is pretty dimensionally stable, so gluing it isn’t a problem (and the cut edge of the plywood is great for glue to grab onto)
I’ve assembled my share of Ikea dresser drawers, and the bottoms are usually not glued into those, often because the parts are melaine/plastic-covered MDF and the plastic covering won’t accept glue well. Also, Ikea construction usually makes sure the corners of a box are fairly stiff (using those torque bolts or whatever) and the whole box’ structural strength comes from those.
The pieces of oak I’m using a pretty thin (1/4″) and there’s not much room for a groove at the bottom, which is giving me a bit of a headache since I need to rig up a shallow slot cutter and I don’t have the right dimension ball bearing right now (waiting for the postal service)
Presume the title is a referenc eto this old classic song yeah?
Unless it was meant to allude to this? :
https://www.twenty20.com/photos/f3b395f1-9e3e-4b71-8dab-bbcf5c580efb
Incidentally, could people look less like boxers than Simon and Grafunkel there? Good song but the discordancy of the messages from eyes versus the lyrics…
“When that’s all done, you take it apart and glue it all together.”
Interesting choice of glue there Marcus (Figure 2). In UK we use that stuff to stop our push-bikes squeaking ; )
astringer@#8:
Interesting choice of glue there Marcus (Figure 2). In UK we use that stuff to stop our push-bikes squeaking
Ha! That’ll teach me. [basic rule of photography is to always review the ENTIRE frame for composition before the shot]
I usually use gorilla glue (foaming polyurethane) for stuff like box joints because it fills gaps.
Marcus @5
when i was doing slots for the bottom of my drawers recently i did them with a table saw, doing two partial depth cuts side by side. might be an alternative rather than waiting for shipping.
I’m jealous of anyone who can do this sort of stuff. Late father was old school misogynistic and girls-can’t-do-that was part of my name during my teens and 20s. I did learn some things but in a small apartment, woodworking is not an ideal hobby
brightmoon@#11:
I did learn some things but in a small apartment, woodworking is not an ideal hobby
I’m sorry. Woodworking is some of the most fun you can have with clothes and without pizza.
In most towns there are maker-spaces or places that teach techniques, and you can almost always get access to a shop that way. Shared shops are non-ideal (nothing less fun than using a saw when someone keeps chipping the teeth and changing settings) but for an apartment dweller it’s an option.
dangerousbeans:
when i was doing slots for the bottom of my drawers recently i did them with a table saw
Yeah that’s how I always used to do them, but I always mitred my corners and dolled them with cross-cut keys. Using box joins is a new thing for me. I’ve done dovetails, too, but I did them with an inner frame around the inside of the piece (a huge table) so the cut-lines weren’t an issue.
@brightmoon
look into hand tools and small portable workbenches. you won’t be able to make anything huge, but things like small jewellery boxes are really satisfying to make. a small wood lathe could also be an option.
look up Rex Krueger on youtube, he has a lot of stuff on hand tool wood working.
I was recently thinking about eventually making some presentation boxes for some of my more “luxurious” products. But I am in no hurry to do that.
Nice jig. For glue-ups like this, I normally use a Spanish windlass. Not particularly precise in where and how the pressure is applied, but simple and ideal for impromptu one-off situations.
@brightmoon, it sucks to not be able to pursue a hobby you might like. If it is of any help, I have made my first six knives with a vice fixed to an old bedside table, and a few cheap hand tools. In my bedroom. So there might be options for you how to make some small woodwork like dangerousbeans says. You know your own situations best of course, but do not lose hope too quickly.