This is a thing I made the other day; mostly it was a matter of rough-cutting with a diamond wheel then angle grinding it and eventually sanding it.
There’s a lot more to it than meets the eye, though. For one thing, while I was grinding and cutting it, I wound up work-hardening the steel to the point where it was difficult and time-consuming to drill through. My original idea was to have a triangular hole that was a bit larger.

If you look closely, you can see weld-lines in the metal. It’s a low layer-count damascus; I think there were around 8 layers of source material. I didn’t do anything to the bar to increase the layer count because, in this case, that was out of the question. I’ll explain more about that, in a bit.
Making that sort of thing is fun and relaxing; you just chew away at it and eventually it turns into what it is! I suppose the artform is “sculpting” but I think of it more as “stock removal.” The best thing about this process is that even with a diamond wheel, the material is tough and you have to work to ruin a piece. Transformations occur very slowly, so you have plenty of time to think “I’ll make it a bit thinner over here” or “Maybe I should bring out this ridge a bit with a crisp transition-line.” I’d make more stuff like this except it’s time-consuming and I suppose I have other things I’d rather be doing. I do think that a viking-style “thor’s hammer” out of this stuff might be fun.

Here’s what it looks like after 20 minutes in some ferric chloride, and an hour-long soak in coffee.
That’s what’s special, to me, about this piece: it’s 1095 high carbon steel, forge-welded with 304 stainless steel.
Now, let’s talk about forge-welding stainless steel.
Stainless steel is similar to aluminum, titanium, and probably other alloys, in that it rapidly forms a hard but effectively invisible oxide layer, which prevents further oxidation. I don’t quite understand the physics of that part, but (?) apparently the oxides are so thin that you can’t see them – normally aluminum oxide and titanium oxide are pretty distinctive-looking, but on the metal, they just look “shiny”. The oxides are also (I really don’t understand the physics of this part) impossible to weld to. So, if you’re using a MIG (metal, inert gas) or TIG (tungsten, inert gas) torch to weld aluminum, the torch exudes a small bubble of shielding gas around the working end, which keeps oxygen away from the molten zone under the plasma arc, so oxides don’t form. The shielding gas is usually nitrogen with a hint of argon, if that interests you; the main thing the shielding gas hasn’t got is: oxygen. This is clever stuff. According to some sources (The Skunk Works) welding titanium was a process that was not figured out until Kelly Johnson decided that the SR-71 needed to be made of titanium, and some poor bastard had to invent a welding system capable of doing that job. Now that I think about it, that’s probably not true; I believe the nazis were making aircraft out of aluminum that was welded, so maybe the tricky boffins were in the Rhine Valley not Los Angeles.

For someone with a setup like mine, forge-welding anything to stainless ought to be impossible; you’ve already got so much oxygen and propane flowing around an object that it is literally shrinking while you work on it, and great big chunks of scale (oxides!) are falling off the surface. How do you do this? Well, it goes back. Ancient Japanese smiths used to wrap their billets in rice straw and clay (forming an oxygen barrier around the weld-to-be) and Scandinavian smiths used to cover some of their smelting processes in sand, which melted to glass and formed an oxygen barrier. That was all before the invention of stainless steel, of course [if you showed up in the middle ages with a stainless steel sword, they’d probably call it ‘Excalibur’ and make you king or something. Hm… Sounds like a movie plot.] but the principle is the same: keep the oxygen out.

I don’t know who invented the technique called “cannister damascus” but, whoever they are, they are clever. What you do is you take your steel, surface grind it to get the oxides off, put it in a container – usually fairly thin mild steel, about 20 or 16 gauge – and weld it shut so it’s airtight, then pop it into the forge. Since the materials inside do not have any oxygen to work on them, you can give them a long soak in the heat, then hammer or press them when they are at welding temperature 2300F/1260C and hope for the best. There are details, of course. One of the details is keeping the materials inside the cannister from welding to the sides of the cannister and needing to be ground off. Some smiths coat the inside of the cannister with WhiteOut(tm) correcting fluid, which is basically titanium dioxide and collodion (nitrocellulose dissolved in ether) – the collodion burns in the can, too, which converts any remaining oxygen, and the weld does not stick to the titanium dioxide. Other smiths wrap their inner components in stainless steel foil. What I did was sneaky: I didn’t surface grind the stainless steel pieces that formed the outside of my stack, so they remained covered in oxides that wouldn’t weld to the inside of the can.

A steel sandwich snuggled in the remains of the flattened cannister
Another issue is that the oxides form fairly quickly on the outer surface of the stainless steel. So, I hit upon the technique of doing the surface grind then immediately dropping the piece of stainless into a steel can full of kerosene. The kerosene acts as an oxygen barrier and will also consume any oxygen remaining in the cannister as soon as it gets hot. It’s a bit of insanity: you take a piece of steel that is probably just shy of red hot, and toss it into kerosene. Then you reach in, pull the pieces out and stack your billet, and get it into the furnace as fast as you can – which means you’re wiping kerosene off your hands as you’re reaching for your MIG welder.
A lot of smiths make nice cannisters with fitted ends that are welded neatly with air-tight welds. I’m lazy and a bad welder, so I crush down the end of some steel tube using my hydraulic press, then run a bead of welding along the exposed end. Meanwhile, I light the forge so it can come up to heat, then surface grind the steels and store them in the kerosene. Finally, when I am ready to go, I pull the steel out, stack it, tie it together with a piece of thin stainless steel wire, shove it in the can, crush the open end of the can down, tack weld it, and toss it into the oven. The whole time, I am trying to move quickly but safely, efficiently and precisely.
It has never been an issue for me, but I always orient my cannister at an angle in the forge, in case pressure builds up in it and it pops like a pimple and shoots very hot something-or-other around the vicinity. What I assume is happening in the cannister is that the kerosene has burned up any remaining oxygen and left a bit of carbon behind (that’s fine, carbon is a pretty “sticky” molecule) and, after a good long soak to get hot, it gets pressed hard a couple of times. Then, to a vise and a diamond wheel and cut the ends off, chisel the sides apart, and you have a bar of something special. Or, it falls apart. So far my success rate is around 60%. When I started, it was around 20%.
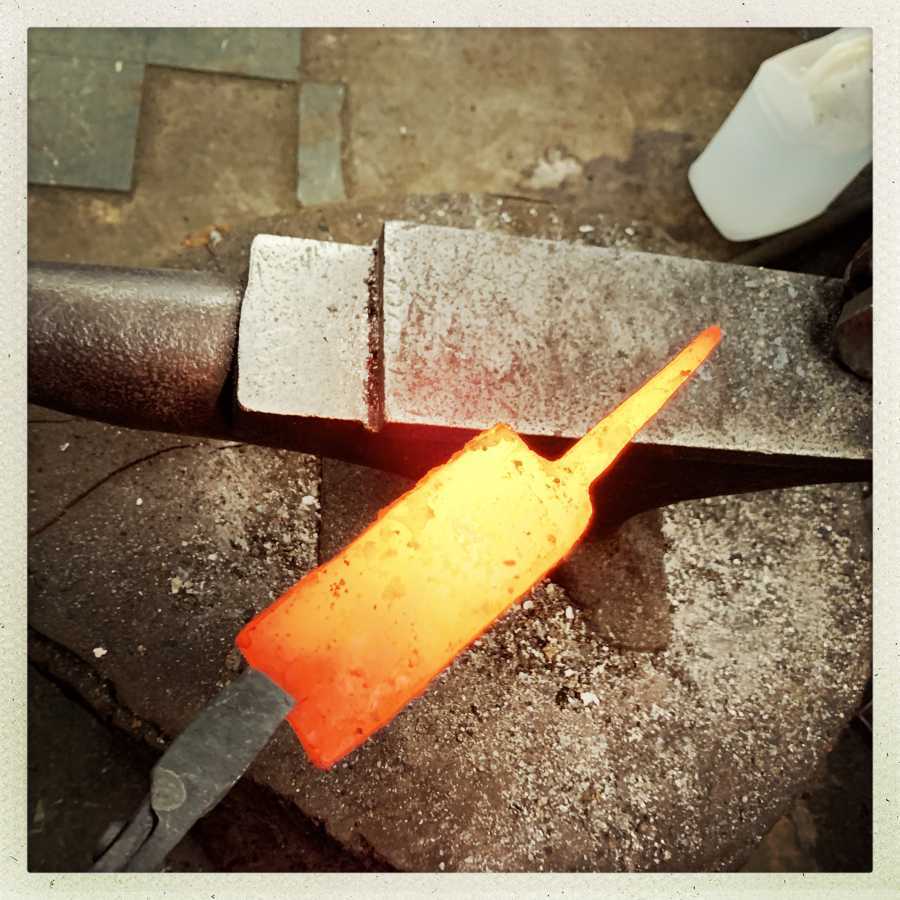
I have a commission that I am working on, which is to make a “camp knife” and my client and I decided that I would try this process, to make a blade that is 304 stainless on the sides and 1095 high carbon in the core. Perhaps I am a bit superstitious and don’t want to “jinx” myself, but I learned pretty quickly that one way to see if your welds took is to immediately take the layered steel and try to draw out a tang for a knife. That entails hammering the weld on the edge, and if it’s not stuck tight, the whole thing disintegrates under the hammer, you cry a bit, and start again.
There are loads of problems making knives using this process. For one thing, quenching the blade entails hardening the inner layer and the outer stainless layer doesn’t harden at all – so you get some weird stresses from the different expansion and contraction of the steels. One of my early experiments, the stainless sides literally ripped the 1095 apart once it was hard, and it crumbled like a cookie. How do you fix that? Grind back the stainless and form a proto-edge, then do an edge-quench on just the 1095. Each error I discover, I have to figure out how to overcome. I actually made a fairly credible blade but I started grinding on it to see if the weld had stuck and used it to test the edge-quench, and by the time the blade was done I didn’t like the grind and now it’s sitting on the “shelf of shame and woe.”
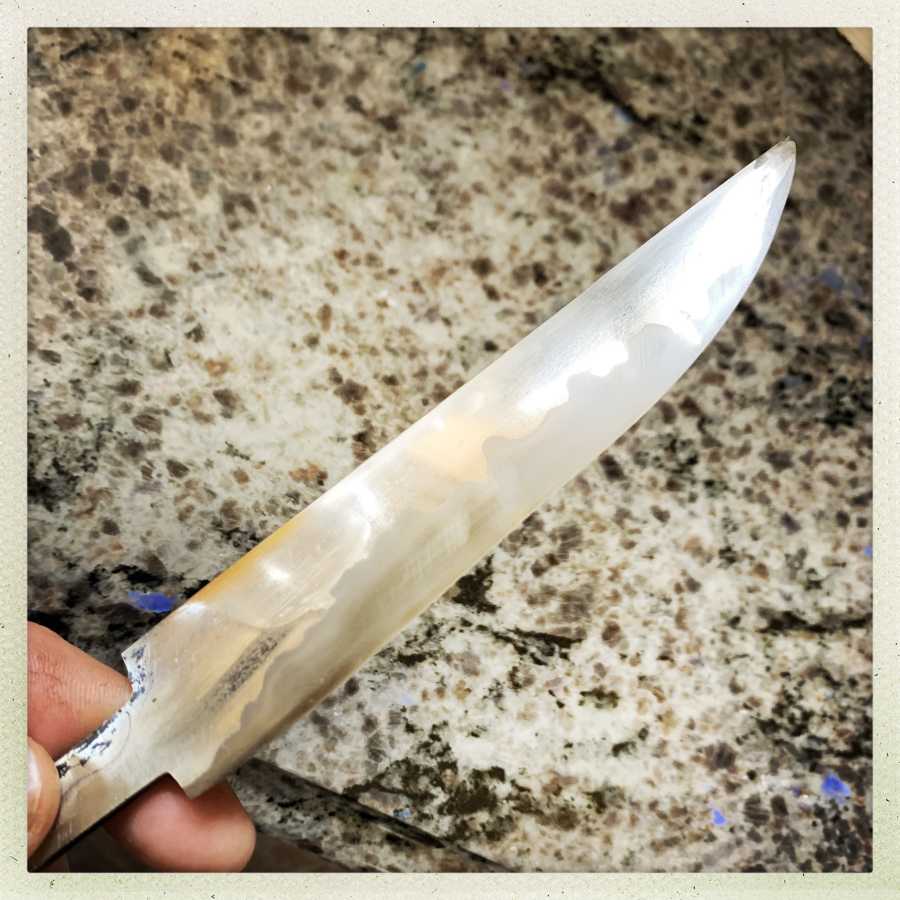
A problem you have with a knife that you don’t have with a gooby is that you have to keep the high carbon steel core in the right place, through all the hammering and crushing, or the blade comes out literally lopsided. The blade above, a quench test, looks nice on this side, but the other side has nothing but stainless showing. OOps. Start again.
I don’t want to sound like I’m complaining. I’m having a great deal of fun, actually. Frustration makes victory sweeter, assuming you manage to achieve victory eventually.
So that’s what I’ve been up to in the shop. There hasn’t been a lot of output because I’ve been busy making mistake after mistake and learning the whole time. For me, that’s as good as life gets. The other day I got a couple small sheets of 20ga (2mm) 304 stainless and 1095, and I dropped them off at the fabricators to be chopped up into 1″ x 3″ strips so I can try to make some high(er) layer-count stacks of damascus for belt buckles or who knows what. It has occurred to me that I could do cut/stack damascus with stainless so long as I leave a piece of 1095 on both sides of the outside: 1095 will stick to itself quite eagerly. I’m just at the point where I can get the welds to stick so I’m reluctant to make a bar of the stuff and risk blowing a re-weld on the cut/stack pass. Eventually, I am sure I will do that, as well.

I still have a good-sized chunk of the material from which I made the tooth gooby. Any suggestions for something else to make? I’m thinking of a couple “thor’s hammer”s but I’m not stuck on that idea. Unfortunately, it’s too tough to mill in its current state so I can’t do anything that involves well-shaped complex holes, unless I re-anneal it and buy some carbide mills.
Ariel Salverria is the smith who has published the best description(s) of making cannister damascus, so he is the “go to” source for most internet blacksmiths. Salverria also appears to use the same technique for making mokume gane – stacked forge-welded copper/nickel or gold/silver. [aes] That seems like a much better process than the way jewelers generally do it, wiring together a stack and nearly melting it, then hammering it till it sticks. The thing about copper is that it would be quite liquid at 2300F – I would not want to put a cannister full of liquid copper and nickel in a hydraulic press and see how far that stuff would squirt!
Your “gooby” is really cool. I like how it turned out. As far as work hardening… I take it the whole bar is not work hardened? If not, I wonder if drilling the hole first would work, so that the drilling would not be so difficult? Any number of shapes would make neat key fobs. This one looks like it would be nice to wear but would also be fun to roll around in the hand, or pocket. The other thing that might be cool to make with this stuff is a small flat piece to serve as the center of a bracelet. I guess you’d be aiming for a small rectangle, with a hole drilled on either side. The marks in the damascus could look like runes or whatever. The sides could be leather, or could even be two other pieces of the same metal.
The idea of a canister full of liquid copper and nickel is enough to give me nightmares for a week.
All the stuff looks really good! I really like tha pattern on the tooth.
The knife is really a shame, you must have been off by a fraction of a mm, if I understand you right. Would it still make a usable knife or will it not be taking the edge well?
The kerosine method reads like it is from Ignition, to be honest. Sounds ‘exciting’.
The trick of Aluminium and its oxide is, that the crystal structure of the oxide matches that of the underlying Aluminium metal pretty closely. So it can stick to the surface of the metal (The different iron oxides for example usually can not stick, as they have non-matching crystal structures to the bare metal and so flake off). At room temperature oxygen can not diffuse through more than a few layers of the oxide and so you get a very thin layer indeed. I don’t have my solid state chemistry book at hand, but I think it was about 30 nanometres (I am not sure about the exact number, but much smaller than any visible wavelength) so you can’t see it. And yes, you can look through crystaline Aluminiumoxide, it is the same material as in corundum, saphire and ruby (Saphire has some Ti4+ in it, Ruby some Cr3+). Also think smartphone “glass”, which usually is some metaloxide-ceramic crystal and not really glass. Same goes for TiO2, the mineral name there is rutile.
As for welding, aluminiumoxide has a much higher meling point that Al itself (2050 °C vs 660 °C), so I would guess that is a problem in an oxydating environment. The Al running away long before the oxide layer starts to even soften up.
avalus@#2:
The knife is really a shame, you must have been off by a fraction of a mm, if I understand you right. Would it still make a usable knife or will it not be taking the edge well?
It’d look forever like I screwed up, because I did.
There’s probably a lesson hidden in that one: always work seriously and don’t ever just shrug something off as an experiment, because it might turn out really well.
I did not realize that new smartphone “glass” is not glass. I just did some reading on that and it’s pretty cool stuff. Like science fiction, really.
Sorry about the knife. The “tooth” looks good, though I thought more of a beak when I saw it.
Giliell@#4:
I thought more of a beak when I saw it
You are correct! It’s, um, a basilisk beak!
Yeah, it is amazing stuff.
Relatedly, we were once invited to a place that made crystal cores for lasers. Their “discard pile” was a sight to be seen.
@Marcus #3
You know, if it yields a workable knife I would prouldy own a badgered experiment, optics be damned :D Just putting it away on a shelf seems like a waste to me. But probably I don’t see the the whole picture there.