I screwed up one of my pieces of rosewood, so I can’t present all three of the chisels as finished work. Unfortunately; but that’s just how things work out, sometimes.
My skills with a lathe are not what they used to be, so turning big handles out of rosewood is probably overreach. On the other hand, a handle is much easier than a bowl or a box, so I treated this as “practice.”
Drilling on a lathe is not something I have experience with. And, while it’s basically straightforward, there are things I did not know at the time when I did not know them. Most of us are used to using a drill by making the drill spin then moving the spinning drill toward the stationary target, which is usually held in a vise. When you’re drilling on a lathe, you spin the target and then move the drill into it – the machined ways (that’s the track everything moves on) of the lathe keep everything straight and you get a much better, more even hole.
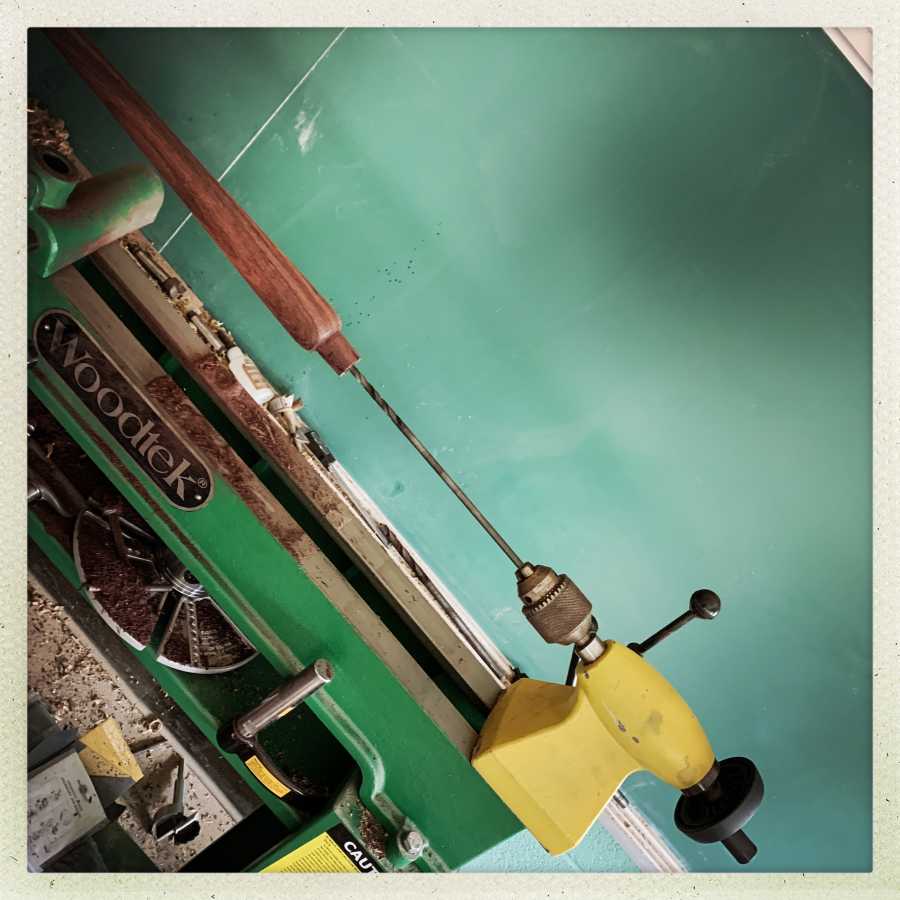
Pictured above, I have a drill chuck on a taper mounted in the tailstock. You can’t see the other end of the handle, but it’s a big square block that’s clamped in the chuck that powers the whole process. To drill, you spin the lathe up, then slowly crank the extension on the tailstock forward using the little handle on the right, which drives the thread in the tailstock. The lever sticking up is the tailstock lock; you can move the whole tailstock forward a few inches at a time, when you run out of extension.
The drill I have in the chuck above is a 1/4″ bit that seemed like a good size/length for drilling a pilot hole. My plan was to come back and then use a larger drill to make the final hole. There are some woods, like ebony (and, it turns out, rosewood) that are pretty hard, and a lot of heat is generated by the drill going into the wood.

That’s too hot. What is happening is that the chips are building up and binding along the sides of the drill and – basically – they’d be “on fire” except there’s no oxygen in there. I started backing the drill out every couple inches, but it was still making a lot of smoke and acting very unhappy. The nice thing about this arrangement is that the drill is perfectly aligned so you don’t have to worry about moving it in or out; it’s going to go exactly back where it was.
In the picture above you can see that the drill is larger; that’s a 1/2″ for the final hole size.
A basic rule of goodness for a lathe is to have the work-piece held at both ends, with something solid that will keep the work-piece from wobbling. Wobble – even a tiny bit – means that the work-piece will try to wrench itself out of the chuck and then the spinning work-piece zooms around the room like a baseball bat at 1,200rpm, looking for something to hit. When the work-piece is held at both ends that can’t happen. In the situation where you’re drilling, the drill is a really good, stable, mounting on the tailstock end.
When ebony (and, as it turns out, rosewood) gets hot, it releases a sort of sticky oily goo. I had the lathe spun down, so I could move the tailstock out and release the chips, then cranked it in. Sometime in that process the sticky stuff cooled enough to make a grip on the sides of the drill. When I hit the power “on” the lathe wrung the neck of my work-piece and snapped the wood right off.
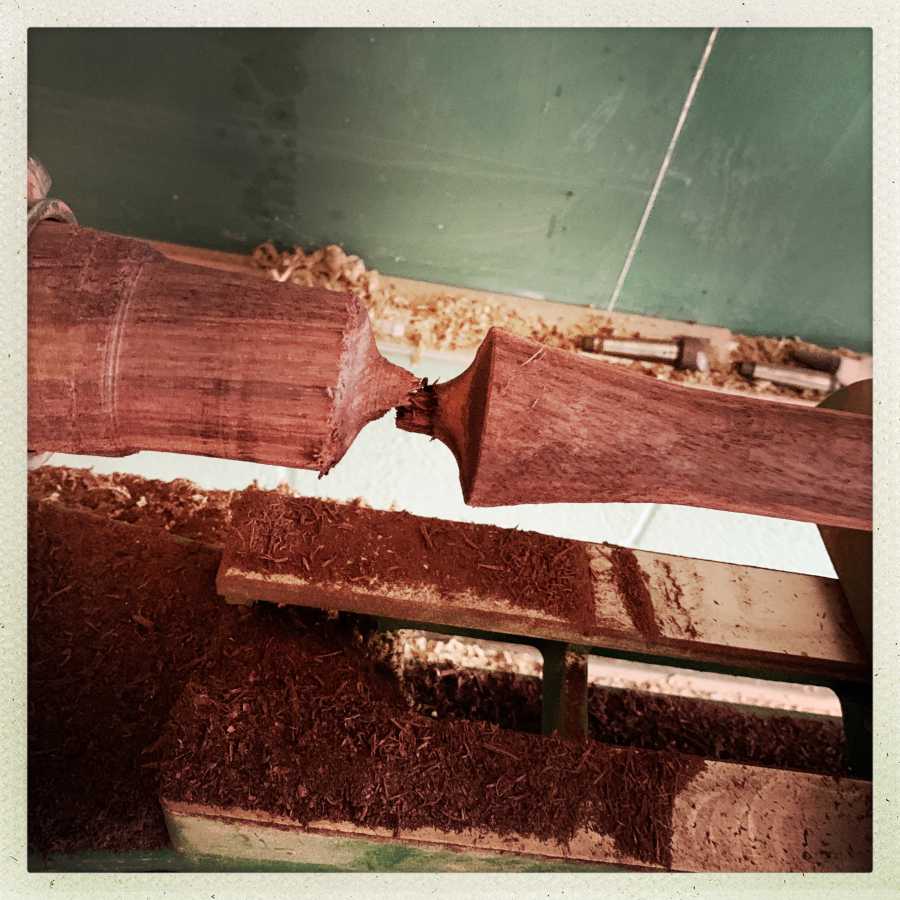
Fortunately, because the drill was still inserted about 8″ into the work-piece, nothing flew around the room. “Aha!” I say to myself, “Self, remember not to get things too skinny at the chuck end.” Then I sat there and thought for a while, trying to figure out how to salvage the situation.
I don’t have a picture of the final arrangement, but what I did was swap the work-piece around: I put the drill in the drive chuck, and then sawed the broken finial end off and sanded it flat, so that I could use a live center to hold that end. There was no way that it’d be solidly locked enough to hit the wood with a chisel, but I could sand it safely. I had actually hoped to keep shaping the handle, but the break ended that plan; time to sand. And, I made a mental note not to stand in front of the work-piece while I was sanding; it might launch itself.
As it happened, I was able to sand things pretty well. It was wobbly so I kept the RPMs low and just took my time. The shape is not quite right, and the length is not quite right (I was going to shorten the finial end) but at least I didn’t blow the whole thing to pieces.
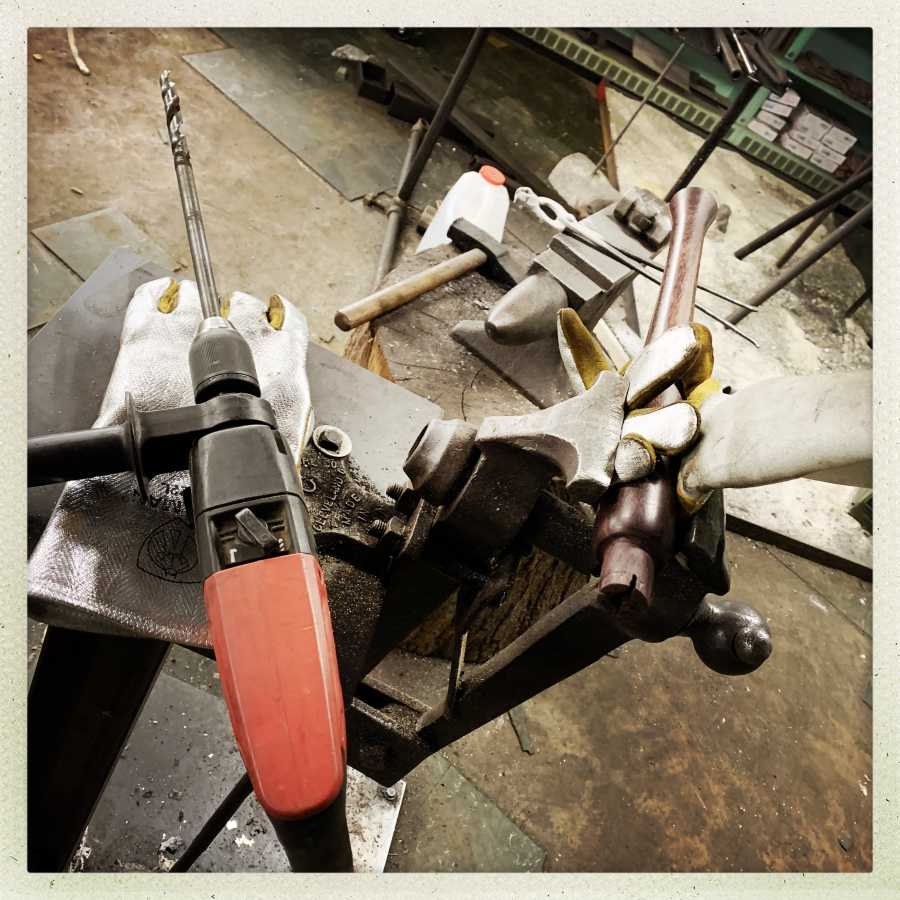
The hole in the handle was only about half as deep as I wanted it to be, so I carefully wrapped it in padding, gently put it in a vise, and then used my Evilly Powerful Milwaukee Hammer Drill to complete the drilling. The hammer drill is the only one I have that will hold a 1/2″ bit. I was very careful, because that thing would easily torque the wood right out of the vise. But care paid off and I eventually had a nice clean hole.
Next step: a ferrule!
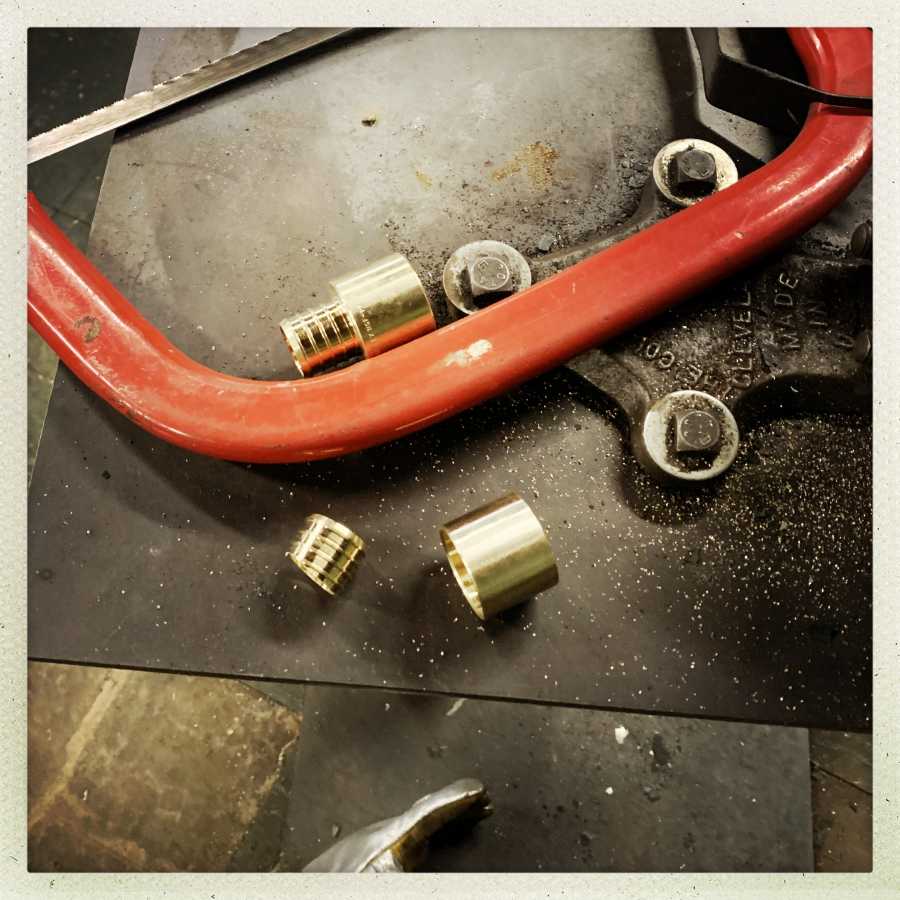
Those are 1″ PEX pipe fittings with 1/2″ nipples. They’re nice brass, they cost a couple dollars, and they’re practically perfect right out of the gate. Saw the nipple off and sand it down, and you’ve got a nice flat end with a 1/2″ hole. The belt sander smooths everything out in a couple of seconds.
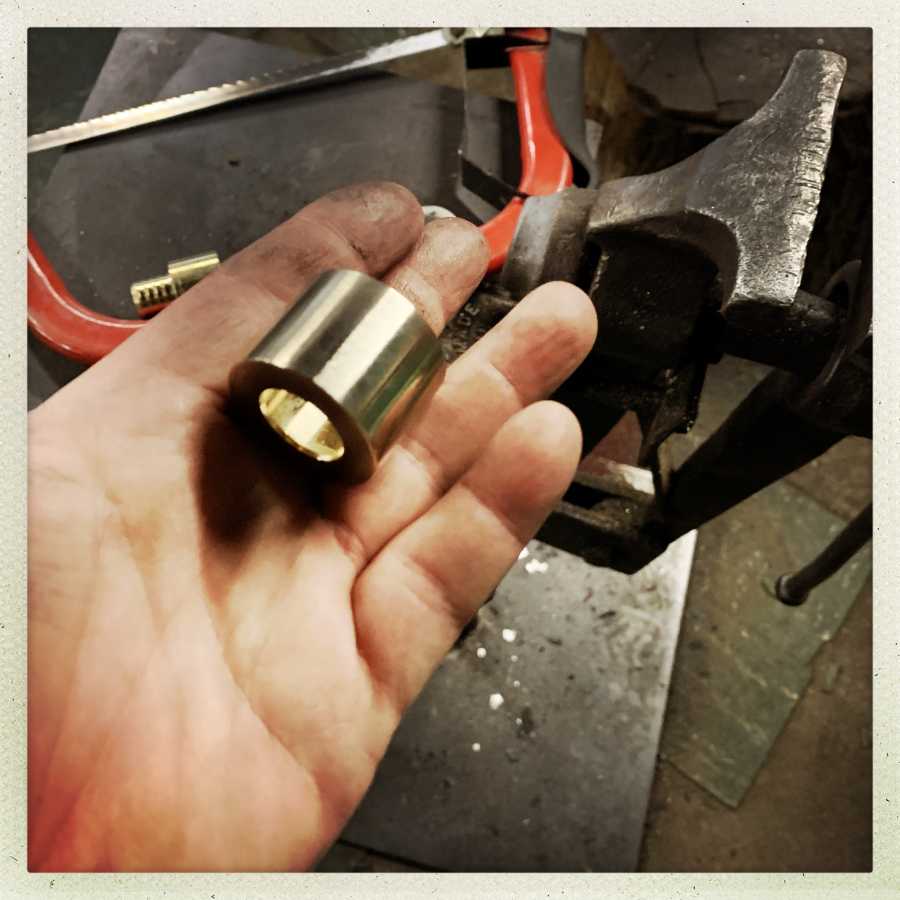
Having a good ferrule for a lathe chisel is really important. It holds the throat of the handle together and transmits the shock evenly. It also serves to prevent the handle from complete sudden disassembly if it decides to disassemble; keeping things from flying around is the name of the game, here.
From there, it’s straightforward: knock the edges off the chisel’s tang so it’s round(ish), mix a batch of epoxy and add some chopped glass fiber, pack it down into the chisel handle, put the ferrule over the blade, smear epoxy around, shove the whole thing together and burp it, and it’s done. The final assembly is super anticlimactic and I’m fine with that.
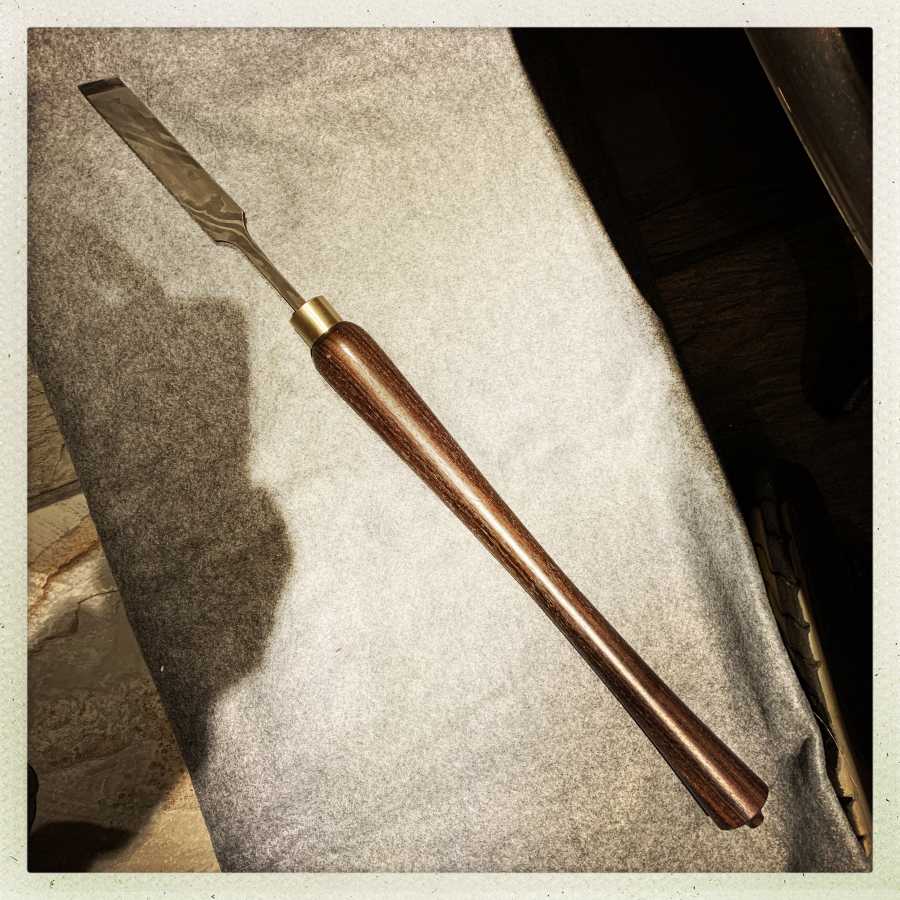
That’s an unofficial snapshot of the skew chisel. The handle I show turning is the roughing gouge. As I mentioned, the handles are slightly different but I’m forgiving myself; we have to look forward not back, amirite?
Here’s an official picture of the chisels, with a ruler for scale.
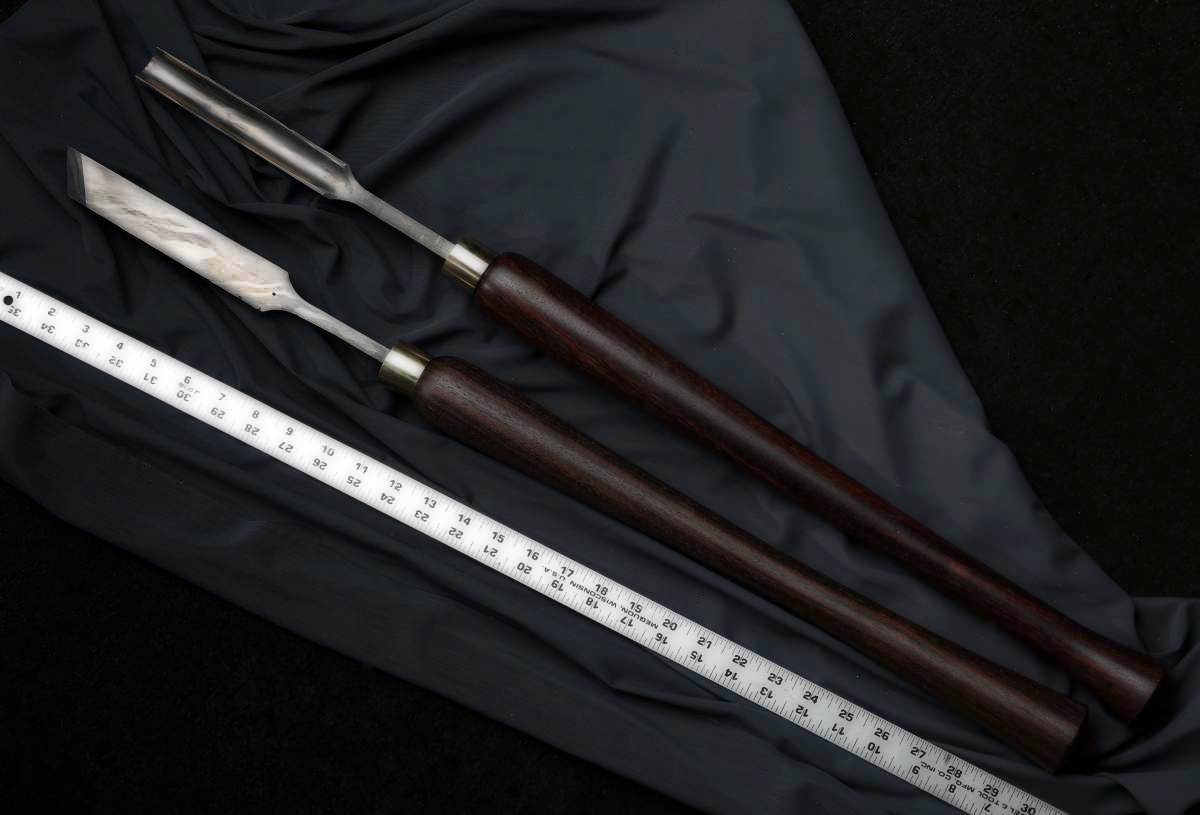
You can see that the handle on the skew chisel is much better proportioned. I was going to somewhat improve that look by narrowing the shoulder of the gouge’s handle by a bit (it’s about 1/4″ larger) but when the finial snapped off that was not an option any more. I’m generally happy with how they turned out. I have a pretty significant work-queue built up, so I don’t have time to make a twist damascus bowl gouge, but you know that’s going to happen eventually.

There’s another story to tell about what happened making the handle for the carbide bar; I’ll tell that when I finish the carbide bar off.
Bowl gouge: Those are a long round bar with a cut down the middle; perfect application for a milling machine! And a metal lathe! Oh, I know someone who’s got those. I may let the bowl gouge wait until the metal lathe is leveled and bolted down, which means it’s last on the list after “finishing the shed” and a letter opener, a sgian dubh, and a cleaver/knife.
Beautiful, beautiful chisels. You should be proud; they “turned” (ha ha) out really well.
I did not realize rosewood would do that. I did spend some time carving some, but I was using a Foredom with a foot control, and probably did not get anywhere close to the speed of your drill. There was no smoke while I was working that wood. It does smell nice when you carve it.
kestrel@#1:
It does smell nice when you carve it.
It does! I think it may be why they call it “rosewood” – the shavings smell slightly floral.
If you ever need any rosewood chunks or scraps, lemme know. For example, when I turned these, I knocked the corners off on the table-saw, which gave me some 2 foot long thin strips of 45-degree rosewood. I threw them away and only thought of sending them to someone a day or two later when I was boxing up some burl and bog oak scraps for Gilliel.
Oh, would you like some random slices of bog oak? My attitude toward bog oak is: “just add silver and it’s jewelry” but I’m not a jeweler. There are folks on youtube doing really neat stuff with resin/wood composite jewelry…
Those look really pretty.
They look jolly fine.
Those look too pretty to pass as working tools
Beautiful chisels.
When doing anything dealing with humans it pays to remember that we are liked for our consistency but loved for our flaws. Hand-made implies each is a bit different. The Japanese are very much into the subtle flaw that highlights the beauty.
Pretty easy to se why the bit bound up while drilling; the shaft and working end are the same diameter. Any adhesive material is operating on a large surface area. A masonry bit (reground for wood) or something like a Forstner bit would avoid the issue. You would have to back out frequently. Even a spade bit might work as long as the cutting edge is wider than the shaft, but I think it might bind if it vibrates and cants in the bore. Perhaps if taken slowly.
A neighbor used to make lamps and he would drill the hole for the cord with a funny looking drill bit chucked in his lathe and used at a slow speed. Only later did I learn that it was called a gimlet drill. His was about 24″ long. He claimed it didn’t follow the grain or bind.
I found shorter versions:
https://www.fine-tools.com/windenbohrer.html
They are, obviously, meant for use in a brace but you get the idea. All the cutting is done on the sides by pulling the fibers inward.
There are also purpose-built bits but, despite being named for the job, they don’t give me a warm feeling. Someone seems confident, even as I am not:
https://www.thebestthings.com/newtools/clifton_lampauger.htm
As always, the job is easier with the right tool. Keep up the good work.