This is a set of photos taken over the course of about 1 month of real-time.
One of the molds I sent Gilliel was a sort of multi-faceted fake rock. She stuffed the mold with USB fairy lights (one of my favorite things!) and gold leaf (another!) and filled it with red resin – then sent me the result. I decided to do my own version, which was a bit more over the top. It just happened that I have a couple of large quartz spear chunks. The box is a quick and dirty mold box made from scraps I cut on the table-saw. Old school mold-makers like Adam Savage use hot glue guns to assemble this sort of box, and I guess they are good enough with the hot glue guns to make a liquid-tight seal. I’m not that good so I reinforce the seams with strapping tape. There are two reasons: 1) having silicone leak all over your floor is expensive and sucks, 2) the silicone and the object are heavy. A fair amount of pressure is going to be on the corner-joints and the deeper the mold gets the more weight will bear down on them. When I am doing a mold box, I don’t worry much if there’s only a cup or so of silicone, but this is going to take almost a gallon, which is $150 worth of silicone and a tremendous potential mess.
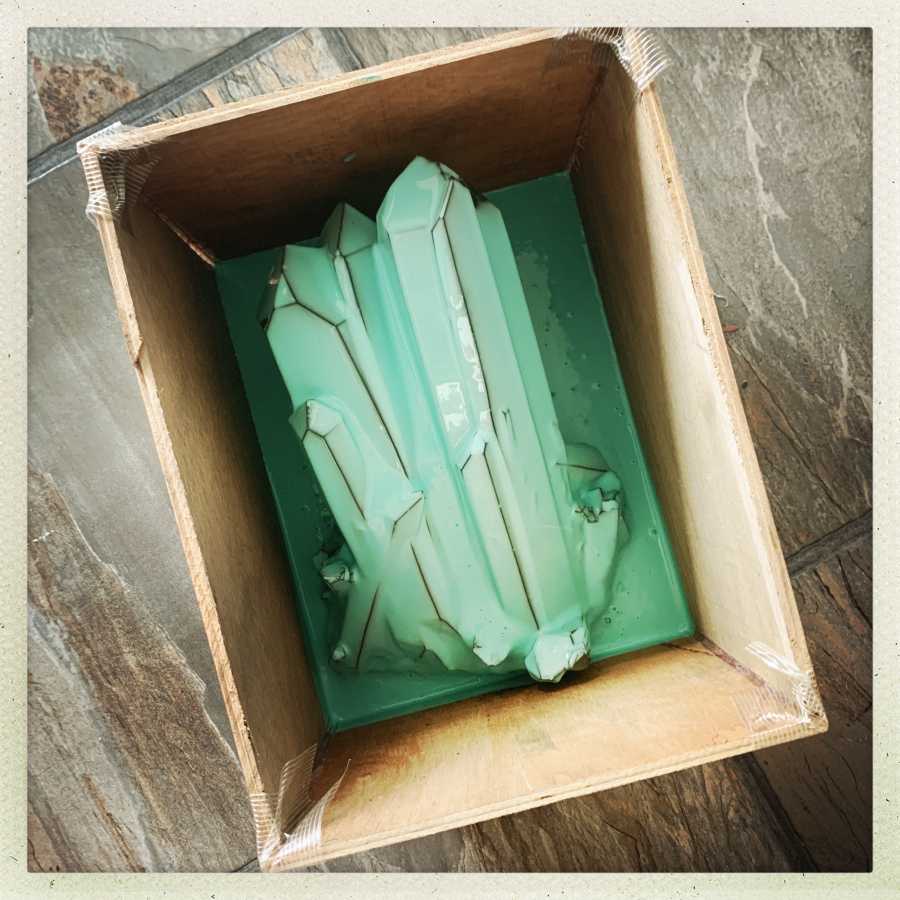
One of the tricks I’ve learned is to do a thin pour and pop the bubbles with a bamboo chopstick, to keep the mold from having voids up against the object. Here, I did an initial pour of about 2 cups of silicone and let it sit for about 15 minutes. Another way of doing this is to use a brush and brush the silicone onto the surface of the object, then put it in the box.
It’s nice when you’re dealing with rock, because it won’t float up to the surface of the silicone. You need to be careful with any object lighter than the equivalent amount of silicone (Archimedes, FTW!) because if it floats up, you have a ruined mold – getting the object stuck down onto some kind of base after it’s covered with silicone is an awful mess. Don’t ask me how I know that. If you are using a wood box and a light object, put a screw up into the object through the base.
Here is another trick: take digital photos of the object and its position in the box. Those will be very very useful for cutting the object out of the mold when it’s cured. You’re going to want to make cuts to release the object that will take into account the shape of the object, so it’ll release better.If your object is delicate you don’t want to be probing around it with a sharp knife.
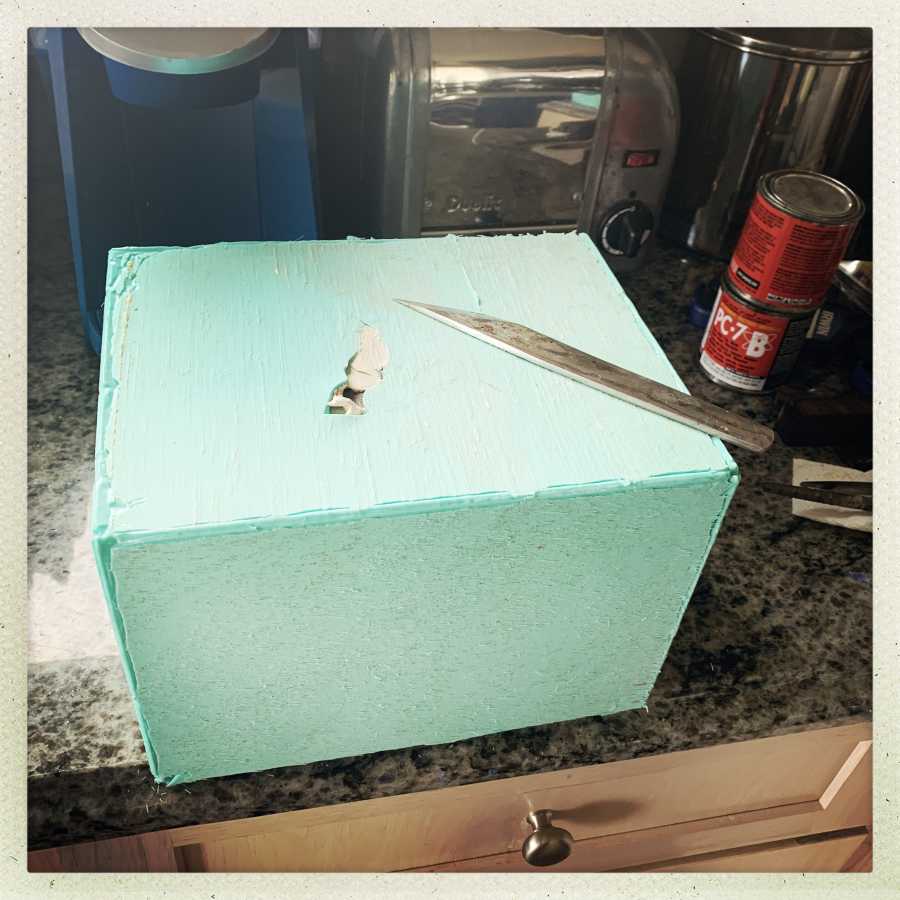
Now I have a big block of silicone with a bunch of quartz in it. The kiridashi knife shown above (not one I made, it’s a tamahagane kiridashi I bought in Tokyo in the 90s) is very good for separating molds: it’s scalpel-sharp and very pointy. You slice gently through the silicone and devise parting-lines for the mold based on your memory and photos of the object. I don’t have any pictures of that process because it’s hard to hold a phone, take a picture, and pull heavy pieces of silicone rubber apart at the same time.
This is the easy way of doing a mold. A harder way is to design the mold carefully, with parting-lines and multiple pours, with backing supports, so that you can save silicone at the expense of a great deal of time.
Getting the quartz out took me about a half an hour. It’s kind of fun – it’s like exploring for a fossil or something. I keep a few wine bottle corks around to use to wedge the cuts open as I go, but it’s still hard going. Pulling the quartz out of the rubber, at the end, took all of my strength to break the vacuum between the materials.
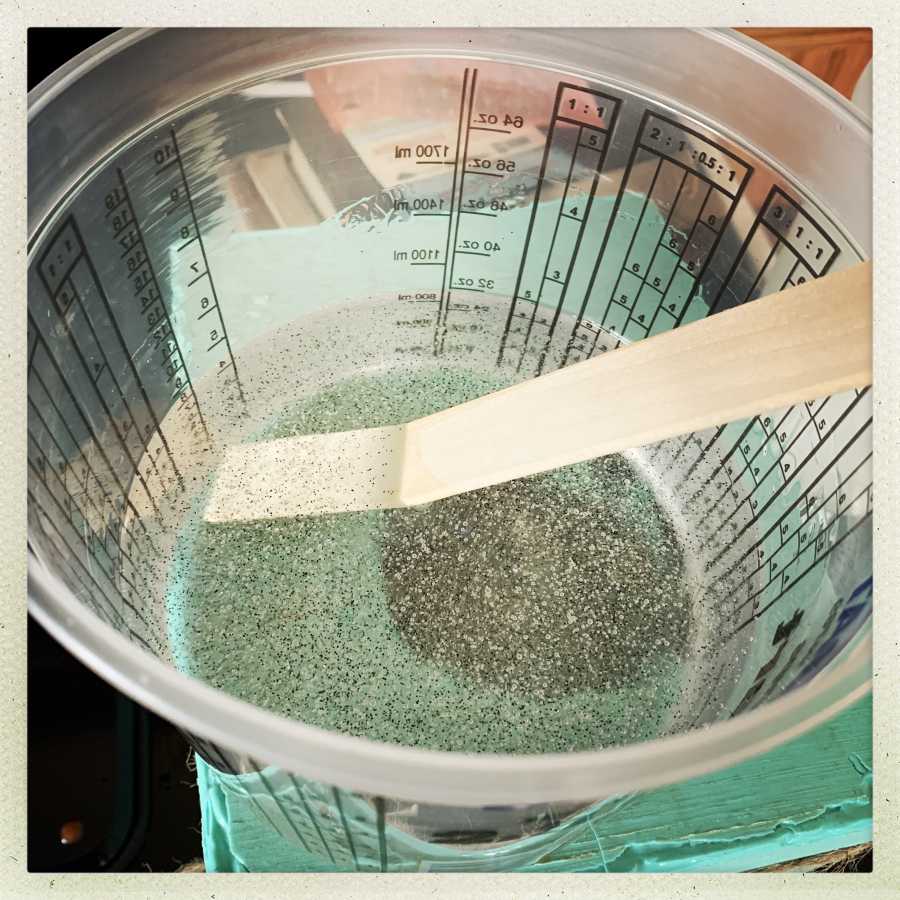
This is Alumilite “water clear” resin with a bit of black hologram flake added. The total pour took nearly a quart of resin, so I wound up blowing through my entire supply. When I got to the last bit of the mold to fill, I added a bit of black pigment to the resin and poured it on top. I hadn’t let any of the existing resin gel, yet, so it shot down into the mold and vanished. I had no idea what I was going to wind up with.
Water clear resin is very liquid stuff – it has the same surface feel as alcohol and it flows beautifully. To keep it from flowing out of your mold, you tie the mold block back together with a bunch of twine and tension it with chopsticks twisted into it. Believe me, you do not want an “unauthorized resin excursion” happening on your kitchen floor.
For the USB lights, I pushed them into the cavities in the mold using a wooden spoon, and threaded the power wire out through one of the cuts in the silicone. That made a tiny gap that would have resulted in resin squirting all over the place, so I sealed that with a dab of vaseline (petroleum jelly) before I pushed the cuts together. It’s important to think of this stuff before you pour the resin in because you absolutely can’t reach into the mold or the cuts once the resin is inside.
In the image above you can see a lot of bubbles. That’s fairly normal and that’s why the water clear resins are very light and thin – give them a lot of time for the bubbles to rise out. A trick that works well with some objects is to think about where the bubbles will rise and do a series of pours, each pour building into the next cavity as the resin rises in the mold. Another trick is to use a vacuum system to degas the resin – which still leaves bubbles, so I usually don’t bother with it. You need to understand each mold in order to design your “bubble management” strategy for that object.

It turned out pretty cool! The bubbles are a real problem, though. One part of the problem is that I did the pour on a humid night (it cures overnight) and urethanes react with water by making bubbles. I could have/should have waited for a day that was more dry, or something.
The hologram flakes I put in were all slightly heavier than the resin, so they fell down on the surfaces that were the bottom of the mold. If I had been being more careful I would have put the flakes in the mold before pouring the resin, shaken them around, and then they’d have stuck more evenly to the surfaces. But I wanted them down inside the resin. It’s an experiment!
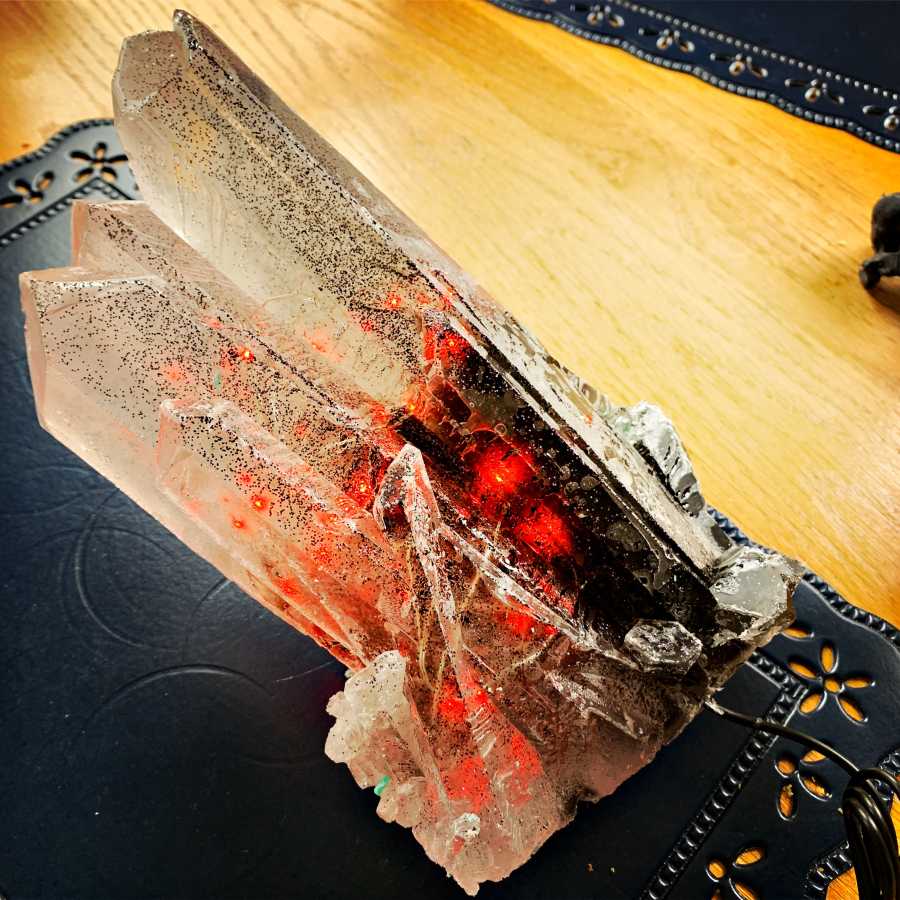
That’s what it looks like, plugged into a USB power supply.
I am thinking of taking the base onto the belt sander to flatten it down, then mounting it on a wooden escutcheon with a battery pack hidden in it. I could hang it on a wall or something. It’s a …thing.

Gilliel’s resin artworks are currently available as a fund-raiser for FTB, to help defray some of the expenses from Richard Carrier’s SLAPP suit. You can see them [affinity] Gilliell’s artistic sensibilities are more refined than mine, when it comes to resin.
It sure is a thing. A pretty thing that could work as a light of some kind.
I love it. I currently imagine it outside, glowing in the dark.
Playdough. I keep a couple of sticks to stick shit to surface of create small feet for pouring the the resin when creating moulds.
Beautiful! Love that black and red.
I love this idea – what a super cool lamp to have sitting on the table next to you as you read. If you made a whole bunch you could create a designated “Geode Room” in your house.
I think the little flakes will succumb to gravity no matter how you disperse them in there. If you could somehow get them in and dispersed when the resin is half cured that might work, but I don’t see how that could be accomplished.
That is a really intriguing shape to cut out of a mold – and it only took you half an hour? Well done… if I had done it, I would have added at least another half hour for swearing. This is what I do for pulling back the edges of a mold: I get metal clamps, the type that have a powerful spring in one end, at the hardware store. Then I take off the plastic guard on the tip. It grips the material better that way. Two of them, directly opposite each other on the same cut, will handily hold the mold open along that line. The benefit there is I can slide my wrist into the gap between the handles and open it further, while still holding the scalpel (that’s what I use) and continuing to make cuts. I still end up wishing I had a couple more arms and hands but it works well for me.
that’s pretty neat.
I have a vague memory of using epoxy resin in my youth, and being taught to use a torch to get rid of bubbles. Can’t really remember any specifics, and it wouldn’t really work with molds and such.
“unauthorized resin excursion” -lol
Gilliel@#2:
Playdough. I keep a couple of sticks to stick shit to surface of create small feet for pouring the the resin when creating moulds.
Do you mean actual playdough, or some kind of oil-based clay? Playdoh contains water and is contra-indicated for resin. I do use a lot of oil-based clay for making pouring spouts and whatnot. I actually used a bunch on the bottom of the quartz spears to keep them from tipping forward because of their weight.
lochaber@#5:
“unauthorized resin excursion” -lol
That’s the name of a Torturer-class VFP, it turns out.
I think the trick with the torch is to break bubbles on the surface. You can also mist the surface with silicone oil to make it nice and smooth. The real problem is getting the bubbles to get to the surface in the first place. If/when I do this again I’ll do it in layered pours and it’ll come out much better.
kestrel@#4:
Well done… if I had done it, I would have added at least another half hour for swearing.
I keep meaning to make an MP3 file of swearing so I can save time by just having that play on my phone while I work.
The clamps are a good idea! Usually I am doing much smaller things than this and since it was rock I could get a bit rough with it. To be honest, I was mostly concerned with not dropping the damn thing on the bridge of my foot! You have probably experienced “silicone snapback” – when your rubbery silicone suddenly remembers it’s rubber and makes something go flying across the room?
(New wine corks are a really tough but non-marring closed cell foam. They can be cut in half at an angle to make a wedge and a block; they’re great for wedging random stuff open and you get to drink a bottle of wine!)
I like it, clearly you have discovered a crystal life form previously unknown to science
My casting experience is with porcelain slip in plaster molds. No way around the hard way there– you figure out your parting lines on your model, and very carefully work to minimize the number of mold pieces you need.
Casting with a flexible material seems like cheating to me. ;)
feloniousmonk@#10:
Casting with a flexible material seems like cheating to me. ;)
It really is! That’s why we do it.
Why couldn’t you cast porcelain slip in silicone? With a supporting mold around it, it’d take the weight no problem. And the detail is amazing. I have done silicone molds which capture fingerprints in the casting.
An important part in slip-casting is that the plaster sucks water from the clay– which both lets the casting process be faster, and allows your finished cast pieces to be hollow, as a sort of shell dries a bit on the inside of the mold, and you can pour the rest of the slip back.
felonious monk@#12:
An important part in slip-casting is that the plaster sucks water from the clay
Aha! That makes sense. How do you keep it from sticking to the plaster? (“carefully” I bet)
This also implies there must be a limit to how many pieces you can process through a given mold in a given time.
Sorry for not being clear, I use playdough when making silicone moulds. Like here:https://freethoughtblogs.com/affinity/files/2019/03/20190305_082804.jpg
When the clay is leather-hard (or completely dry, but you want to still manipulate your cast pieces) it stops sticking to the plaster. But yeah, you can open your mold too early and tear the piece apart. And you’re right, if you cast too many pieces too quickly, the plaster gets too wet to work properly, and you put your mold out in the sun or in front of a fan for a while.
Silversmith story
Sweet!