I’ve been having a new problem with my handles, which I finally figured out.
This is pretty straightforward: my tools and techniques have let me get more precise when I inlet a blade bolster, and that means I can get so much epoxy behind the bolster that it pushes the blade back out. The way I do my bolsters, the blade is held with epoxy into the handle, and the bolster is also held to the front of the handle. The bolster’s load-bearing but most of the pressure from cutting is along the glue-up zone inside the handle, where the tang is braced against the sides of the wood.
All that is a roundabout way of saying that the blade is just slid down into the mass of epoxy and is held there as it cures. If the blade slides back out, then you get a horrendous gap between the bolster and the blade:
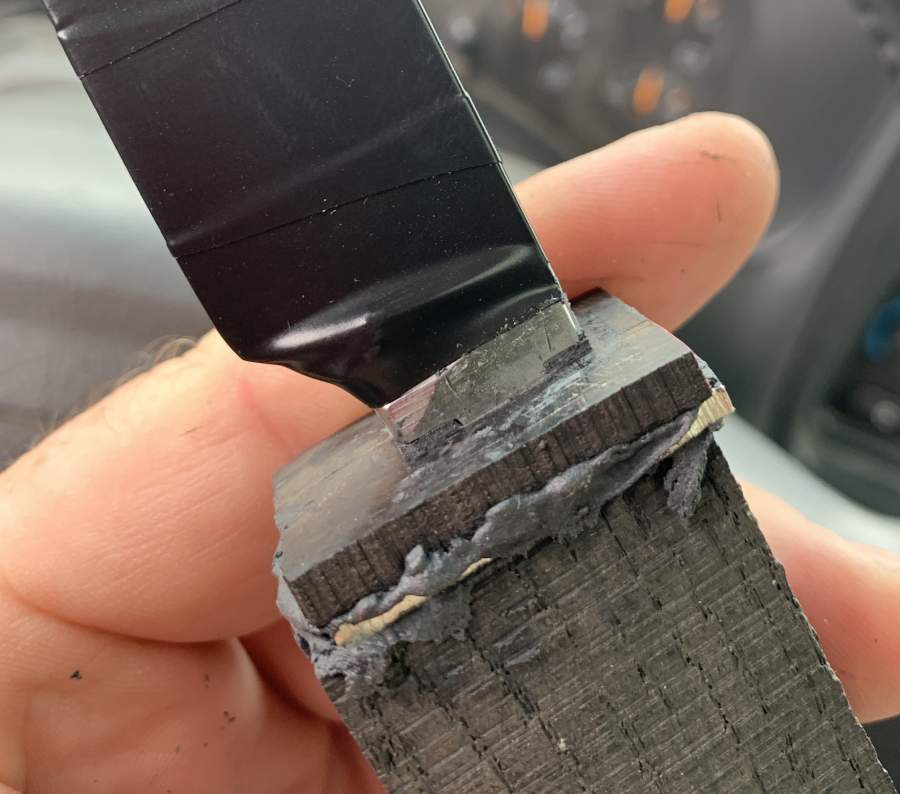
In case you’re wondering, that’s a chunk of ebony, some silver, and some bog oak for the main piece of the handle. I thought it’d look spiffy.
See the hip-pieces where the epoxy went under the blade? When I assembled the whole thing for glue-up, that was pressed tight against the bolster.
How will I fix this in the future? Easy – I usually hog out a bit of the bolster behind where the tang goes through, so I’ll glue that up, let it cure, then do the full glue-up into the handle once I’m satisfied that the bolster is right. I want to avoid having to clamp the blade in any way, though I suppose it’d be easy enough to build a jig that held the blade between two blocks of polypropylene, and had a wedge/block for locking the handle into place. I have lots of polypropylene stock lying around, I suppose I should give that some thought.
In the meantime, I had to take off and nuke it from orbit. That’s the safest bet:
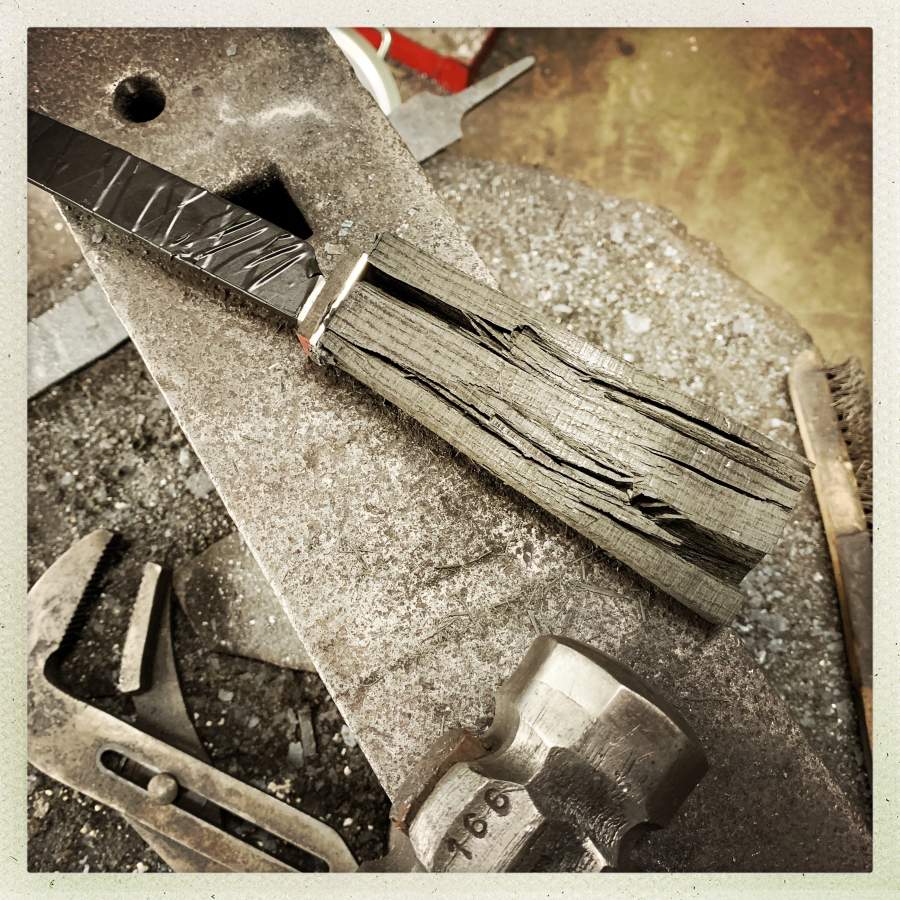
If you hammer it a bit, it turns into toothpicks and then you can just grind the glue off the tang and you’re ready to start all over again. The silver’s OK, so now it’s just a matter of making another bolster and handle. 3 hours of fitting and filing down the drain, oh well!
Ouch. That nice piece of bog-oak smashed into toothpicks causes me a heartache.
I did not do this type of construction yet, almost all my blades so far are either full-tang peened/screwed, full-width-thang with scales or hidden tang with pins. The only exceptinon is my father’s knife, and that is held in by friction – I had to hammer the blade into the handle.
I intend to try this for chef knives, because this type of tang would allow me to utilise my steel stock better. So thanks for posting your experience – I will rustle up a jig before I do this. Although I also have an idea for a bit different and perhaps easier construction of hidden tang knives, but as it is now I probably won’t get to try it out before next year.
What are the diagonal and other lines I see on the blade in the picture with the smashed handle? It looks as if they are just decorations on the blade. Is there an additional purpose? If not, is there a concept behind that pattern of decorations? Are there other knives with similar marks? Please tell more. Thanks.
Bruce: that’s electrical tape wrapping the blade to protect it and my hand. I haven’t sharpened it yet but it’s quite dangerous already. I don’t want to have it clamped in a vise or something and accidentally brush against it.
Also getting epoxy off your mirror polish is a real motherfucker.
apologies if this is a dumb question, but…
What’s causing the blade to get pushed out of the handle assembly? Is the epoxy slightly expanding as it cures?
I think most of the knives I have are slab-handled, which I kind of like, as I can tell at a glance how much tang there is. It’s not quite as pretty, and not really a style conducive to bolsters, but most of my knives are very well-used (sometimes abused…) workers, and I’m not really concerned about their appearance.
Except, I do want to get a pretty folder. Partially so it (hopefully) doesn’t look as “scary” to other people when I use it, and also because I’ve been kinda tired of the “tactical” look for some time now.
@Marcus, I am wiping the epoxy with alcohol off the steel while it is still fresh. It works very well.
Allegedly it also helps to smear the part where the glue is not supposed to adhere to with vaseline beforehand, but I did not try that one out, because there is a risk that during the whole glue-up kerfuffle some gets where it is not supposed to go.
Very interesting, but if I may, what about having a hole through the handle, and then capping the back end later? Would that be better than attempting to estimate the proper size of any well into which epoxy might expand?
I’m not assuming I know your art better than you, or that even if my suggestions were plausible that they would be artistically appropriate for what you wanted to create, I’m just interested in your process.
I think the rebound of the metal back out of the handle is likely due to trapped air, the epoxy then acts as a piston ring to the piston (=tang). CripDyke’s suggestion could cure this, or you could de-gas the whole lot in a small vacuum chamber. Perhaps use rubber bands to maintain the pressure of tang into handle.
What a terrible end for the bog oak. That, plus 3 hours of lost time – well, that just sucks.
I know nothing about these things, but I’m wondering if vacuum pressure would hold things in place while they seal.
astringer @ 7
thanks, that makes sense and seems pretty plausible.
It would likely be pretty messy, and rather wasteful, but I imagine that if this is the case, it could be lessened by carefully filling the handle cavity with epoxy, and then introducing the tang, so that no air is introduced?
Seeing that piece of bog oak turned into shards gave me a genuine sad, but at least it wasn’t in vain
More thoughts to #9: “carefully filling the handle cavity”. Some experience of this: yep, messy, and you need to fill from the blind end: pouring viscous setting epoxy traps air, but a cheap syringe and thin tubing works.
Not tried this, but a fuller along the tang might help the excess epoxy emerge? Might even solve the trapped-air problem on its own.
This is (partly) why I generally don’t work with anything rare or valuable. I would rather screw up something replaceable.
Seeing that piece of bog oak turned into shards gave me a genuine sad
How do you think I felt!!? I was practically in tears. When I’m making something I’m constantly updating my mental picture of what it’s going to look like/what I need to do next, and a flaw like that is a complete shock to the whole system.
lochaber@#9:
it could be lessened by carefully filling the handle cavity with epoxy, and then introducing the tang, so that no air is introduced?
Often I do an end-cap, which allows me to drill down to the cavity from the other end and do a second round of epoxying by putting a silver pin through the air-relief hole.
The problem is that I’ve developed a better way of broaching the hole through the bolster so it’s tighter and I can’t assume that glue will squeeze out through it. I need to be a bit more cognizant of the glue, that’s all. I use slow-setting epoxy (PC7) and if it feels like it’s in there too tight I need to pull it out, wipe some of the glue off the tang, and put it back.
My failure was lack of attention to detail. This is only the second time it’s ever happened in 20-odd years, but it still stings.
The other one is when I accidentally grind through the side of the handle into the glue-filled cavity while shaping the handle. As the handle gets thinner that’s more of a risk. It has happened to me maybe 3 times in 20-odd years. So I have a pretty good success-rate but the failure is still galling.
Crip Dyke@#6:
Very interesting, but if I may, what about having a hole through the handle, and then capping the back end later?
Bingo! That’s why some of my knives have caps on them!
I don’t do it as often as I should because there’s another tradeoff: if you use silver or ebony or something hard, when you shape the handle, the cap will heat up. That can destroy the adhesion of the epoxy and the the cap comes off and you’re in hell. So putting an end cap on is nice but it brings its own complications. Honestly, I mostly do a cap if I think that I cut the stock for the handle a bit short. It’s an easy way of picking up a half an inch.
Also: if you make a knife with caps and give it to someone stupid, they think that it’s there so they can use it to hammer walnuts. No, really.
Do they still have whole fingers?
Jazzlet@#16:
Do they still have whole fingers?
Yeah, and I managed to repair it. But they’re going to wonder why they don’t get one of my newer generation pieces. I mean, everyone else on the planet will get one first.