There are a variety of patterns in damascus steel-making, each of which represents a different way of laying up the bars, and manipulating them afterward. Each step brings with it a unique opportunity to fail: if you work too slowly, things may oxidize and not weld cleanly anymore. If you work too fast, you may wind up with inclusions or a mis-aligned weld. Two bars the have been forge-welded together are now one bar; you can’t re-position things.
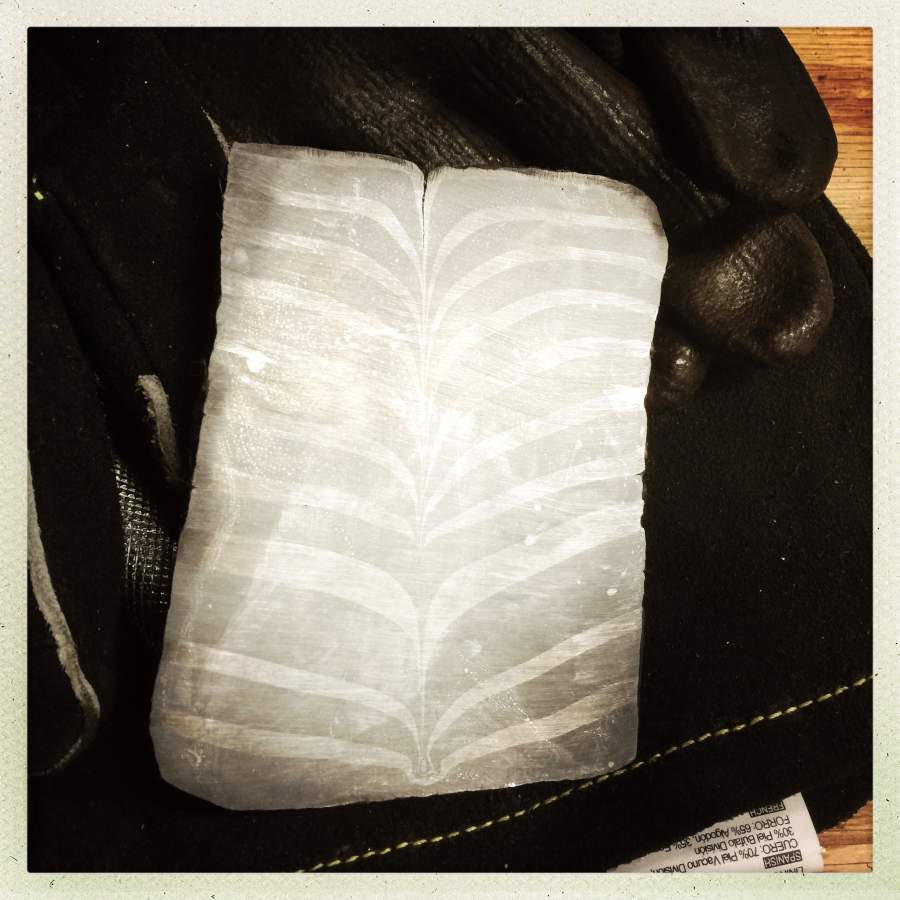
My favorite, right now, is called “feather”:
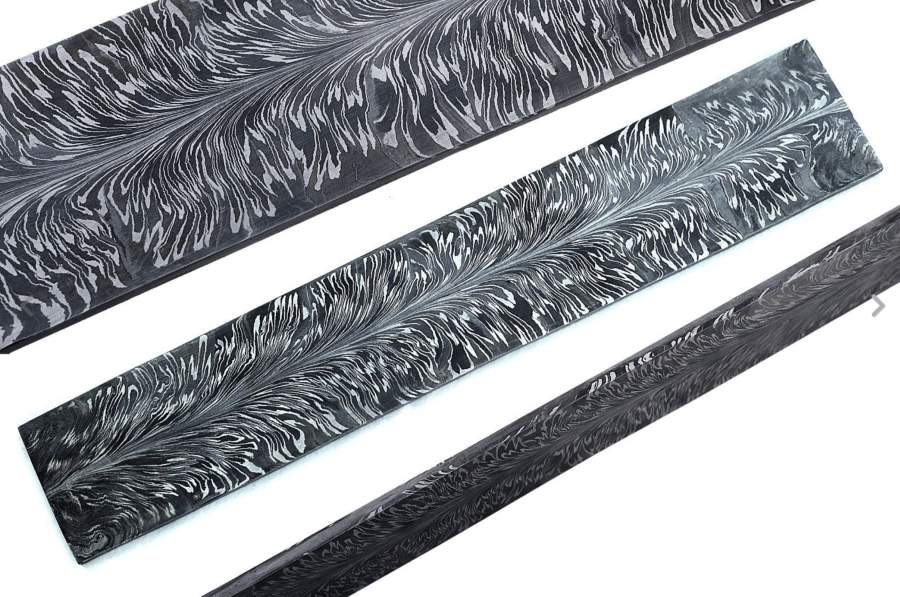
That’s a superb example of someone else’s featherwork. Mine’s not anything like that; which means I have lots of headspace for improvement!
It’s made by making a stack of contrasting bars (usually 1095 and 15n20) then welding them, twisting them, and chopping them down the middle with some kind of cutter, then welding them back together mostly along the original line. Sounds easy, but it’s not! Normally, when you hot-cut the metal you’d be able to frantically brush the scale off and pour flux on, but this is a great big crack, you can’t get there from here.
I’ve made 3 attempts, so far, and I’m getting closer with each one. My first attempt came out looking like this: [Spoiler below the picture. You may wish to amuse yourself by looking at the picture and figuring out what I did wrong]
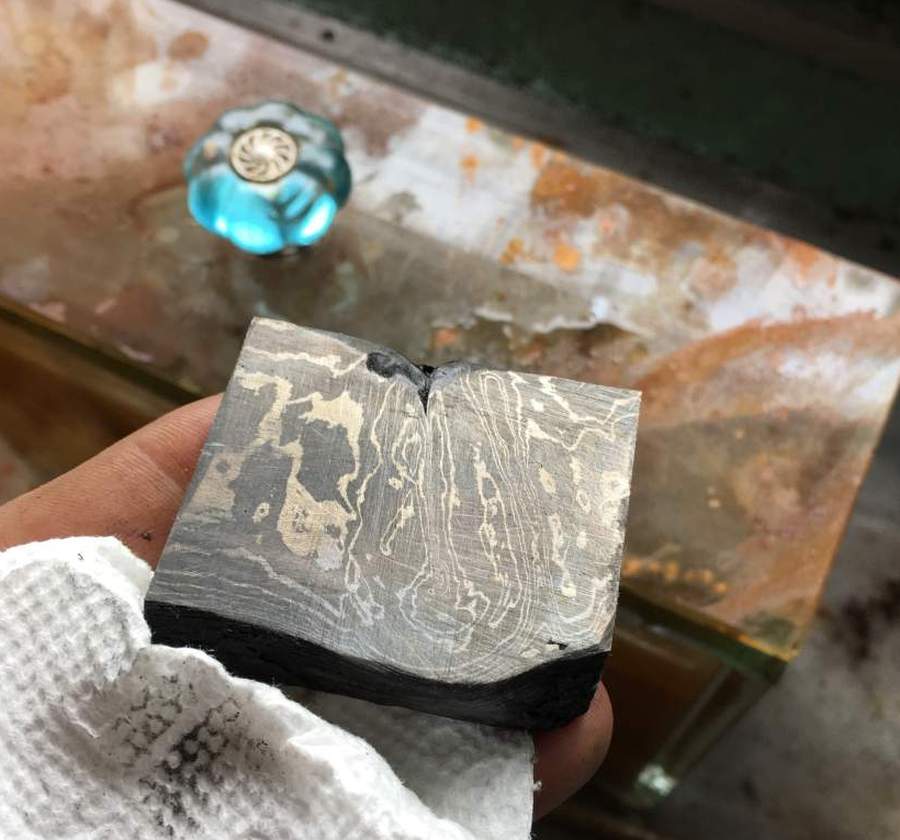
There are a couple of problems with that block. First off, it’s too little! By the time I draw that out into a knife-shaped thing, the pattern will be completely crushed. Second, some doofus (I am not going to name names!) cut it on the wrong axis. When the damn thing is glowing orange, you can’t tell where the pattern is, unless you had the presence of mind to carve a mark into it before you get started. This is how I learn things.
That little chunk wound up having a different purpose, which I’ll be writing about soonish.
Part of the problem is that, to get those lovely layers, you need to make a largeish block and ruthlessly smash it down over and over until they get thinner. Each “smash it down” ends with being formed into a square bar, chop-sawed to pieces, welded together on the cut-lines, and re forge-welded. Chop-sawing it or bandsawing it makes a mess of the surfaces, so you need to clean them up with a grinder so they will weld properly. If you look at the example bar I have at the top, you can see where the maker welded two chunks into the “stack.”
Since you want the feathering to run the length of the blade, that means you want the cut side to be the long side.
Hahahahahaaha! Joke’s on you, amateur!
There are many hobbies where the process’ difficulty scales with the size of the work-piece’s surface area. I used to do life-casting and I discovered that a 4″x4″ cast is easy, but a 24″x24″ cast takes 2-3 hours. A full-body cast requires 3 assistants, or it’d take 8 hours. Forging has some of those properties: the difficulty of working with a piece shoots up quickly as the piece gets bigger, because you eventually need a 50 ton press and a gigantic oxygen-free forge, and then you realize you need a forklift to move your billet.
After some thinking, I decided to do a simple stack, and not cut/weld like you are supposed to. There’s a value in doing things the way you are supposed to do them. This is how I learn things.
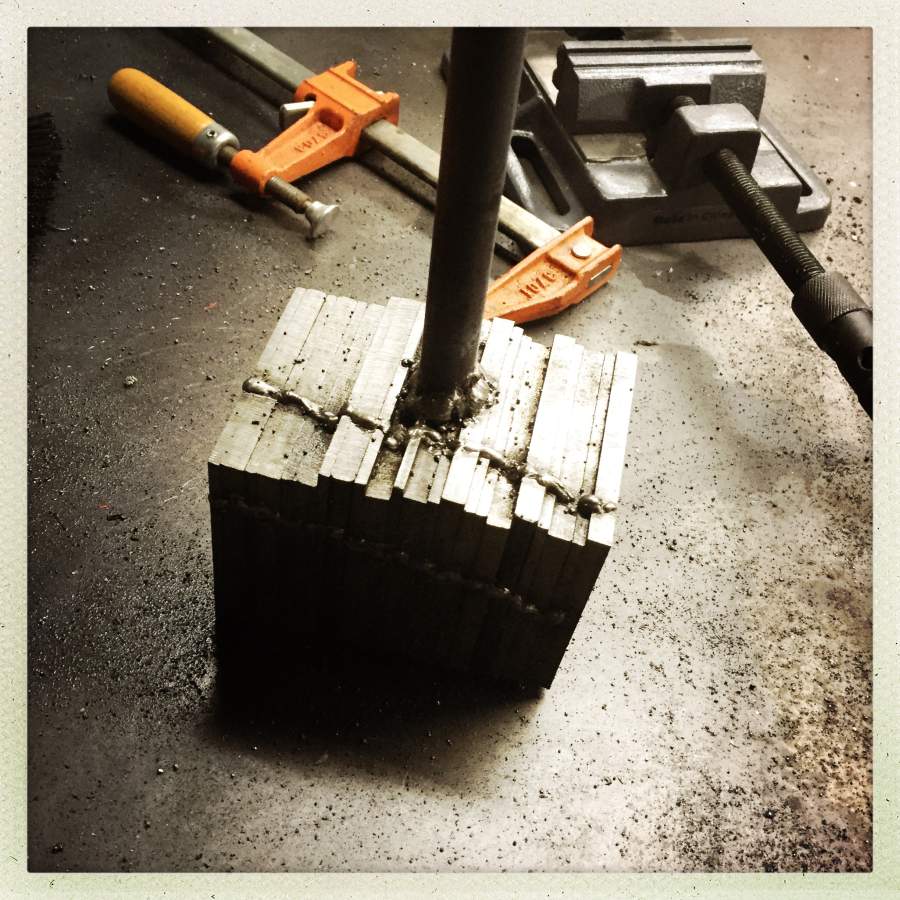
Now that’s a mighty block! It’s about 6″ on the “tall” side (which will get cut) and I made it non-square so I could tell the right axis to cut on. The chunks are surface-ground and compressed, WD40’d to help keep them from corroding, and welded. Some smiths take a block like that and store it in a bucket of kerosene to keep it from oxidizing – make sure the welds have cooled down before you drop a thermal mass like that in a bucket of kerosene, OK? [No, I did not learn that the hard way] [If you squirt it with WD40 and it bursts into WD-steam, it is too hot to handle] Here is another thing I learned: it’s easier to surface grind the bars before they are cut up. That went very prettily, and the bandsaw made background noises for an hour, and I had a 16″ tall stack of 3″x3″ chunks of steel. Next time I want a big chunk like this, I’ll just pull them out of the box, unwrap the butchers’ paper, and make a stack. This is how I learn things.
I also learned to label the things. One block of welded oxidized stuff covered in scale looks pretty much like another.
Sometimes, learning is also a process of violently remembering things we already know.
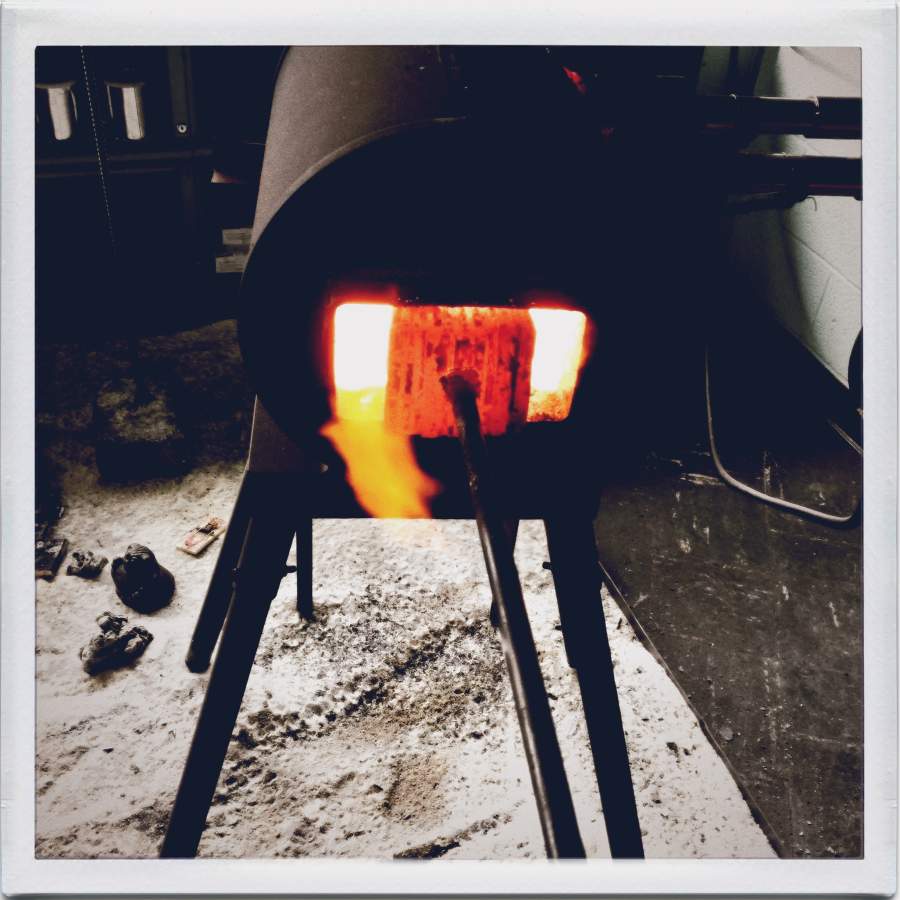
For example: steel expands when it is heated.
If you forget that, you may wind up with a glowing hot 15-lb block of steel, stuck in the mouth of your forge. If it’s just big enough to fit in, it’s not big enough to pull out. Here’s what I did, I turned the gas down a bit and let the part of the brick that was stuck cool down and wiggled the whole thing a bit until the weld on the handle broke off.
When I said earlier that the process gets harder as the work-piece scales up, this is part of what I was talking about. Instead of having that nice handle, I was now down to using tongs – and tongs, on a billet that large and heavy, are an awkward two-handed process that feels a lot like some kind of satanic gym equipment: “Press together the handles of The Torso Torsioner of Torment, while I sit and sip a mint julep and laugh at you, mortal!”
Once I got it out, I put it on the anvil for some furious whanging to even that top-edge out so it would slide awkwardly in and out. That let me get some flux on it and give it a few taps to start the layers of steel sticking to each other. By now I am about 2 hours into a process that I expected would take half an hour. Every single bit of it is harder – now, I have to plan carefully how I put the brick back into the forge, so I can get the jaws of my tongs around it; I have to think about how I’m going to pull it out and rotate it (if necessary) without putting it on the anvil, which will suck heat out of it. It’s kind of like a game of Tetris except horrible when you lose.
Do this as an experiment: put your hands in front of you about a foot apart, turned like they are holding the handles of a pair of great big air-tongs(tm). Now, imagine you have a 15-lb yellow-hot weight at the end. Still with me? Next, imagine you have a forging press next to you, 3 feet away. Your mission is to figure out how to turn your arms with those tongs, so that you neatly and safely place that mass in the jaws of your forging press without dropping it on your foot.
The whole time, the forging press is watching you with a strange expression on its face, its jaws gaping like this:

The press has interchangeable dies – contact surfaces – so to set the weld, I start with a big flat one that just straight squishes the metal together. That seems to work pretty well, but I’m worried that if the welds haven’t fully set, the block will burst apart when the time comes to chop it. Getting the whole block welded together is a lot of work; as the block gets bigger the thermal mass goes up, so it takes longer to soak in the heat before I can pull it out and squish it again. The good news (such as there is) is that it stays hot longer so I have more time to work with it on the press. Eventually it’s time to try the cut.
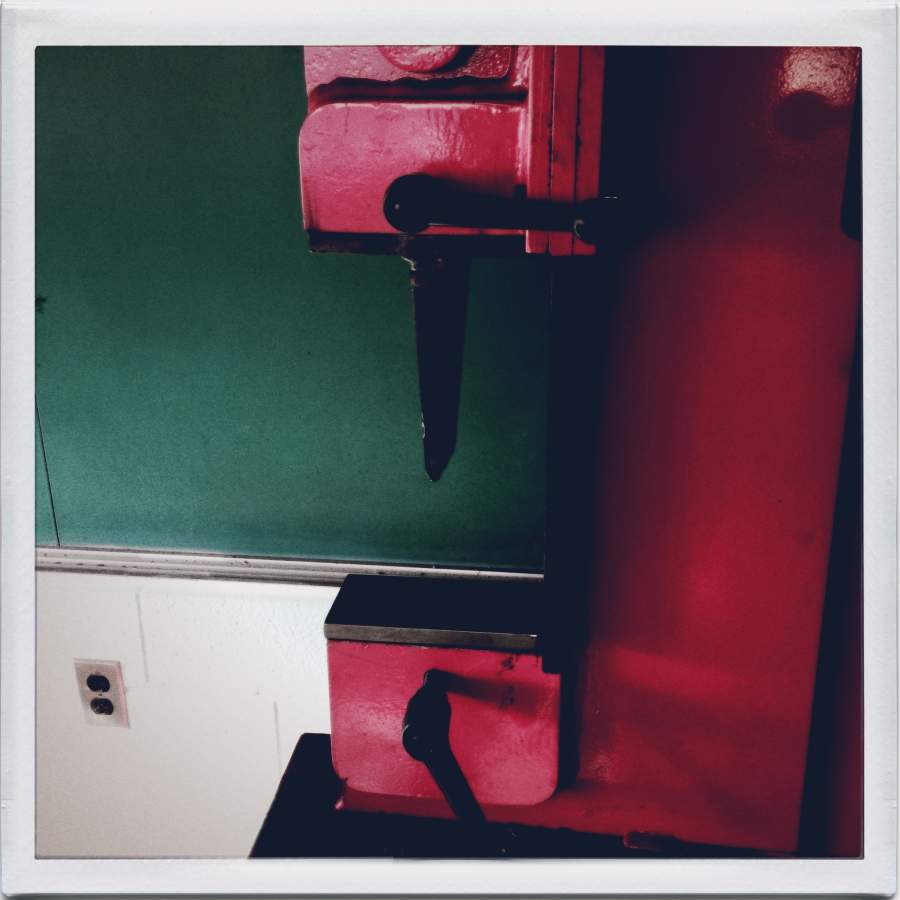
I tried to make this look ominous. How did I do?
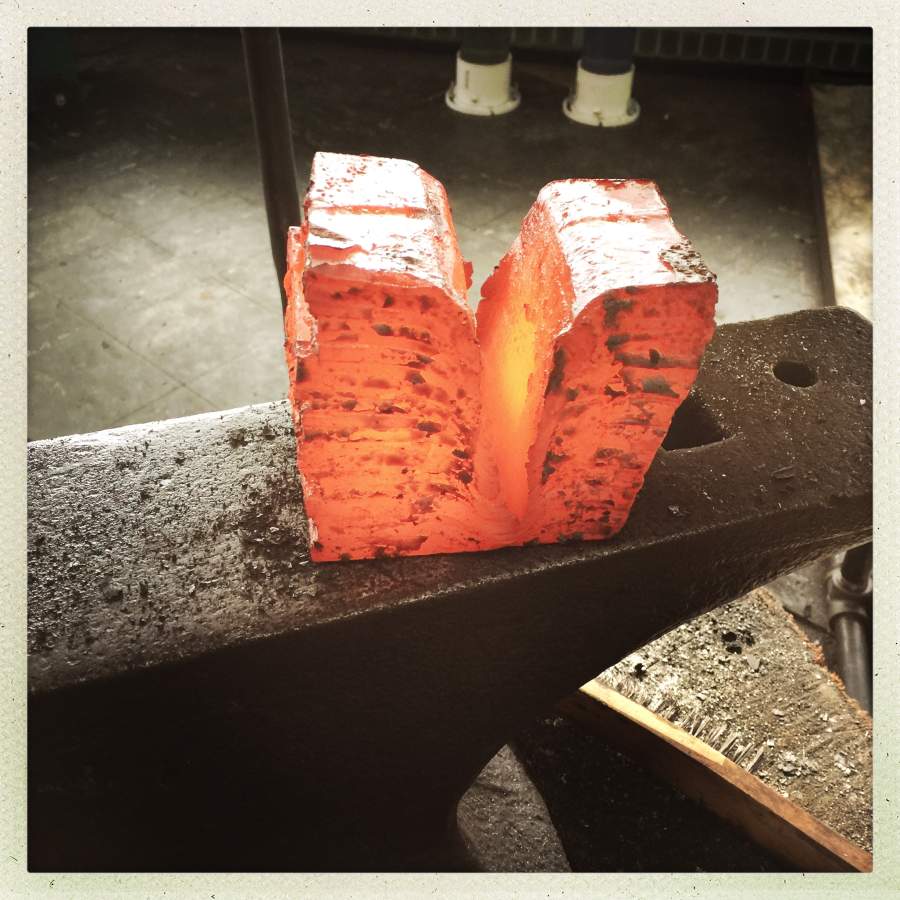
The cutter is a log-splitting wedge welded to a plate of S7 steel. I need to be careful not to squish it all the way through because I do not want the wedge to snap and shoot red hot pieces of wedge around the place. After my first attempt, I learned that sometimes the wedge will stick in the steel being split, which means I have to simultaneously grab the block and hit it with a hammer. Hard, with a hammer.
Between the bottom of the wedge and the lower die-plate is about 6″. The block I am working with is about 6 1/2″ – in other words, it won’t fit. That’s what the funny shape on the back of a cross-peen hammer is for: fullering. “Fullering” is the process of making a groove in a piece of metal. I hammer frantically for a while until there is an approximately 1/2″ deep trench across the top of the block, at which point it fits under the cutter, and I get to see what 16 tons of hydraulic power does when it’s behind less than 1″ of surface area. Under that pressure, the block reacts as though it’s cheddar cheese; I have to whack it with my hammer to break things loose but once it starts to cut, it moves surprisingly easily. [There is a good look at my cross-peen hammer a few pictures down]
That part, I don’t have pictures of because my hands were busy.
Squish!
After this stage, ensued an hour of hell. First, you get it back in the furnace – or try to – only to discover it does not fit at all, anymore. While it’s cooling, you have about a minute to use your hammer and that anvil to get that chunk back into a shape that is small enough to fit in the door. Such an adventure we are having! At least it’s not freezing cold, like it is outside.
Trying to weld the pieces back together is hard. It doesn’t want to stick and there’s a lot of thermal mass sucking up heat. Each attempt to squish it back together results in something popping apart; a few of the welds on the side turn out not to be very good and begin to separate. Panic starts to set in.
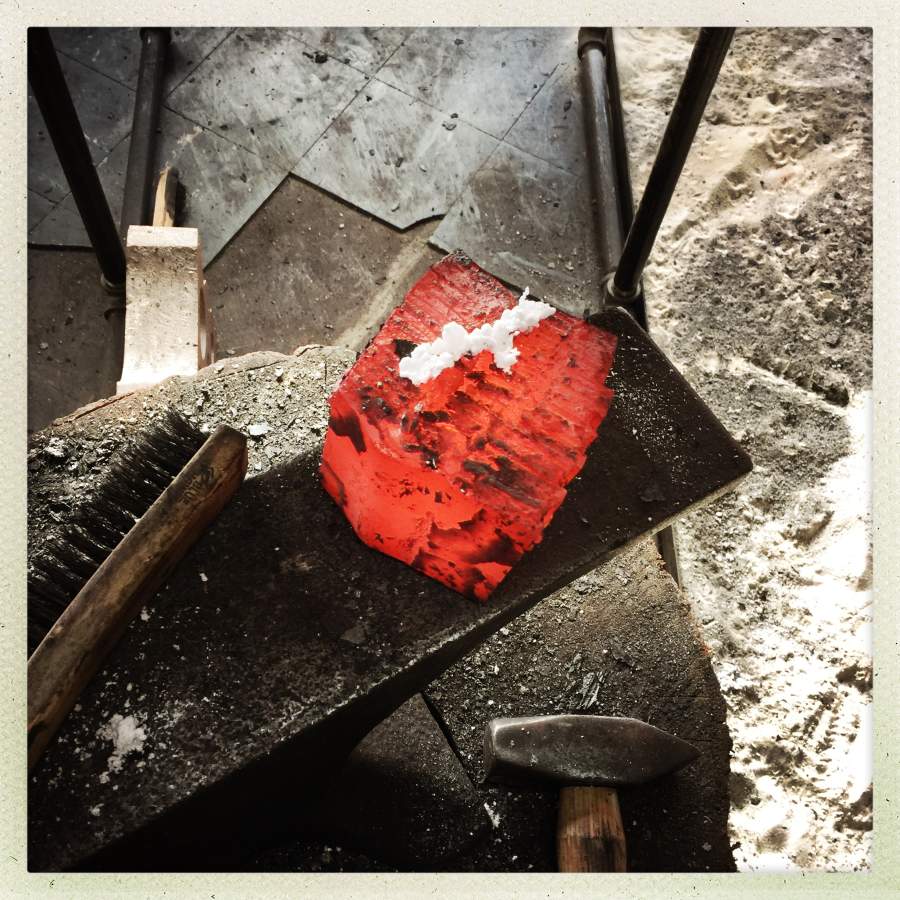
hammered back together, re-fluxed, and cooling down
Then, my hands slip with the tongs and the whole thing falls – kerplunk – into the sand tray. Now it has sand in the gap. It’s not going to weld with sand in there and I don’t want it to. I am done for the day. However, having learned from before I heat it back up and put it in the annealing bin to cool overnight – I don’t want it to harden or I will have a hell of a time doing anything with it.
Based on feedback from the Commentariat(tm) and elsewhere, I replaced the vermiculite in my annealing bin with pearlite. It turns out that not only does pearlite smell better, it’s an incredible insulator. I know this because 2 hours later I check up on the block and it’s still cheerfully glowing orange at me. Good grief. That’s just too big a chunk of metal to work with, with my existing gear and processes. This is how I learn things.
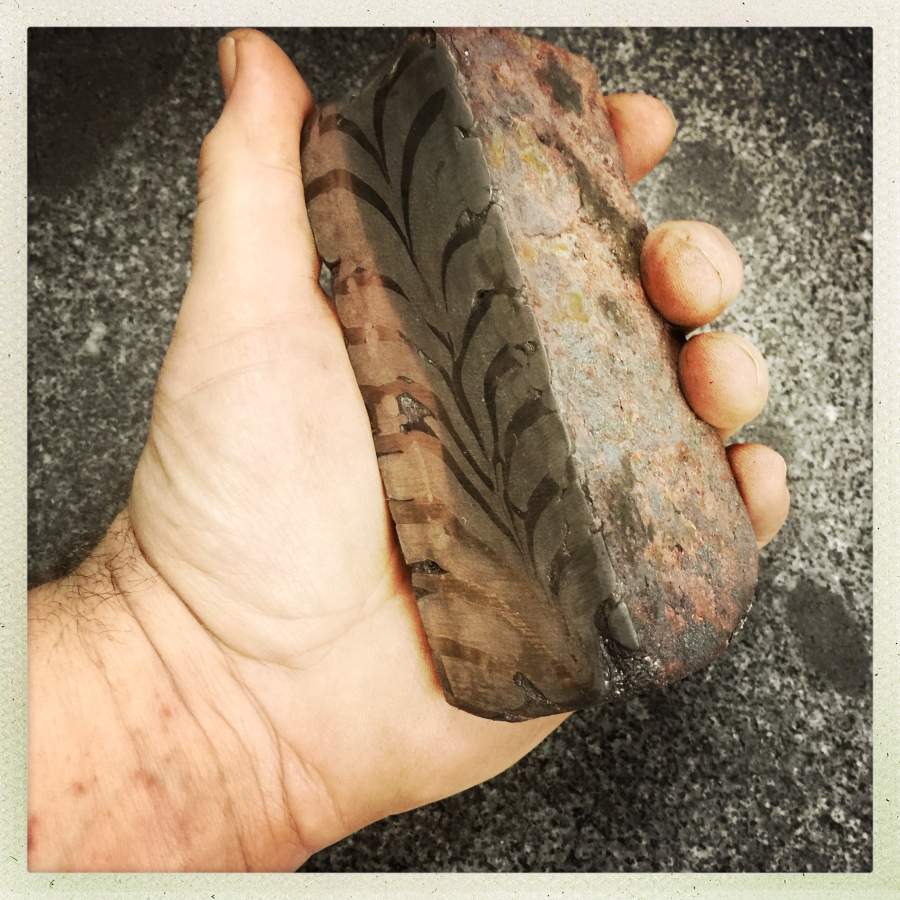
The next day I come back and use a cutoff wheel on an angle grinder, and complete the cut between the block. Now I have two blocks, which are a workable size. Those go back in the forge and are brought to welding temperature, formed up a bit better, and chopped and welded back together. The picture above is actually one of the halves of the larger block, being welded back together. Eventually, there are two differently-shaped blocks of steel, with who knows what inside of them.

Melted pearlite is sticky. I check with a file to make sure it’s annealed and isn’t hard, then put it on the bandsaw to knock off a slice.
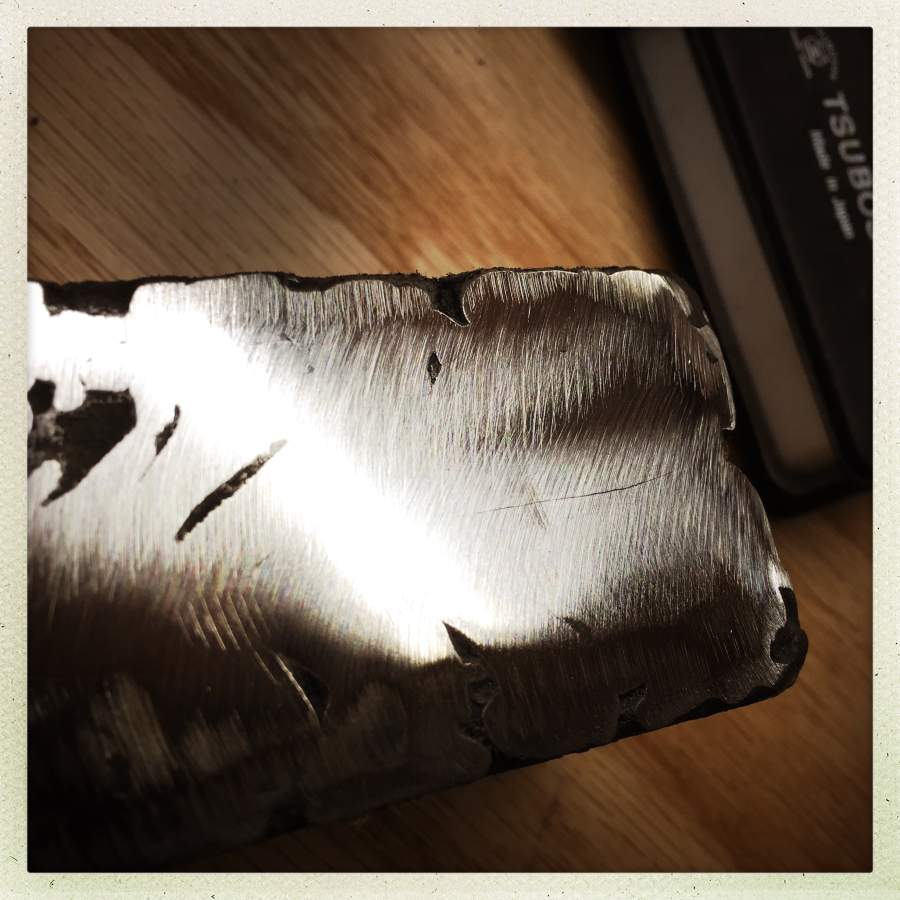
I won’t be making any knives out of that. That crack is where the sides did not weld back together. My guess is that what happened is too much time being fiddled with allowed oxidation to happen in the split, and it didn’t re-weld.
That’s more like “zebra damascus” I’m afraid. To get the proper feathery look I would need to cut and stack several blocks like that, and that would absolutely require a taller press. The professionals who make this stuff do a set of stacks of bars, squish them and weld them, then clean them, stack the entire set, and squish and weld. This is a case of “nyaa nyaa nyaa look what I can do!” as far as I can tell.
The great thing about damasteel is that you can always find a use for it. Perhaps someone, someday, will say “I am desperately looking for material from which I can carve a steel zebra belt buckle” and I’ll be right there, the hero of the moment.
This is how I learn.

In the last picture, you can see some funny shiny inclusions on the edge and face of the block. Those are the welds that held the whole thing together. What I should have done is grind them out with an angle-grinder while the block was still hot (that gets very exciting!) rather than squish them into the block.
You can also see that two if the welds in the bottom block are split on the left side. It’s one heck of a paper-weight.
I keep trying to see a badger in those stripes. Damasteel badger belt buckles would make airport security oh, so happy.
Okay, that first photo got a lot of Ooooooooooooooooooooooooooooooooo out of me.
And I like the zebra damascus! It has a certain panache, with the right wide-brimmed hat and a suitably fluffy feather! (Seriously, I like it. I like it a lot.)
Thanks for sharing the process, too. I take great pleasure in watching other people work. ;)
Oooooooh pretty tough feathers. I like the zebra damascus too, though it has a very different look.
One of the wonderful things they have in the Sheffield museums is film of men handling hot iron and steel in various kinds of manufactury. They must have had rock hard muscles to lift, say a 40cm tall crucible, held with metre long tongs around the neck, and move it from the furnace to the moulds and then accurately pour the iron into the moulds. Then do it again, and again and again all day long. No wonder they drank a lot of session beer at lunch.
That is so interesting. So this is how people get pattern on mokume gane? Just on a smaller scale? That’s amazing.
Is it that you can’t really work this piece of metal anymore? Is that why you refer to it as a paperweight? I don’t know but I would have thought you could keep heating it up and then chopping and welding it… but maybe not.
The pattern is cool even if it’s not what you were aiming for.
Actually I think that’s “zebra buttcrack damascus”
@kestrel: it’s a paper-weight because if I’m not 100% sure of the weld down the middle I might spend 6 hr grinding a blade out of it and have the weld pop open from thermal shock when I quench it. Then, well… nobody likes to see a grown man cry, right? Unless it’s Donald Trump crying, as they perp-walk him, that is.
@Marcus, #4: Ah, I see. So the crack is now permanent, and no amount of heating/welding will fix it. Got it!
For my work the cracks can sometimes be fixed. However, I’m working with different types of metals, plus what I’m doing is not as exact and demanding. So I can see that this would be a serious issue.
Well … Gooogly Eyes! Everything is better with them!
*ahem.
with that out of the way, the Zebrapattern is very beautiful! I would hand that piece on my wall.
Thank you for taking us through your works. This is how we all learn something!
That was interesting. I like to learn how people make stuff and problem solve on the fly, especially if they have a sense of humour about the bloopers. ;D
The feathered damasteel at the beginning is gorgeous, but I’ll bet its maker had a few bloopers before producing it. I hope we’ll get to see your next attempt.
Your doing great. Learning is a process. Sometimes as much a matter of building new muscles and muscle memory as a mental process. It wasn’t for nothing that the strongest man in many medieval towns was the blacksmith. Then again there may be ways around the worse of it.
Reading your description of manhandling the red-hot mass caused me to vaguely recall a picture or scene of a smith using very large tongs that were suspended from aloft on a long chain Attached near the point of balance. The chain carries the weight of the tongs and holds the work at the approximate work height while allowing freedom of movement between forge, anvil, and other devices. A man is holding and manipulating the work with one hand taking advantage of the leverage of long handles and the chain carrying the weight.
I have no clear idea where this picture in my mind came from. I visited colonial Williamsberg a few times, and watched at an iron works a bit but perhaps it was somewhere else. A mind is a funny thing.
So much work to make inferior steel :-) . That first picture looks absolutely gorgeous. Feather damascus is, visually, my favourite. I would love to try my hand at forging it.
This is a real paradox of knifemaking. Damascus steel looks cool, it is a lot of work and it takes a great skill to make it and to turn it into a knife. And it seems that people are willing to spend extra money on that fling. But any knife made from homogenous crucible steel will always be better tool. I wonder if anyone actually uses damascene blades?
I am not sure when I get around to forging. Maybe when my employer finaly decides to fire me with a big enough severance package? Maybe. Otherwise – probably never. It is hard enough to find time (and energy) to do even what little I do now.
Could tat crack not be repaired with borax or boric acid? They allegedly seep into cracks with capillar force when molten, and in red heat they dissolve the oxides in slag that can be squezed out.
I was pondering the zebra damascus, and some of the films of working huge chunks of steel that I’ve seen, and my need for a splash back behind my cooker, and thinking that I’d rather like a huge piece of that for the job. You can get plain polished or brushed stainless steel splash backs, but that is too large a mass of ‘clinical’ for the rest of the kitchen so I’m probably going to go for hardened glass. I’ll put lists of things like the capacities of my saucepans, pots, bowls and jugs, the oven temperatures and times for things that get cooked most often, the temperatures of the gas oven as it’s not the standard gas marks, maybe even the ingredient proportions for some recipes, behind the glass so I don’t have to look them up. There is a lot of cooking info that I used to remember and don’t any more because of the drugs, and it annoys/upsets me that I don’t, so having it all there with out having to think about it would be helpful. But having a steel zebra ‘skin’ that hadn’t hurt a real zebra would be lovely.
That must be how Satan fabricated all those fossils or bird ancestors and feathered dinosaurs 6000 years ago.
Charly@#9:
It’s more complicated than that. It’s possible to make a damasteel composite blade that is inferior to monosteel, and it’s possible to make it vastly superior in some situations. Most of the action now is aesthetic but sometimes it’s practical. For example, I can lay up a blade structure with stainless cheeks on a high carbon edge. Suddenly, it’s more corrosion-resistant and (maybe) has a better edge than basic stainless. Or, I can as many Japanese sushi knife-makers do and use an edge of very expensive tatara-smelted iron sand dendritic steel welded onto a plate of very tough iron. One, by itself, would be fragile and insanely expensive while the other would not even hold an edge. It’s certainly less easy than buying a bar of ${supersteel} from Hitachi and grinding a knife out of it, but monosteels are certainly not always the answer.
For example, Caine’s scalpeldashi was 1095 monosteel bar on the side that made up the edge, and 1080 damascus wire rope on the other. Since the cutting edge was monosteel, is the knife “damascus” or not? Since the cutting edge is 1095 I expect it to perform like 1095, but it’s not 1095 any more. And differential hardening makes that more complicated still – of the 1095 side, the 1/4″ part forming the cutting edge was about RC60, and the back was around RC30. The cable face was around RC40.
It certainly is less cost effective in terms of time and propane. But you have a lot more options. In a couple weeks I hope to post some pics of the competition chopper that’s on the bench right now: victorian wrought iron cheeks with 1/2″ of 1095 protruding from the edge. It’ll cut like 1095 and it’ll handle deflection forces like a chunk of wrought iron. During the height of sword-carrying in Japan only a few blades were 10,000+ layer construction – many were decent steel with an edge insert of something that was relatively unaffordable. I have a chiseloid on the bench right now that is 20 layer 1095/wrought iron on the top, and solid 1095 on the belly. The 1095 will chip if mis-handled but I expect with that construction you could chisel a hole in a jeep without damaging the chisel. I hope to eventually post some build-logs of some of those things.
The problem with the weld is not solvable with flux. I already fluxed the hell out of it and merrily squished it at yellow heat. The problem is that there is some scale in there and it’s just not going to stick. I could use florospar reducing flux (I made a batch and all I can say is: nasty!) and I even did try that, but sometimes it just doesn’t want to happen. When I’m welding I run a reducing flame, too. The problem is I’d have had to soak a chunk that big for maybe 20 minutes – and it’s still not likely to take. My guess is that there’s glass in the split from where I dropped the parent brick in the sand tray.
I could have gotten it to stick by wedging it apart, letting it cool, clean-grinding the weld zone, and trying to weld it. Unfortunately I didn’t get to see the weld didn’t take until I annealed it and bandsawed a slice off it.
The good news is I still have lots of options for things to do with those chunks, and I will post build-logs if anything looks promising.
Jazzlet@#2:
One of the wonderful things they have in the Sheffield museums is film of men handling hot iron and steel in various kinds of manufactury. They must have had rock hard muscles to lift, say a 40cm tall crucible, held with metre long tongs around the neck, and move it from the furnace to the moulds and then accurately pour the iron into the moulds. Then do it again, and again and again all day long. No wonder they drank a lot of session beer at lunch.
According to what I’ve read about Pittsburgh during the steel age, workers were pretty much worn out by 40.
Descriptions of stirring puddle steel with a ladle are utterly horrifying. And then there were the accidents.
avalus@#6:
the Zebrapattern is very beautiful! I would hand that piece on my wall
It’s pretty, for sure; it’s just not what I wanted. I have a plan for the other brick, which I have already (sort of) put into motion. If it works, it’ll be pretty neat and there’ll be a couple of worth belt-buckles or hatbands out of it.
I love the idea of a damasteel hatband ornament. Especially if it’s pretty. And has no razor sharp edges. The airport police will hate that.
lorn@#8:
Reading your description of manhandling the red-hot mass caused me to vaguely recall a picture or scene of a smith using very large tongs that were suspended from aloft on a long chain Attached near the point of balance. The chain carries the weight of the tongs and holds the work at the approximate work height while allowing freedom of movement between forge, anvil, and other devices. A man is holding and manipulating the work with one hand taking advantage of the leverage of long handles and the chain carrying the weight.
That’s how it’s been done since the early industrial age. You have a counter-weighted set of tongs suspended from a chain-fall at exactly the right height. So you can grab the very heavy thing using the tongs as a lever. One nice thing about that system is it means the person with the incredibly hot ${whatever} tends to follow a predictable path: no pouring hot bronze on the co-workers.
If you watch footage of forging being done in China, right now, there are examples of this sort of system.
Watch this at 7:07
https://youtu.be/oJYGSy6fRic
A bit of a spoiler: Michaelcthulhu (a youtube welder who is quite a character) built a homebrew version of such a system. Since I am going to have a static grinding room, I intend to build a wall-mounted counterweight system for my angle grinders. I have all the parts, I just haven’t done it yet. I need to position it pretty carefully because I will have a similar arm on the other side of the room for my breath mask.
voyager@#7:
The feathered damasteel at the beginning is gorgeous, but I’ll bet its maker had a few bloopers before producing it. I hope we’ll get to see your next attempt.
There are smiths whose entire specialty is producing bars for sale, like that one. They’ve got the process down to a fine art. Some of them (there’s a team in Las Vegas) use oxygen-purged forges and electrical heating systems that don’t oxidize the metal. Very clever. If you’re doing it as a full-time business, it makes sense but otherwise it’s just way over-geared.
Something about that bar is unusual, to me. It looks like it was twisted then cut, not layered and layered then cut. So I have to decide if I want to make a foot-long bar and give that a shot. That first bar is also 3 different steels, not 2. They have a neutral, a black, and a silver. It’s mighty purty. It also looks super crisp and clean because it’s been surface-ground on a milling machine, probably a CNC. If you’re doing this stuff for production, that makes sense.
Marcus @#13
There is an obvious reason why the NHS prothestic department in Sheffield is so good. The Pain Consultant at the Pain Clinic that treated me was explaining the problem of phantom pain to me, and used the example of a patient that came to her still feeling the pain of the hot steel hit his absent foot *shudder* – but she was able to help with that.
Jazzlet@#17:
It’s still a very dangerous job.
There are videos on youtube of slag spills that nearly make me pee myself from here.
That’s the idea. Looks like those folks are still working on the details. Quite a few missteps and delays. Learning is a process and I’m sure they will soon have it flowing smoothly.
Needn’t be as complicated as an actual counterweight, perhaps even a track, system even though that would be an ideal to shoot for.
A long enough chain and tongs solidly suspended in the approximate center of the cluster of tools might be a rough and ready adaptation. A longer chain gives you a wider swing and less of an effort going up-hill moving away from the center. It could be as simple as tongs, chain, a couple of shackles, and a stout ring in the ceiling.