Before my big end-of-year spate of travel started, I did some forge-welding and made a few pieces of bar-stock. One of the pieces was intended for a bread-scoring knife for Commentariat(tm) member Jazzlet.
Some illustrations of the original design are here [stderr].
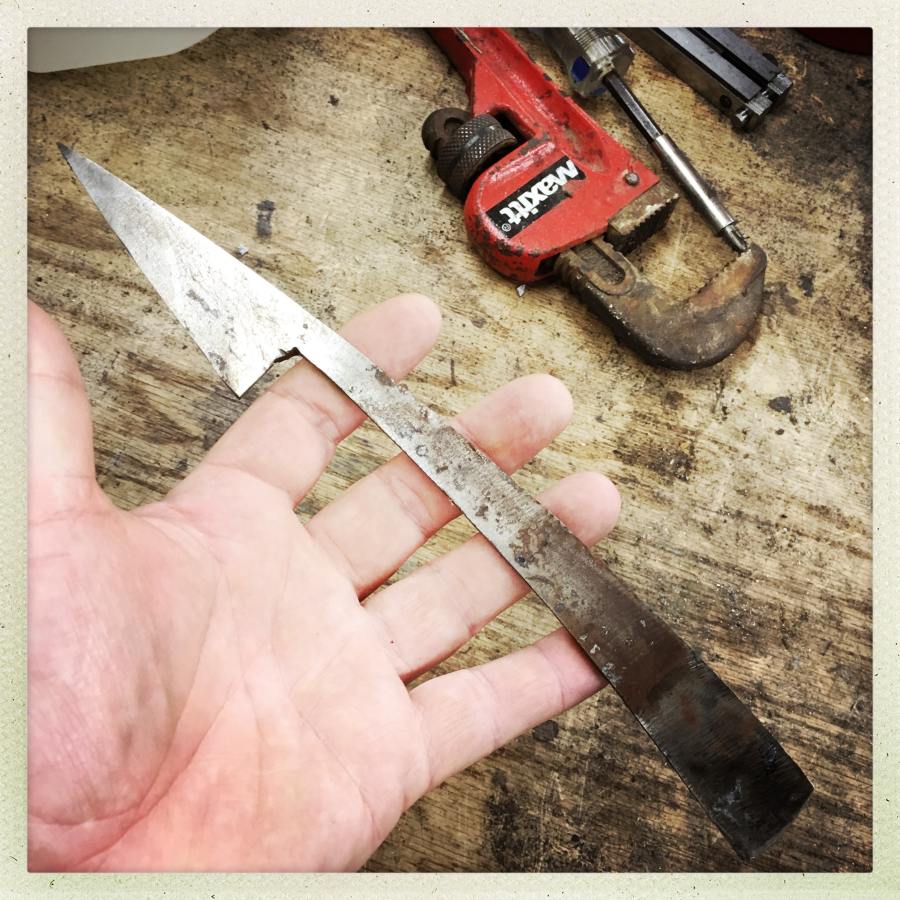
I learned an important thing: the scale of the knife is important. We already know that, but it’s more subtle; sometimes “bigger is awkward” not better. Things go from elegant to chunky. It doesn’t fit between the fingers right to give a feeling of precision, it’s heavy, and it just feels wrong. Unfortunately, I could only learn and confirm that by making it too big, cursing a lot, and re-thinking the whole thing:
The next attempt went a bit better. I decided I was going to make some smallish test-pieces of twist damascus. My plan was a few thick pieces of 1095 and some thin pieces of 15N20, welded and then wrenched and hammered back into a bar-shape.
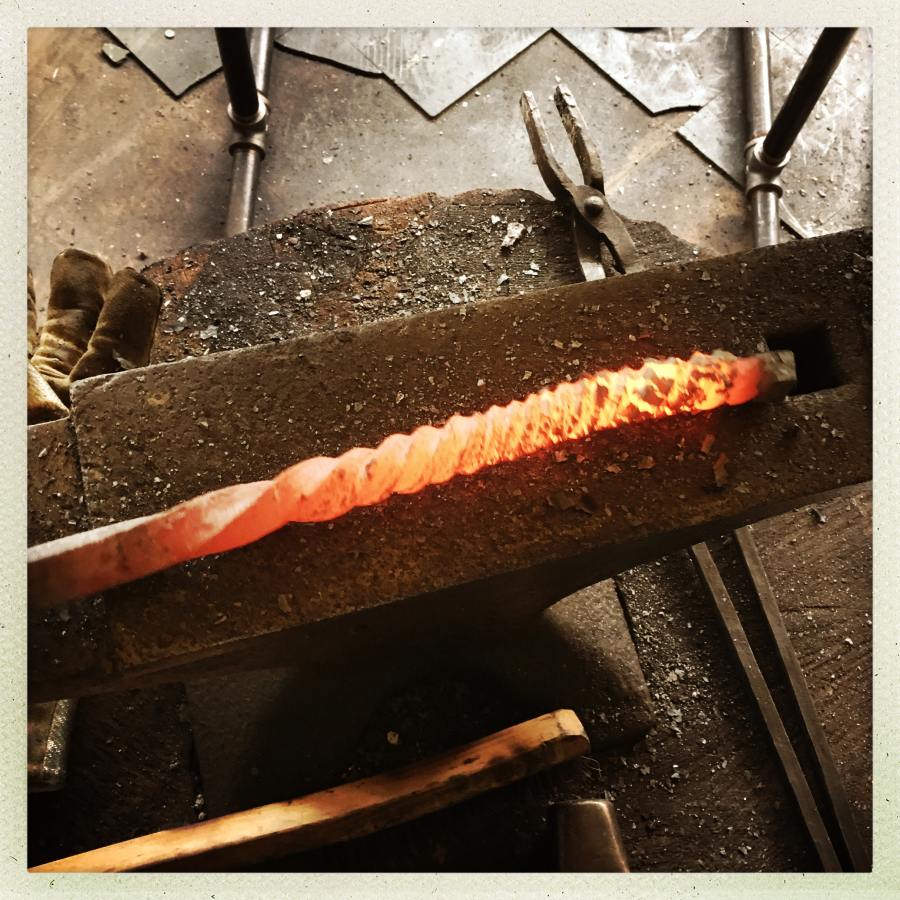
Now you can see what the post vise is for. I need something that will hold the bar while I bend it and otherwise deform it. Instead of hammering it out, I just use the press to squish it into a bar shape.
This is what’s called a “low layer count” bar; it’s only 8 layers (or so) and there are 5 thin layers of the shiny 15N20 – it should make some dramatic, wavy, lines when it’s all hammered out and shaped into something. It’s a spare bar that I made when I was experimenting, so I’ll use it for Jazzlet’s knife because it’s there, and it’s got to be useful for something and this seems like a worthy project.

You can tell if you look at it, that there’s something going on with the layers, but it’s not possible get a read on how it will look, yet. To get the new shape, I just reloaded the old file in Inkscape, re-sized the design, and printed it out, cut the outline from the paper, then traced around it with a sharpie. The bar has been sprayed with gray primer to make it easier to see the design.
A professional (or someone with more design discipline) would size their bars for the end project, or would lay things out to get better mileage out of the material. That’s a disadvantage with curved items or complex shapes: you’re wasting metal.
Cutting the basic outline seems to be a process that various bladesmiths individualize a lot. Some hammer the blade into shape on the anvil, others use a bandsaw, or a grinder, a plasma arc, or a mix of cutting disks and grinders. Hammering it into shape while it’s hot is the fastest and least wasteful approach but you have to know what you’re making before you let the metal cool.
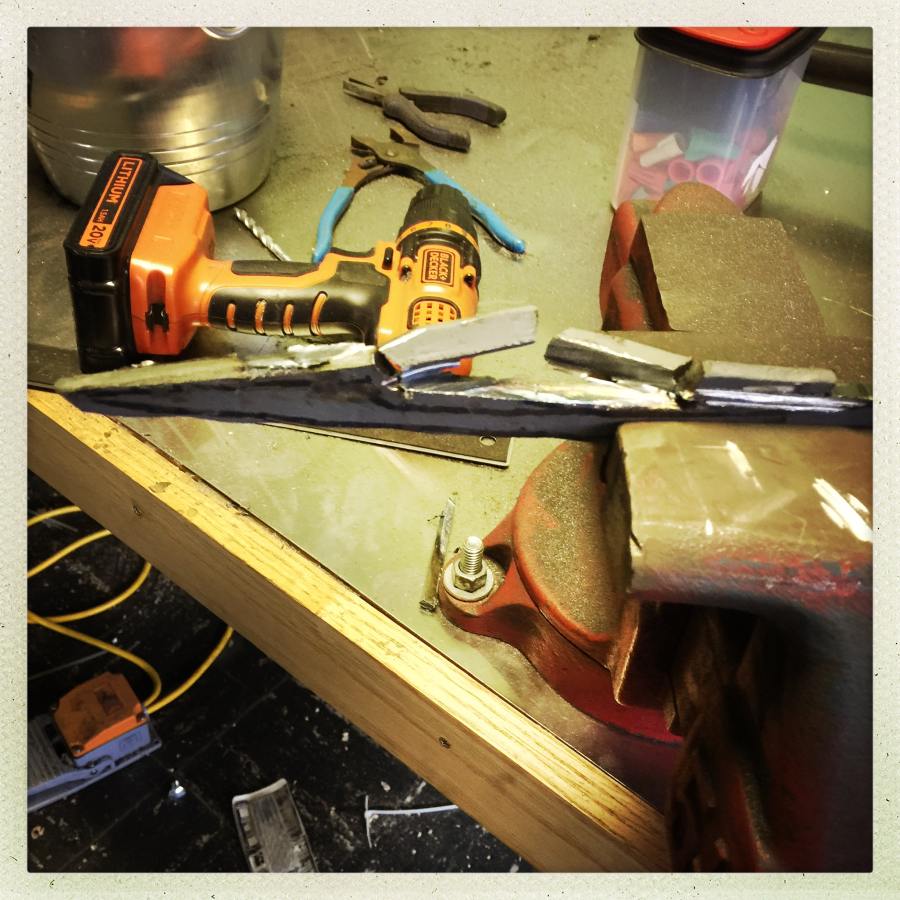
To cut a curve you make vertical cuts and then cut between them with a cutoff wheel in an angle grinder. It’s a messy process and the results look dauntingly horrible. It all goes fairly fast; this is about 10 minutes of work. Another 15 minutes with an angle grinder and a sanding wheel, and it’s the outline of what the final knife will look like.

From here, corrections are mostly a matter of refinement. I’m going to take a few tenths of an inch off here or there to change the lines a bit (the back needs to be more arched and the belly more curved up) – as the process continues the amount of change gets successively smaller. That’s a hard thing for beginners to grasp because you really can’t let something go until you can sand it a bit to get it right, you can spend days with a 1000-grit belt to remove what comes off in seconds with an 80-grit belt. And you can never put it back. Once it has come off, that’s that. All sales are final.
The blade, above, is what some people call “profiled” – it’s the outline of the blade but it’s a flattish bar with no edge or contour shaping. Because it’s flat, we still can’t tell what the damascus pattern is going to look like (though you can see hints of it if you look closely). At this point, if I like how it feels in my hand, I’m going to start setting up to turn it into a knife.
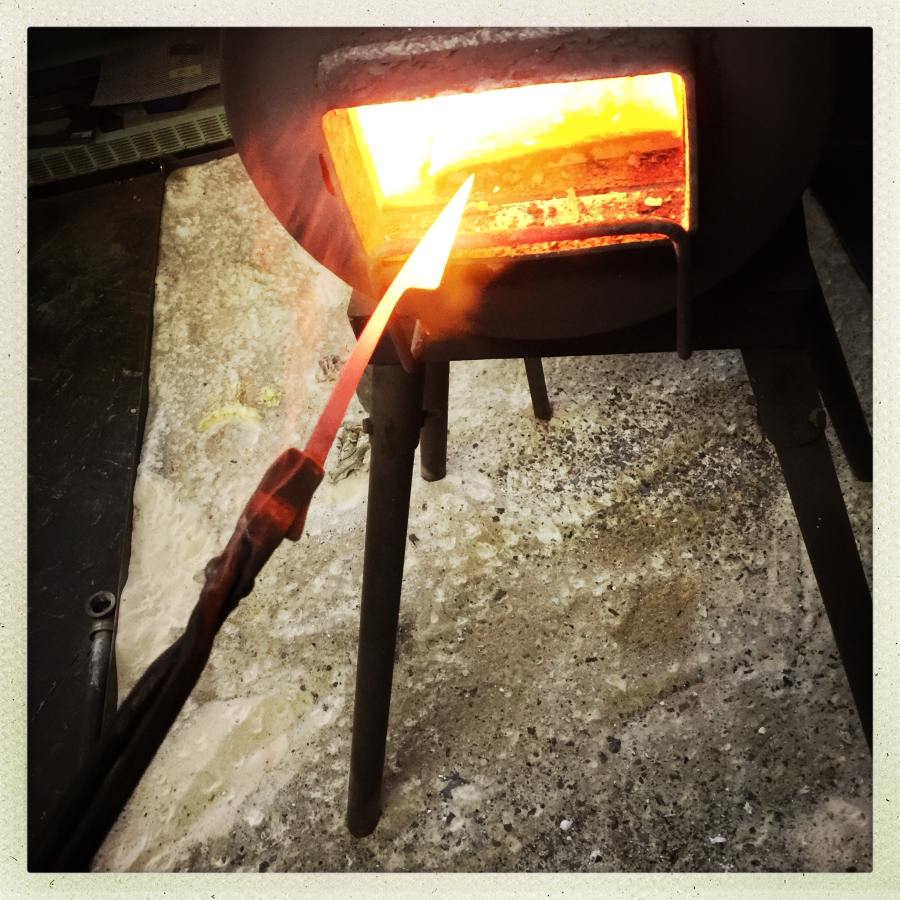
One challenge is hardening/tempering the steel. You need to really think about how that’s going to work and happen (I have a posting I will eventually do about what happens if you don’t get that right) (spoiler: it sucks) in this case I’m going to leave the handle bare metal and it can’t be hardened at the neck because I don’t want it to snap if takes any impact. There’s another factor which is that it’s a whole lot less fun to grind/sharpen hard steel than soft steel, so I want to harden the right parts and leave the rest so it’ll be easier to work with. A Japanese bladesmith would differentially harden the blade by encasing it in clay with just the edge exposed, so the blade quenches to a hard cutting edge of martensite and a softer back with a distinctive temper-line where the martensite transition happens. For this blade, I don’t want to have a temper-line (“hamon” if you’re a Japanese smith) because it’d distract from the pattern of the twist in the damascus – I don’t want to have two different visually distinct things going on. I decide to try something a bit risky: an edge quench. The idea there is to quench the edge so it gets hard but to let the rest of the blade cool slowly so there’s enough heat bleeding back and forth that the temper line doesn’t form. In fact, if you do it right, the edge hardens but then the heat remaining in the rest of the blade makes the edge relax along with the rest of it, so there are no internal stresses in the blade that will make it easier to crack. In knifemaking terms I’m trying to quench and temper the blade in one step. The quench is when you transform the edge to hard martensite and the temper is when you relieve the stress and soften the metal slightly so it’s not just hard, it’s springy and tough.
It’s a mystical process if you’re not geared to approach it as a strictly scientific work-flow. If you’re doing production you can’t afford to fudge things around; you can’t have one batch of blades be a bit stronger than another, and another batch take a sharper edge or snap. Another factor that’s going to complicate all of this is that the blade is comprised of a bunch of pieces of steel that are different formulations, welded and twisted in one direction at a high temperature using a lot of leverage. When I heat the blade, is it going to try to un-wind? When I quench it, are the different layers going to over-stress and pop apart? With some twisted bars, the whole thing can try to turn into a pretzel. A nasty steel pretzel. A worthless steel pretzel.
There’s one answer to that problem which is to leave the piece fairly thick, so the stresses in it will have less impact. Of course, the thicker it is, the more hard steel I’ll have to grind away to shape an edge. I also decide to do a couple of cycles in which I relax the metal by bringing it up to “normal” temperature and letting it cool down to about 400F, then back up to normal temperature. Each steel has a different temperature at which the steel de-crystalizes – around 1700F for 1095 and 15N20. One reason the 1095/15N20 combination is popular is because they normalize at the same temperature, quench at the same temperature, and expand/contract at the same rate. Things can get exciting if you have a piece of high carbon steel like 1095 layered to a piece of stainless steel like O1, which doesn’t expand much at all – the blade will begin to warp dramatically. For this blade, I went with The Tao and did things the way that was easiest: I left it nice and thick, took it easy, and edge-quenched it so that it tempered as it came out of the quench.
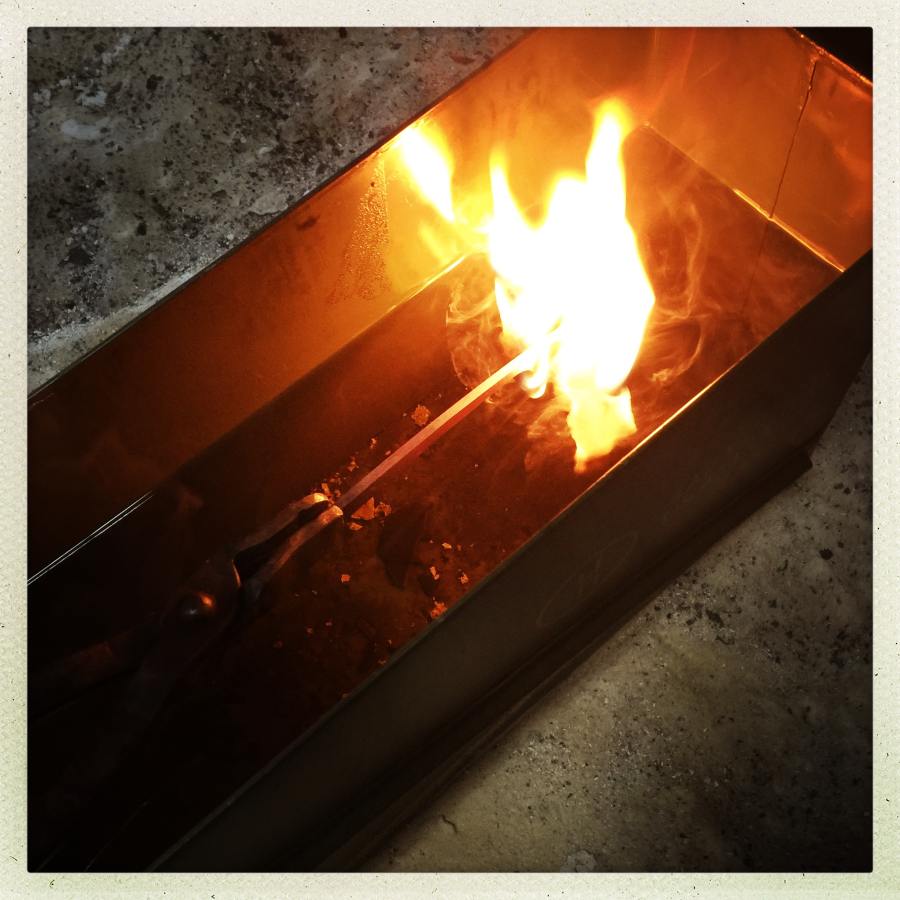
After a couple normalizing cycles I made sure the heat was even through to the neck, then gently put the bottom 1/2″ of the part-that-is-to-be-sharp in the quench bath. For quenching some people use bacon grease (which stinks and can ignite and then you have a stinky mess) many use canola oil or peanut oil, some use antifreeze, etc. The Japanese use water, which is calibrated to a temperature that the smith has determined gives the hardness they want – the Japanese way is exceptionally hardcore: you sometimes have a blade explode to pieces because the water bath was too cold or the gods just needed a laugh. That’s not a big deal if it’s just a small knife but if it’s a katana that you spent 3-4 days welding and shaping, you’ll probably need to hide in a corner and cry for a while.
I use this almost magical stuff called Parks #50, which is an industrial-age magical (and proprietary) mix of oils and additives that works amazingly well. It’s some kind of light machine oil but it has some volatile things in it as well that carry heat out from the edge very quickly. Knifemakers seem to be pretty superstitious about quenching oils but it’s a big deal, really – and there are a lot of considerations what are not well-understood. Lighter oils like Parks carry heat away from the edge fairly fast, whereas water carries it extremely fast but only if you remember to keep the blade moving so a steam jacket doesn’t form around it.
What I’m getting at with all this explanation is that I just fired up the forge and fudged furiously and everything came out fine. Not because I was skillful; it was at least half luck. (and 25% was the magical Parks #50)
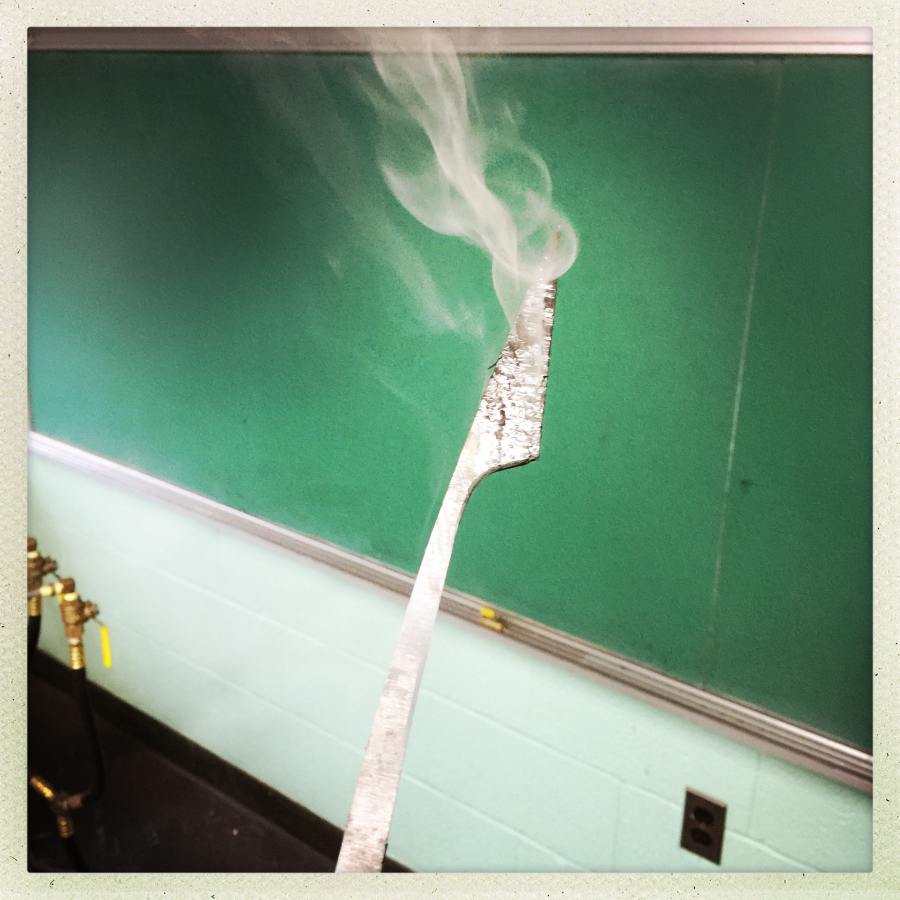
After I pull it from the quench it’s still really hot; it’s still shifting all its molecules around into different arrangements. I let it cool slowly. Then it’s time to test it to see if it quenched right.
One way to test hardness is with a graduated set of files that are varying hardnesses themselves. If you rub the file along the edge and it doesn’t bite into the steel, it’s harder than the file. This way you can map out where it’s hard and where it’s not. The blade came out around Rockwell 65 hardness scale right along the edge, and it’s nice and soft at the back and neck. The hardness will come down a bit as I work it to shape the edge bevel – it will unavoidably get hot but nowhere near normalizing temperature, since I will be holding it in my delicate little hand.
You can see where the edge of the blade formed martensite; it reflects light differently. If I polished the blade with an intent to expose a temper-line I probably could emphasize it. But I won’t.
So far, I am super happy with how it came out. It could not have come out better if I had actually known what I was doing and planned it that way! However, it was getting late and I had to head home for the night, so I decided to do two more things: 1) test etch the metal so I could see how the damascus looks 2) start to grind the edge bevel so I could test the hardness of the steel inside the bar. Since I’m going to have to grind away quite a bit of metal, I want to be sure that I didn’t just harden the outer layer of the steel (“case hardening”) it needs to be through and free of cracks or weld delaminations. I wouldn’t be able to go home and sleep without knowing whether I had produced a pretty disaster or a decent blade.
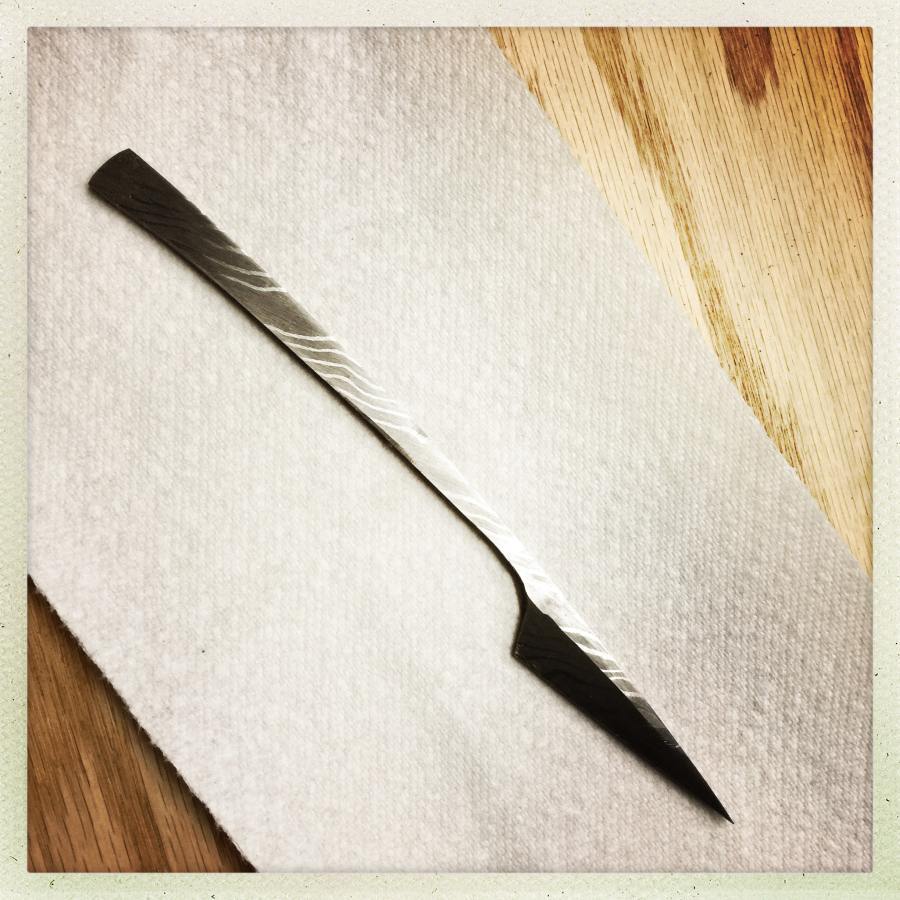
That’s not a real edge bevel; there’s a whole lot more metal that will have to come off of there, but it gives me a good idea what the knife will look like if it survives grinding, polishing, sharpening, and final etching.
Ooooooooooooh … Marcus it already looks both beautiful and perfect for it’s purpose, what more can one ask?
WOW that is great! This is so cool… and pretty exciting too to see the photos when it is really hot like that. Nice work! And wonderful photos and explanation!!
I am interested in the process too, I just don’t know enough about it to comment usefully. In fact you and Charly are teaching me a lot about knife making :-)
Knife size matters.
I am using sunflower oil as a quenchant and I am pretty confident that my quenching fails were due to insufficient temperature or too low carbon content and not due to the quenchant.
I have actually read up on which vegetable oils give best results and in the article that I have read it was written that suflower oil quenches good even when it is old and used, whereas canola oil only works good when new. So I went for sunflower oil.
The knife looks great.
Charly@#4:
I have actually read up on which vegetable oils give best results and in the article that I have read it was written that suflower oil quenches good even when it is old and used, whereas canola oil only works good when new. So I went for sunflower oil.
I’ve even seen people try to apply the scientific method. I think there are too many variables to science it properly. I go with ‘whatever works for you’ and the Parks works wonders for me. If I weren’t using Parks I’d be using ATF and a bit of methanol and baby oil.
Knife size matters.
It really does. There was a lot of cursing when I finished cutting out the too big one. Someday I’ll make it smaller but for now it’s on the Shelf of Shame.
BBC: A ‘samurai’ swordsmith is designing a space probe
Reginald Selkirk@#6:
BBC: A ‘samurai’ swordsmith is designing a space probe
Interesting! I suppose high carbon steel laminate would be OK for that purpose; I’d expect ceramic to be better. But at least they don’t have to worry about corrosion.