Post vises are popular with blacksmiths because they can clamp incredibly strongly and the ajax-style threading allows them to be tightened quickly with one hand.
I don’t know where the “post” design comes from; to me it seems a bit like an afterthought but It Is How Things Are Done, apparently. This is an old post vise my neighbor Bob scrounged up when I put word out that I was looking for one. He is the kind of guy who knows where every post vise, hit/miss engine, or piece of heavy machinery is within 20 miles, and whether its owner would be likely to part with it.

I should have flipped it around but it’s really heavy and it can’t balance on its silly post. You’ll get a better look at how it’s assembled in a bit.
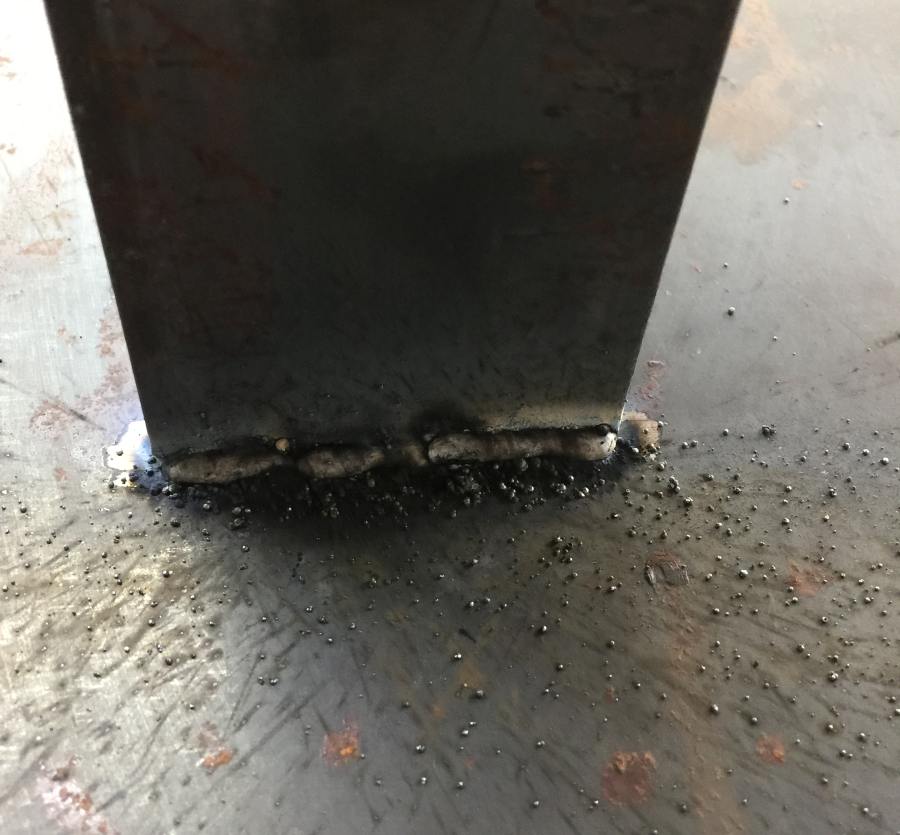
I’m still a noob at welding. But I’ve been learning the right way to grind back the metal for the weld to take, and I gave this weld a few experimental whunnngs with my cross-peen hammer and all it did was make noise. So I completed the bead all around the piece.
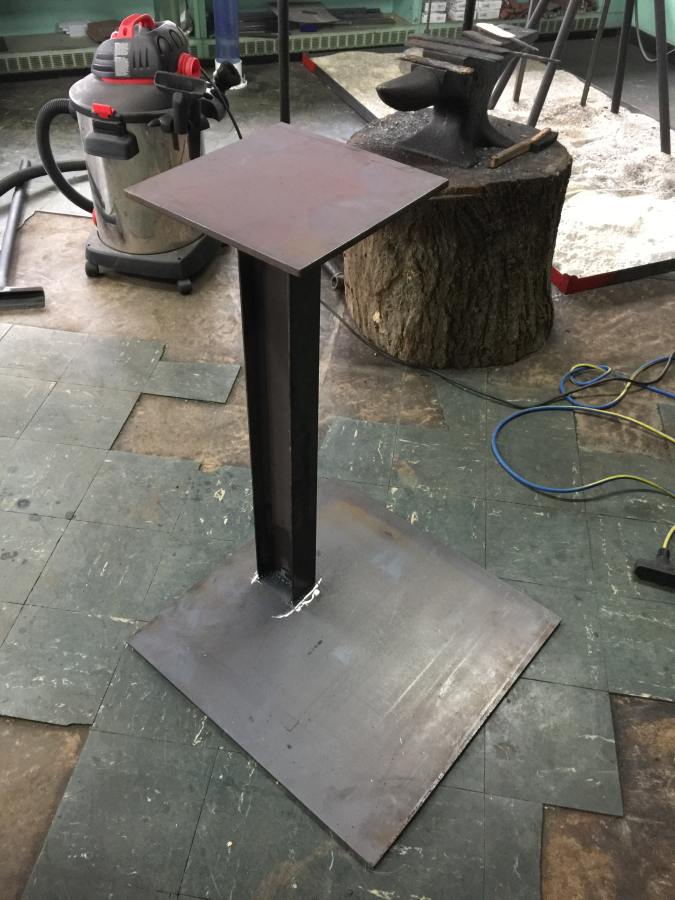
The base is a 2′ x 2′ plate of 1/2″ mild steel. The post is a 4″ I-beam. Most of the time when I see people making mounts for post vises they use wood – sink a 6×6″ beam 5 feet into concrete and bolt the vise on; that kind of thing. Since the main purpose of the vise is going to be holding red-hot metal while I whack it, I thought a fireproof stand would be the path of maximum wisdom. I used a large plate as the base because if I am using the vise I will be standing on the plate! Therefore, I will be exerting energy against myself and cannot flip the thing over or anything like that, as long as my welds do not fail.
I ought to be able to park something really heavy on that without noticeable effect.
The wonderful battery-powered angle grinders that (was that you YOB?) someone sent me came in very handy since I was able to grind down the metal without having to lift the plates up. Cordless is convenient!
Surprisingly, this project took a grand total of about an hour, and was remarkably free of drama, bloodshed, or burns. Mostly. I did remember halfway through that I was wearing my army jacket instead of my welding jacket. The army jacket is now full of holes; it is a “ventilated army jacket” for warm environments. I am glad it’s flame-retardant.

Eventually I plan to cut some fjords in the top-plate that I can hang things like pliers and twisters on. In the meantime, it will make a fine coffee-stand.
Once the whole thing was bolted and tight, sprayed with WD-40 and wiped down with linseed oil, it looked so good I completely forgot to take a picture of it.

The post thingie is wrought iron and I’m pretty sure it’s indestructible in spite of the fact that it looks flimsy. Remember: it only looks flimsy in comparison to the rest of the vise. That is a great big chunk of metal. The whole thing weighs about 200lb, so I don’t need to worry about it blowing over on a breezy day, and that’s a very nice big thermal mass.
To mount the post, there’s a piece of schedule 40 steel tube welded to the base. It’s not going anywhere.
Very impressive! And yes, I’d be scared of the breeze that would blow that baby over. Better wear steel-toed boots if the wind comes up that high!
So the purpose here is to shape the metal while it’s very hot? Can’t wait to see it in action, that will be very interesting.
Ajax threading? Or Acme threading.
When you flip it from the heavy end down to the heavy end up like that, it becomes vise versa.
Owlmirror
Grooooaaaaaan!
Owlmirror@#2:
Try as I might I can’t think of a decent come-back. Well done!
travisd@#2:
Ajax threading? Or Acme threading.
Acme. You are correct. The gears in my brain did not mesh properly.
I’ve seen worse welds.
Check your polarity. If that’s okay try cranking up the amperage a bit to get more heat so you get more penetration and the fillet flows a little more smoothly into the pieces instead of beading up on top of it quite so much. It is also possible you are drawing the rod a bit too fast or your arc is too long but deposition seems okay so that doesn’t seem likely. Hard to tell without some scale to compare it with.
This is probably far too welding 101, but one never knows. It is so simple and useful I figure I’ll mention it, even at the risk of eye-rolls from people who know it.
You can tell if the arc length is about right by listening to the weld. It should sound very much like bacon vigorously frying in a hot pan. Hissing or singing usually mean too long an arc. Muffled or lower pitch sounds tend to indicate too short an arc. Once you know the right sound you can easily identify good from not so good.
Your probable okay for now, as a test fit-up, but butting the I-beam into the plate without a substantial fillet is going to give you a stress concentration and perhaps metal fatigue over time. You might weld in four triangular pieces that will spread the bending loads and increase the weld lengths.
Alternately, instead of messing with fiddly little triangle reinforcements I might span the top and bottom plates with two bands that taper at both ends down to the plate. Just to make sure I might cut a hole in the reinforcements and do a plug weld in the middle of each band into the top and bottom plate of the I-beam.
lorn@#7:
I appreciate the welding 101, truly.
You mean the outlet may be wired backwards? Since I did it, it’s 50/50; I’ll check when I get home. I need to run a 220 line anyway – maybe I’ll boost that project up the list a few notches.
I’m using a mig. Getting the feed rate and amperage right still seems to elude me. I ought to do tests on scrap before I start but I don’t have a scrap archive yet. I am almost certainly not keeping the speed even. One thing that is not good is watching welding on youtube and they speed it up! I only just realized that.
The triangular fillets idea … hrm. I never thought of it flexing much but it’d be good practice. I have another build that’s similar and will have a motor and vibrate. I’ll look at doing that right.
Advice is always much appreciated!
Polarity in this case references the electrode versus the “ground” clamp. If your welder works it is most likely to be done right. Assuming the welder is running on 240v AC line power, as opposed to 120v, there is no polarity on the line power side.
On the low-voltage, welding, side you have either AC (perhaps only AC) and/or DC and the electrode, the clamp holding the rod, is either hooked up to the positive or negative connector on the front of the welder. On AC the polarity is reversing 120 times a second so there is no ‘electrode positive’ or ‘negative’. On DC, assuming your machine has DC, you get a choice of the stinger, rod, being positive or negative.
Most rods are marked, both on the box and on the rod itself (if you can read it) often with a four letter designation of DCEP (Direct Current Electrode Positive) , previously called ‘reverse polarity’ or DCEN (Direct Current Electrode Negative), previously known as ‘direct polarity’.
The general rule that AC rods will run well on DC. If you have DC use it. You get a smoother arc, more control, less splatter. Most DC work is done DCEP because it gives you more penetration, slower rod burn, and a smoother bead because the majority of the heat is going into the work piece. In my experience many professional welders plug the electrode clamp cable into the positive terminal and it stays there, pretty much, for the life of the machine. TIG is different.
That said, if you are trying to weld materials a bit lighter than what your stick welder was designed to easily work with switching to DCEN may back off the penetration enough to keep from blowing holes in the work piece. I’ve been told there are rods that work best with DCEN but haven’t used one.
My advice is to get yourself some scrap materials and play around with all the settings. Compare AC to DC and DCEP to DCEN. Crank up the amperage and play with different size welding rods. See how low you can get the amperage with each size rod and still make a bead. See if you can weld tin cans together. Try filing a large prepared groove between thick pieces with thin rod at low amperage. All through this listen to how the sound of the arc changes. Observe the details of how the puddle forms and moves.
Try different rods. Try welding through paint and rust. Some rods work well with little or no preparation while others need things to be clean to work well. Try a few cutting rods. They only do rough work, unless you’re really good, but with them you can cut to length, chamfer or cut holes quickly without changing tools. Some salvage and other crews under time pressures use them a lot.
Nothing wrong with knowing theory, and study from a book is often the fastest way to mastery but IMHO nothing is as good as having a visceral feel for the tools and material that comes from play and casual experimentation. Take it out and see what it can do.
Do protect yourself. Strong ventilation and/or respirators are vital. I’ve seen welders sick with shakes after welding galvanized steel. Manganese, present in some rods, can cause violent mood changes if you get exposed to too much. At the least try to be up wind of the weld and keep your face out of the fumes. Protect your eye, blatantly obvious I know but it is remarkable how many experienced welders get ‘flashed’. The UV radiation is terrible for any skin. Skin cancer on the forearms or neck, pretty common for welders working in hot climates, is no joke. Welding splatter down a collar or through the top of a tennis shoe is funny, as long as it’s not your hide. Until you see the raw burns going all the way to the bone. Keep a fire extinguisher handy and keep the welding area clean and flammable materials away because your life depends on it. Every year there are new stories about fires and explosions because someone overlooked a can of gas. Every few years another story of someone killed, or even worse, badly burned all over welding on a gas tank or fuel cylinder. Many of those people knew better but got complacent or thought they could ‘get away with it this time’.
I have never felt sorry for anyone more than a man in the burn ward with second and third degree burns over 85% of his body. He was telling the young nurse it was okay. He didn’t take it personally. She had a job to do. He was going to listen to his music and scream while she scrubbed the scabs off. Damn, that’s tough.
A spray bottle full of water to damp down an area helps and it is handy to put out fires that are too small to reach for the fire extinguisher yet. Cooling hot steel, once below the critical temperature, can also speed things up. A bucket of sand and/or water is cheap insurance.
I’ve never seen that design before. The only vises I know are screwed to the workbenches. Incidentally, when Mr and I were talking about what we really need once we manage to get a work bench set up, neither of us could remember the word “Schraubstock”.