Doing flat-grinds on a belt sander is an eye/hand skill you never completely forget. But you can get rusty. So, I’ve been working the stiffness out of my muscle memory, while experimenting with my whole tool-chain to see what works best, where. My tool-chain has gotten vastly more powerful and complicated since I was in high school, making “prison shiv” style knives with just a file and a bench grinder.
So, I’ve been doing exercises around big flat-ground bevels, with the idea being to get my grinds flat enough that they’re, well, flat. If I put a beveled edge on a stone surface with some oil, it ought to stick there. The kind of Japanese-style chisel/hollow-ground cooking knives I want to eventually produce require that kind of grind.
It’s also tremendous fun to look at a piece of metal and try to see a knife in it. Sometimes it’s just a cut-off, i.e.:
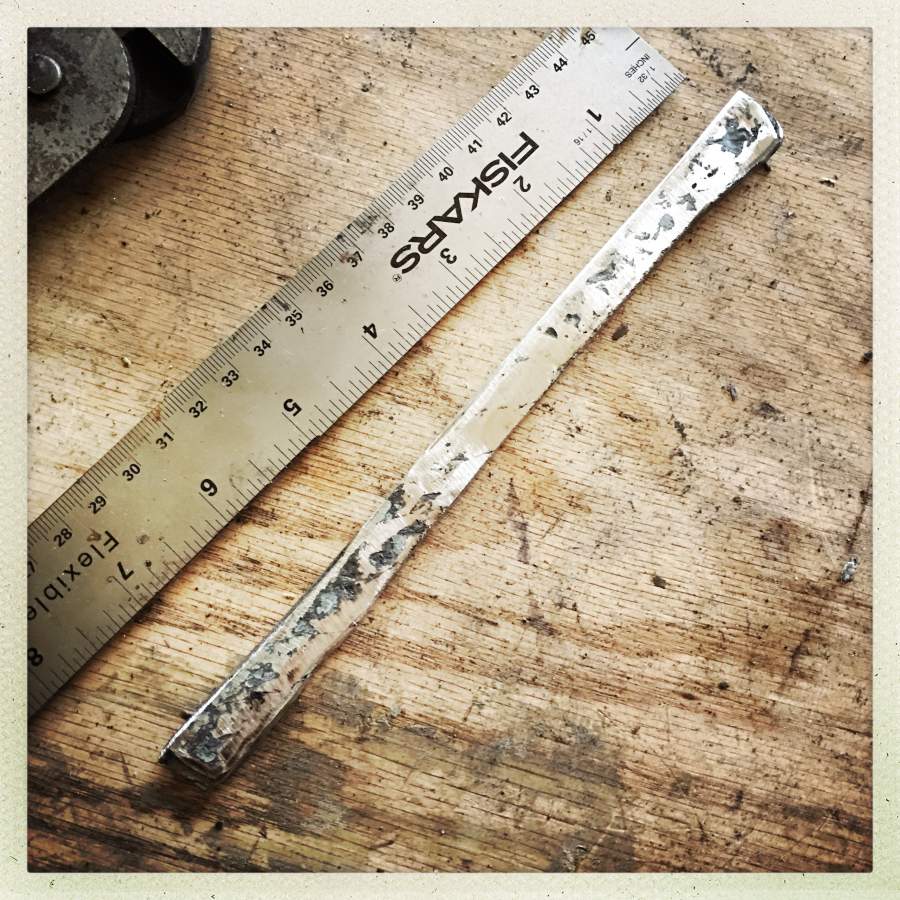
That’s the rough edge of a piece of cable-faced 1095 that I assembled. It seemed like a shame to throw it away. So I put it in the vice and whacked on it with a hammer a few times, to see if it was tough enough to survive. After a few whacks, I came to respect that little piece of steel; it did not want to go gently into the garbage bin.
Since I made that, I’ve improved part of my process. You can see that the metal still has a lot of forging-scale to grind off. I’ve stopped doing that sort of grinding on my bench sander, and have switched to doing it with the collection of angle grinders. On one end of my bench I have a library of angle grinders, all hooked up on a power bar, ready to go. One has a wheel, one a flap-disc sander, one a diamond cutoff wheel, and one a steel brush. This is not conspicuous consumption on my part it’s convenience and safety (not in that order) I figure that if I spend a lot of time mounting and dismounting angle grinder wheels, there is a higher chance I will mount one off-balance, or crack it, or not tighten it down enough. If I don’t remount wheels in their lifetime I can be careful to get it right when I replace a wheel. It’s also simply fantastic to be able to reach over and have the right abrasive sitting there, already mounted and ready. Given that you can get a used angle grinder on ebay for about $19 (if you’re willing to replace a chewed up wire or plug) they are basically giving them away. Since I have huge amounts of space and tons of storage room under those gigantic benches I made: why not?
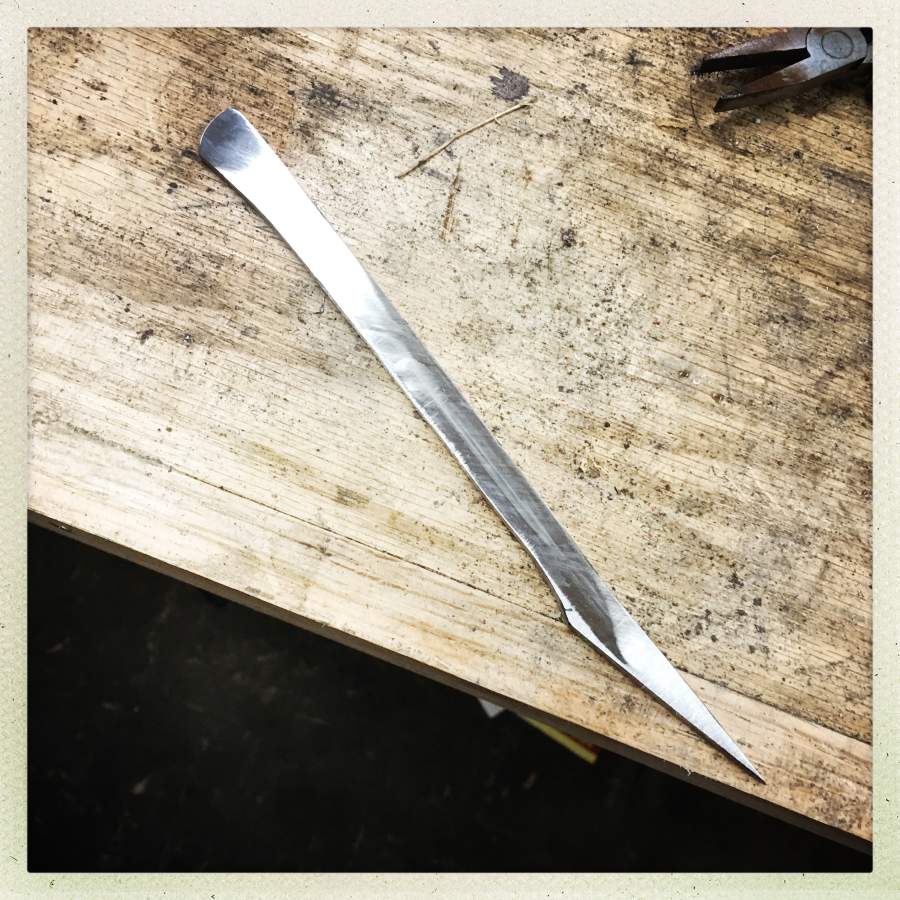
When I took the piece above, I did some shaping on the inner face with an angle grinder, then switched to the big belt sander.

Well, apparently it wants to be a sort of scalpel-like thing. I immediately dubbed it the “kiriscalpel” (short for kiridashi scalpel)
Remember, this is mostly just an exercise in getting my grind-lines flat and straight, and my bevels smooth. But, as I work on it, it starts to take a shape that I like – which makes sense because I’m shaping it; I’m just going where the steel and the grinder take me. I’ll have plenty of time to work on designed shapes with intent, later.
At this stage you have to resist the temptation to grind everything down ’till there’s no forge-scale at all. That’ll all come out by the time it’s hardened and I’m into fine-grinding it.
When it’s starting to look like it’s flat and smooth, I can check the flatness by going over to the flat stone and giving it a few strokes back and forth on some 1000-grit sandpaper. That immediately reveals where there are hills or valleys. It also makes me cringe and think my grinding is shit. But when I step back and think about it I realize that we’re talking machine tolerances – this is not wood-working – and that’s probably only about 1/1000 of an inch off.
Suddenly, I feel a lot better and realize how remarkable the human hand/eye/machine gestalt can be: we are capable of high precision when we’re not even trying hard. (“trying hard” would mean walking over to the milling machine, mounting the blade up, and face-milling it into mirror-like perfection.
This is still “goofing off” territory. The next challenge (and it’s really fascinating to me!) is what does the edge look like? How far back does it get ground, where are the plunge-lines, what angle is the bevel? On the big belt sander, this is about 5 minutes of work since the steel is annealed; it has not been hardened yet (except by repeated heating and bashing)

If you look at the face of the bar close to my thumb you can see various colors in it; this is a multi-part bar – the face is cable damascus (I made earlier [stderr]) the base is 1095 high carbon steel, 1/8″ thick. I heated them and welded them together. This is a high risk bar, because it’s going to be internally stressed – the cable will expand/contract in a twist and at a different rate from the 1095. However, if it’s welded right it won’t blow apart, it’ll just bend/unbend as it heats.
When you’ve got the proto-edge down to about the thickness above, it’s time to make a decision: garbage can, or heat treat? I suppose it’d make a good palette-knife for a painter even if it wasn’t hardened for sharpening, but I’m interested in the process and whether this technique works at all. If cable-faced 1095 blows apart when you quench it, I would rather know now, before I make a large knife and spend hours on a disaster.
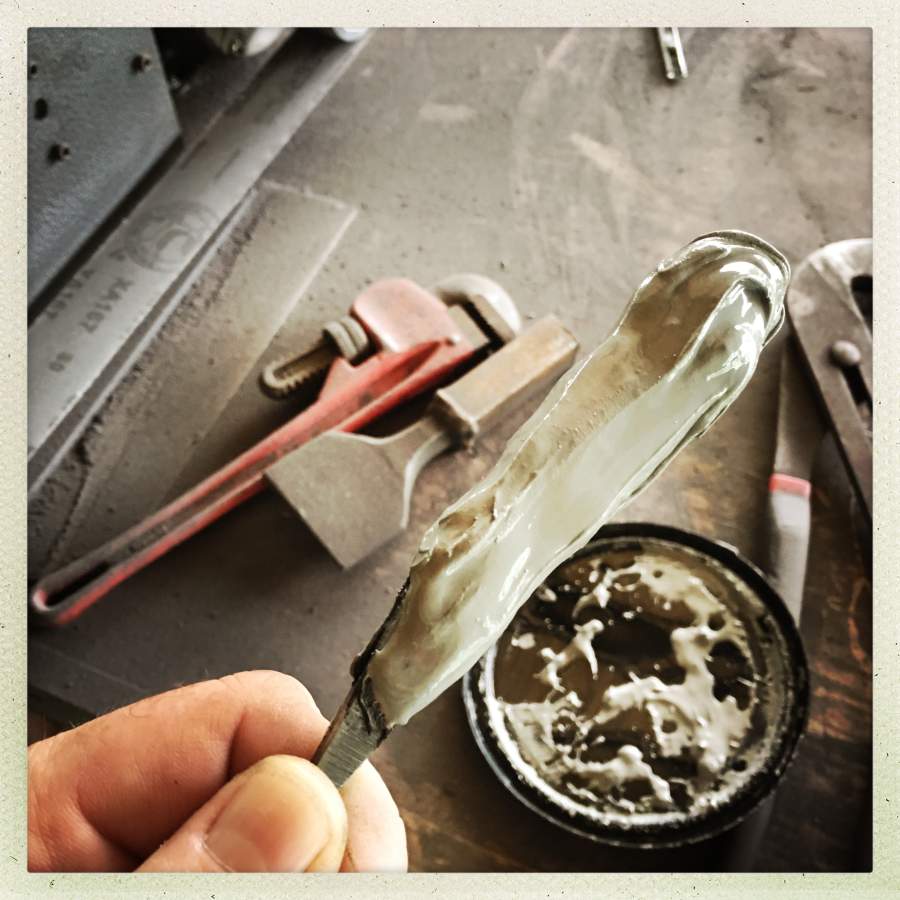
Here’s one way to reduce the likelihood that the blade will blow apart when it’s quenched: blanket it. The Japanese swordsmith/knifemaker uses clay and charcoal and secret mojo sauce to blanket the blade. Various bladesmiths use various things. I use furnace cement with a bit of charcoal added (more carbon near the steel will keep it from leaching out of the blade so much when it’s at quenching temperature) and some FeO3 Fe2O3 – black iron oxide.
Some time when I am quenching a blade I’ll shoot video, but this time I did not. Usually, my hands are full and I’m busy and don’t want to be messing with cameras.
Quenching is quick: you heat the blade until the edge goes non-magnetic (“normal” temperature) then soak it at that temperature for a couple of cycles, and plunge it into some kind of coolant. I’m using fancy 1095 steel, which is not very quench-friendly (“ask not ‘why we do these things because they are so hard?’ we do these things only because they are so hard!”) and likes to be quenched in automatic transmission fluid, or a toxic and stinky brew called Matrix-50. Naturally, I go with toxic and stinky out of a feeling of kinship.
The clay blows right off with a wire brush, and then it’s back to the grinder to finish all the surfaces and bring the edge down, and straight. That’s a lot more work once the steel has been hardened. My hardness gauge rasps say it’s about Rockwell 60, which is a bit hard but it’ll come down some as I repeatedly heat/cool cycle it on the sander. I don’t want to get the blade hot (over, say, 500F) so it’s a lot of sand-dunk-sand-dunk-sand.
One trick I use – I keep the blade wet while I am grinding it and if the water disappears off the back, it’s too hot. In fact, when the water disappears off the back that’s because it’s turned to steam and the heat from the other side of the blade is about to poach my finger! It’s a bit of a weird moment when you realize “I am about to burn my finger” and there’s not a damn thing you can do about it except dunk everything in your water-bucket as fast as you can.
Hours later, then on to fine-polish on the stone with oily sandpaper, and an hour in the etch-bath, it’s ready for the next stage.
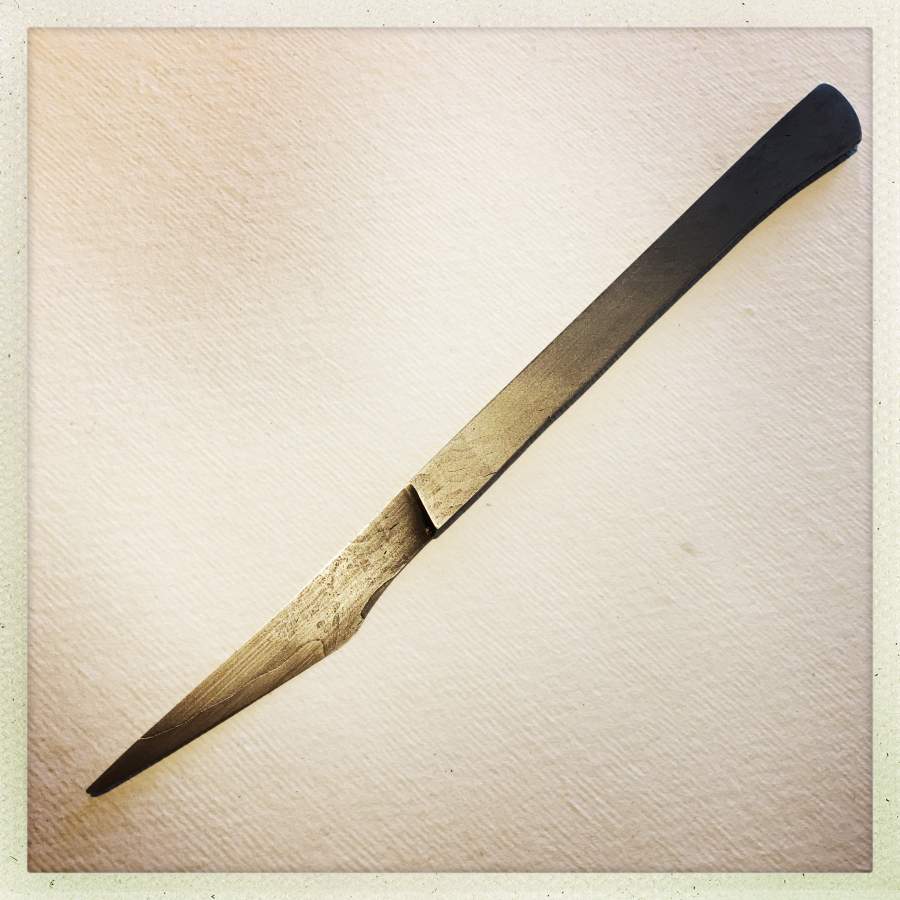
[The tip isn’t broken, that’s the shadow cast on the paper.] Here’s a couple funny things – see the “chip” at the neck of the edge? That’s not a chip, that’s where the cable facing is ground down to the 1095. Put differently, that’s a bit of 1095 sticking out. It’s actually smooth as buttered silk and perfectly flat at that spot. I could polish the whole blade down more to eliminate it, but I like the way the cable damascus cladding comes down at the angle of the edge. I also like the way the 1095 sticks out along the edge, as it was intended to. That is some badass-looking edge, in my mind.
Note the texture in the handle; that snakeskin pattern is the transitions between the welded-up wires in the wire rope – it’s imperceptible to the touch; the whole thing feels like silk.
A nitpick – FeO3 does not exist.
You probably mean Fe2O3 (magnetite), that is black. Another stable iron oxide is Fe2O3 (hematite) which is red.
There is also FeO, which is too black, but also chemicaly unstable so I doubt you have it and/or know how to prepare it.
Very nice scalpel. Could also be used as marking knife for precise woodwork.
Blast, I meant Fe3O4 for magnetite.
I was about to pick the same nit with the iron oxide ;).
A beautiful thing you have created! I love the character the damascus gives the blade-edge.
(As an aside: the student safety person inside me screams: you never go for the toxic if you do not have to.
But then, I am sure you know how to handle … the matrix)
Charly@#1:
Yes, that stuff.
I have both in the cabinet; the red stuff is used by Japanese sword-polishers to emphasize temper-lines and darken the steel. Someday I hope I can do that. In the meantime, I just keep it far away from my powdered aluminum so if the state police come asking, I won’t show up in the news “local terrorist caught with sword-polishing materials!”
Very nice scalpel. Could also be used as marking knife for precise woodwork.
Thank you. I like it enough that I may repeat the design in a couple materials. I have some cut-offs of wrought iron/1095 that are candidates, which I am eyeing.
I have a friend who’s a mortician and I am currently trying to imagine what a damascus 1900s mortician’s knife would look like. Nowadays they all use disposables, of course. But I keep threatening to make a damascus stryker saw blade… It’s an empty threat but they don’t know that.
Or for scoring dough before it goes into the oven, you need a very sharp straight blade with that sort of angle to the handle. I’ve used scalpels in the past, but they’re really too short, razor blades are better, but I haven’t found a holder that lets you bite deep enough into the dough.
avalus@#3:
As an aside: the student safety person inside me screams: you never go for the toxic if you do not have to.
I hear you. I’m actually not very thrilled about the “this is our secret formula, which has things in it, which works great, but we don’t tell anyone about.” What, is it Great Cthulhu’s blood in there?
It does appear to work.
I’m wearing my chemical breath-mask (my safety officer at Fisher said it was what I should wear when I’m handling the cyanide and cadmium bromide, and I do!) when I use it. It’s a pretty quick process and the air clears fast. Hopefully it’s not leaving some kind of toxic residue.
The one that really worried me the other day was some wrought iron I got that was coated with red paint. Old red paint. Probably lead. So I masked up, gloved up, sanded it off with the shop vac set to collect the dust, and then vacuumed the whole shop – which never hurts, it always needs it. Now, I’m not going to go around licking stuff to see if it tastes sweet but I think that I ought to be OK. If I were still in my 20s I’d be handling everything differently. On the other hand, when I was in my 20s I was melting and pouring lead and lugging around mercury. So I console myself that my safety practices show a year-over-year improvement!
jazzlet@#5:
Or for scoring dough before it goes into the oven, you need a very sharp straight blade with that sort of angle to the handle.
(eyes the cut-off piece of wrought iron/1095 on the bench)
Oh, really?
I meant to add Marcus you have a fine eye for line, it really is an elegant knife.
I think so, how long did the edge turn out to be? I think the ideal is maybe an inch and a half or two inches – I’d have to try a suitable blade on dough that needed deep slashes to be sure, :) One can buy such things from specialty bakery equipment suppliers, but I’ve not seen one I’d give kitchen space to or spend money on. Most are variations on razor blade holders, and I can’t see they’d be any better than the one I use which originally came from my mother’s (possibly grandmother’s) sewing box. The other type seem to be dual purpose surface scrapers/slashers and I doubt they have a sharpen-able blade so you’d be more poking a dip in the bread than slashing through the skin of the dough. In case you don’t know – slashing the skin allows the dough to reach maximum ‘oven spring’, the final part of the rise when the bubbles of carbon dioxide in the dough expand in the oven heat, it’s necessary for many doughs that produce a skin strong enough to actually restrict oven spring.
jazzlet@#9:
I think so, how long did the edge turn out to be?
Just under two inches. I have not sharpened it, yet, but the last 1095-edged thing I ground was so sharp it made me giggle. For best cutting, obviously, you want a thin blade geometry and shallow angles on the bevels; a scalpel blade just doesn’t have bevels at all, but it’s nowhere near as strong as this thing. Tradeoffs are fun!
So, out of interest this afternoon, I thought it’d be interesting to re-think the production process I used for making scalpeldashi. That was all freehand ground and mostly done on the belt sander. I took a chunk of wrought iron-faced 1095 and did the rough cuts with a diamond wheel, but then took it to the milling machine and milled the belly-line (total time: 1 minute) and the back (another minute) then face-milled the flanks (2 more minutes) – it came out of that step more or less ready for a final polish. I haven’t really thought hard about integrating the milling machine into my process, so it was kind of a “wow, that’s really shiny!” moment for me. I don’t have a CNC controller on the mill so the curves on the belly cut were done by eyeballing the table adjustments with the hand-wheels; is that “hand-made”?
Right now I don’t have any bars the right length or thickness to make another scalpeldashi but I’ll add it to my “to do” list. I’ve got this cool damascus-twisting rig I just built, and was thinking of making some spiral 1095/15n20 damascus to lathe on; I can save a chunk and make you a scalpeldashi pretty easily. Or I can make another batch of cable-face; I need to do that anyway. Any requests (left hand cut/right hand cut, hanger hole, etched/unetched/mirror polished)? Length of the handle? scalpeldashi is 180mm long.
Very nice.
This reminds me of watching a Japanese master comb-maker cutting perfectly straight and even comb teeth by hand, without even marking them out first…
Dunc@#11:
This reminds me of watching a Japanese master comb-maker cutting perfectly straight and even comb teeth by hand, without even marking them out first…
It’d be interesting to watch his brain in an FMRI, just have him visualize doing it and I bet you’d get a very clear activation cascade ( <- I do not know the proper term for it, so I just made that up)
Marcus that would be wonderful! I’m right handed. Similar dimensions to scalpeldashi would be great and I don’t have any preference for finish, so you can prroduce whatever you want to perfect your skill on.
Now I just have to work out how to get you my address, I did try for the fridge magnets, but all attempts at emailing you came back with ‘local area network problem’. I’ll try again and see what happens.
jazzlet@#13:
mjranum@gmail.com is a good fallback.