Cutting and stacking and welding pieces of steel – it’s hard work. Who’d’a thunk?
There are still a lot of details and I’m dealing with a block of metal at scary heat. For example, one thing I have discovered that I don’t like one bit: the handle you weld to the block comes apart at welding heat. Because the welds deform when you whack the billet.
Sit there and let the bandsaw do its thing for an hour, stack the pieces in a machinist’s vice, run some embarrassing welds down the side, soak it in kerosene as a flux, and voila! [pro tip: not to put in kerosene until MIG welds cool!]
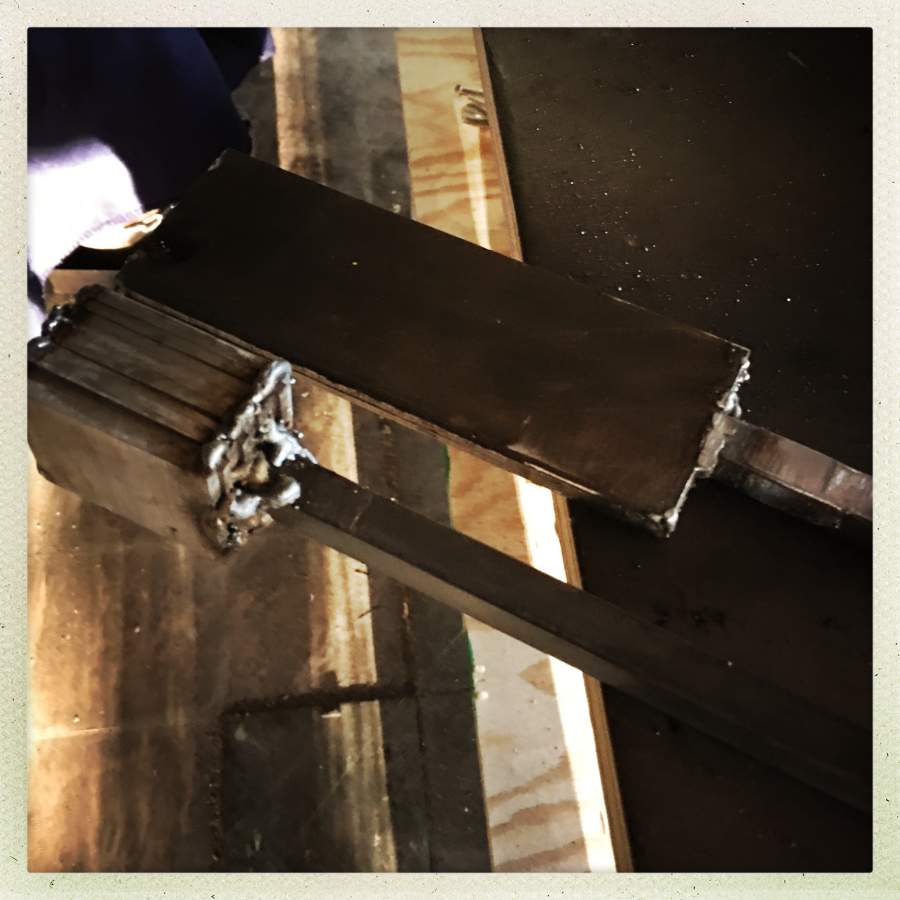
That’s a short stack of 15N20 and 1050HC, next to a 3 layer plate of the same materials. They are Experiment #1 and Experiment #2.
After being brought to welding temperature, I smash them together with gentle raps from the hammer. Then, I pound them sideways to see if the weld took. Once it appears that I have a single block of steel, I experiment with squishing it in the press. Will it separate, or have I achieved unification?
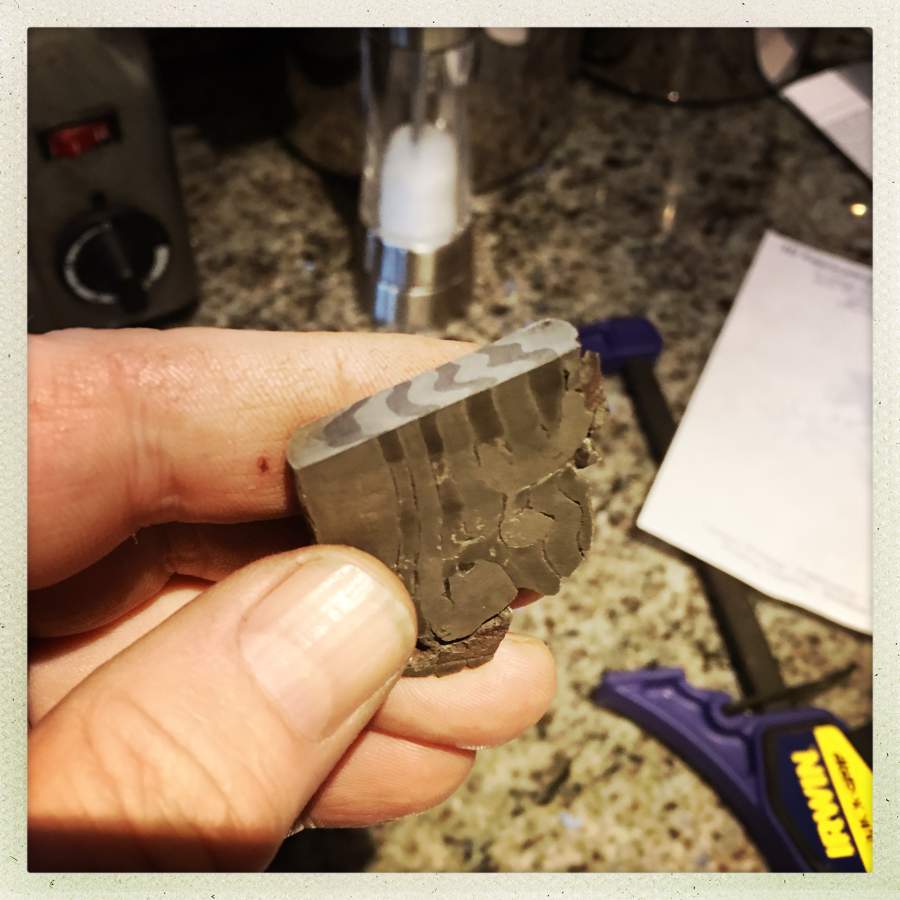
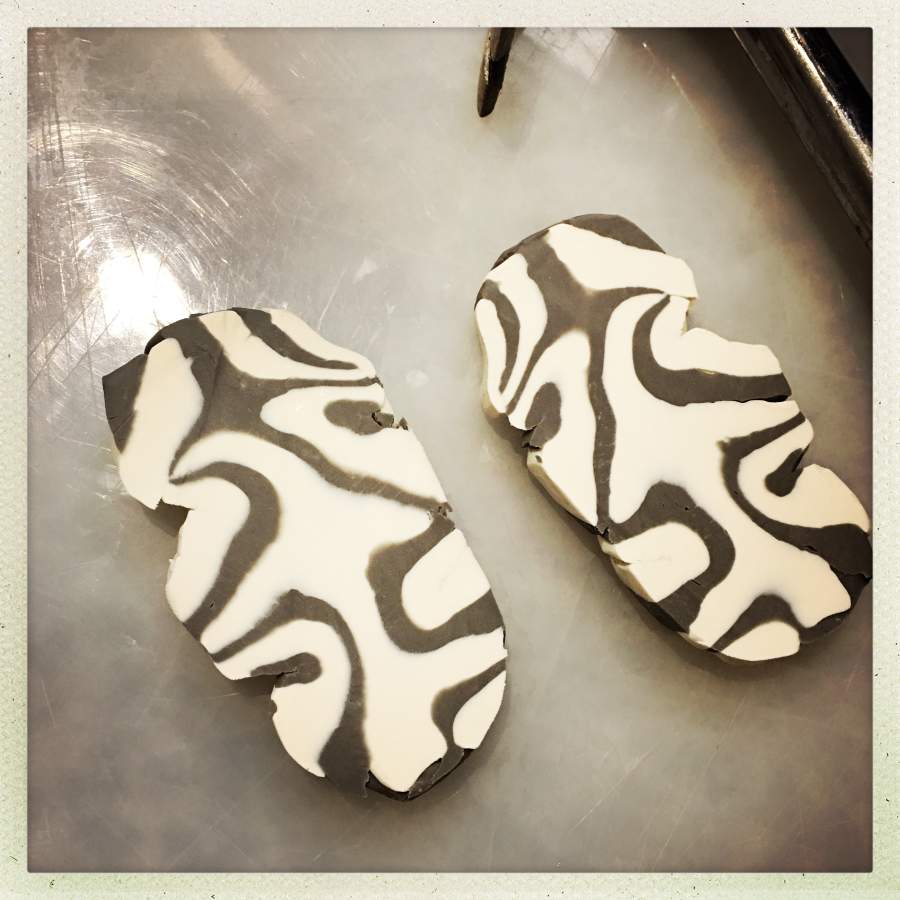
That’s what Experiment #1 looks like after it’s been brought up to welding heat, smashed horizontally and vertically, and basically squished around at random. The main thing I wanted to see was if the welds held, and they did: I put it in a vise and whacked it sideways with a hammer and it didn’t even budge the metal at all – best of all, it did not delaminate. So: I have pattern-welded steel!
Experiment #2 is currently in the form of a large bar-shaped pancakey thing with a very rough surface. I plan to cut some shape out of it and whack on it and grind on it and see whether the welds are tight. Welding Experiment #2 was not a lot of fun: the handle I used my MIG machine to tack on – the weld got soft at temperature and when I pulled it from the forge it drooped sadly. Or, as “sadly” as something radiating 2300F/1260C droops. Maybe I should say it “drooped furiously.”
This is scary, hard work, and the materials are expensive and the set-up time is significant. Making Experiment #1 bar-block took an hour (while I did something else and my bandsaw chewed away at bars of steel) – just throwing a bunch of metal around is time-wasting, hard, a waste of propane, and expensive high carbon steel. I do not intend to experiment much.
Enter: claymascus.
What would be a way of designing the operations to perform on a block, before I go to the trouble of cutting it and heating it and mashing it?
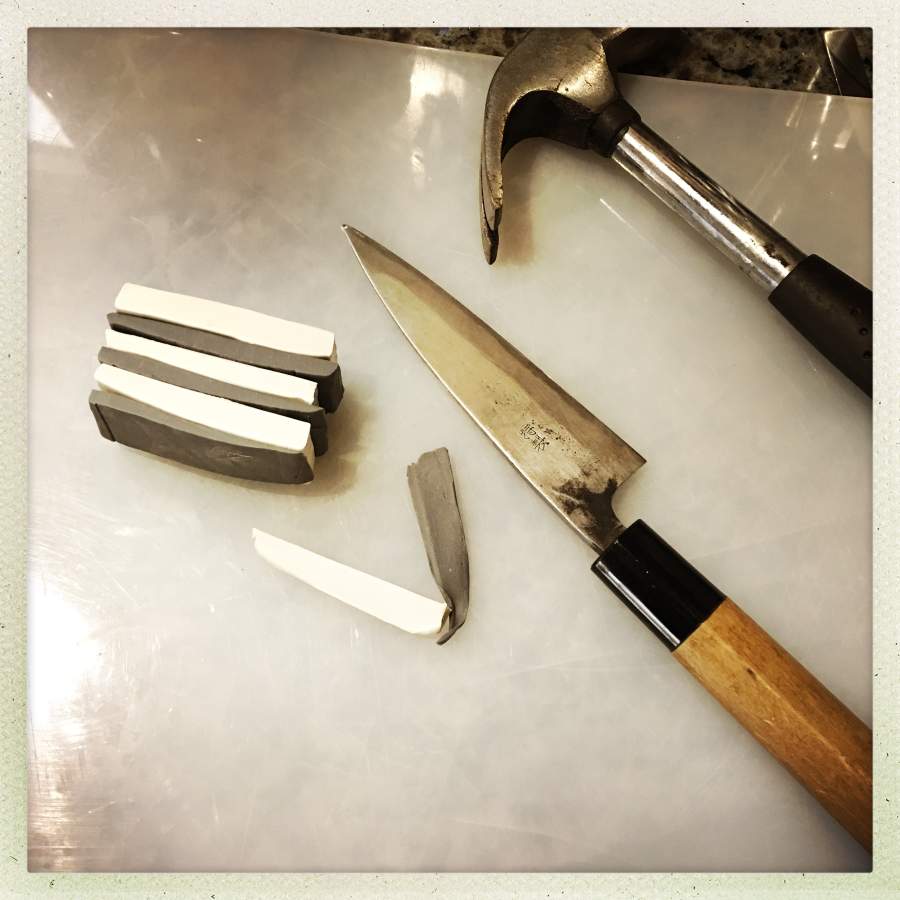
1) stack

2) smash (“weld”)
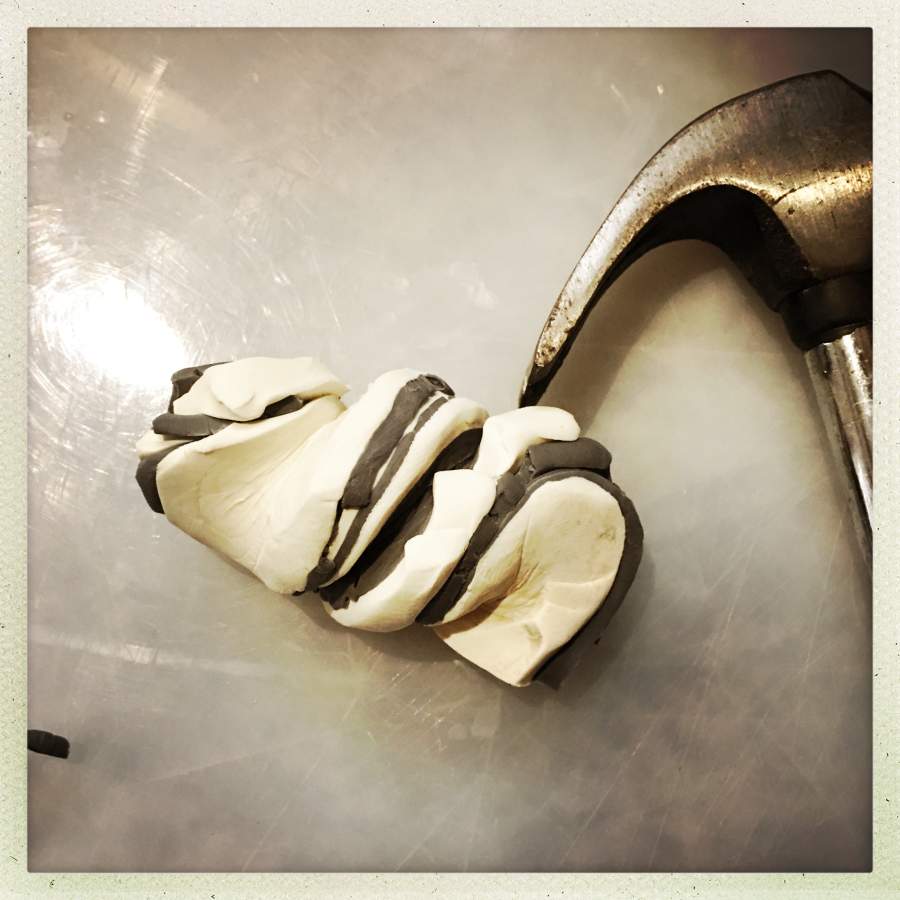
3) Twist

4) smash
5) section
There have been other claymascus experiments. That one is the best and it was a very easy process.
Your claymascus is pretty cool. Yeah, I too have had the issue of heating up a piece of metal and having previous joins (in my case they are soldered) come apart. In silver you have to try and set it up so that the whole thing “goes” or flows all at the same time. With silver you have to get the entire piece up to temp or it won’t go. I’m only taking it up to about 2,000 F. Plus my pieces are much smaller.
Your steel experiment #1 sure turned out beautiful, though. I can see so much potential! But it sounds like scary work – maybe once you get a handle on the handle, so to speak, it will go more smoothly?
You could perform similar experiments with cookie dough, and the results might be delicious.
Very cool! The claymascus was a grand idea.
Reginald Selkirk@#2:
You could perform similar experiments with cookie dough, and the results might be delicious.
Well, NOW I know what my next holiday cookies are going to look like. That’s a great idea!
Q: “Why is that blacksmith so round-looking?”
A: “sugarcookiemascus”
kestrel@#1:
once you get a handle on the handle, so to speak, it will go more smoothly?
It will. I am coming to realize that a big piece of the issue is planning where things will come out, and making them not vary too much. So, if I am sandwiching HC between semi-stainless steels, and I want the HC to form the blade-edge, I can’t just whang away and deform the steel to the point where the blade-edge looks like a ruffle. In other words I need to plan my deformations with a specific start and end in mind, otherwise I’m going to be dealing with a lot of “random pattern thingie” which might be pretty but might have an edge that chips apart.
There’s an interesting paradox: the “where things position on the edge of the steel” is irrelevant if your damascus is very layered and twisted – then you get very fine lines and dense shapes and it doesn’t really matter as much. But to get that kind of density you have to layer and weld and twist and layer and weld and spend a huge amount of time welding and re-welding your block – and it gets smaller and smaller while you do that. The steel is oxidizing all the time it’s in the forge, so you can start with a piece of steel the size of a pack of cards and end up with something 3/4 that size when you’re done. “Ooops! Small paring knife I made!”
I will figure it out.
But, for now, I whang.
Marcus @4, As soon as I say the claymascus I thought Marble Cake. See here
https://en.wikipedia.org/wiki/Marble_cake
Looking at pic 1 it looks like the outer layer on each side of each bar is unground. Pic 2 shows pretty large gaps between the layers. No amount of flux is going to overcome that nonshiny outer layer. I’m guessing you probably know that, but if not some work with your grinder will help a lot.
The claymascus is great, I had no idea that damascus steel was also twisted.
The idea of banging on and handling things that hot makes me twitch. I just work with solder on circuit boards and I still get burned sometimes. Do pockets of flux bubble out of the semimolten metal when you bang it?
AndrewD@#6:
As soon as I saw the claymascus I thought Marble Cake.
As soon as I saw “marble cake” I thought “steel cake.”
I’m not into casting (that’s really scary!) but cast iron muffins would probably be a lot of fun. There used to be an outfit called Max Castings that did all kinds of weird found objects in cast iron – e.g: cast iron baby dolls.
Marbled Sugar Cookie Cutouts
[Edit: link failed]
sillybill@#7:
Pic 2 shows pretty large gaps between the layers. No amount of flux is going to overcome that nonshiny outer layer.
Correct. The trick is to stack it so that it won’t oxidize into scale between the layers, long enough to weld them together and then it doesn’t matter. But once there’s a bunch of scale, forget welding it. That’s why pretty much nobody does stainless damascus: it oxidizes very quickly and setting a weld through the scale ain’t gonna happen. There are a few specialists who have electrical forges with an argon atmosphere. Very trick. A lot of “nope.”
That’s the end of the billet where I grabbed in with the tongs. So it didn’t get squished. I did the cut to a) get rid of it b) get a piece I could test where it was weakest. Until I get more used to planning my welds I am likely to have chopped off chunks of damascus billet all over the floor by the bandsaw. My poor, patient, band saw.
When you’re doing “stacked” damascus, you chop-saw your stock into equal-sized pieces, grind the surfaces flat and clean (hours of work, depending on how flat you were able to whang them in the first pass) and then re-stack, tack weld with the MIG, flux, and repeat the cycle. Some damascus makers deliberately go over the top with the process – Alec Steele (who is a delightful nut) did a million-layer chunk, once. Once. You’re looking at days of cutting and grinding and hammering and cutting and shaping.
I had no idea that damascus steel was also twisted.
They do all kinds of tricks – stacking edge-on, twisting and re-stacking, sectioning and mirroring, etc. I’m not a huge fan of the complex patterns, but that’s an aesthetic thing: it seems to me to be “difficulty for its own sake”
Do pockets of flux bubble out of the semimolten metal when you bang it?
If you use borax, which is what many use, yes. A lot of forge-workers have marked themselves with borax squirts. That’s why I am not using borax and I am not going to work with anything near melting temperature – squirts are bad. Bad bad.
There is a technique that involves shielding your billet from oxygen by welding it into a tube, then crushing the entire tube to set the weld. Sometimes people try that (cannister damascus) technique and forget the part where it says you need to drill a hole so air can get out. Then, the thing blows up in their forge and shoots chunks of welding-temperature stuff all over the shop, which immediately bursts into fire in dozens of locations. I plan to avoid that technique.
Good, safety first. Go buy some more fire extinguishers anyway. Maybe a couple buckets of sand in strategic places.
Also too, if you work by yourself doing such dangerously entertaining stuff I hope you have some sort of system worked out with a freind/neighbor for rescue if you fail to call back in a few hours or whatever.
“grind the surfaces flat and clean (hours of work, depending on how flat you were able to whang them in the first pass)”
Well, obviously you need to get an old mill and an automatic table grinder with an electromagnetic clamp. when each piece is properly ground toss it into a bucket of kero to keep it from oxygen until all the pieces are done.
Every problem can be solved with the proper application of money. /h
@Marcus, #10: no idea here, but I send my waxes off to a caster who casts with vacuum casting. Do they do that with this type of work? Would be interesting… I know my caster produces PERFECT metal when doing vacuum casting… his gold and so on is just flawless… But it seems like it might not work for this. Would be fascinating if it did. For one thing I rarely if ever have to clean firescale off my metal.
You’re adorable.
This steel-chunk looks really neat, it has a geolocical feel to it, allthough marble cake was my first thought as well, must be a german thing.
I am curious how you will progress from there.
I took a blacksmithing class here in Portland (OR) – the first couple of hours he had us practice with modelling clay – and recommended doing a dry run with clay before heating up steel.
That 2 hours taught me more about practical smithing than anything else to date!
avalus@#14:
I am curious how you will progress from there.
These are tests; I am not making attempts to produce anything that will result in a finished work. Mostly, I’m trying to learn the feel of how the metal lays out under various transforms, and what welds properly with what and how. So I expect to experiment for a while still and slowly ease into producing a few things.
These pieces will probably get beaten to death in testing. I need to learn how far I can deform a bar before it disintegrates or crystallizes and cracks. Stuff like that.
I may try to beat some of these pieces into small bars and see what they look like on a lathe.
kestrel@#12:
I send my waxes off to a caster who casts with vacuum casting. Do they do that with this type of work?
I don’t know much about casting, but what I do is that metal-casting doesn’t need vacuum so much as thinking of air relief so there are no embolisms in the casting. The metal is heavy enough and doesn’t generally like to stick to the molds enough that there is no problem with bubbles. The main problem appears to be not having enough air relief and then having a steam explosion throw molten iron all over the place. Which is why I intend to avoid casting.
sillybill@#11:
Also too, if you work by yourself doing such dangerously entertaining stuff I hope you have some sort of system worked out with a freind/neighbor for rescue if you fail to call back in a few hours or whatever.
I’ve already informed them that I’ll send smoke signals if something goes horribly wrong.
Most of the neighbors have stopped by at some time or another to ask me “why such a large propane tank?”
Go buy some more fire extinguishers anyway
So here is an interesting but unpleasant thing I learned: forge fires are about thermal mass more than anything else. Suppose you are making cannister damascus with ball bearings and you forget to drill the relief hole and the cannister explodes and there are yellow hot ball bearings all over the room. Everything bursts into flame because the temperature difference pushes it over kindling temperature instantly. You can then spray it with a fire extinguisher and it won’t matter because what you’re really up against is the thermal mass: you can put out the flames and the metal is still over kindling temperature and everything re-ignites. If you pour a bucket of cat litter over it, you’ve put out the flames but it’s now insulated and will stay searing hot for hours.
During the napoleonic wars, some ships would fire red-hot shot at eachother. This was considered to be insanely dangerous because what if you dropped the cannonball, once it was red-hot, and it was rolling around your gun-deck with all the powder and stuff. But if you got it in the gun and managed to hit the other ship, it would set it on fire unless they had someone standing there for 15-20 minutes pouring bucket and bucket of water over it to bring down the thermal mass. By the way, the idea of “red-hot cannon ball” now inherently gives me the eebie-jeebies.
It really encourages one to think about thermodynamics, not just ignition. You got your “rapid oxidation” and your “very hot thermal mass” and they behave very differently – but both leave a trail of flame behind them.
I figured this out because I dropped a billet onto the oak round that supports my anvil. It immediately started to burn merrily. I picked the billet up with tongs and put it on the anvil where it was safe, and then I was able to easily blow out the flames. If I had tried to put it out with a fire extinguisher I’d have had to spray CO2 at it for quite a while, while it burned its way down into the log.
“yellow hot ball bearings all over the room”
waahht? huhhhh? Geez, that would be hard to deal with. Can’t argue with thermogoddamics.
Good thing you won’t ever do anything that dumb.
In the Navy they taught us that all the safety rules were written in blood. Happily you seem to be the sort of person who learns from others mistakes before making your own, so we can continue to be entertained and enlightened by your hobbies.
sillybill@#19:
Happily you seem to be the sort of person who learns from others mistakes before making your own
For me, half the fun is figuring things out. The actual projects are a byproduct of that.
Back when I was doing wet plate photography I was trying to estimate the exposure difference between two lenses (because pouring a plate depletes your chemistry, and the chemistry changes with each plate, you are unable to do lots of tests) and I realized that the way a lens works is really the surface area of the glass that’s warping the light – different lens sizes and light-gathering ability are tied to surface area (that’s why the reciprocity rules are powers of 2: there’s a Pi in there that’s a constant!) So I was able to calculate the exposure difference based on the surface area of the lens using a little ruler. It worked perfectly. I had a smile on my face for a week. It just feels super good to me to understand what I am doing to the point where I can begin to manipulate it.
In this case, yeah, I’ve been thinking about thermodynamics a lot. Also oxidation in the metal. But mostly I am thinking about oxidation that happens in the forge and worrying about oxidation if it happens to my building or my hair. See?
sillybill@#19:
“yellow hot ball bearings all over the room”
waahht? huhhhh?
There is a technique called “canister damascus” which I intend to experiment on, with an eye toward making a few innovations in the process, if I can. But the physics of the forge don’t allow for a lot of innovation, I am discovering.
The problem canister damascus is trying to solve is that stainless steel produces a near-instant oxide layer that is very hard and stable. That’s why it’s “stainless” – you’ve got this layer of chrome oxide and other stuff that keeps the rest of it from oxidizing. That layer is hard to weld to! Welding and oxidation seem to go together: the easier it oxidizes the easier it welds and vice versa. I am sure one of the physicists in the commentariat could explain. I know it has something to do with valence electrons but that was a long time ago. Aluminum is the same way. That’s why when you’re MIG or TIG welding, you have a tank of inert gas that keeps the metal from forming that oxide layer until you’re done welding it.
So that’s the set up. Now, suppose you want to forge weld a billet of stainless steel. What you do is make a “canister” that’s a steel rectangular 16ga tube, which you fill with your materials you want to weld, and then you seal the ends with welded-on plates, fill the whole thing with kerosene to keep the oxygen out and doing the kerosene or WD40 fill reminds you to drill that fill-hole. When the whole thing goes in the forge the kerosone/WD4 burn in the canister and that means the oxygen is being consumed so there’s an oxygenless environment in the canister. When it’s at welding temp, you smash it in the press and – if everything was done right – you get a bar of composite stainless steels which you can then hammer and shape as you see fit (it won’t delaminate, it’s actually a single piece of metal).
Supposedly the guy who had The Canister Damascus Disaster was trying to make stainless ball bearings in a matrix of 1095 high carbon powdered steel, and didn’t understand that the little hole is hugely important. The pressure of the atmosphere in the canister was enough that – when the welds weakened as it got up to welding heat – the end blew off and the room was filled with burning 1095 powder and flying yellow-hot stainless steel ball bearings. < ---- No Damn Fun At All
BDF does a video on canister damascus: https://www.youtube.com/watch?v=1p8BKgriP1A